|
Re: Brake Booster Conversion
|
||||
|---|---|---|---|---|
|
Just can't stay away
|
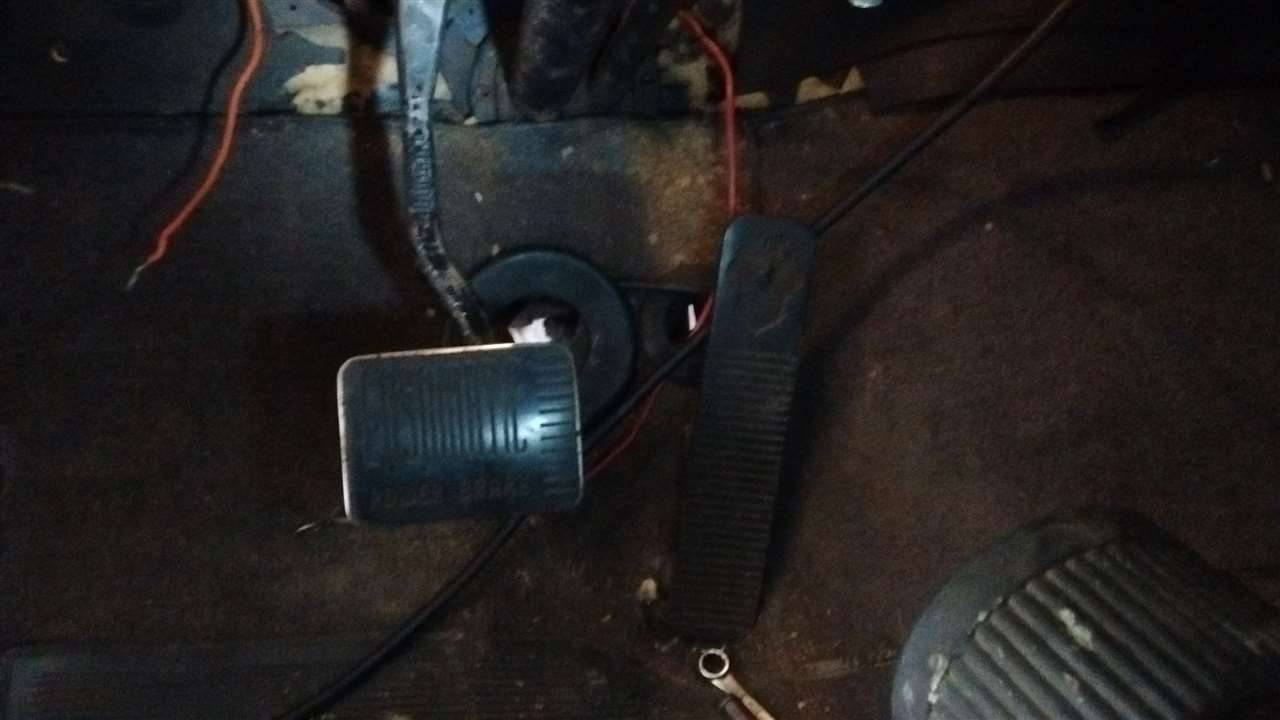
a few more out of the car..
Attach file:  (83.55 KB) (83.55 KB)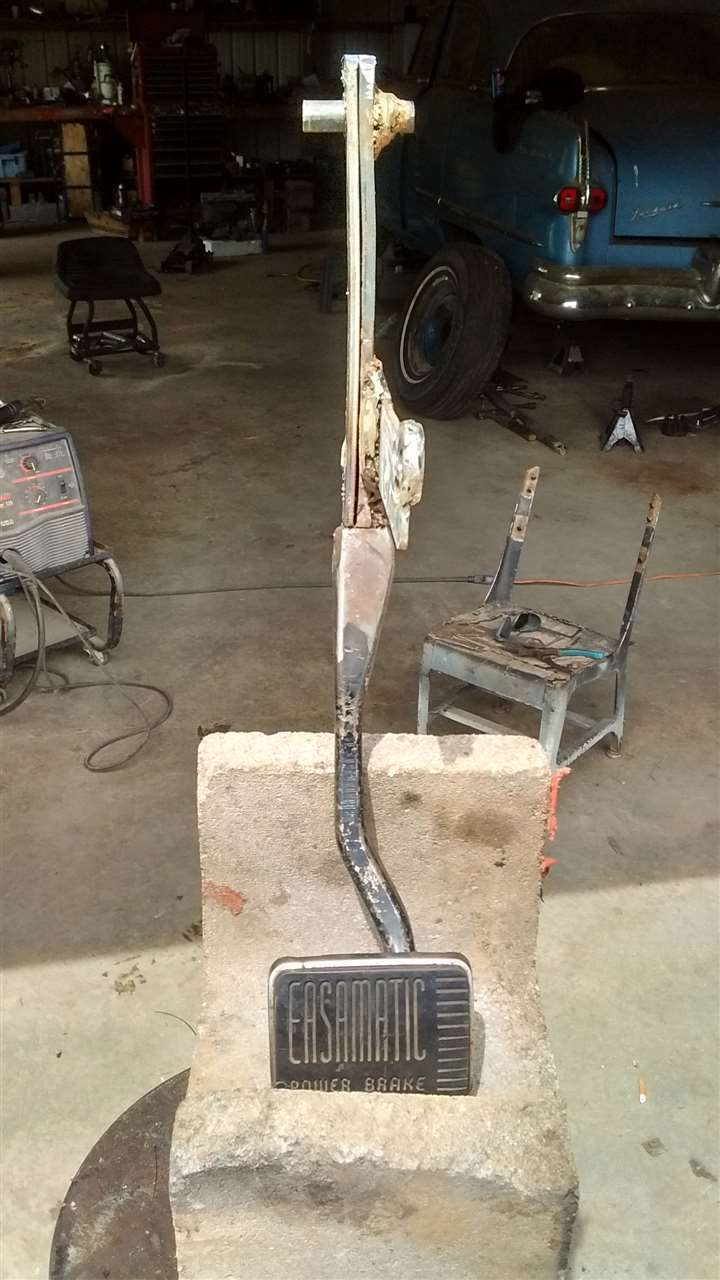 (73.76 KB) (73.76 KB)
Posted on: 2015/7/21 15:56
|
|||
|
The best are yet to roll

|
||||
|
||||
|
Re: Brake Booster Conversion
|
||||
|---|---|---|---|---|
|
Just can't stay away
|
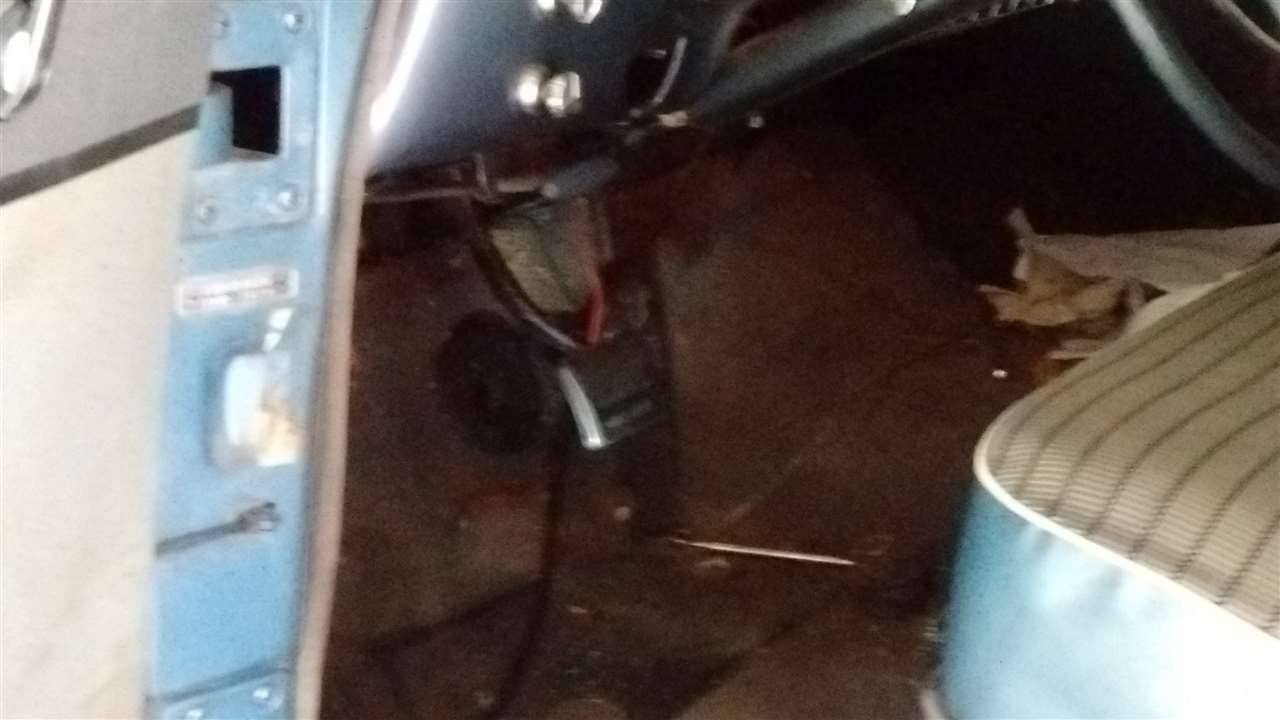
It is dark but this is where the booster shaft meets with the pedal arm bracket. (It is only temporary for now)
Up above you can kinda see my inner assembly with yet another inner firewall support plate and then it bends and carries over to where the steering bracket mounts to. I had actually removed The steering bracket to reinstall it on top of another fabricated bracket of mine that goes accross to the two steering bracket bolt holes. Then my inner firewall bracket that carries over is bolted to that bracket under the steering braket. You may notice in this picture the heat duct. I thought originaly i would have to cut a portion and shorten it. as you can see I started to do but, as I repositioned myself better I noticed all I really needed to do was to cut a portion of the flat mounting portion of that duct. I will drill new holes in my configuration to mount that duct firm... This must sound confusing but pictures say all, I'll try for better pic's up in there. Oh by the way pay no attention to that weld, this is where I ran out of wire and my wiper motor cable will be moved out of the way... Attach file: (54.87 KB)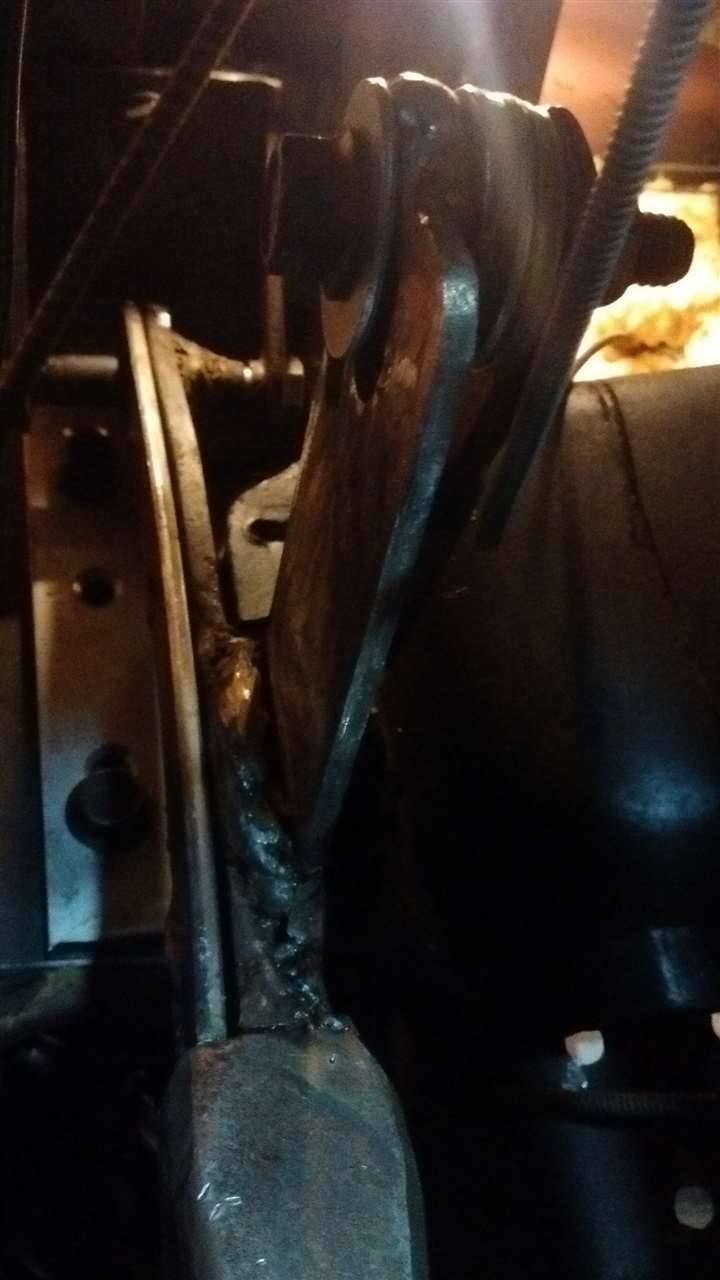
Posted on: 2015/7/21 16:18
|
|||
|
The best are yet to roll
|
||||
|
||||
|
Re: Brake Booster Conversion
|
||||
|---|---|---|---|---|
|
Just can't stay away
|
In this image im laying on my back shooting upward into the dash giving you a better look of where the steering bracket came into play..
See the bolt? The first bracket closest to the bolt head this is the Packard steering bracket. Under that if you look hard is a 3/16"x 1" steel flat stock comming out almost at 90deg from under the steering bracket. That flat stock goes from steering bolt to steering bolt using slightly longer bolts. Then that other mounting bracket with the holes drilled in it that goes from that 3/16' x1" flat stock mount straight to my firewall then takes a 45deg straight down the firewall and over the other support plate already on the inner firewall. This also has the cut out for the booster shaft swing and drilled the same holes for the booster mounting bolts. My swing mount is also bolted to the inside of this upper mounting bracket.. Enough for now Better pictures are gold to see this but, the end result is firm and sturdy it made that thin firewall like boulder tough with no flex... Attach file: (53.80 KB)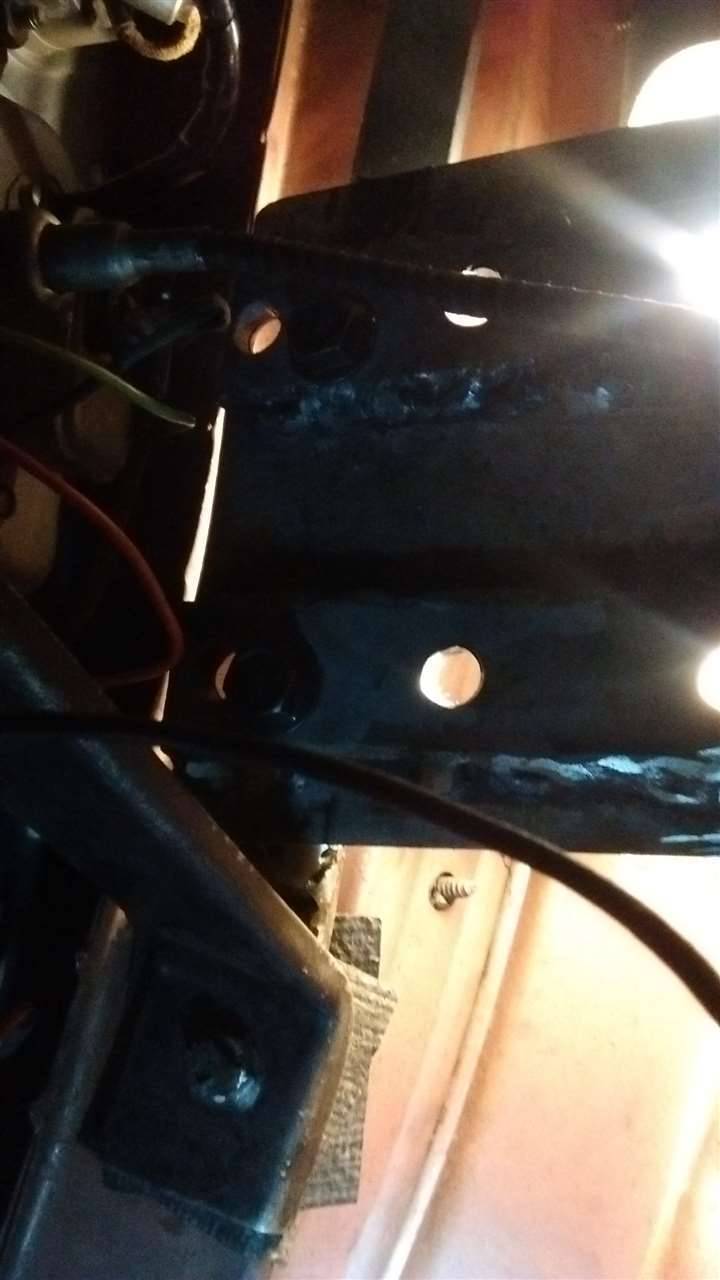
Posted on: 2015/7/21 16:28
|
|||
|
The best are yet to roll
|
||||
|
||||
|
Re: Brake Booster Conversion
|
||||
|---|---|---|---|---|
|
Home away from home

|
Hi I got my dual resevoir system for my 52 from a company called ABS in l.a. Ca. Nice folks there ,they supply parts that others sell there was a generic booster pedal included I think mine was a 9 " I also used the driver vent hole with a piece of plate metal over it to mount to
They supplied the discs and calipers too Engine vac plenty to pull it I'm very happy wit h the switch Judging from the pics on the thread I also had to bang in the inner fender a bit to make room for the proportioning valve
Posted on: 2015/7/24 11:57
|
|||
|
||||
|
Re: Brake Booster Conversion
|
||||
|---|---|---|---|---|
|
Just can't stay away
|
Yes I shopped hard there was a company that had made the complete setup but they stopped producing them due to low sales of them units.
I did some time speaking with a rep from one of them large brake supplier companies and all they could sell me was a 9" dual brake booster and a purotioning valve. He had agreed with me that anything smaller than a 9' dual booster would be pushing it in the case of a panic stop! Figure adding weights; of the cars wet weight then adding in the person or persons and cargo carring weights it is a lot of weight. My purportioning valve sits nicely enough away from any of the body so no banging of the original structure. Although I am changing it to a bottom mount under the master so I can run my brake lines out from the passage way of the vent tube. The vent tube I will configure in but first I need to explain how and why I went with the booster I went with.. Before doing anything I thought of the things I wanted and studied my compartment. I made a desicion that I wanted a booster that was away from the firewall leaving me about 6 inches in distance apart plus the circumference space between the firewall and booster is now mainly open. By doing it this way I benefit with all of the things I want to do and possibly more. (Rather than having a flush mounted booster) 1.) Keep the vent tube. 2.) Have room for my wires behind the booster. 3.) Keep the regulator mounted back there. 4.) Having a place for a trans dipstick to mount to behind or along side the back portion of the booster (GOD BLESS) The booster mounting bracket firewall side has three mounting holes on each side, two of which are lower away from the four needed. So the one side of that bracket over lapped the vent opening by an inch so i cut a relief cut on that booster bracket and bent that up leaving it at a 45deg. angle then cut off the other side of the relief porion so that would not block the vent hole.. (Now I have a bolt mounting hole if needed) I had done the same to the other side of that booster mount by leaving that mount hole upward at 45 deg I then will use this hole to mount my Trans stick configuration.. (Yet to come) The vent tube hole on the firewall to the booster is about 6 inches gap space, although with this what I am planning on doing is to take that first portion of the vent tube that mounts to the firewall and move it towards the front, it also holds in the vent door so that can not go back there again. (Space is too short having the vent door back there) I will swap out that vent portion with the longer front portion vent tube and have a cut out to allow the booster to fit into like a puzzle fitting. ( Not cutting the tube completly through, leaving it as one piece) That cut out hole will have a molded flashing the shape of the booster inserted into the vent and then have an overlaped flange on the tube to be rivited on and a layer of neopreame to be glued on for rattling purposes. Now the vent tube at that booster location will have an inside halfmoon opening leaving about 3-1/2 inches at it's widest point. The remaining portion of the that vent tube will now be infront of the master cylinder allowing me to mount the other vent tube with the door flapper in it. So doing this I am moving my vent door from the rear now to the front and then extending my vent cable to the door hinge... ( There will be a bit of configuration on the vent tube mounting flange) Having something is better than having nothing.
Posted on: 2015/7/24 16:58
|
|||
|
The best are yet to roll
|
||||
|
||||
|
Re: Brake Booster Conversion
|
||||
|---|---|---|---|---|
|
Just can't stay away
|
A BIT OF A BREAK DOWN ON PARTS AND PIECES...
BRAKE BOOSTER; LOCAL AUTO PARTS STORE GOING FOR $102.00 BUT I BOUGHT THRU THEIR WEB SITE WITH A SHIP TO HOME AND GOT 20% OFF THAT WAY WITH TAX $82.00 LIFTIME WARRENTY PLUS I HAVE A $10.00 CORE COMMING WITH ONE I USED AS A TRIAL SO $72.00 A new master cylinder $32.99 localy bought life time warrenty A new combination valve with mounting bracket, master to valve lines and combination bleeding tool $65.00 ebay bought. Some extra steel other than what I had laying around here and harden lock bolts and nuts about $45.00 This here alone was $214.99 And a whole lotta blood, sweat and raw configuring on my part... Other added things.... All new brake lines double flared dual lined rust resistant $65.00 ebay bought. Wilwood front brake conversion bought thru summit $840.00
Posted on: 2015/7/24 19:18
|
|||
|
The best are yet to roll
|
||||
|
||||
|
Re: Brake Booster Conversion
|
||||
|---|---|---|---|---|
|
Home away from home
|
I like it! Well done.
Craig
Posted on: 2015/7/24 20:45
|
|||
|
Nuke them from orbit, it's the only way to be sure! Ellen Ripley "Aliens"
Time flies like an arrow. Frui |
||||
|
||||
|
Re: Brake Booster Conversion
|
||||
|---|---|---|---|---|
|
Just can't stay away
|
Thanx....
Posted on: 2015/7/24 21:53
|
|||
|
The best are yet to roll
|
||||
|
||||
|
Re: Brake Booster Conversion
|
||||
|---|---|---|---|---|
|
Just can't stay away
|
Here is my pedal with the welding done smoothed and painted, I used what I had in paint here in the garage.
With a combination of John Deere Green and Semi Gloss Black. These pictures I took don't look so great, I am still not use to my new phone and waiting for the focus, although I'll get better pics when done with the clear coating. (It looks nice) And you can see in the one picture I finally got my rear drum from hell off!
Posted on: 2015/7/29 21:50
|
|||
|
The best are yet to roll
|
||||
|
||||


