|
BigKev's 1954 Packard Clipper Deluxe Sedan
|
||||
|---|---|---|---|---|
|
Webmaster

|
Well I guess I will start this forum off with bring everyone up to speed on my project.
I am bringing a 1954 Packard Clipper Deluxe Touring Sedan back from the dead. It was bought this car off of E-Bay for $500 back in Feb of 05 as a birthday gift to me from my wife. The car was stored outside behind a U-Haul facility in San Bernardino, CA. While the car was all basically there, it was in bad shape. The reason I bought this car was not so much to have some to go to shows with, but to use as a learning experience to teach myself mechanicals, body work, and everything else that goes into bringing one of these cars back to life. So I was looking for something that was going to need a lot of work, but doable. When bought the cars condition was as following: 4 Rotted Tires Smashed Front Grilled 70% Surface Rust Broken Tails lights Missing rear door trim, and trunk trim Missing trunk lock Missing hood ornament Missing radio knobs Missing cigarette lighter Interior while present is all dry-rotted and was infested with mice Front floors bad Rust around rear wheel wells Small dent in front driver's side fender Dent in rear driver's side door All mechanicals in place Engine stuck Brakes shot I am really have started to work on it just in the last 6 months. Work space and time really stalled the project at the beginning. Attached is the pic of exactly what the car looked like when I found it. I will post more in a bit to catch everyone up. Attach file:  (20.45 KB) (20.45 KB)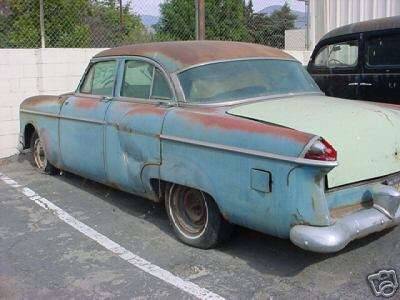
Posted on: 2007/1/18 16:11
|
|||
|
-BigKev
1954 Packard Clipper Deluxe Touring Sedan -> Registry | Project Blog 1937 Packard 115-C Convertible Coupe -> Registry | Project Blog |
||||
|
||||
|
Re: BigKev's 1954 Packard Clipper Deluxe Sedan
|
||||
|---|---|---|---|---|
|
Webmaster
|
Well not much happened to the car the first year. After getting the car towed home and pushed into our 2 car garage, I had only about 8" of space around the entire car when my wifes car was in there. Our garage at that house was in the front, and in a way was our main entrance to the house.
That first year was spend tracking down missing trim parts, and doing lots of research. I found some major pieces like a new grille, a trunk lock, the rear door trim and a few other missing pieces. I also managed to make a pass at sanding down the major surface rust on the drivers side of the car. I only did this side as it was the only side of the car I had room to work on (when the wife's car was not in the garage). Attach file: (42.32 KB)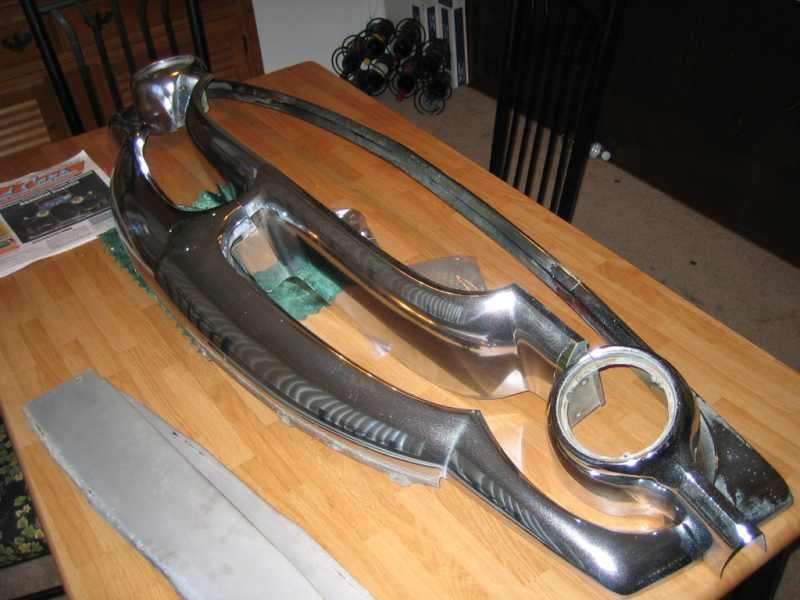 (41.07 KB) (41.07 KB)
Posted on: 2007/1/18 22:47
|
|||
|
-BigKev
1954 Packard Clipper Deluxe Touring Sedan -> Registry | Project Blog 1937 Packard 115-C Convertible Coupe -> Registry | Project Blog |
||||
|
||||
|
Re: BigKev's 1954 Packard Clipper Deluxe Sedan
|
||||
|---|---|---|---|---|
|
Webmaster
|
Well fast forward a year and now we have bought our first house, and my wife let me have the entire garage to myself.
4 new tires were bought to turn the car into a roller, and the car was towed over to its new home. With more room to work, and places for the parts, I tore into the front end and removed all the sheet metal. Here is what I have done since then: Refinished the Starter Installed a 12volt solenoid Added a Ballast Resistor (needed due to the 12v conversion) New 12v coil Refinished the trans cooler Refinished the fan and pulley Installed new plug wires Refinished the Oil Filter canister Rebuilt the fuel pump Cleaned the fuel filter, and replaced the element Pulled the oil pan, cleaned out the sludge, and refinished the pan. Fabbed up the bracketry and installed a GM alternator Converted the regulator housing into a master fuse holder. Refinished the air filter housing Refinished the Heater Blower housing, and swapped the motor for a 12volt one from a 55/56 model Getting settled in the new house and the expense that goes with it really put a pinch on the resto budget. Also the crazy heat this summer had temps regularly above 115 in the garage. So all of that slowed down the amount of progress I was able to make. Santa was good to me this year a brought new tools to make everything easier moving forward. Attach file: (54.67 KB)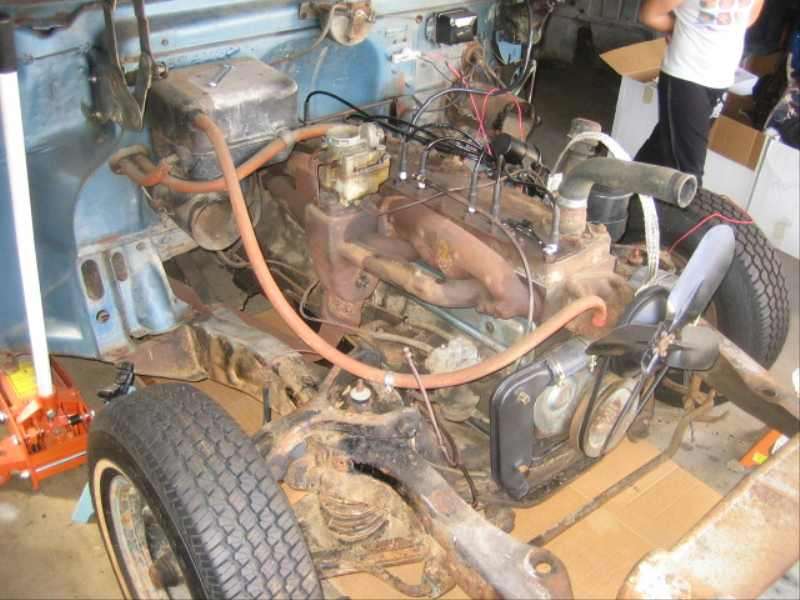
Posted on: 2007/1/18 23:28
|
|||
|
-BigKev
1954 Packard Clipper Deluxe Touring Sedan -> Registry | Project Blog 1937 Packard 115-C Convertible Coupe -> Registry | Project Blog |
||||
|
||||
|
Re: BigKev's 1954 Packard Clipper Deluxe Sedan
|
||||
|---|---|---|---|---|
|
Webmaster
|
Well I figured it was time to update my project blog:
The PI Swap Meet ended up being a sucessful treasure hunt for my '54 Clipper Project. I was able to pickup a Carb rebuild kit for my Carter WGD 2102S. The kit was $50 and is made by Daytona Products. It looks to be a pretty complete kit. I also found 4 rims off of the same '53 Clipper for less than the price of buying one of them from a part house. My car had two 15" rims and two 14" rims when I got it. This now gives me a 15" spare tire, and also 1 extra rim. The 14" will find a good home somewhere. I just need to buy 2 more 15" tires now. I have to buy two 15" tires and two 14" tires when I moved the car here from the old house. But before I do that I will take they 4 new rims and get them sandblasted and painted. Once that is done then I will worry about the tires. I also found a new bumper guard cross bar. The one that came with the car was pretty dented. The entire grille on my car was bad when I got it. It looked like some kids had kicked it in while it was stored for so many years outside. I found a complete good grille shortly after I bought the car, but I still needed that cross-bar. So I was glad to find this for only $30. I also picked up a brand-new reproduction battery retainer that was sold by the San Deigo PI chapter. My car came with the classic Billy Bob n' Cooter bungee cord retainer. My tax return check came in today, so I was off to Sears to buy me a real compressor for the garage. I wanted something that would be powerful enough to run most shop tools without a problem, and also not rattle my wifes dishes off the wall in the kitchen when running. Also since my house was built in the mid 50's the electrical in the garage is not what one would call optimal. So this compressor had the best features, electrical requirements (115 15amp), and was in my price range. sears.com/sr/javasr/product.do?BV_UseBVCookie=Yes&vertical=TOOL&pid=00919541000 It also got great reviews from people that have bought it. While it may not be a good choice to use for media blasting, I think it will work for most other home shop tasks. I went to the store and looked at all the models, and the old-timer that has worked at this Sears for 20+ years recommended this one. He let me plug all the different compressor in and run them, and this was by far the quietest and smoothest running. The compressor is actually made by Devilbliss, but rebadged as a Craftsman product. Porter Cable also has a model that is very similar that is also made by Devilbliss. The salesman confided in me to stay away from the red craftsmen compressors. He said that while they work, and are usually cheaper, then are not of the same quality as the black craftsmen compressors. The online reviews seam to support that. I bought the compressor, but it was not in stock, so they had to order it for me. It will be in next week. I also like this design as it will fit under the workbench that runs the length of the wall in my garage. The upright style would have created a space problem in the garage. Also this compressor is 240 convertible once I get the A/C in the garage updated. Finally I will be able to get some real work done in the garage!!! 
Posted on: 2007/2/10 23:55
|
|||
|
-BigKev
1954 Packard Clipper Deluxe Touring Sedan -> Registry | Project Blog 1937 Packard 115-C Convertible Coupe -> Registry | Project Blog |
||||
|
||||
|
Re: BigKev's 1954 Packard Clipper Deluxe Sedan
|
||||
|---|---|---|---|---|
|
Webmaster
|
Well this weekend has pretty productive out in the garage. I spend last night rebuilding the Carb on the '54. It came out very nice, and I will be doing a write-up for the website on it very soon just like I did with my fuel pump rebuild.
Luck shined my way today when I was walking around the local swap-meet, which they have every weekend at the drive-in. I found a brand-new Professional Series Craftsman rolling tool chest that lists at Sears for $200+ plus for $40. It just has some scratches on the backside of it, that no one will see. The caster kit, and top chest were still boxed and shrink-wrapped. SCORE!
Posted on: 2007/2/18 20:00
|
|||
|
-BigKev
1954 Packard Clipper Deluxe Touring Sedan -> Registry | Project Blog 1937 Packard 115-C Convertible Coupe -> Registry | Project Blog |
||||
|
||||
|
Re: BigKev's 1954 Packard Clipper Deluxe Sedan
|
||||
|---|---|---|---|---|
|
Webmaster
|
The compressor came in today and appears to be working fine of the shared outlet it is on now. I eventually get a dedicated outlet ran for it. But right now it looks like it's going to cost me around $750 to run a sub-panel out in the garage. So that may have to wait until later.
Posted on: 2007/2/20 19:06
|
|||
|
-BigKev
1954 Packard Clipper Deluxe Touring Sedan -> Registry | Project Blog 1937 Packard 115-C Convertible Coupe -> Registry | Project Blog |
||||
|
||||
|
Re: BigKev's 1954 Packard Clipper Deluxe Sedan
|
||||
|---|---|---|---|---|
|
Webmaster
|
Here are the before and after pics on that Carb rebuild I did. I will post the my rebuild how-to as soon as I have time to sit down for a couple of hours to write it all up and organise the photos. Work has been crazy, so I have been pretty worn out by the time I get home in the evenings.
Here are the photos: Attach file: (25.36 KB)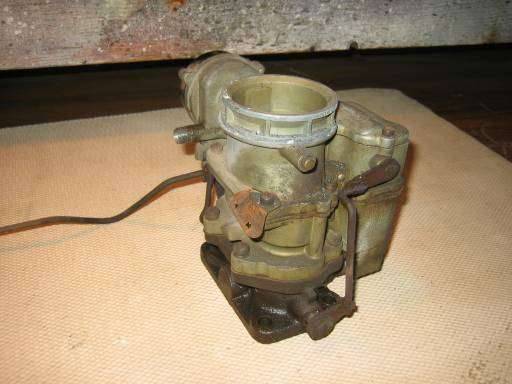 (26.71 KB) (26.71 KB)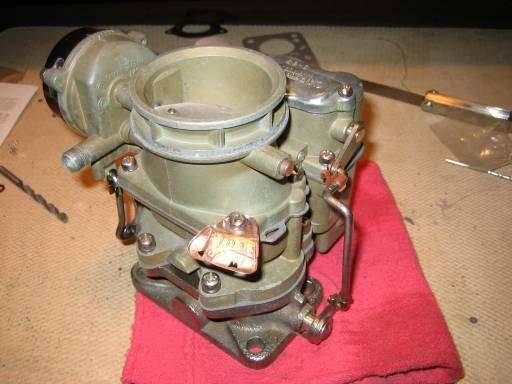
Posted on: 2007/2/22 23:05
|
|||
|
-BigKev
1954 Packard Clipper Deluxe Touring Sedan -> Registry | Project Blog 1937 Packard 115-C Convertible Coupe -> Registry | Project Blog |
||||
|
||||
|
Re: BigKev's 1954 Packard Clipper Deluxe Sedan
|
||||
|---|---|---|---|---|
|
Webmaster
|
Well will the sub-panel installed in the garage and all the feeds ran for the bench outlets, overhead lights, and the dedicated compressor feed.
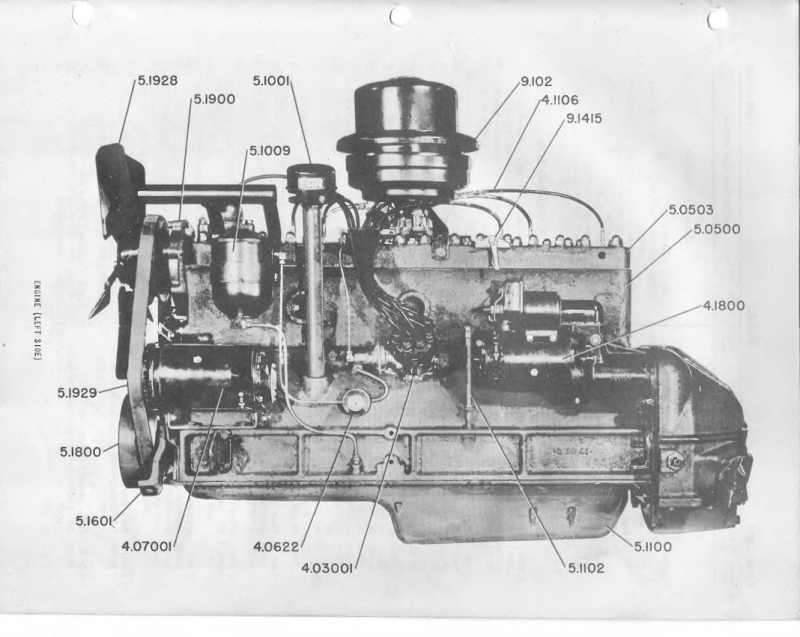
With the compressor now able to run without snapping the breaker, I was able to get back in the garage this past weekend to get some work done on the car. I started by pulling out my Impact Wrench for the first time, and I was finally able to bust loose the bolts holding the front bumper assembly to the frame. With the bumper out of the was it makes it so easy for me to roll my shop chair right up the front of the engine. No more sore back for me. I then pulled the fan and water pump pully back off so I could clean up and paint the waterpump, timing cover, and crank pulley. Next tool in the line-up was a die-grinder with a wire bursh. I used it to clean up all the rust and gunk off of the crank pulley. I was happy to see that I can finally read the timing marks. So I cranked the pulley around to TDC, and upon that I discover that my plugs wire were installed (by me) off by one position counter clockwise. All I had to do was move them all one space to the left, and now I have them back where then are supposed to be. I think the next thing on my list is to pull the distro, for cleaning, and rebuilding where required. Also I need to fab up some new oil, vacuum and fuel hard lines. The old one are rusty, brittle, and some of them are run incorrectly. For example the oil line to the filter were installed incorrectly. The filter is supposed to be a by-pass arrangement. But the way it is currently plumbed, it is not. (See picture). The lines are supposed to T' at the pressure port, with one side of the T' going to directly back into the inlet on the block above the pressure port, and the other side of the T' feeding the filter, and then back into the pan. As you can see the lines run directly to the filter, and then right back to the oil inlet on the block. Not sure what kind of pressure or flow drop the current setup caused to the upper part of the engine. Any thoughts? Attach file: (29.40 KB)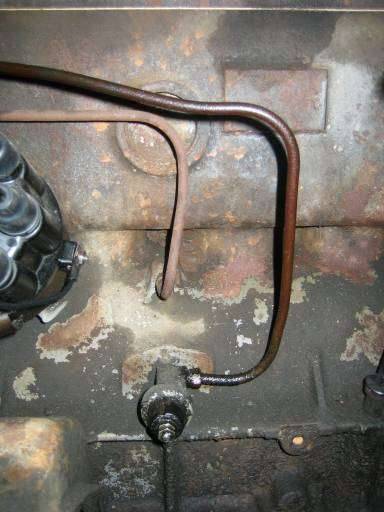
Posted on: 2007/5/21 15:36
|
|||
|
-BigKev
1954 Packard Clipper Deluxe Touring Sedan -> Registry | Project Blog 1937 Packard 115-C Convertible Coupe -> Registry | Project Blog |
||||
|
||||
|
Re: BigKev's 1954 Packard Clipper Deluxe Sedan
|
||||
|---|---|---|---|---|
|
Webmaster
|
Well I lucked out at a yard sale a few blocks over, and found this 6" Vise still in the box, brandnew, and for only $20.
This one is way better than the "fisher price" one I had before. The garage is slowly coming together. Attach file: (41.90 KB)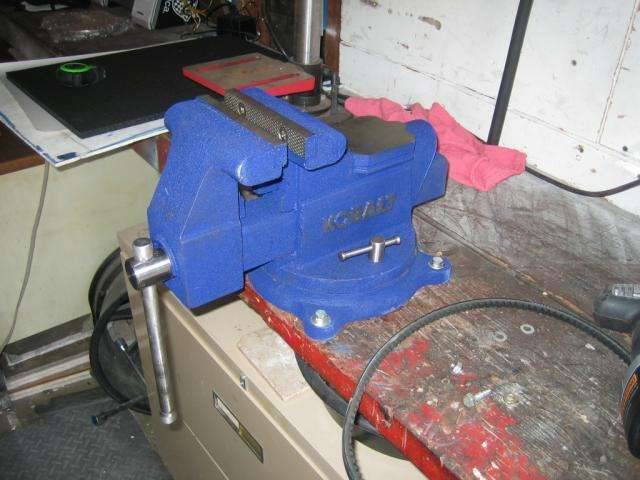
Posted on: 2007/5/24 13:21
|
|||
|
-BigKev
1954 Packard Clipper Deluxe Touring Sedan -> Registry | Project Blog 1937 Packard 115-C Convertible Coupe -> Registry | Project Blog |
||||
|
||||