|
288 Head Gasket Replacement
|
||||
|---|---|---|---|---|
|
Quite a regular

|
After 75 years it is time to R&R the head gasket on my 1949 Packard Standard 8 that I bought last year. The engine was losing coolant, white smoke out the exhaust pipe, and I suspected coolant in the oil pan when I changed the oil last week and discovered some copper colored goo in the bottom of my catch bucket. thinking a former owner used stop leak.
There is no obvious sign of a "blown" gasket but several of the nuts on the cylinder head studs were not torqued real good. The work is being done by a fellow car club member and owner of the United Motors Garage in Bonham, Texas they specialize in antique and classic car repairs and restorations. Also have the radiator I removed for leaks in the core. Make me an offer, and you probably want to pick it up because shipping will be expensive.  Attach file:  IMG_E5652.JPG (485.09 KB) IMG_E5652.JPG (485.09 KB)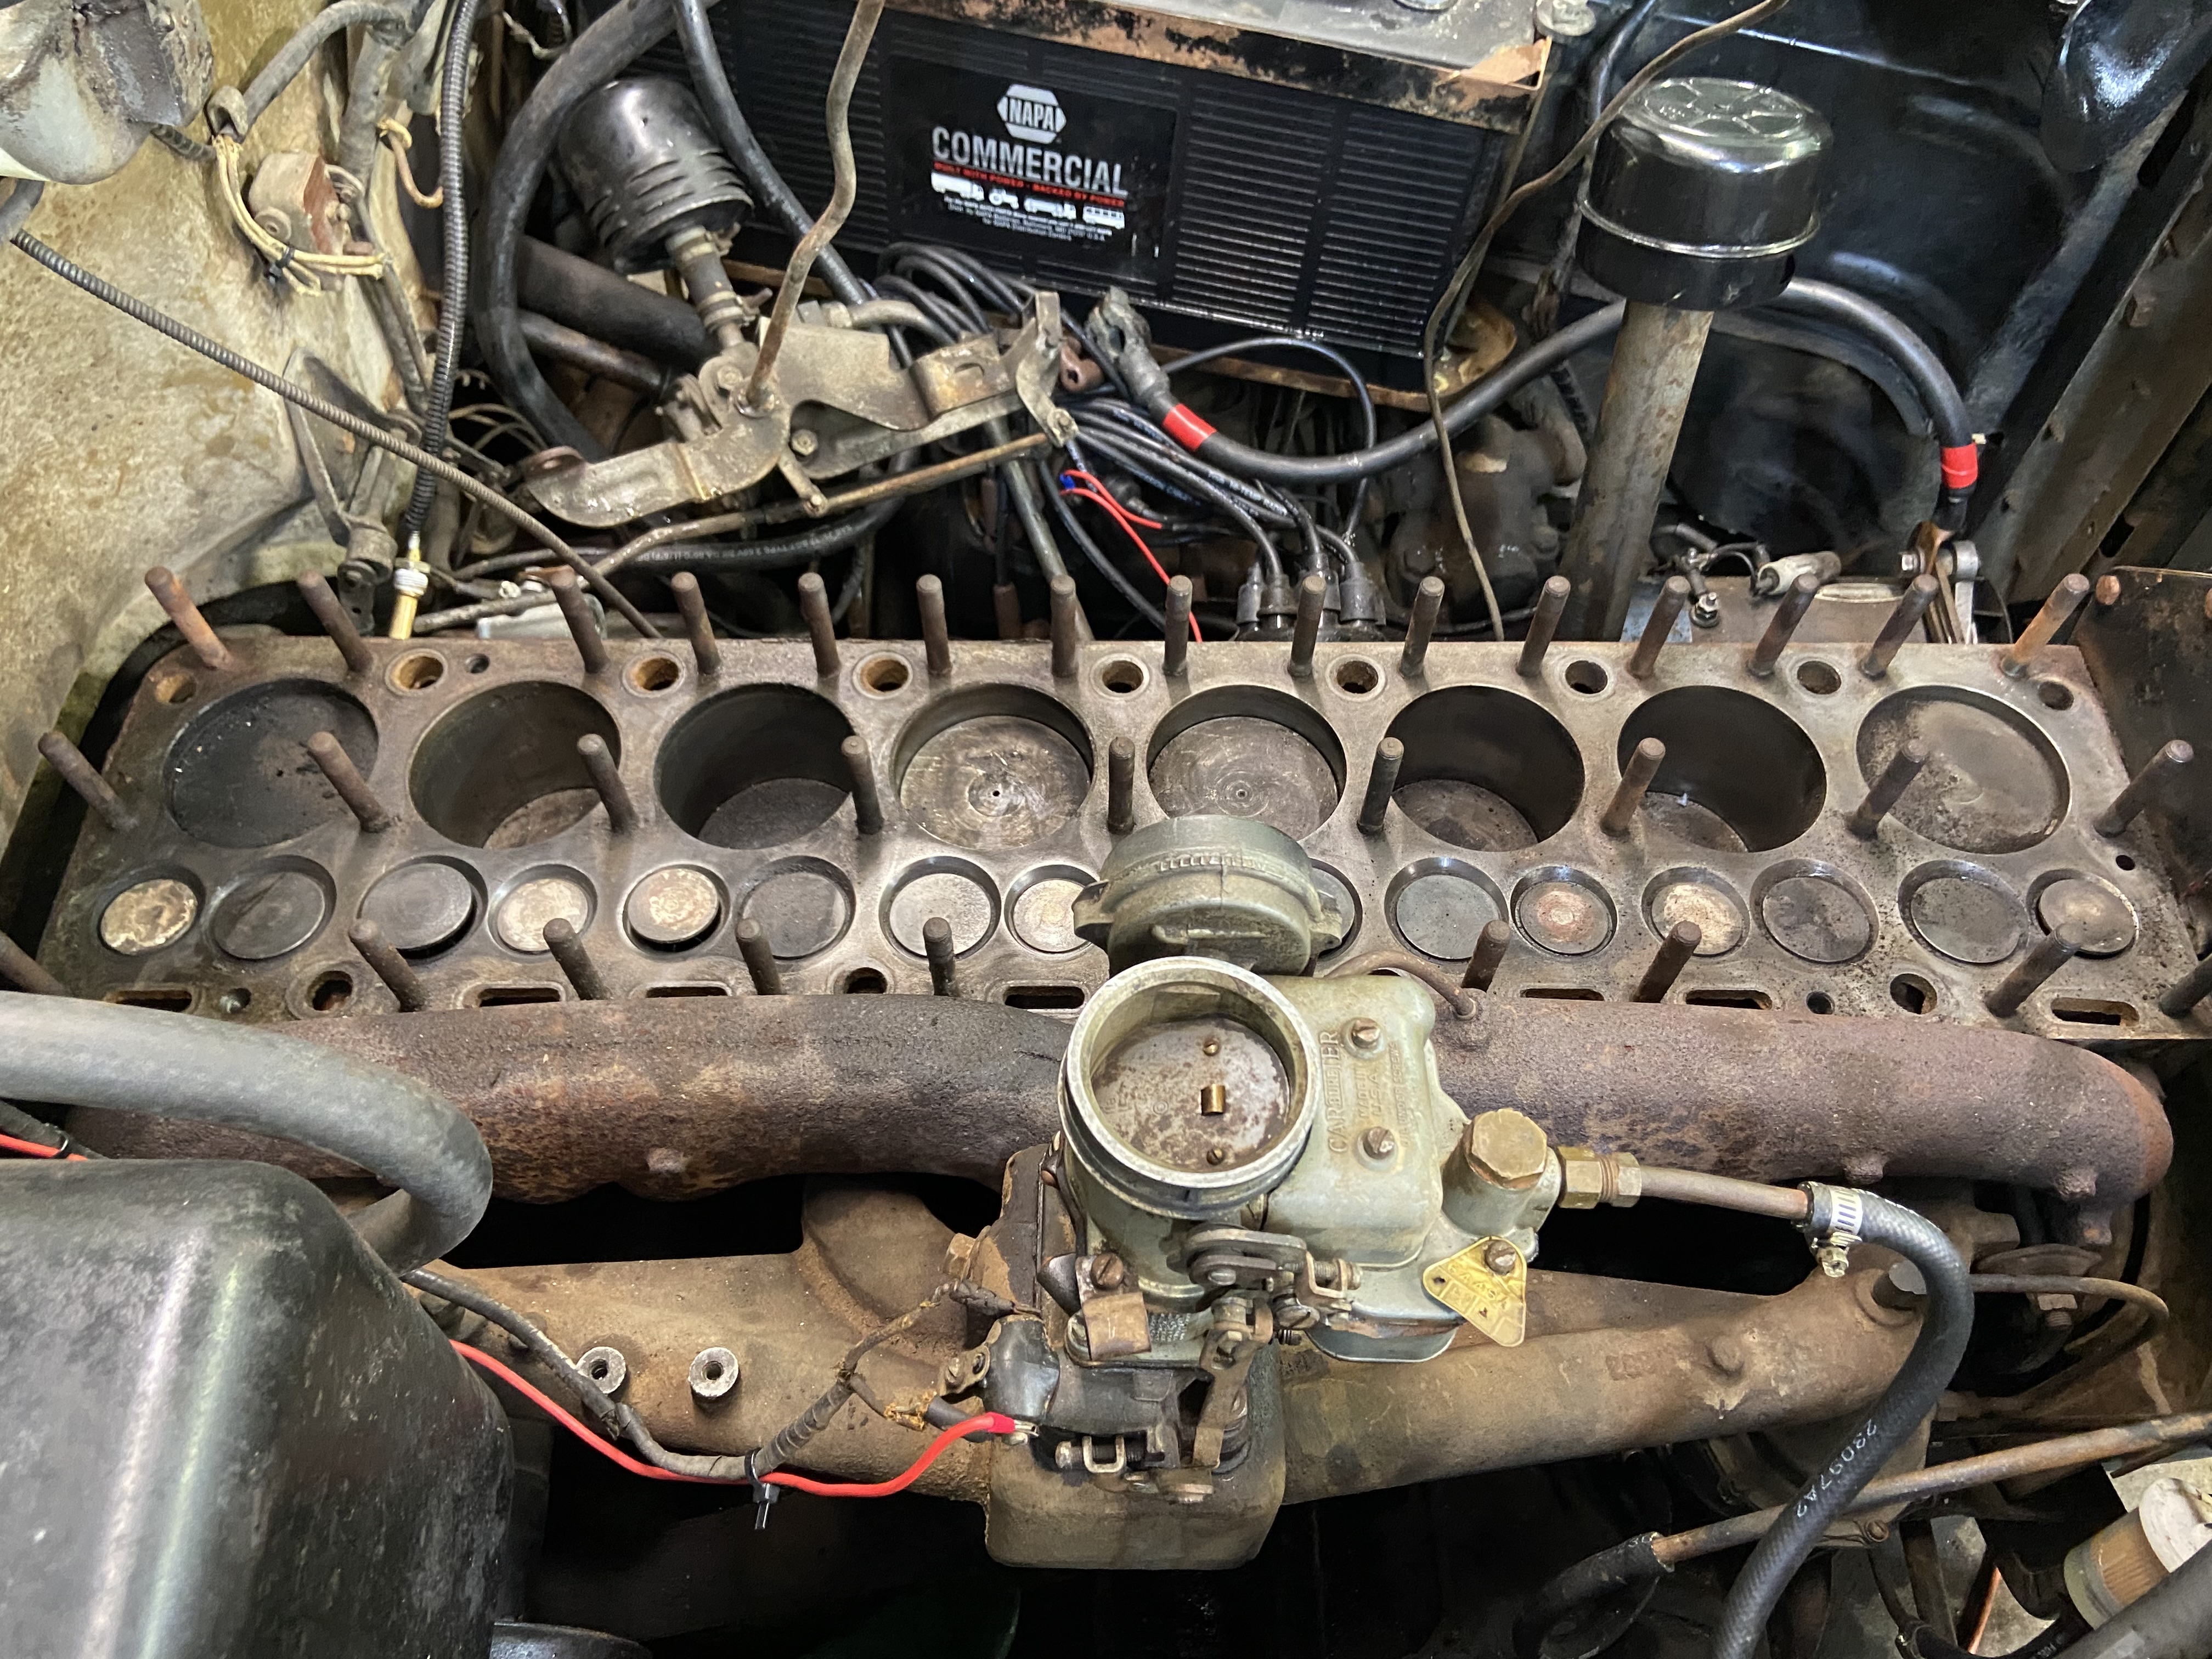 IMG_5600.JPG (564.46 KB) IMG_5600.JPG (564.46 KB)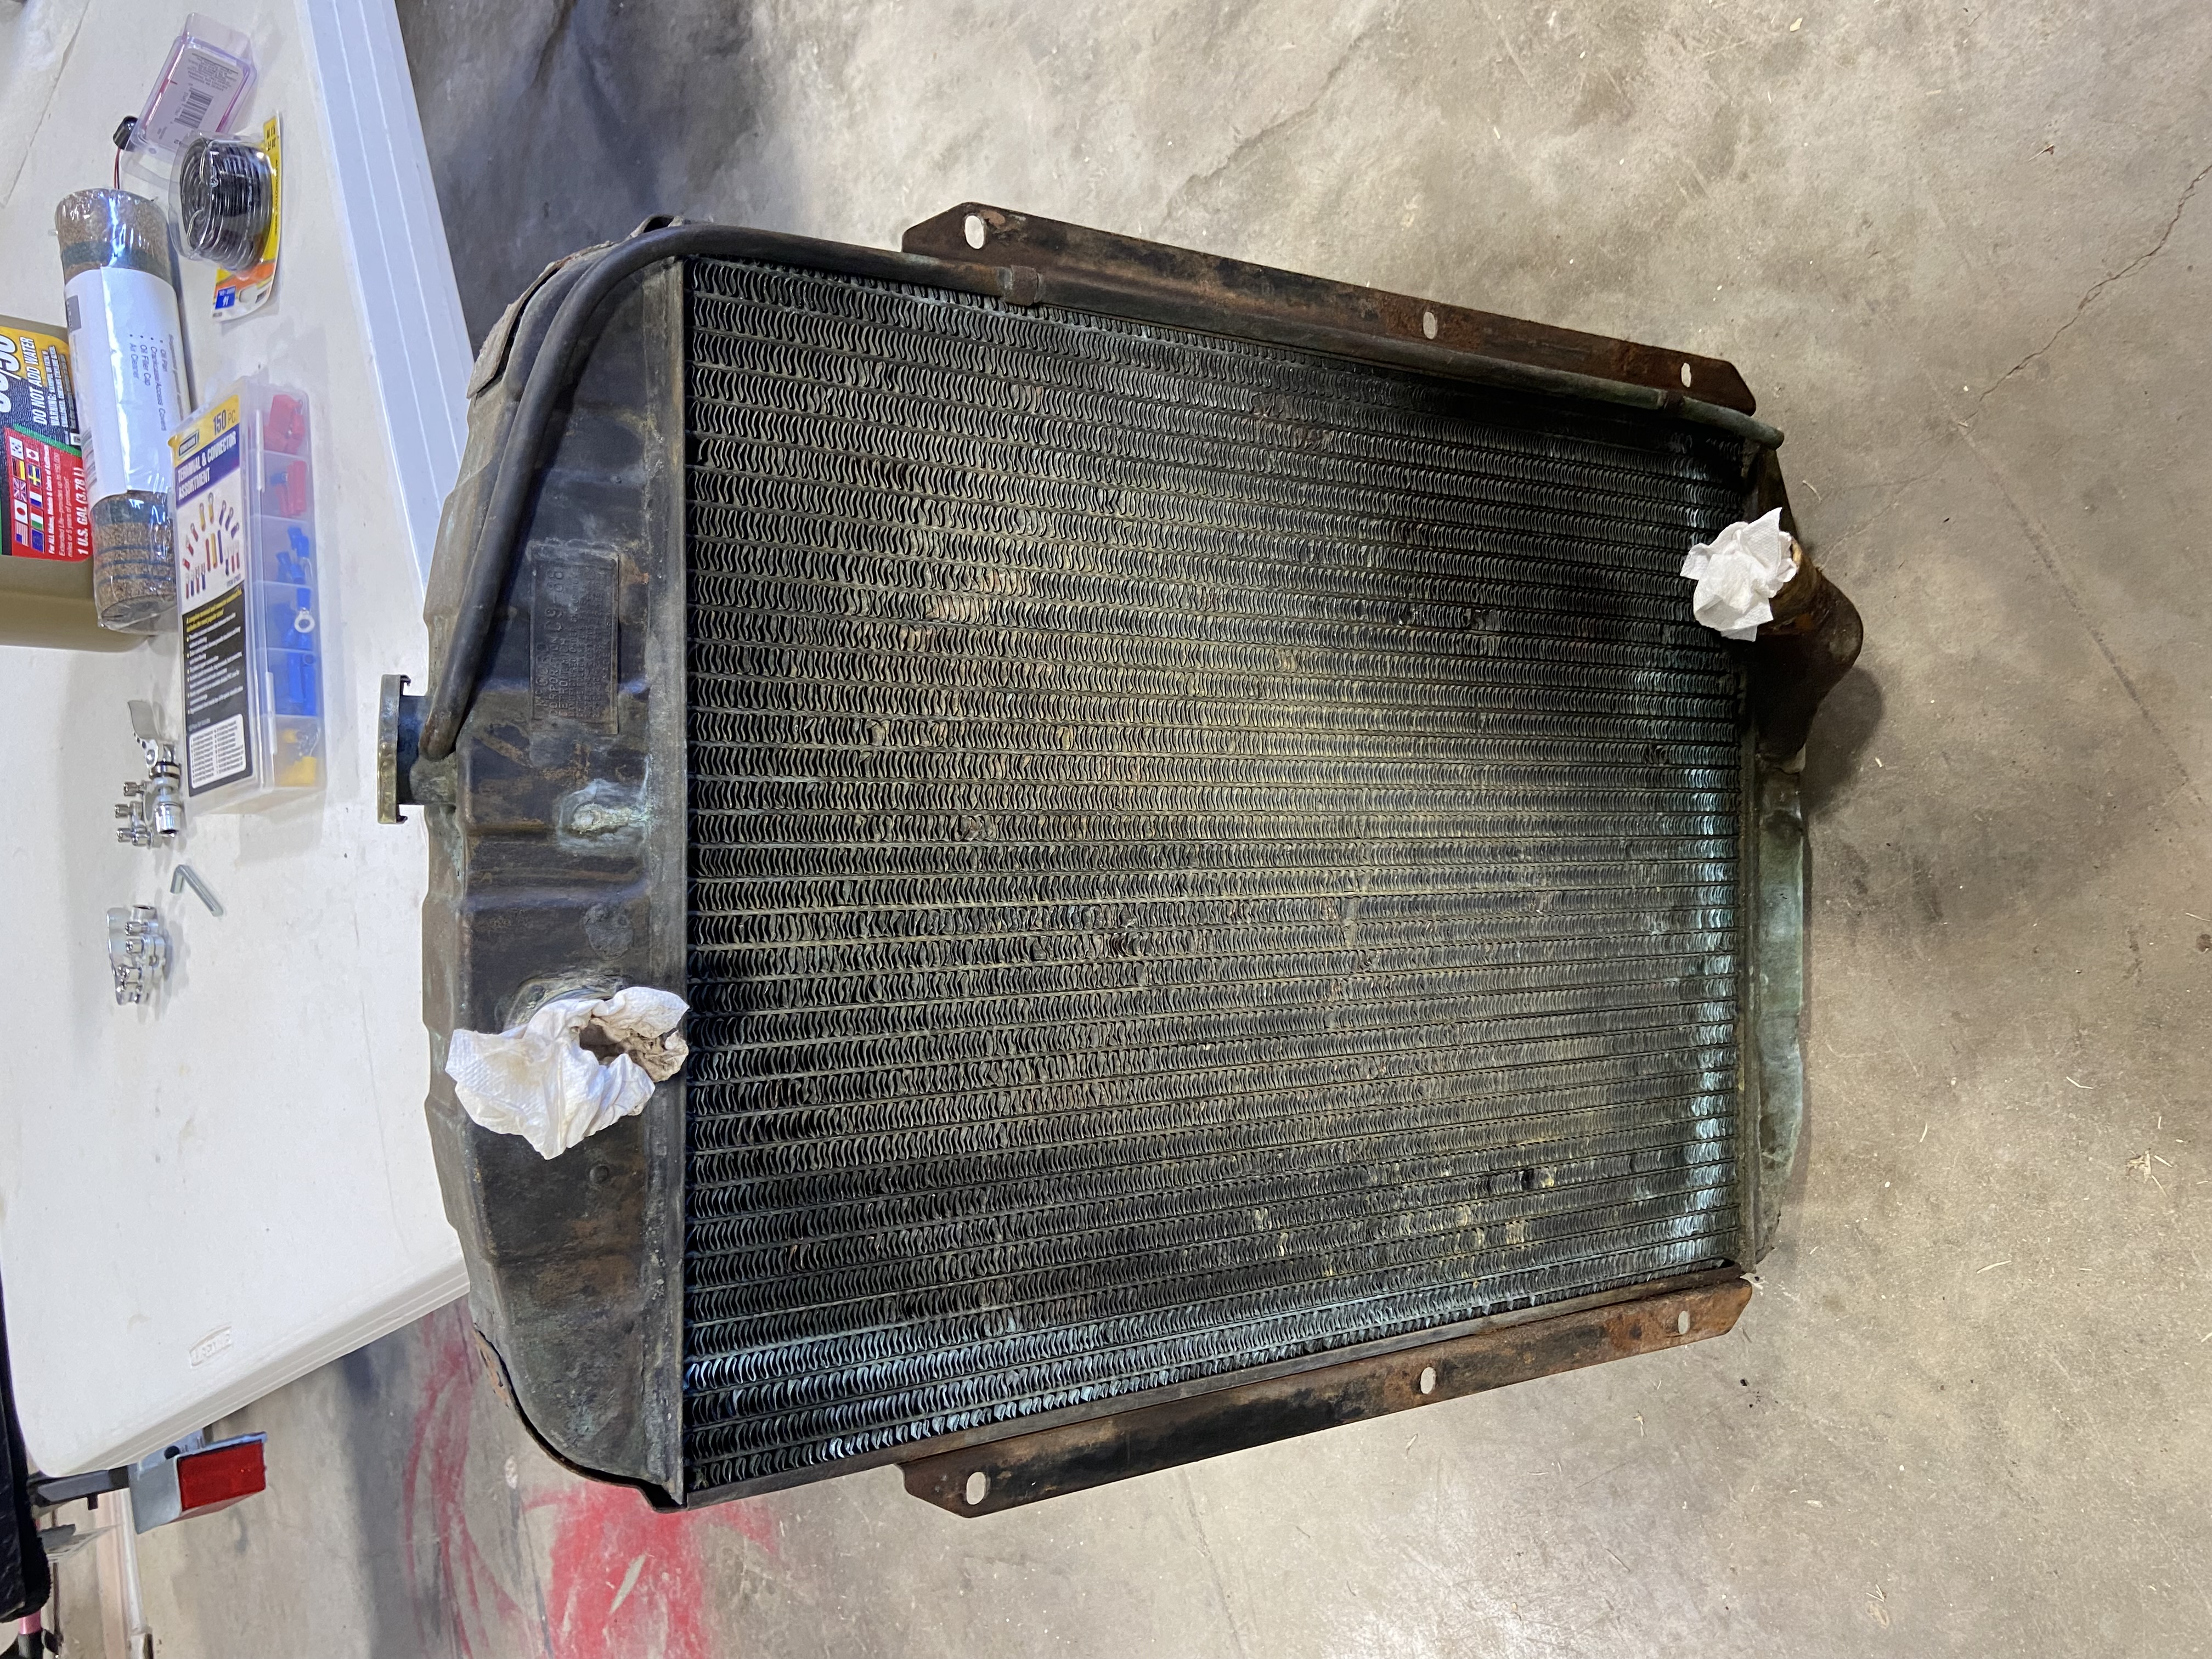
Posted on: 2024/3/5 8:57
|
|||
|
||||
|
Re: Wanted 1949 Packard series 2301
|
||||
|---|---|---|---|---|
|
Quite a regular
|
If you are looking for the whole assembly, I can't help you. But, if you want a metal oil bath filter with the screen mesh I have one.
Posted on: 2024/1/29 8:52
|
|||
|
||||
|
Re: Help with carburetor
|
||||
|---|---|---|---|---|
|
Quite a regular
|
My electric fuel pump works great on my 49 Standard 288 as the only pump being used.
Try disconnecting the fuel line from the pump and pour gas down the line into the carb and see if it still leaks between the needle and the seat. Just because you had the carburetor rebuilt doesn't mean it was done correctly.
Posted on: 2023/11/27 9:39
|
|||
|
||||
|
Re: Carpet Restoration
|
||||
|---|---|---|---|---|
|
Quite a regular
|
Good tip, tks for sharing
Posted on: 2023/11/21 6:17
|
|||
|
||||
|
Re: Carpet & Upholstery Material
|
||||
|---|---|---|---|---|
|
Quite a regular
|
I appreciate that you are sharing your seat rebuild project and the photos. Without doing a quick web search, I suspect that the burlap covering the springs acts as protective barrier, so the metal springs don't wear through the padding and seat upholstery. My driver side front seat has a compression issue compared to the passenger side. After looking at the spring configuration on your seat I was wondering if cutting some high-density foam to fit down inside the coils would provide addition support. And cover the bottom of the frame with a sheet of plywood. FYI, the Kanter.com catalog has seat rebuilding kits.
Posted on: 2023/11/5 8:07
|
|||
|
||||
|
Re: gas milage
|
||||
|---|---|---|---|---|
|
Quite a regular
|
Mine averages 10.42 Nautical Miles per gallon.
Posted on: 2023/11/3 8:24
|
|||
|
||||
|
Re: New Radiator for 49 Standard 8
|
||||
|---|---|---|---|---|
|
Quite a regular
|
Tks for the comments and suggestions. The outside temp on the test day was 79F and on flat ground.
I didn't mess with the thermostat and have no idea what the orifice diameter is. When I cut the old hose off I was pleased that the neck on the housing was not corroded and falling apart. The 6 volt fuel pump mounting location was selected after reading other reviews covering mounting locations and pushing vs drawing fuel. I don't like crawling under cars anymore. The pump draws fuel just fine and doesn't flood the carburetor at idle. The OEM fuel/vacuum pump is still mounted with the fuel line bypassed. May pull it and rebuild same this winter. Fabricating a fan shroud is a good idea to enhance cooling and safety while working on the engine while it is running. During the radiator installation I painted the inside tips of the fan white to make it more visible. I didn't consider repairing the OEM radiator after talking to a friend that paid $900 to fix the one on his 48 Buick and it took six weeks. I'll put the OEM radiator up for sale when I am satisfied that the new one is meeting my expectations.
Posted on: 2023/10/16 6:48
|
|||
|
||||
|
Re: New Radiator for 49 Standard 8
|
||||
|---|---|---|---|---|
|
Quite a regular
|
Install complete. Test drive today. At 50 mph temperature is at 180F, at stop light it indicates 190.
Attach file: radiator hose.jpg (148.30 KB)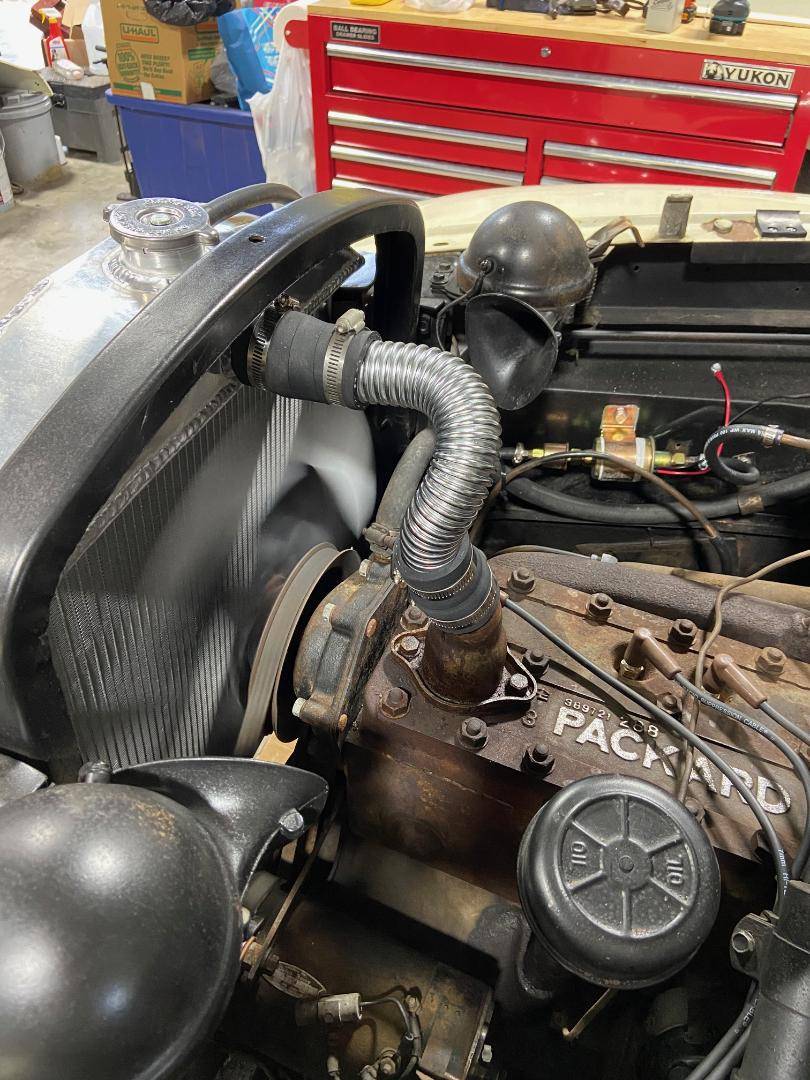
Posted on: 2023/10/13 13:11
|
|||
|
||||
|
Re: New Radiator for 49 Standard 8
|
||||
|---|---|---|---|---|
|
Quite a regular
|
The new radiator is manufactured by 'Work' in some place called China. I think Walmart knows where that is. It is a two row unit designed for a 1940-41 Chevy pickup with a 216 cu.in. six. The mfg's ad on Ebay states that their aluminum radiator achieves a 30-40% improvement in heat dissipation. The OEM radiator ran at 185-190F in traffic. I'll update this post after I receive and install the hoses.
Posted on: 2023/10/9 4:27
|
|||
|
||||
|
New Radiator for 49 Standard 8
|
||||
|---|---|---|---|---|
|
Quite a regular
|
Replaced the OEM leaking radiator with a new aluminum radiator. Had to make two mounting brackets to accommodate the narrower width. Still working on the hose configuration and ordered some parts online from Summit Racing.
Attach file:  image5a.jpeg (401.70 KB) image5a.jpeg (401.70 KB) image8a.jpeg (200.66 KB) image8a.jpeg (200.66 KB) image11a.jpeg (326.09 KB) image11a.jpeg (326.09 KB)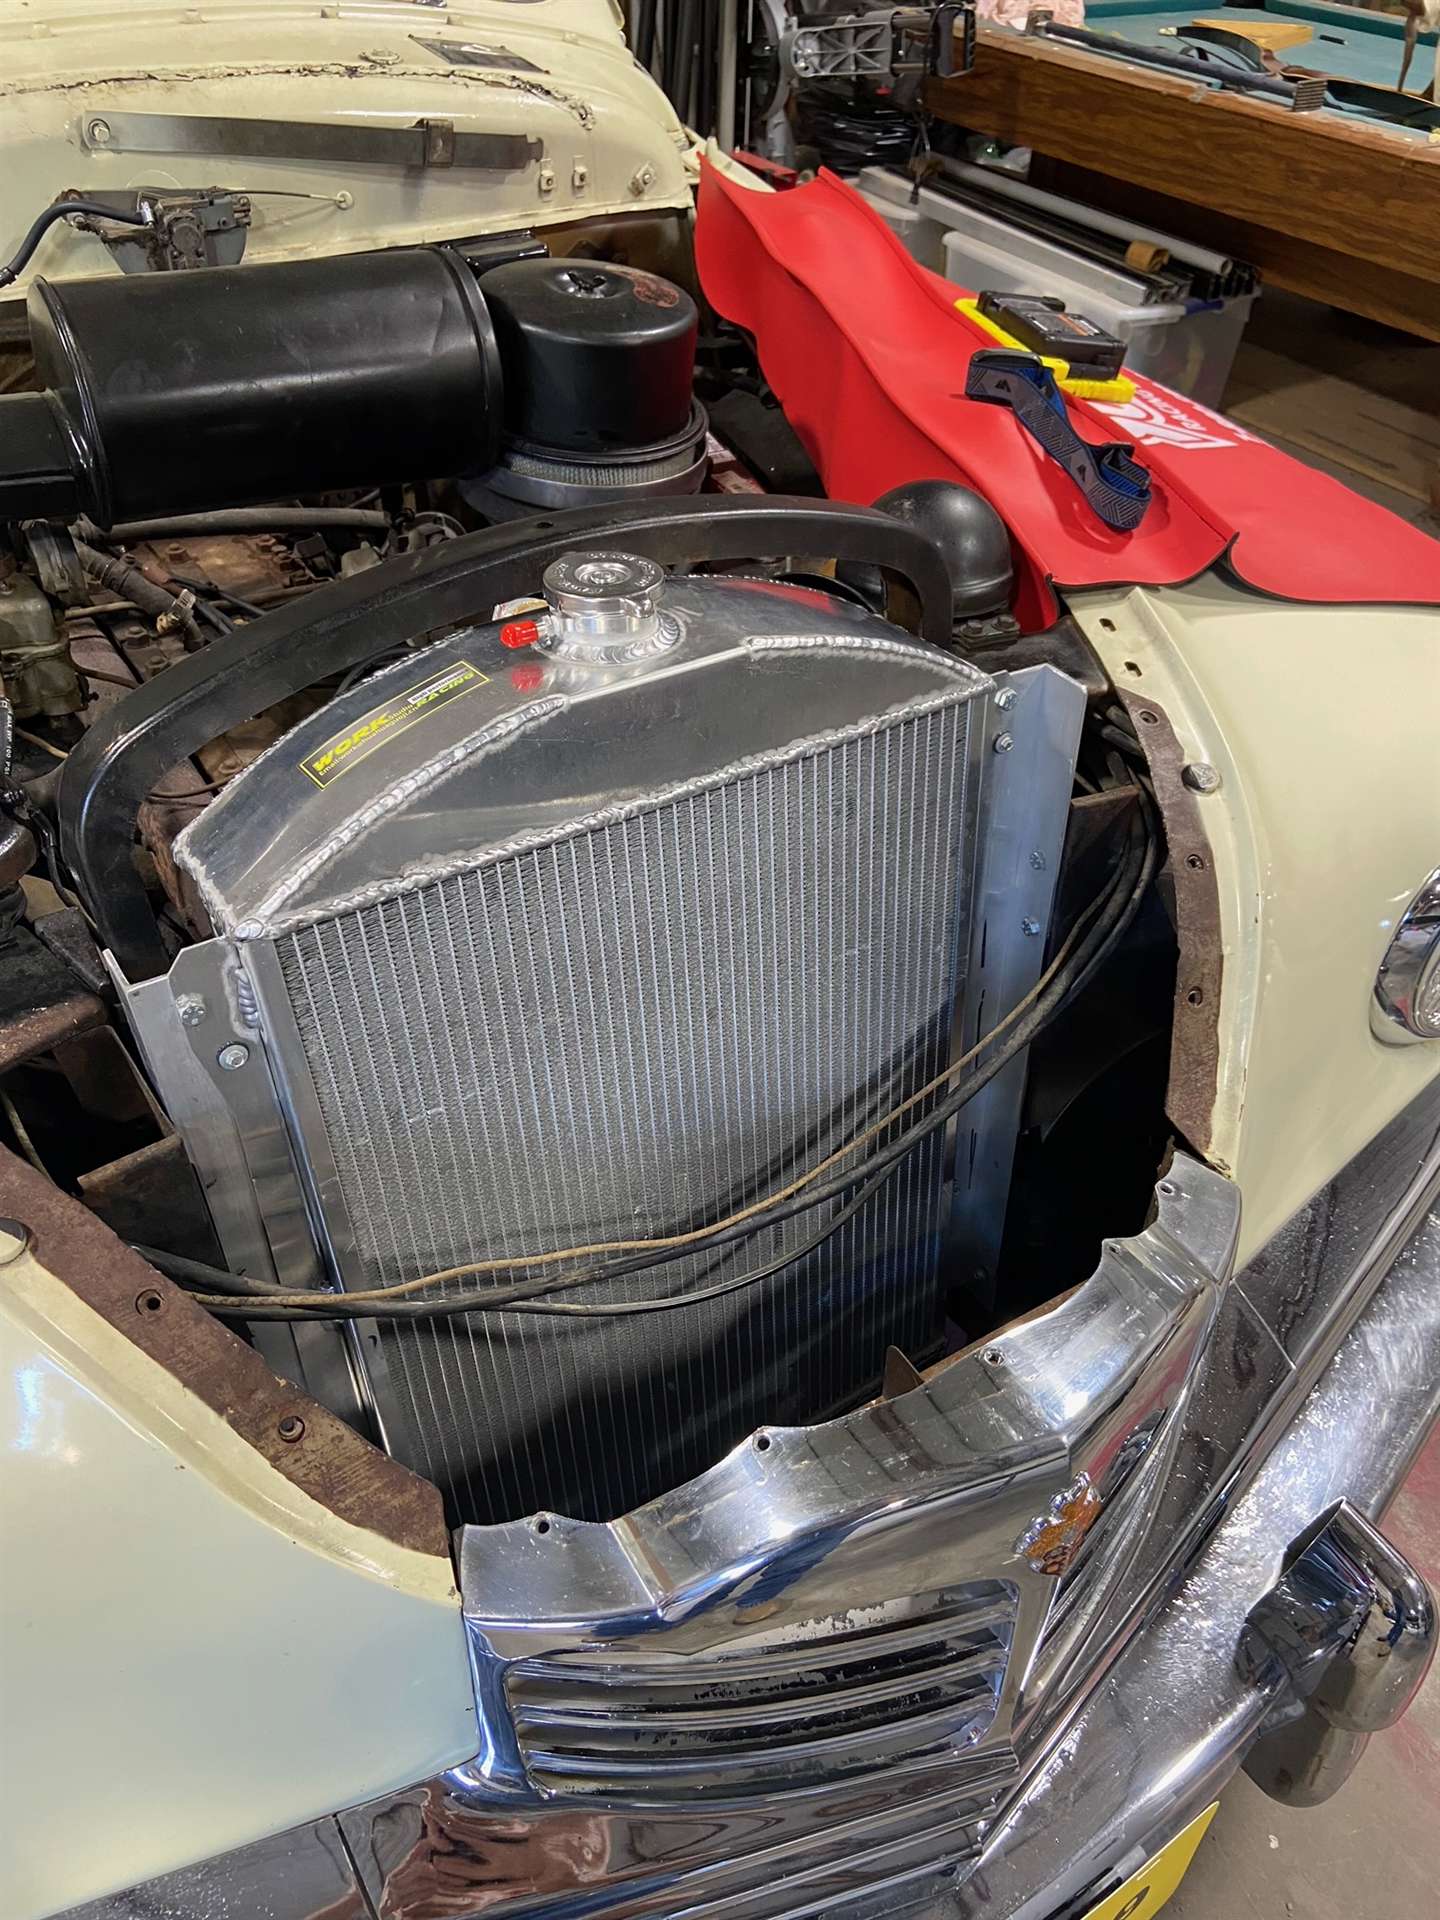 image12a.jpeg (286.79 KB) image12a.jpeg (286.79 KB)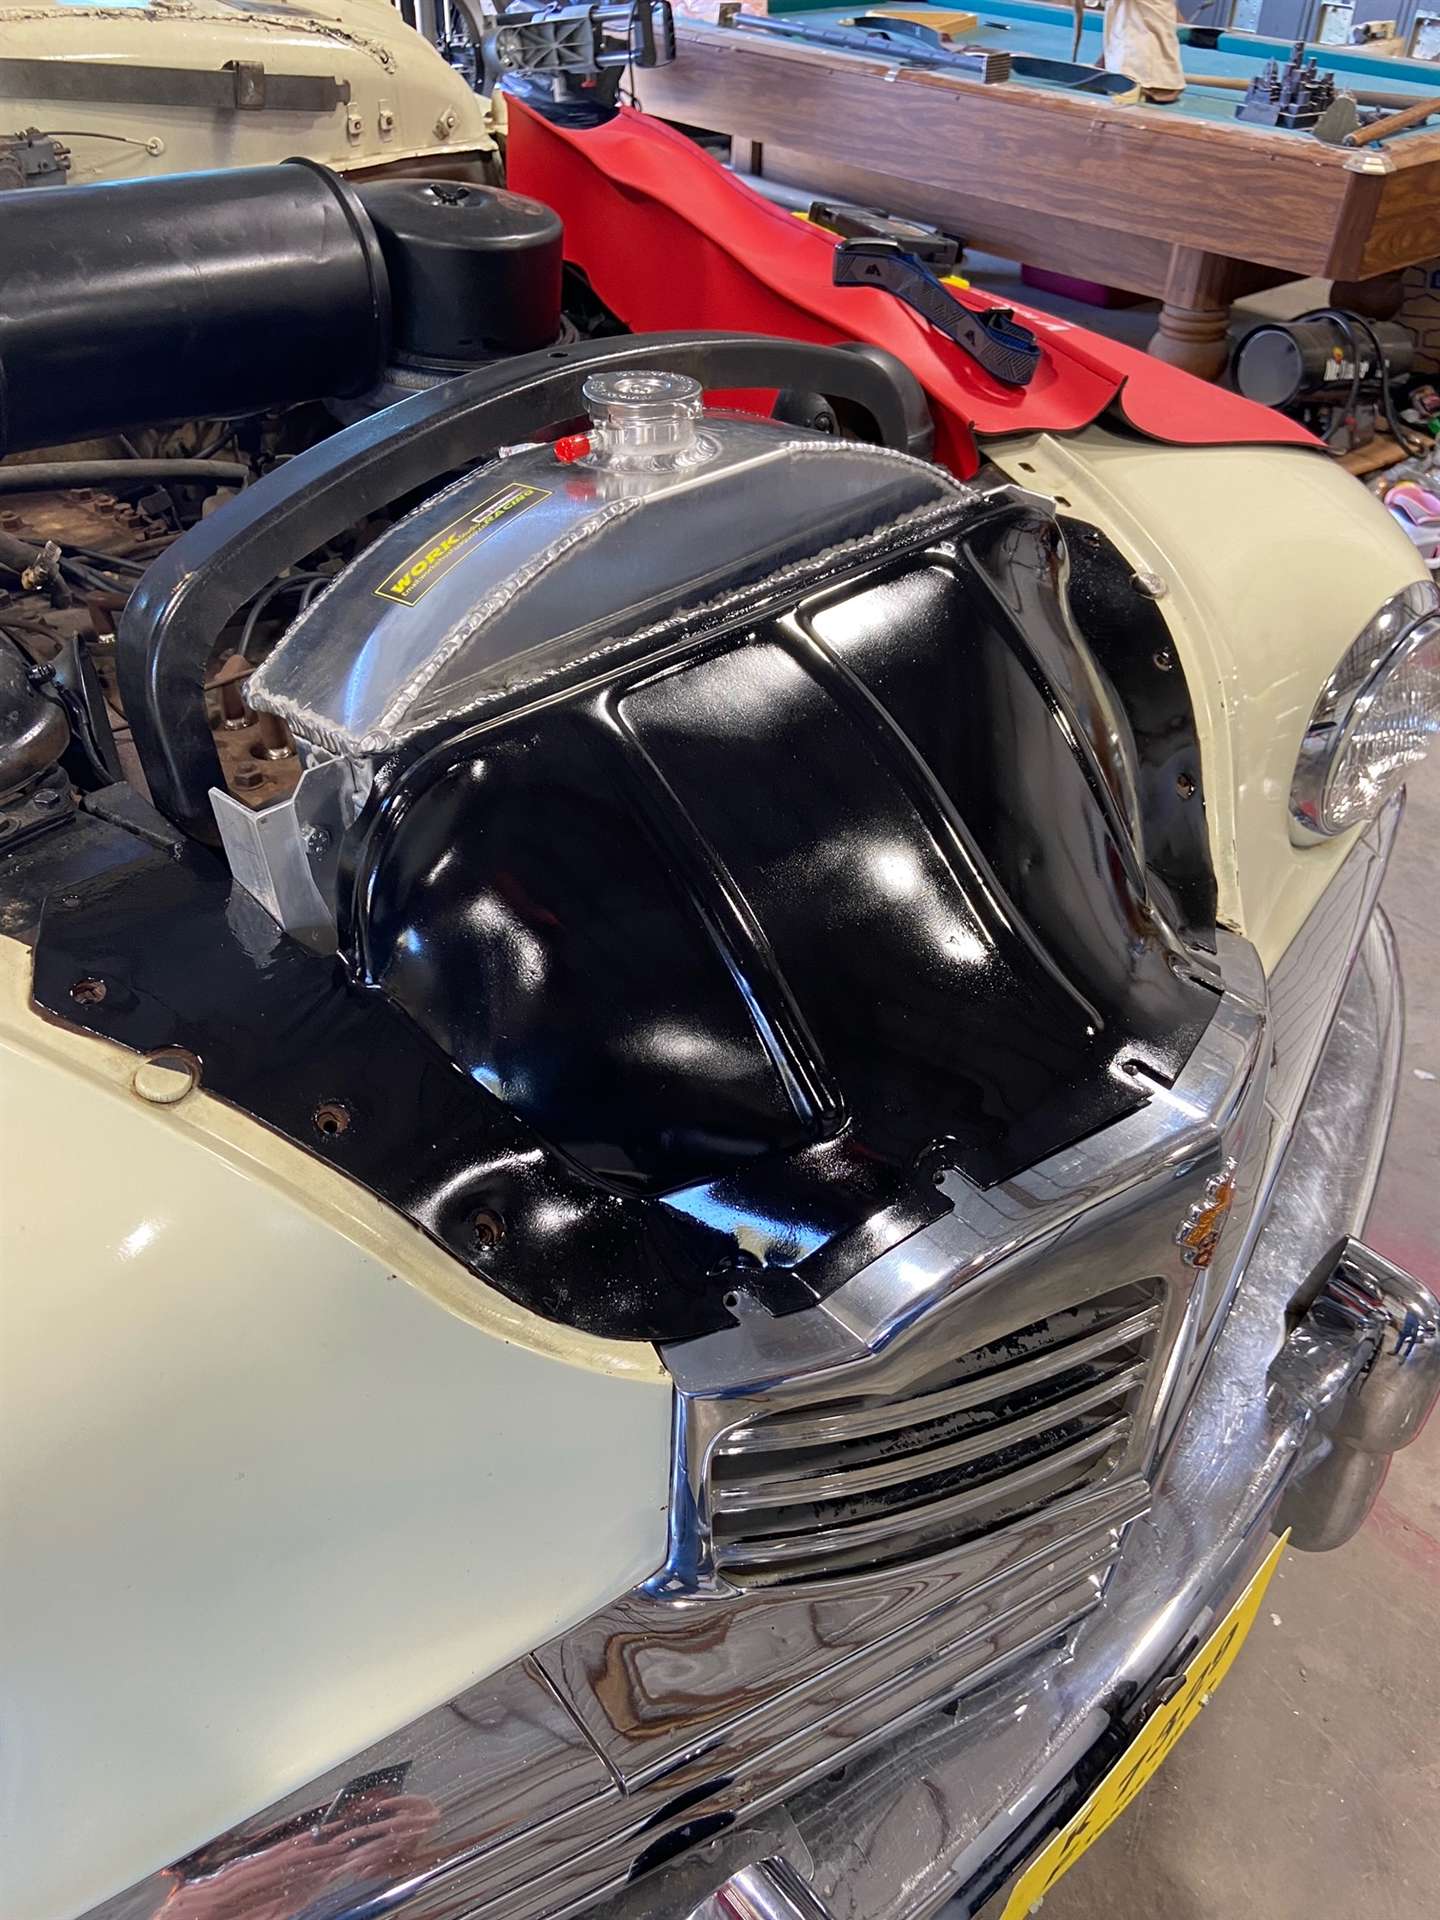
Posted on: 2023/10/8 7:17
|
|||
|
||||


