|
Re: Richter's '53 Caribbean
|
||||
|---|---|---|---|---|
|
Home away from home
|
Thank you for letting me know! I went ahead and sent him an email, so hopefully I'll hear back soon
Posted on: 2015/7/13 9:32
|
|||
|
||||
|
Re: Richter's '53 Caribbean
|
||||
|---|---|---|---|---|
|
Home away from home
|
Oh no, I was talking about the pictures of the new support on the bottom - it looks like all the little ribbing on the bottom of the floor, with the hole in the end is welded to the new inner rocker.
Posted on: 2015/7/8 8:48
|
|||
|
||||
|
Re: Richter's '53 Caribbean
|
||||
|---|---|---|---|---|
|
Home away from home
|
Awesome pictures, thanks! A lot of that will help. I ended up having to cut the old ones out in sections, so I have about a 2 foot section of clean metal I can look at which will help too.
Did you fabricate the new ones yourself, or is there a supplier out there somewhere where I can get them? The ones in the '55 look great, and if I could pick up a set rather than having to come up with them on my own, that'd be much preferred! Just a note, on my '53, it doesn't appear as though the bracing struts were ever welded to the box section. I considered that it seems like it would be much stronger to do it that way. It looks like they're welded in the '55 pictures.
Posted on: 2015/7/7 14:03
|
|||
|
||||
|
Re: Front Suspension removal from bare frame?
|
||||
|---|---|---|---|---|
|
Home away from home
|
Getting them off isn't so bad, but I recommend using a ratchet strap through the inside and outside of the spring, so that if it rapidly unloads, it can't go far. I too have shot a strut tower cap into the drywall when there was more spring tension than I had planned for.
Posted on: 2015/7/6 11:29
|
|||
|
||||
|
Re: Richter's '53 Caribbean
|
||||
|---|---|---|---|---|
|
Home away from home
|
Wow, I guess it's been a while since I updated.
A few weeks ago I managed to get the body up, the old floor cut out, the new floor is now sandwiched between the body and the frame, and all has gone surprisingly well, although at the time there was a quite a bit more cutting and grinding than I'd counted on, and the bottom of the Caribbean body had quite a bit more damage than I'd thought before, which is why I don't have it all welded back in place yet. I seperated the floors at the pinch weld below the firewall in the engine bay, and then right along the floor pans to the outer rockers on back. The wheelwells and trunk pan is seperated, but it looks like I'm going to be using those panels as well. The drawback is with the bottom portion of the Caribbean being in such rough shape, the only part available to weld to at the moment is that same pinch weld at the firewall. The bottom of the A pillars needs to be replaced because it's pinholed with rust - luckily I managed to keep those from the Clipper, because I knew there were some pieces I would need. The next part I'll have to worry about is where the doors come down in the back, to the rear wheel well, and that'll probably be some custom fabrication (the Clipper was a 4 door, and it doesn't match) but it shouldn't be too hard to continue the curve up to match the door. The body reinforcement for the convertibles is actually built of two thicker sheets of metal welded together rather than a single boxed section, so despite being a pain to fabricate, it should be easier to source and get done than finding an exact size of box steel. I may have to break down and buy a sheet metal brake finally. At least it's mostly contained in one bay of the garage now, which makes me (and the wife!) much happier. This past weekend, despite the holiday I only managed to get 5 hours or so to work on it, so I decided to tackle the front suspension rebuild, which took quite a bit longer than I had thought. I have the kit will all new bushings and bearings and kingpins, and I had expected to get at least one side totally disassembled, cleaned, painted, reassembled and installed. As it happened, I barely managed to get the upper control arm finished, but at least it's progress! I found that installing the bushings using a 3 jaw puller and a socket presses them in quite nicely without disturbing the spacing, and eliminates the need for the custom spreader tool. The first one goes on great, but the second one is work because you have to have that center pin installed (the part that bolts to the frame). Since the end isn't perfectly level, when you add the large socket (so that you can press without damaging the bolt head) it wants to press off-center, so the going is slow, like a half turn, hammer the socket back to center, then a half turn, hammer the socket back. Finally completed it though Scraped all the old grease off with a blade, screwdriver, and wire wheel, then a quick blast in the sanding cabinet. A nice double coat of semi-gloss black, new bushes installed, and torqued to spec on the chassis. At this rate, only 4 more weeks and I'll be ready to tackle the spindles. :P
Posted on: 2015/7/6 11:07
|
|||
|
||||
|
Re: Novice question-how do you remove the rear universal joint??
|
||||
|---|---|---|---|---|
|
Home away from home
|
haha, that will do it - luckily I had my rear end out of the car, but mine took a 12 ton press.
Posted on: 2015/6/9 12:42
|
|||
|
||||
|
Re: Differential ID
|
||||
|---|---|---|---|---|
|
Home away from home
|
Quote:
Some makes and models were stamped on the case or a tag on the case This was the case here, too - but the numbers weren't all lined up. I used a variation of your method - put some tape on the pinion straight up and down, and turned a drive wheel around twice and got just past 3 1/2, so I was guessing 3.54. As I was wirewheeling the differential down for paint, I found the stamped 3, 5, and 4 on the bottom, but they weren't super close together enough to be obvious. At least that answers the question!
Posted on: 2015/6/4 16:04
|
|||
|
||||
|
Re: 1953-ish Front Suspension Rebuild
|
||||
|---|---|---|---|---|
|
Home away from home
|
Hmm, thanks for the response! You're right, pretty much the same as the 53 manual. I'm almost done with the rear differential section (now I can roll it around on its own rear tires again!) so when I get a chance to mess with it again, maybe it'll make more sense.
Posted on: 2015/6/4 15:57
|
|||
|
||||
|
Re: Richter's '53 Caribbean
|
||||
|---|---|---|---|---|
|
Home away from home
|
I've been sneaking up on getting the floor replaced. I haven't got the most genius idea of how it's going to go yet, so I've been working on things I know have to happen - I added some additional reinforcement to the body, prepared the Clipper floorpan to go in (removing the pieces that go to the Clipper but not the Caribbean, like the door post reinforcement). I've also cut out the rest of the basic floor from the Caribbean. Right now I have the box steel supports that run from front to back on either side, and the one that runs across the middle at the bottom (which the Clipper doesn't have.) My intent is to grind the bottom of that cross beam to remove the original Caribbean floor, then I'll just push the Clipper floor in place and weld it to that without removing it from the body. The scary bit is the side beams. I'm sure I've got enough bracing, the body doesn't do anything, and the bracing is rock solid, but removing those is probably going to be the last thing I do.
It's also rained about 20 of the last 30 days, so I haven't been able to do much that requires pushing the car out of the garage. We did have a nice day yesterday though, so I was able to finish prepping and painting the rearend. It turns out the diff DID have the gear ratio stamped on it, I just couldn't understand until I manually tested it. It's got a 3 5 and 4 stamped on it, but not all together. Counting the turns of the pinion shows that it is a 3.54 though. Attach file:  (83.58 KB) (83.58 KB)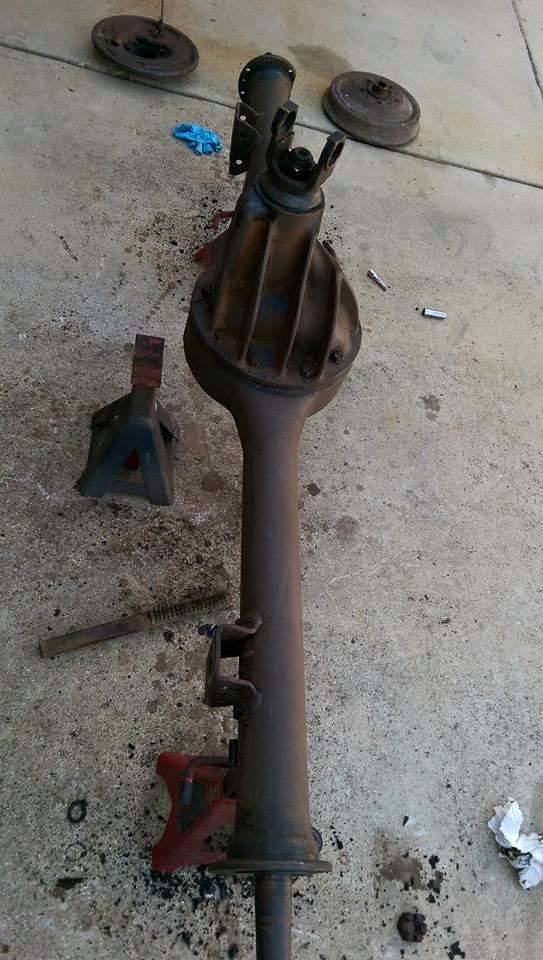 (80.79 KB) (80.79 KB)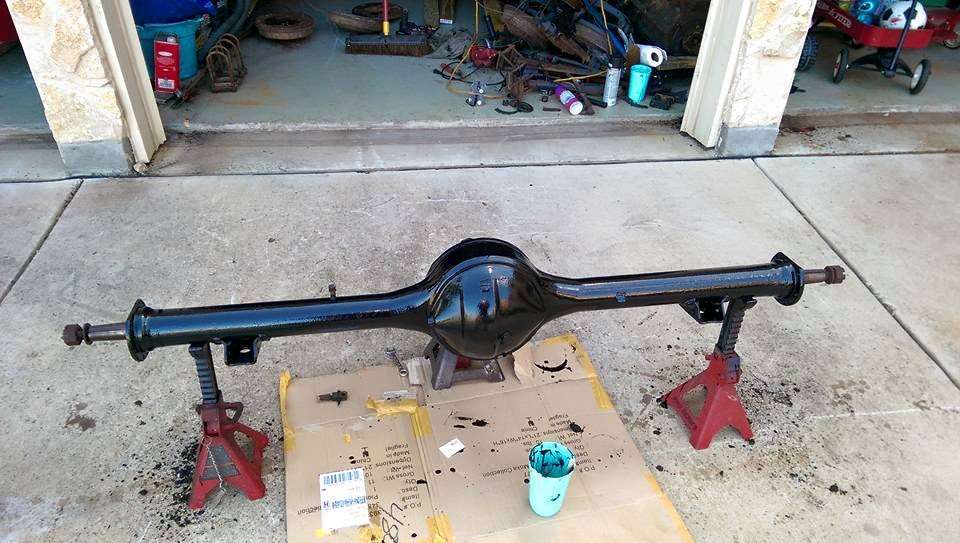
Posted on: 2015/6/1 10:31
|
|||
|
||||
|
Re: Richter's '53 Caribbean
|
||||
|---|---|---|---|---|
|
Home away from home
|
Just an update - I started cleaning up the differential. I'm having a beast of a time getting the u-joint out. One side I managed to get free, the other side was stuck, so I had to break out the 12 ton press, thinking if I can free it up, then I can lube it and push it back out the other way. Nope, popped all the way in. I'll have to come back to that issue later.
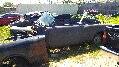
Beyond that, I had a great idea for how to get the floor pan from the Clipper into the bottom of the Caribbean, but it didn't work out the way I planned exactly. My hope was that the inner bolts would be through the center section of the floor, and the outer bolts would go through on the other side of the seam weld for the inner rockers, so my hope was that I could cut the inner floor free on the Caribbean part, and the outer rockers off of the Clipper floor, and then use the frame to hold it all in place while I welded the floor back in. Was so excited about it I had a hard time sleeping that night (thought came to me about 11pm). Next day I looked at it, and it's not quite so easy, but it may not be much harder. Since the convertible frames have the extra boxed section under the body, I can still keep that attached while I cut the floor out above it (hopefully). So it will be similar to the thought I had, but not quite so amazingly clever. I just have to be careful not to cut all the way through the convertible support when I cut the floor out from above it. I also ground off the rivets from the rear section of frame that I need to replace, and from the Caribbean donor piece (Clipper had a welded on tow bar, and after 30 minutes of grinding, I just chopped that section off on the junk Caribbean frame.) Now I just need to clean it up, paint it, and bolt it back in. (Packard service manual recommends replacing the rivets with appropriately sized bolts if sections need replacing, particularly for the body braces.) I also ground out the body braces and popped them loose, sourced the bolts, washers, lock washers and nuts to fit the Caribbean braces. They too just need to be cleaned up and painted, and now I can clean up the area underneath them on the frame better than I was able to before. Getting the Triumph finished and to the car show kinda helped motivate me. After getting the paint polished up and everything back together and seeing how amazing it looked in the light, and how well it drove the 100 miles to the show and back kinda re-validated that I have it in me to take a car from junk back to something special, so I'm excited to be working on the Packard again. Likewise, my wife will be excited when we can get that space in the garage back again, and don't have a rusty floor tied to the garage door rail. :P Attach file: (67.16 KB)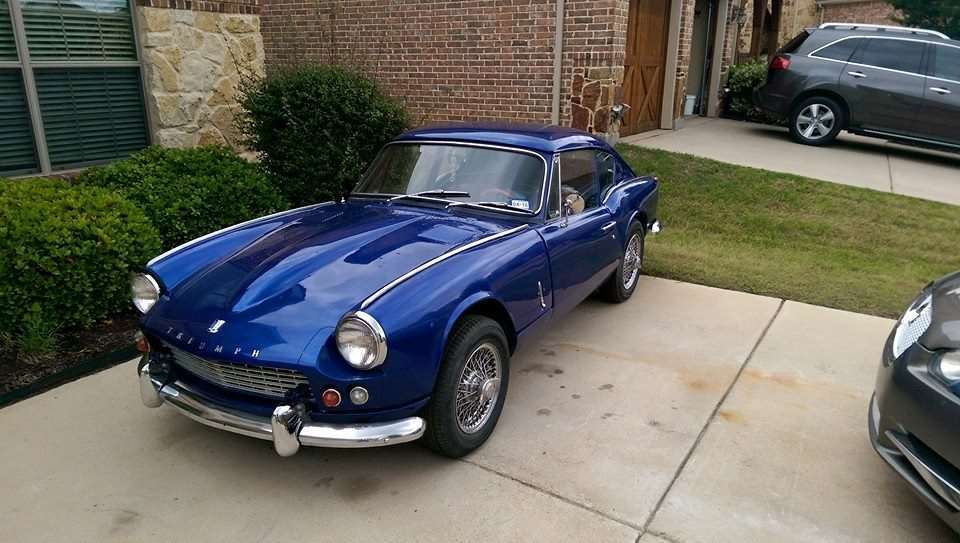
Posted on: 2015/5/12 23:12
|
|||
|
||||


