|
Re: The Duchess Project: 1940 Super 8 Convertible Sedan
|
||||
|---|---|---|---|---|
|
Home away from home

|
JW and Howard, Once again, thanks for the info. The evolution of the 356 over 10 years is always interesting, like going through the business with getting oil to the lifters. What was funny is we went through all the rigmarole to add that pipe and I think a larger hole was drilled, only to discover, because it's a 47-48, all that had be done and the oil flow had been changed to go in the opposite direction through the filter. So I went though the evolutionary steps, sort of.
I want to continue experiencing all the stages of metamorphosis. Actually I have the longer filler tube and the flatter, larger diameter cap. But looking at the 1940 engines, they just didn't have those. For $10 I bought a 1940 crusted tube and cap rusted together. I removed the rust using electrolysis with washing soda and my battery charger because I wanted to try it. It worked. I got them apart. Sanded and primed and sanded and glazed and painted and sanded and painted. They look beautiful now. You want to tell me to put the "old" newer version back on the engine? Just because of a little sludge build up? You know how happy I'd be if I could get to the point where I could have some sludge build-up? I'm going to do this authentically. When I hit the road, it will be like August 1939. I'm going to drive for a year and a half to the equivalent of Feb 1941. Then I'm going to change the tube and cap.That's as authentic as I can get. You make this fun.
Posted on: 2011/3/29 1:19
|
|||
|
||||
|
Re: The Duchess Project: 1940 Super 8 Convertible Sedan
|
||||
|---|---|---|---|---|
|
Home away from home
|
I think you're right. I had put some gum out and marvel oil in the gas. I thought maybe that jelled or something.
Something came out but got washed away in gas that followed and I wiped it up right away. But yes, the gas tank was removed to make it safe to weld the floor and brackets for the trunk. It sat out at the farm for a couple years while that and other parts were worked on, so some little creature could have crawled up the empty gas line. Next time, I'll tape it.
Posted on: 2011/3/28 14:40
|
|||
|
||||
|
Re: The Duchess Project: 1940 Super 8 Convertible Sedan
|
||||
|---|---|---|---|---|
|
Home away from home
|
A SCIENTERRIFIC WEEKEND
HORN INSTALL: There's a theory of physics that says No two objects can occupy the same place at the same time, with one exception. The horns, oil bath air cleaner, spark plug wire holder, and coil of a '40 Super 8 engine. On the '40 356 engine there are two bolt holes just in front of the 3rd head stud from the rear on the left side of the engine. Attaching the horns here instantly worked, with very little clearance. ENGINE START: It's been a huge source of frustration that the engine, beautiful as it looks, won't start or run very long without konking out if it does. Friday night I decided to use the scientific method to determine why the engine wouldn't start, so I went to bed early. Saturday morning I mapped out each item I'd check, no matter how elemental. No assumptions! I started with the gas tank. I opened the plug, gas poured out. I had already changed the in line filter close to the tank. The old one was filthy. I moved to the front of the car and loosened the intake hose of the fuel pump. Nothing came out. I remember my uncles sucking on a line to get gas flowing to the tractor. I wasn't going to do that. I used the shop vac. Probably pretty dangerous when I thought about it later. Just put my hand between the hose opening and the vacuum hose end so I could feel anything coming through. Bloop. Something came out, bubbly and a little oily, followed by gas. Could it be this simple? I didn't prime the carb, just use the starter. Psst. Several revs and she roared into fast idle. Warmed up and idled down to nothing without dying. Ever since the tow truck backed it off last year, it was pointed outward, so the exhaust went into the garage. When the rain stopped, I backed it out, turned it around and, boy, am I a happy camper. Next step is to find a few more missing pieces. Get those ready and have 2 of my grandchildren, Tim and Kate, come over and 'rip it apart.' Everything is finger tight, so we'll take it apart, back and label fasteners and take to Canyon Auto's new $100,000 paint booth. But I'm getting ahead of myself. Gee, one little blob. Attach file:  (74.96 KB) (74.96 KB)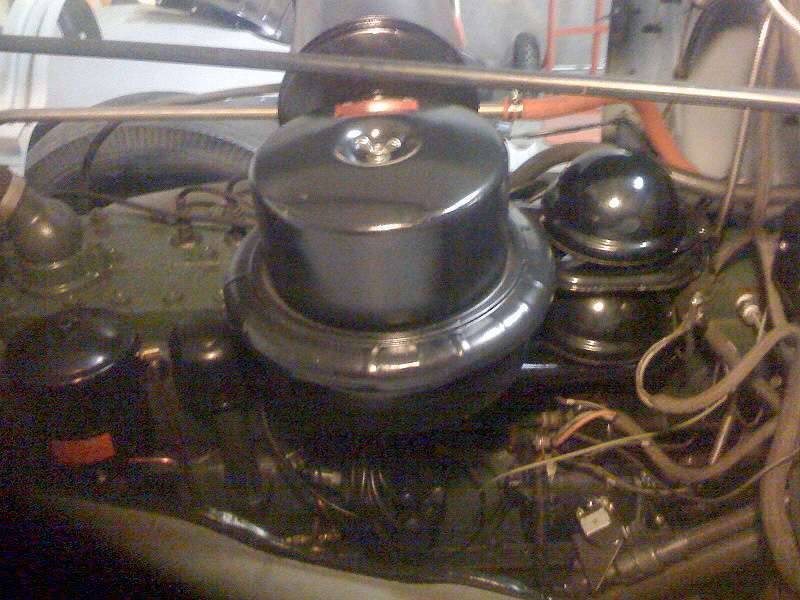 (63.05 KB) (63.05 KB) (65.59 KB) (65.59 KB)
Posted on: 2011/3/28 14:08
|
|||
|
||||
|
Re: Help with horn placement needed.
|
||||
|---|---|---|---|---|
|
Home away from home
|
That's a great photo, West. I have to look at my wire holder bracket. Both yours and Jim's have a horizontal strip to attach it. I think mine only has a hole up high that fits under a head nut. Maybe earlier cars had that. Mine sold on 1st day of announcement Aug '39. However it could be from the '40 120 replacement I had in there for a short time or from this '48 356.
Maybe from the 120. See this nice photo of the parts from Dave C of his '40 120. No horizontal strip under the wire holder and the coil is on the head. (Tho I know it attaches to the air cleaner too cuz I had it that way.) Well, still in flux I guess. Attach file: (119.96 KB)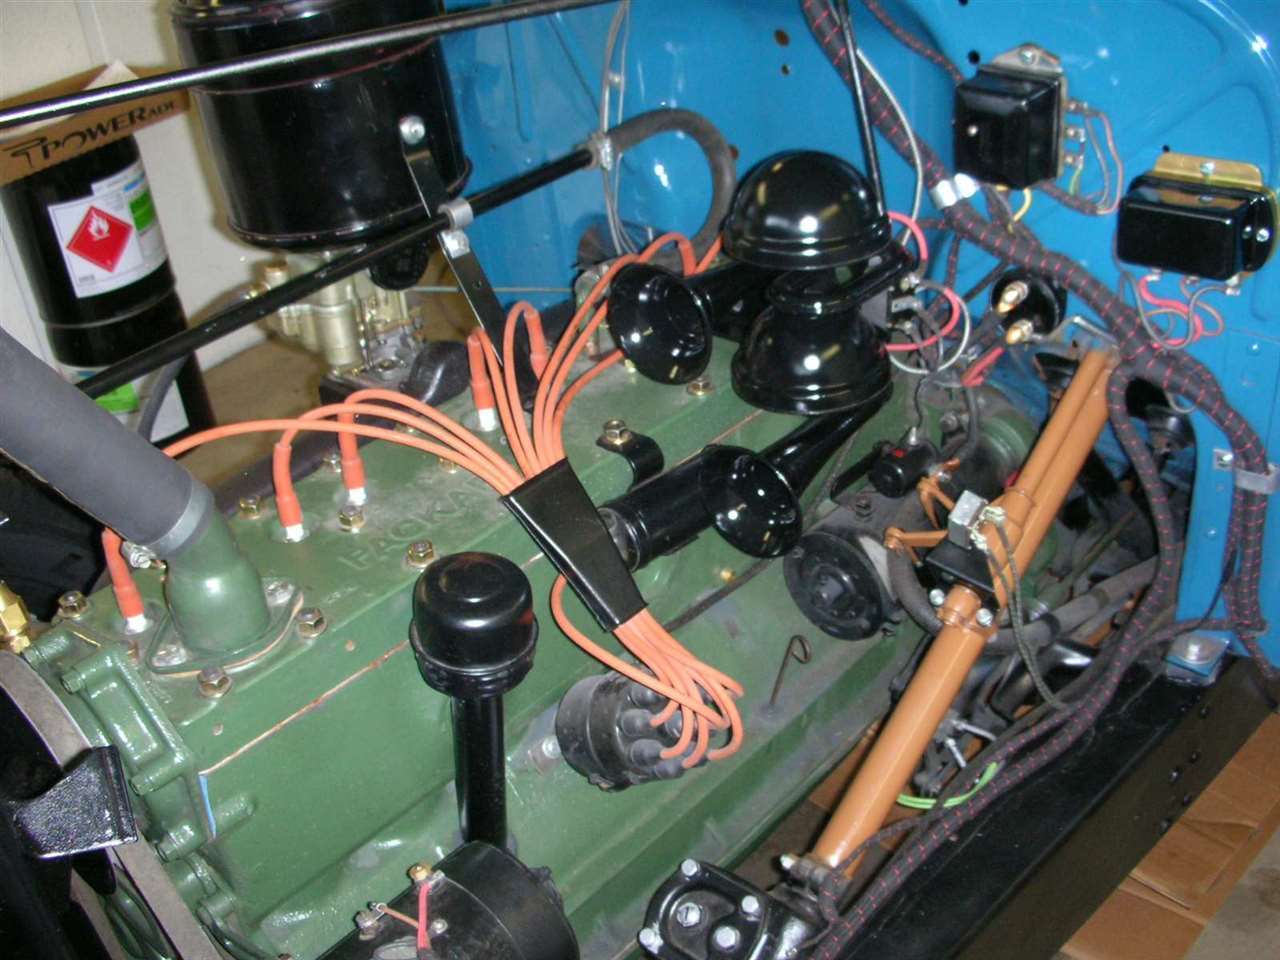
Posted on: 2011/3/22 14:36
|
|||
|
||||
|
Re: Help with horn placement needed.
|
||||
|---|---|---|---|---|
|
Home away from home
|
OK, that would be great, West. I suspect it's like Jim (AZ)'s unrestored 1803 1377. The top photo attached. The coil is attached to the hole in the side of the head where the air cleaner bracket goes. That's how I tried to set it up. But couldn't make it work.
Also attached is how it looks after last night...only I'm moving the wire holder and coil back a stud or two to the right in the picture to give the ignition conduit more play so it can go under the horns. Attach file: (103.25 KB)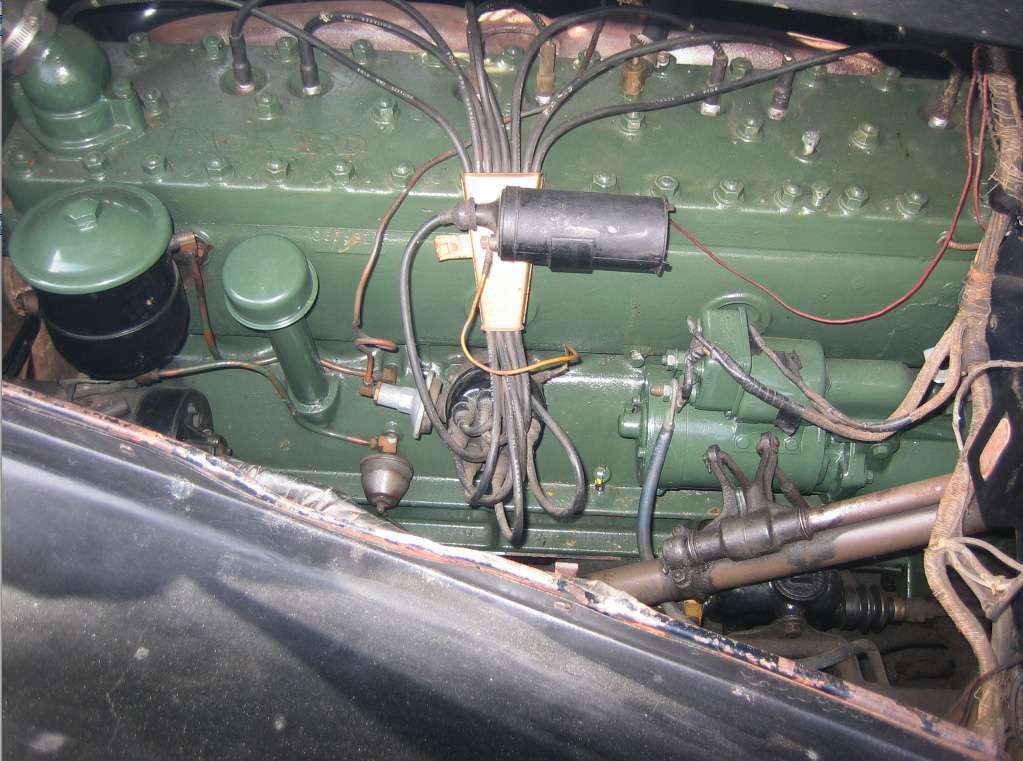 (72.71 KB) (72.71 KB)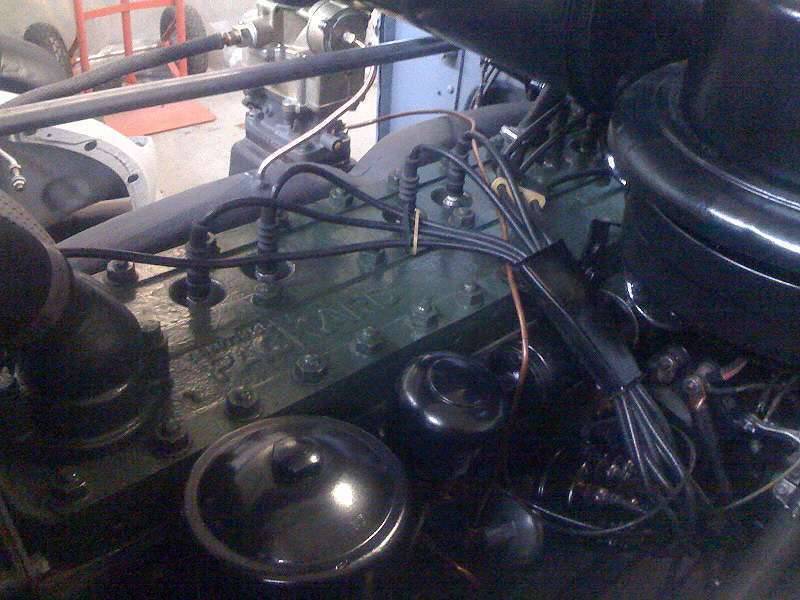 (61.54 KB) (61.54 KB)
Posted on: 2011/3/22 14:22
|
|||
|
||||
|
Re: Help with horn placement needed.
|
||||
|---|---|---|---|---|
|
Home away from home
|
This issue has been resolved. I have a little more fiddling to do and then will take pictures and give some specifics on what worked for me.
Two things I didn't understand is that (1) the permanent coil bracket attaches to a head stud, not to the side of the head on the air cleaner bracket and (2) the ignition conduit goes under or "through" big hole in the horn bracket, not to the left of the horns as I assumed. Thanks OD, JD and Ozstatman. Dave Charvet and Dave McCready, too. Joe
Posted on: 2011/3/22 13:02
|
|||
|
||||
|
Re: Help with horn placement needed.
|
||||
|---|---|---|---|---|
|
Home away from home
|
This is all very helpful. There is definitely more than one way to skin a cat. The attached B&W image is the closest to the items for my car. The former owner is forwarding my request to the new owner.
The red one, a Hyman Ltd restoration http://www.secondchancegarage.com/public/photogallery5/1940-packard-160-rear.cfm I just couldn't get things to fit. But all this helps. I have a list of 1377 owners here at the office and will contact the handful I have emails for as well. Attach file: (73.46 KB)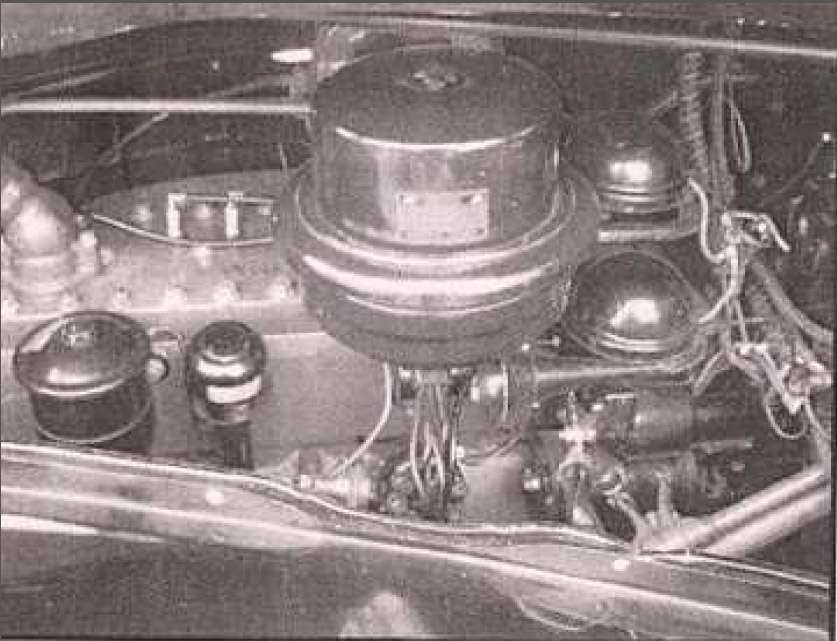 (44.24 KB) (44.24 KB)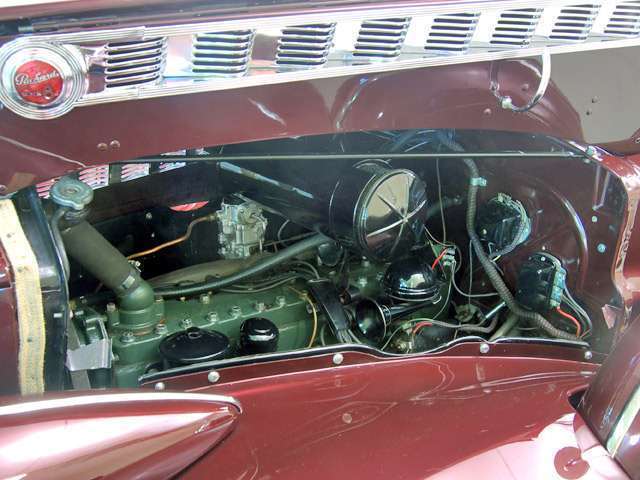
Posted on: 2011/3/21 14:57
|
|||
|
||||
|
Help with horn placement needed.
|
||||
|---|---|---|---|---|
|
Home away from home
|
I restored the horns for Duchess, but now I can't figure where they attached on the engine without bumping in to the heater hose ins and outs or overdrive relay or air cleaner bracket or ignition coil. If you have a 356 1940 - 1950, but especially 1940, I'd like to see which head nuts are near or are used to attach the coil, the oil bath air cleaner bracket, and especially horn...esp if you have a heater. Thanks for help.
Posted on: 2011/3/21 0:11
|
|||
|
||||
|
Re: The Duchess Project: 1940 Super 8 Convertible Sedan
|
||||
|---|---|---|---|---|
|
Home away from home
|
HORNS:
Forgot to add the link to the best information I found for redoing the horns besides p.22 of the 1938-39 Shop Manual: http://www.vernco.com/Sparks/id516.htm While waiting for the carburetor kit from The Carburetor Shop and for Merle to rebuilt it, I've been working on the horns. After doing a lot of research trying to find horn info, I couldn't find my Sparton horns, but they generally all work on the same principle. One horn had not honked since the 1970s. I tried to fix it then and broke the long center post screw with the adjusting nuts at the top. You pretty much need another horn for parts in order to fix it, so it wasn't fixed. When I connected the horns to the car battery with my leads, they barely groaned. I bought a pair of rusted out horns what I first started working on the car. This week I unwrapped them from 1987 newspaper. They looked like they were in bad shape, but actually the essential electrical and vibration parts were fine. I took one apart and replaced the thin large disc attached to the long center post that had been broken. I took everything apart and cleaned, blowing air through them with the compressor. I found a note in my 1940 Prelim shop manual that adjusting the horns and settings were in the 1938-39 Shop Manual, which is online here. The horns are held to the bracket on springy metal crescents attached to the bracket by very heavy duty 1/4 " rivets. These were also broken, so removed the ones from the crusty horns and reinstalled them on the bracket. The shell covers were dinged up, so glazed them and painted everything exterior. They should toot now, right? They didn't. They wouldn't even groan. I discovered that the insulating tubes surrounding the two very top screws that hold the sandwich of metal plates and insulation, the top layers being the points that open and close, weren't doing their job. I tried to reuse them but in trying to press them back in place I messed them up. I bought some shrink tubing, slipped that around them warmed with a hairdryer. That restored the insulation, but still no toot. I called Bruce Abbott, Abbott Instruments, even though he had told me he didn't play with horns much. He did a beautiful job restoring all my dash instruments. But I called anyway to see if he would check them out, see if I didn't anything illogical circuit-wise. He suggested, before I bring them over to try a couple more things. One is to make sure the leads are heavy gauge because horns pull a lot of amps and if the leads aren't heavy enough they won't start vibrating. Two was to loosen everything up and hit them with a rubber mallet to get them to start vibrating. Taking no chances I used my battery jumper cables as leads. It killed me after fussing over these horns, but I tapped and, when that didn't do any damage, and I started to hear a crackle of noise, I hit them a few times. Wow, I got one genuine honk. I loosened the nut that holds the armature, that thick cookie-sized disc, and turned it against my feeler gauge, one horn to .028 in. and the other to .034 in. Now I was getting more honking. I turn the adjusting nut at the top and it got better. Now both horns honk, hallelujah! WHERE ON THE ENGINE? I spend most of today trying to figure out where the horn bracket attaches to the engine. It looks like it should attach to two head studs direct across from one another. I tried re-position the coil, the air cleaner bracket. The heater hose inlets were in the way. The overdrive relay was in the way in another position. I just couldn't figure it out. Putting that question out for help in the pre-war forum. Attach file: (72.98 KB) (44.44 KB) (44.44 KB)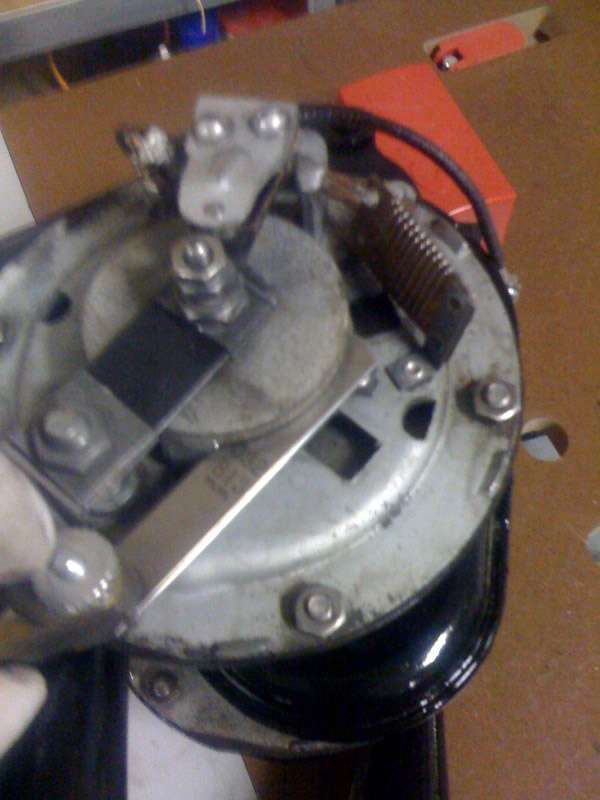 (46.72 KB) (46.72 KB)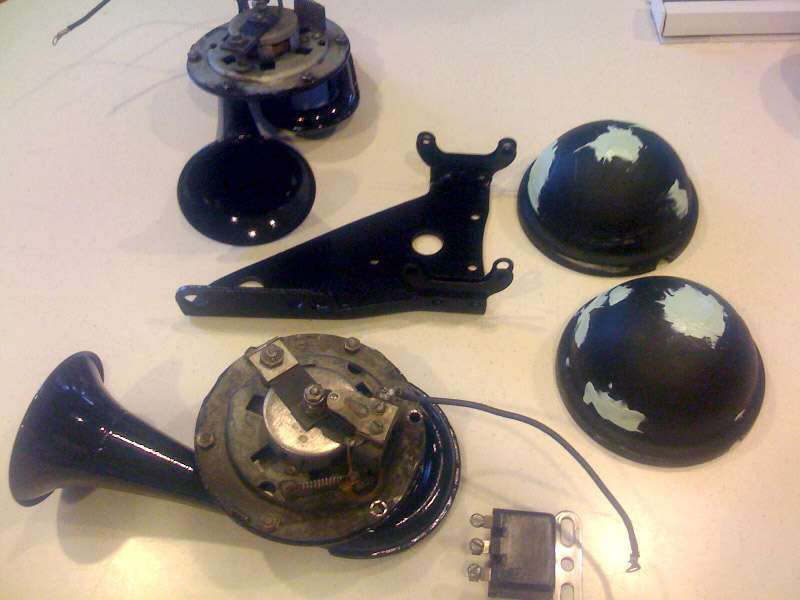 (66.65 KB) (66.65 KB)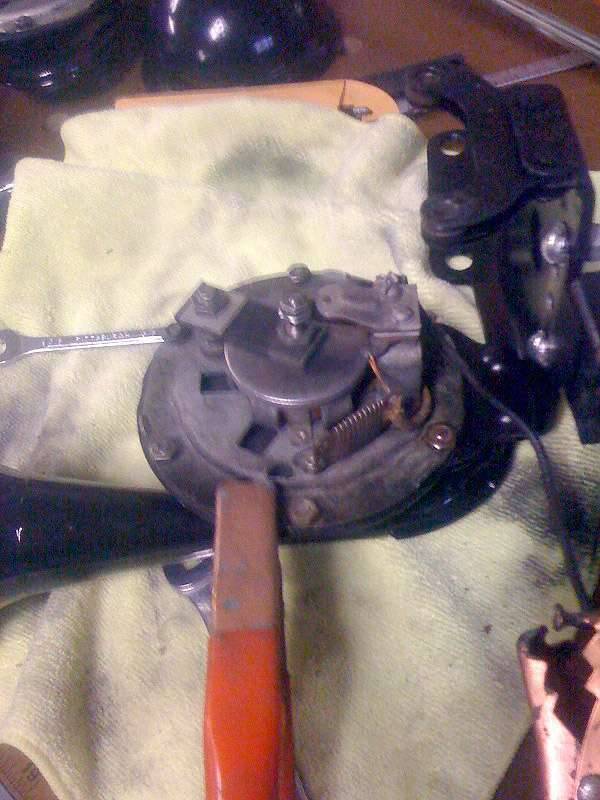
Posted on: 2011/3/20 23:18
|
|||
|
||||
|
Re: Star of the Desert - Car Show - Tucson, AZ
|
||||
|---|---|---|---|---|
|
Home away from home
|
Did you fail to mention one other rider? Jim Beam. perhaps?
It appears the show is sponsored by the AZ Star. Really great to post the winners in the paper like that AFTER the event (I realize you couldn't do it before), but usually all the hype is before and few shows buy ads to announce winners after. Maybe easier if you own the paper, but still a good idea. Thanks for sharing and photos. Joe PS I only take WALKS on the beach at midnight with my buddy Jim, Kevin.
Posted on: 2011/3/14 15:42
|
|||
|
||||


