|
Re: Spark plug seat reconditioning
|
||||
|---|---|---|---|---|
|
Home away from home

|
So: I did a few things:
1) Cleaned those areas really well with a wire brush. 2) Used a bit of JB-weld to fill the pits, smoothed it out using a tool I made from an extra head stud and bolt, which fit down in there real nice. 3) After the JB-weld had cured for 24 hours, used the wire brush again to smooth it out once more. Truthfully, by the time I'd done all this, I'm not sure any of the JB-weld was left, very little if that. Took the car for a couple hour+ long test drives and see no problems at the spark plugs anymore. Thanks everyone!
Posted on: 2022/2/4 21:50
|
|||
|
||||
|
Re: Treadle Vac Conversion
|
||||
|---|---|---|---|---|
|
Home away from home
|
That's an interesting find! It has a chance of working. The important thing (as noted by HH56 below) is what is the stroke? Might not know until you get one.
Question: The specs list two piston diameters 0.625 and 0.875. I don't quite know what that means, but that could be some kind of inner proportioning valve. Also, the specs could be inaccurate. In a standard dual master cylinder, the primary piston pushes on the fluid only, and the fluid itself is what pushes on the second piston, unless there is a failure in the primary circuit. How Stuff Works - Dual Master Cylinder If it's anything like a standard-design dual master cylinder, the important spec is the diameter of the primary piston. If that's 0.625", then well worth a try. If it's 0.875", might not be. Also have to find a booster less than 7" diameter that would bolt up. If you want to go ahead and try the 740 Volvo Cylinder, I would be willing to ship you my 7" Ford Courier Brake Booster, which I know fits in there on a 1953 and presumably also then a 1955/56, on the condition that if everything works well you would ship it back. Those Ford Courier Brake Boosters are still somewhat available. What I saw for the Volvo 740 was 8" diameter, which wouldn't fit I am pretty sure. 1981/82 Ford Courier 7" Brake Booster #53-5211 (Autozone)
Posted on: 2022/2/3 10:53
|
|||
|
||||
|
Re: Treadle Vac Conversion
|
||||
|---|---|---|---|---|
|
Home away from home
|
The problem with the dual master cylinder is that the formula I put up earlier is not correct in this case, since the force is (roughly) equally applied to each cylinder, the formula would now be
Pressure / pound force = 4 X P.R. / 3.14159 / D^2 / 2 = 2 X P.R. / 3.14159 / D^2 that is, the force is cut in half. So you'd need a P.R. of at least 2 to get back to what the T.V. does. And of course you might not be able to get a booster in there either. For the second one, well I actually purchased one myself to check it out. The main problem is that the stroke of 1.31" is very small in comparison to the T.V. stroke of something around 3". So you could easily run out of stroke. Also that master cylinder is not designed for a booster, and adapting one to it is quite a project in itself. Here's another thread on a related subject: 1953 Manual Brake conversion And this one: Ford Courier Dual Master BTV replacement (experiment)
Posted on: 2022/2/2 23:31
|
|||
|
||||
|
Re: 1953 Packard 327 valve guide installation
|
||||
|---|---|---|---|---|
|
Home away from home
|
This tool from Goodson worked for me. Came quickly.
Valve Guide Install, Valve Guide Reamer The whole thread would be worth reading. Short story - you CAN pound them in as described in the manual, but at least I found that, well, you can chip one of the valve guide bosses that way. Better to make yourself a screw press from some threaded rod, and various sized nuts and washers. The process requires much less violence that way. Pictures of how that is done are in the thread as well.
Posted on: 2022/2/2 22:33
|
|||
|
||||
|
Re: Treadle Vac Conversion
|
||||
|---|---|---|---|---|
|
Home away from home
|
Hi,
If it works it is very interesting, at the very least. I have one observation, and a couple of suggestions. Looking at the picture of the linkage: Unless there is something I am not seeing, the pedal ratio would be the ratio of the distance from the pedal to the pivot, divided by the ratio of the distance from the booster axis to the pivot, measured perpendicular to the pivot axis. So looking at that picture and eyeballing it, I don't see anything more than 2:1. Could even be less. They seemed to go to a lot of trouble to make the pedal lever longer, but in the process moved the pivot away from the booster axis as well. Maybe i am just looking at it from the wrong angle. I would suggest before you go this route you should: A) Verify how the pedal ratio is calculated and what it actually measures out to. B) Verify the master cylinder diameter they are using. That way you can compare to what you would get with the original setup with an approximately 5/8" master cylinder diameter and a 1:1 pedal ratio. Note - I have never measured the actual diameter of the T.V. piston (really a rod displacing fluid) myself, I have seen it as either 0.655 or 0.625 or even 0.62. Pressure/pound of foot force = 4 X P.R. / 3.14159 / D^2 P.R. = pedal ratio D = master cylinder diameter So for: D = 5/8 and a P.R.=1, you have Pressure/pound of foot force ~ 3.25 for: D = 1 and a P.R. of 4 you have Pressure/pound of foot force ~ 5.09 for: D = 1 and a P.R. of 3 you have Pressure/pound of foot force ~ 3.82 for: D = 1 and a P.R. of 2 you have Pressure/pound of foot force ~ 2.55 Personally, I tried a 1:1 pedal and a Ford Courier dual master system with a small booster that fit just where the TV does, so like 7" diameter. It had a 3/4" cylinder diameter. So for D = 3/4 and a P.R. of 1 you have Pressure/pound of foot force ~ 2.37 it was NOT ENOUGH. Now in the system above, it looks like they moved the booster over so they could fit a bigger booster in there, which would give you more boost/assist than the T.V., so perhaps you would have better or adequate brakes as long as you had vacuum. But if you lost vacuum - not a fun time. Hope this helps!
Posted on: 2022/2/1 21:50
|
|||
|
||||
|
Re: LED bulbs
|
||||
|---|---|---|---|---|
|
Home away from home
|
The LED light people are based in the U.S., and they sell a housing to convert a sealed-beam to whatever bulb you want. I betcha there are a lot of those around from other vendors too. Note I haven't tried this myself, and I am not sure what one would do with the "parking" bulb spot, but it's there.
Semi-Sealed Beam Housing with parking bulb.
Posted on: 2022/1/25 17:37
|
|||
|
||||
|
Re: Spark plug seat reconditioning
|
||||
|---|---|---|---|---|
|
Home away from home
|
Here's a couple of pictures. Hard to take a good one because of reflections on metal surfaces.
Is this anything to worry about? Is this normal on these engines after all this time? Attach file:  20220125_083047.jpg (129.27 KB) 20220125_083047.jpg (129.27 KB)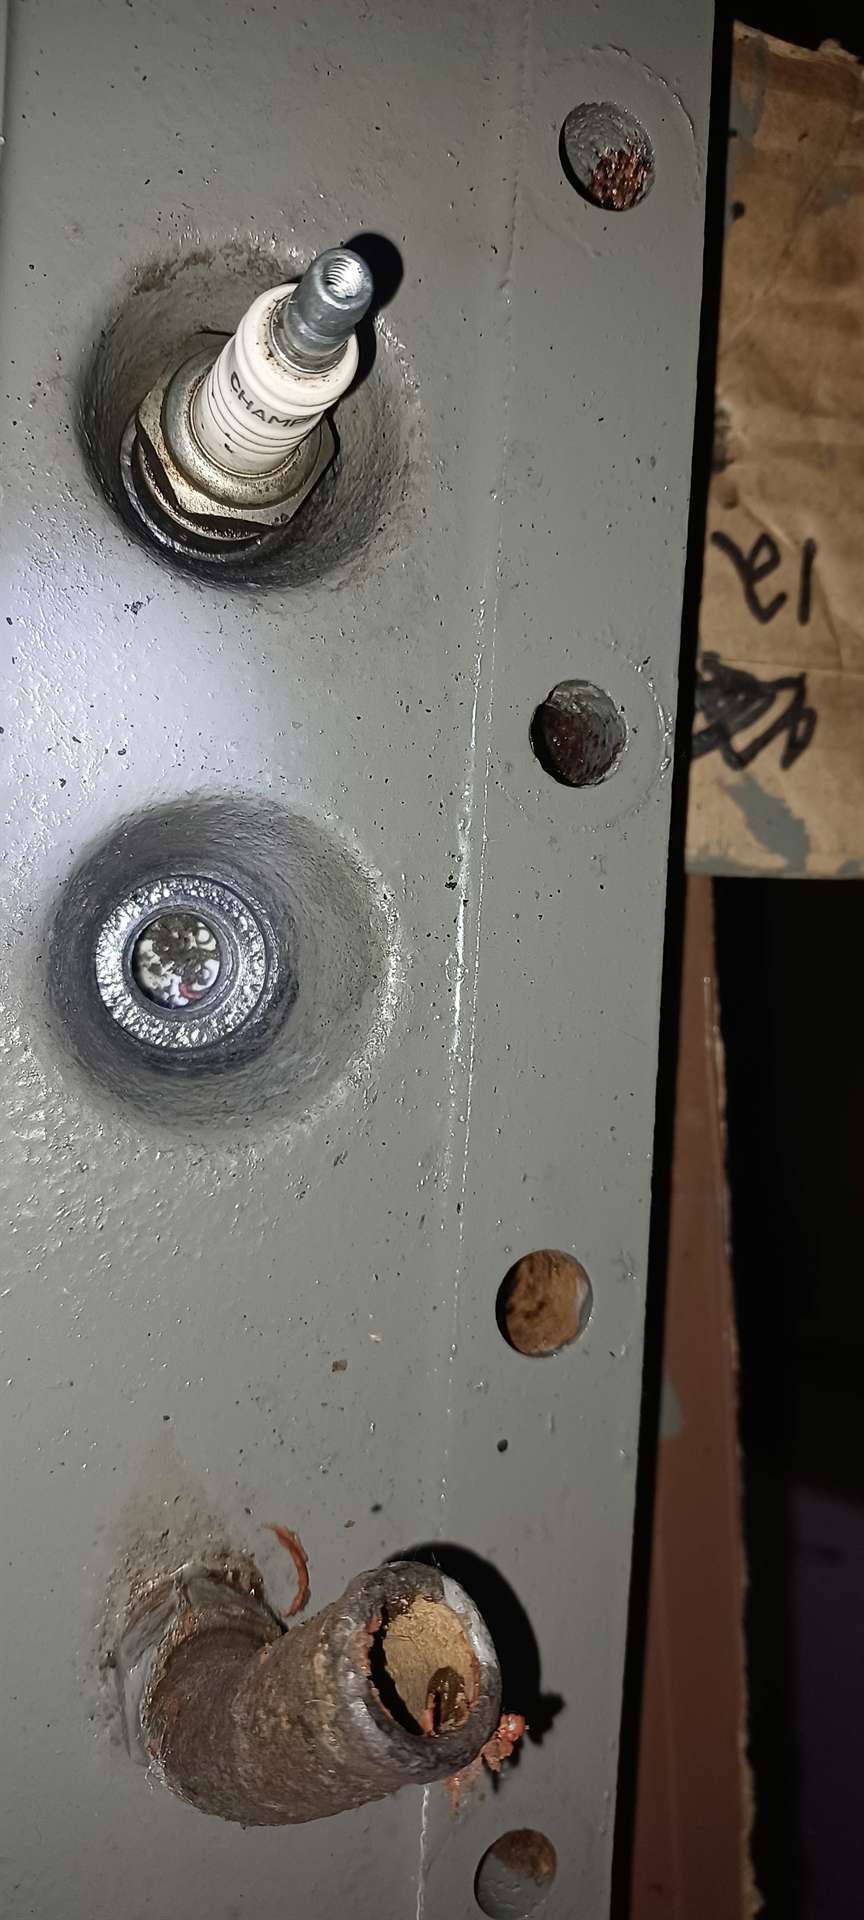 20220125_083057.jpg (141.98 KB) 20220125_083057.jpg (141.98 KB)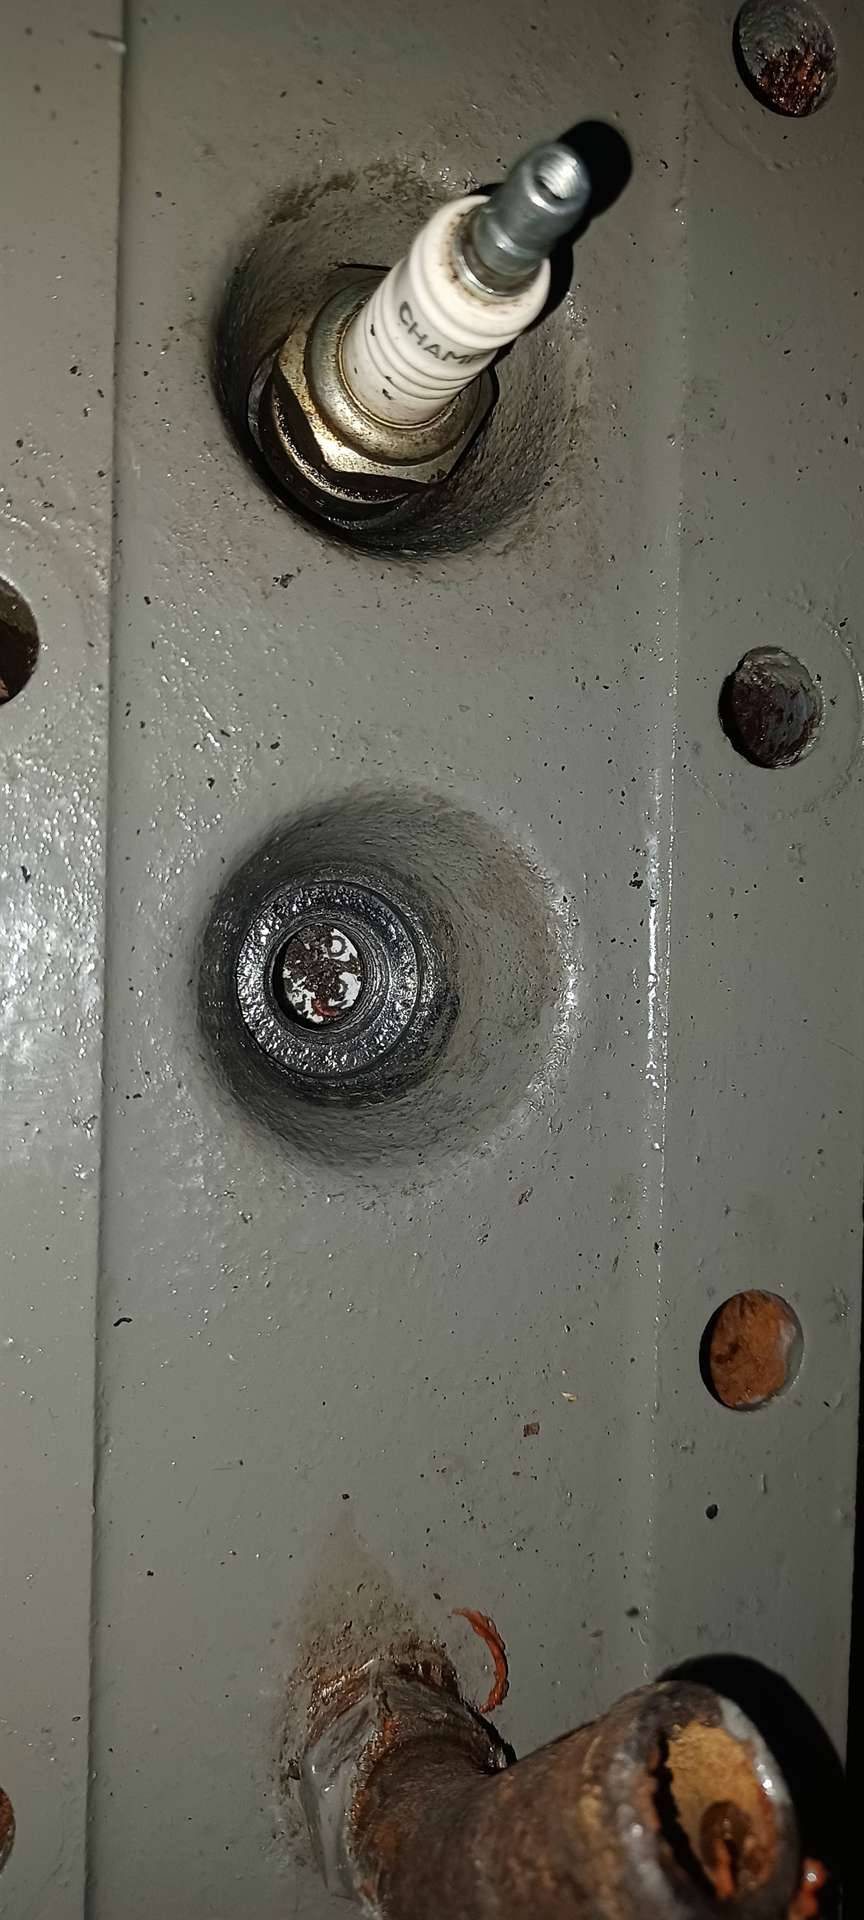
Posted on: 2022/1/25 11:35
|
|||
|
||||
|
Spark plug seat reconditioning
|
||||
|---|---|---|---|---|
|
Home away from home
|
Hi folks,
I was having trouble with one of my spark plugs, seemed like it was getting a little bit of blowby, you could see a little bit of oil bubble past the plug after you had run the thing a long time, from what I understand that would be caused by a bad seal at the spark plug gasket. I thought, well, maybe the spark plug wasn't seating very well, and since I had the head off I cleaned out the well and wire-brushed the seating surface, and in pretty much all of the spark plugs the seat, e.g. where the spark plug gasket sits, is rather pitted. I don't think I was having any problem except with that one spark plug, but now that I've wire brushed the paint off in the sealing surface, I can see it clearly everywhere. I saw that TimeSert sells this tool, kinda pricy. I also wonder if I cut too much of the seat down the spark plug would be sticking out too far and maybe the valve would bash into it: Time-Sert Spark Plug Seat Reconditioning kit. I guess I could take the head to a machine shop to take care of this, but that would also be $$ and have the same possible problem. I will get a picture later and post. Thanks!
Posted on: 2022/1/25 0:00
|
|||
|
||||
|
Re: LED bulbs
|
||||
|---|---|---|---|---|
|
Home away from home
|
These guys sell 6V positive ground LED lights. I've tried them, they work (but note I've only tried them for turn signal and fog lights and a tiny 51 or 55, cannot remember offhand). They seem to be easy to deal with and shipping and stuff has been simple to deal with.
LED lights positive ground They're brighter. For a red tailight, get the "red" one, for a white backing light or front fog light, get the 6000 degree K (hot white) not the 3000 degree K (warm). Be aware that, since the resistance is different for these bulbs, your flasher may not work correctly since it relies on a certain amount of current flowing, and the LED lights use less current. They sell a digital flasher that worked really well for me for 6 months, now it is acting up in a strange way, not sure about that yet, it could be something in my wiring as well, or I may have accidentally fried it when fooling around with something else. It has an extra pigtail that has to be connected to ground somehow. It still works, just keeps both indicator lights on, so when the turn signal indicator lights flash, it looks like the wrong side is flashing. But otherwise I really like it, since I didn't have to add an extra resistor with the corresponding fire hazard and extra wiring (see below). 6 V positive ground digital flasher They also sell these things meant to mimic the amount of current flowing by putting a second resistor in parallel, I have talked to other folks and, well, as they say the resistor gets hot and can burn out (as well it shouldn't be in the vicinity of anything remotely flammable) But I haven't used them myself so cannot tell. They sell 6 ohm and 3 ohm variants. Load Equalizer - 6 ohm
Posted on: 2022/1/23 22:29
|
|||
|
||||
|
Re: Measurements for plug gauge to check tapper clearance
|
||||
|---|---|---|---|---|
|
Home away from home
|
This thread has lots of info:
Thread: Tappet Clearance Tool Short answer is that the gauge can be obtained from Max Merrit or Pacific Northwest Packards, and if you get a new lifter from Kanter they provide instructions on how to take the lifter apart and use it as a gauge as well.
Posted on: 2022/1/21 10:52
|
|||
|
||||


