|
'55 Clipper with stripped bleed valve - replace brake wheel cylinder?
|
||||
|---|---|---|---|---|
|
Not too shy to talk
|
Two years ago I had Ed Strain rebuild the Easa-Matic brake master cylinder on my '55 Clipper Custom. Brakes worked great for a while, but when braking was getting soft I decided it was time to bleed them. The nut on my right rear wheel bleed valve is stripped, however. It will not budge, even at the mercy of vice-grips.
A mechanic who once restored Packards at the Petersen Museum told me he had success removing stripped bleed valves with a Grip-Tite socket: https://www.northerntool.com/shop/tools/product_200810184_200810184 Alternatively, I could buy 4 replacement wheel cylinders from Kanter and replace those - however, I'm a beginner and want to avoid getting in over my head. Any suggestions appreciated.
Posted on: 2021/9/26 16:02
|
|||
|
||||
|
'55 Clipper upshift problem
|
||||
|---|---|---|---|---|
|
Not too shy to talk
|
My '55 Clipper Super runs well, but as I accelerate from a stoplight it "slips out of gear" at about 15mph (in effect, shifts to Neutral). Happens in either the first or second Drive position on its Twin Ultramatic.
If I let off the accelerator while rolling, in a few seconds it will grab again and shift normally. Seems it might just be an adjustment, but all suggestions appreciated.
Posted on: 2021/1/7 20:15
|
|||
|
||||
|
Re: '55 Clipper Twin Ultramatic - replacing throttle valve seal
|
||||
|---|---|---|---|---|
|
Not too shy to talk
|
I've been soaking it in acetone/ATF, which always worked on rusted bolts for me in the past. Going to give it another try tonight. Not a lot of room to tap without pulling out the control assembly - afraid if I pull that out I'll never get it back together again.
Thanks for photos, that helps a lot What's predator?
Posted on: 2019/7/31 19:15
|
|||
|
||||
|
Re: '55 Clipper Twin Ultramatic - replacing throttle valve seal
|
||||
|---|---|---|---|---|
|
Not too shy to talk
|
Owen_Dyneto - The current one is flush with the trans housing - wouldn't want to try without knowing there's room behind it
Posted on: 2019/7/29 21:46
|
|||
|
||||
|
'55 Clipper Twin Ultramatic - replacing throttle valve seal
|
||||
|---|---|---|---|---|
|
Not too shy to talk
|
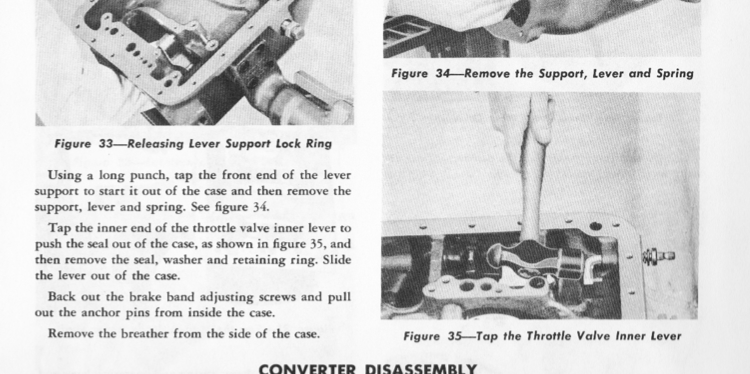
I'm replacing the throttle valve seal on my Twin Ultramatic, and trying to avoid pulling the transmission just to change two seals. The car is up on jack stands.
Transmission service manual says to "Tap the inner end of the throttle valve inner lever to push the seal out of the case..." but it's not moving (see photo). I've used bolt loosener and "tapped" the hell out of it with a hammer, but no dice.  Any help appreciated.
Posted on: 2019/7/28 17:56
|
|||
|
||||
|
Re: Replacing fuel sending unit on '55 Clipper
|
||||
|---|---|---|---|---|
|
Not too shy to talk
|
That would be easier, wouldn't it?
Thanks for the tip.
Posted on: 2019/6/18 15:25
|
|||
|
||||
|
Re: Replacing fuel sending unit on '55 Clipper
|
||||
|---|---|---|---|---|
|
Not too shy to talk
|
Good information Howard.
The arm length on the Ford unit I used was fine, but I needed to bend it upwards a tad to keep the float off the bottom of the tank, and so it would reach all the way to the top. Maybe next time I have the tank out (if ever) I'll insert a 10-ohm resistor between my wire and ground. In the empty position my sender read 130 ohms at full empty, so if the gauge only needs 75 ohms it will read empty when there's still a lot of gas in the tank. When I tested it sitting in the front seat of the car however, it was accurate.
Posted on: 2019/6/17 14:15
|
|||
|
||||
|
Replacing fuel sending unit on '55 Clipper
|
||||
|---|---|---|---|---|
|
Not too shy to talk
|
When my 1955 Clipper Super started stalling on the road a few months ago, I read about potential rust holes in the gas tank pickup line here:
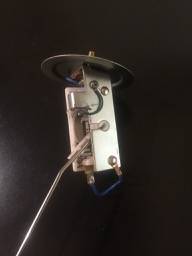
https://packardinfo.com/xoops/html/modules/newbb/viewtopic.php?topic_id=21617&forum=3&post_id=210310#forumpost210310 Since the tank had some corrosion outside, I thought I would start by taking a look inside. NOTE: didn't happen to me, but take seriously the potential for a drained gas tank to explode when sparks from a drill or other tool ignites fumes inside - have the tank professionally steamed at a radiator shop first. With the tank removed it was a good time to replace the fuel sending unit, which was working erratically (stalling was due to other issues). First it was replaced with one described as "1955 Packard Clipper compatible" bought from an online bulk parts depot - mistake. After removing the tank again and draining it, I opted for the '55-'56 Fuel sending unit on the Packard Parts X-Ref page, Ford Part #B7A-9275-F, from dennis-carpenter.com. Determined to have a gauge which showed full when the tank was full and empty when the tank was empty (too much to ask?), I first bought long test leads from an electronics store to be able to accurately test the sending unit from the driver's seat. Older sending units typically are rheostats - variable resistors with maximum resistance when the float is down, no resistance when the float is up. When the Ford float was all the way up, however, the tank showed only ? full on the gauge, and because the gauge showed full when I shorted hot to ground I knew the gauge was OK. With some difficulty I was able to bypass resistance in the sending unit by soldering a wire from the rotary switch's final position, then attaching the other end to the sending unit's case (ground) with a tiny bolt. Mission accomplished. I hope this helps anyone else with an OCD compulsion to have an accurate fuel gauge. Attach file:  (7.55 KB) (7.55 KB)
Posted on: 2019/6/17 12:48
|
|||
|
||||
|
Re: '55 fuel line issues
|
||||
|---|---|---|---|---|
|
Not too shy to talk
|
Thanks HH56, good advice.
Yesterday I was driving the car after Gumout seemed to have fixed the problem, only to have it stall on the road. Though the tow truck driver was able to start the car, he said from towing stalled vintage cars their tanks were usually less than 1/2 full when he arrived - essentially confirming your point about pinhole leaks. There aren't any drawings of the tank in the parts list, but it's described in the service manual as "two-piece welded construction" which I assume means there's no way to get into it without having to re-weld it? Whoever installed the electronic fuel pump neglected to add a fuel filter, and the only cap I can find that fit was an unvented one. Any suggestions for non-OEM Cap? Fuel filter? Durable electronic fuel pump (if I need to replace the one it has)? Thanks
Posted on: 2019/3/19 14:07
|
|||
|
||||


