|
Re: Stewart's 1955 Packard 400
|
||||
|---|---|---|---|---|
|
Home away from home

|
I have a slow leak in my power steering pump. It is not coming from either hose.
It pools on the base of the mounting bracket. Might have to pull the whole thing off. Attach file:  20230823_091745_resized_1.jpg (262.99 KB) 20230823_091745_resized_1.jpg (262.99 KB)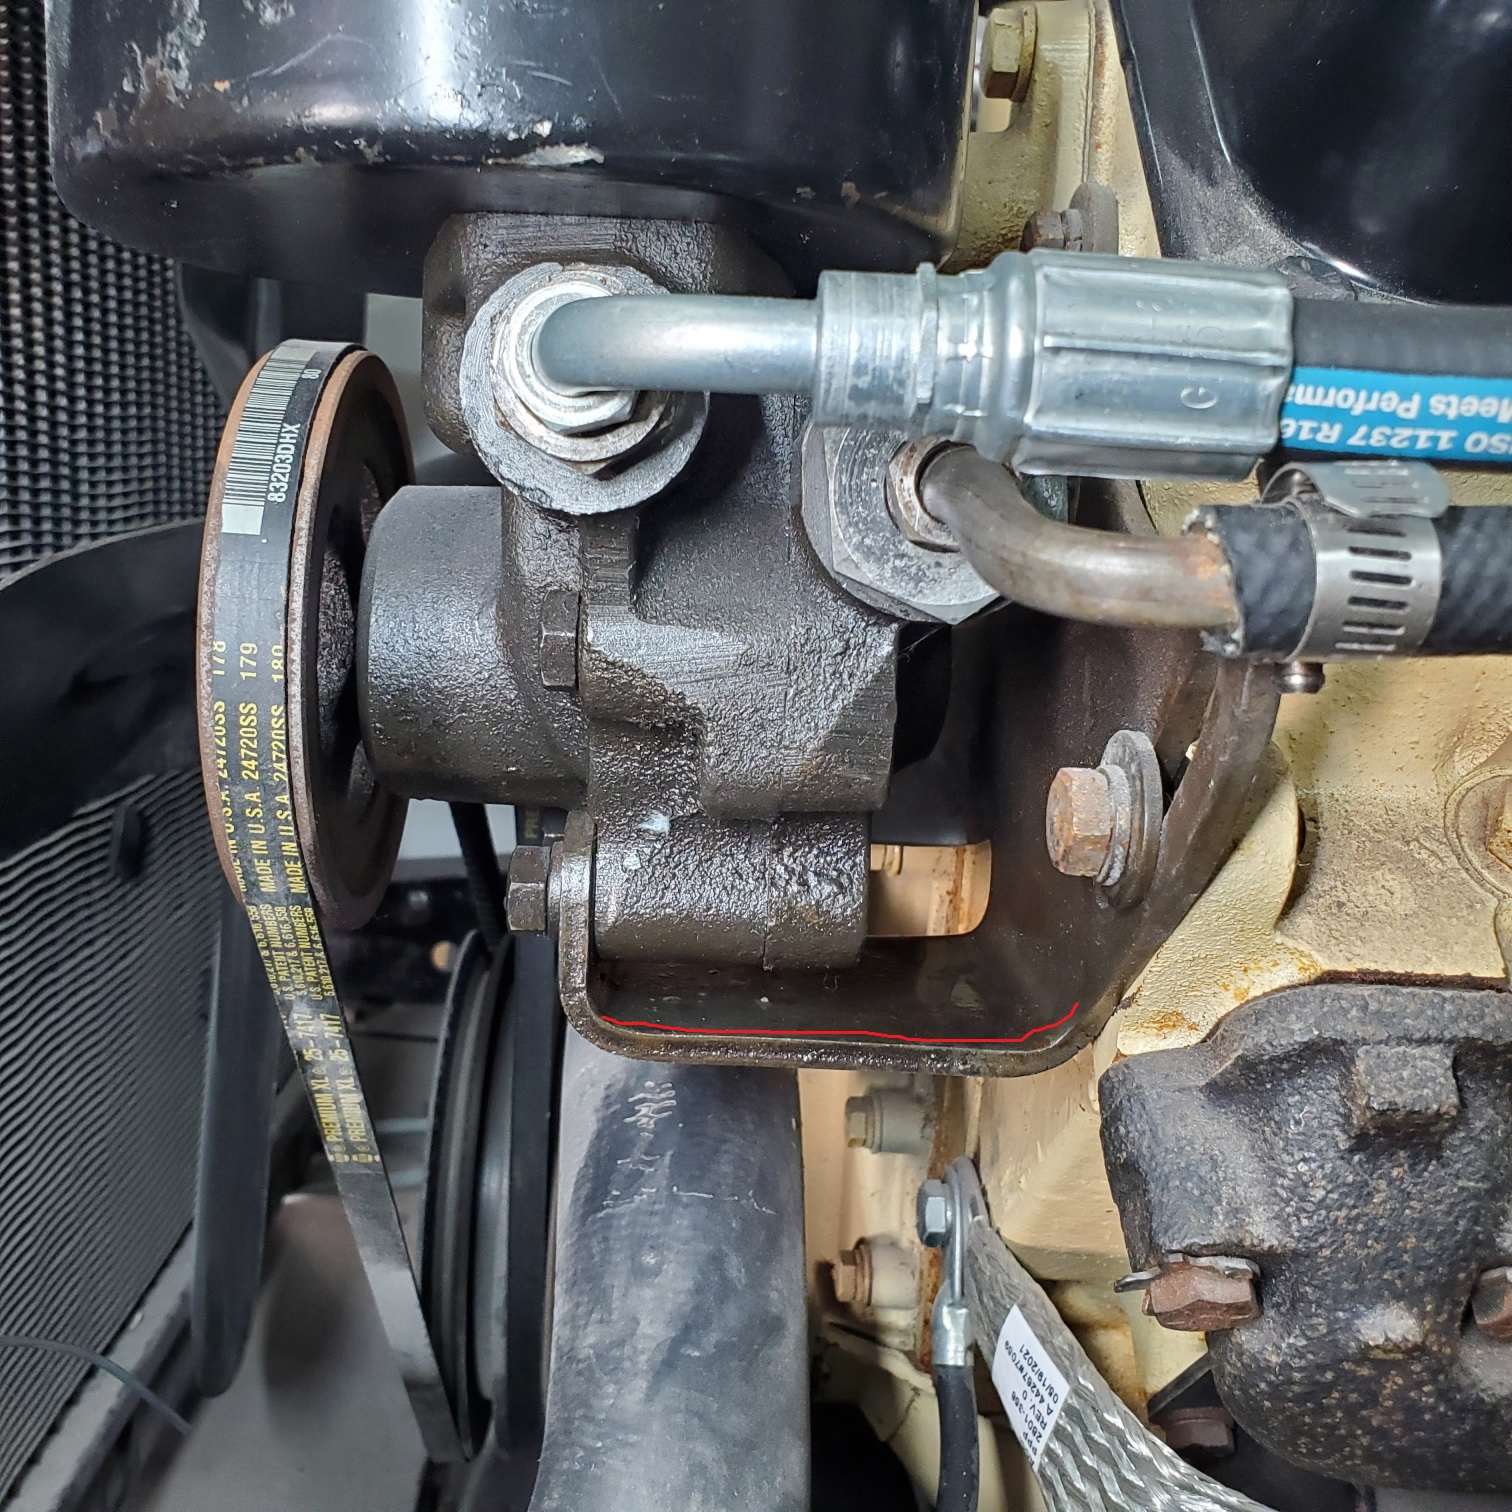
Posted on: 2023/8/24 8:17
|
|||
|
Stewart Ballard
|
||||
|
||||
|
Re: Stewart's 1955 Packard 400
|
||||
|---|---|---|---|---|
|
Forum Ambassador

|
Quote:
I do not disagree with you Howard as you have way more knowledge of all the electrical stuff than I do but the relay is for the pressure switch not the solenoid. The way you describe the monster kit operation it sounds like it works exactly as the diagram with the relay is doing. In the diagram, relay is controlled by the pressure switch and operates the solenoid. Monster could be using a pressure switch or some other switching circuitry with a high enough contact rating to operate the solenoid directly instead of needing a relay to carry the solenoid current. In the drawing: 85 and 86 are relay coil terminals, 30 is the contact common and 87 and 87a are normally open and normally closed contacts. Normally closed 87a was not used in the circuit. Power is supplied by ign sw, goes thru manual sw to relay terminals 86 and 30. The ground on the manual switch is for one side of a light bulb which is in the switch and will illuminate when switch is turned on. Relay 85 goes thru their plug terminal A to one side of the contact in a pressure switch which is apparently plumbed into he hydraulic path for 4th gear. The other side of the switch contact is connected to ground. Relay 87 goes thru their plug B to one side of the solenoid. The other side of the solenoid gets ground from the case thru their plug C. With ign sw on and manual switch closed, power is supplied to relay 86 and 30. Whenever the pressure is high enough to operate the pressure switch it closes and puts ground on relay 85. With power on 86 and ground on 85 the relay energizes. Relay closes and with power on relay 30 it is also now on 87 and goes out to one side of the solenoid coil. With the other side of the solenoid being grounded, solenoid operates and does whatever it does to bring in the clutch.
Posted on: 2023/8/24 9:13
|
|||
|
Howard
|
||||
|
||||
|
Re: Stewart's 1955 Packard 400
|
||||
|---|---|---|---|---|
|
Home away from home

|
Leaks are common where the fluid reservoir attaches to the pump. If the attachment hardware is accessible, tightening it a little may stop the leak.
A leak at the pump shaft behind the pulley will require pulling the drive pulley and installing a new seal. If the pump hasn't had any attention in recent years, but works well when full of fluid, it probably needs new seals and gaskets. There are miracle-in-a-bottle products available that may stop some leaks in power steering systems, but my experience with them has been generally unsuccessful. New seals and gaskets and fresh fluid will usually give a lasting repair.
Posted on: 2023/8/24 10:43
|
|||
|
||||
|
Re: Stewart's 1955 Packard 400
|
||||
|---|---|---|---|---|
|
Forum Ambassador
|
You might pull the top of the reservoir off and filter out to make sure the bolts holding the reservoir down to the body are tight. Otherwise, I am with TxGoat on a dried seal or gasket (O rings) as the probable issue and trying one of the snake oil products before tearing it apart. Of course, there is a possibility a leak somewhere was large and pump was run dry so the shaft or seal was damaged but the snake oil is quick, relatively inexpensive, and if it doesn't help then only time and a few bucks are lost and you can still do the rebuild.
Posted on: 2023/8/24 11:28
|
|||
|
Howard
|
||||
|
||||
|
Re: Stewart's 1955 Packard 400
|
||||
|---|---|---|---|---|
|
Home away from home
|
I rebuilt that whole PS pump a couple of years ago so the seals should be good. I will check the reservoir as you suggest in a little while.
As for the transmission. I really like that kit from Monster Transmission with the external pressure kit, but that kit will not work for me. There are two different cases for the 700R4. One of them has test ports (Image #1 below) and one without test ports. Guess which one I have (image #2). Monster Transmission has a fix for my transmission as well, but it is all internal. The problem is that I have already done the internal work, but it was so long ago that I am not 100% certain how I did it and that plays a part in how it needs to be wired up now. Soooo, I am going to do the right thing and re-check my work. That means dropping the pan. Fortunately, that is all the further I have to go. Also, I never filled it up. It only has two quarts in it, and I replaced the original pan with one that has a drain plug so I can avoid the whole mess on the shop floor part. Once I see how the lockup is wired, I'll know my next step. I may just go ahead and order Monsters internal pressure kit and just switch out my work with their kit. Either way I still must drop the pan. If I do, I'll post some links to parts and videos. Attach file:  700R4_WithTestPorts.png (1,002.51 KB) 700R4_WithTestPorts.png (1,002.51 KB)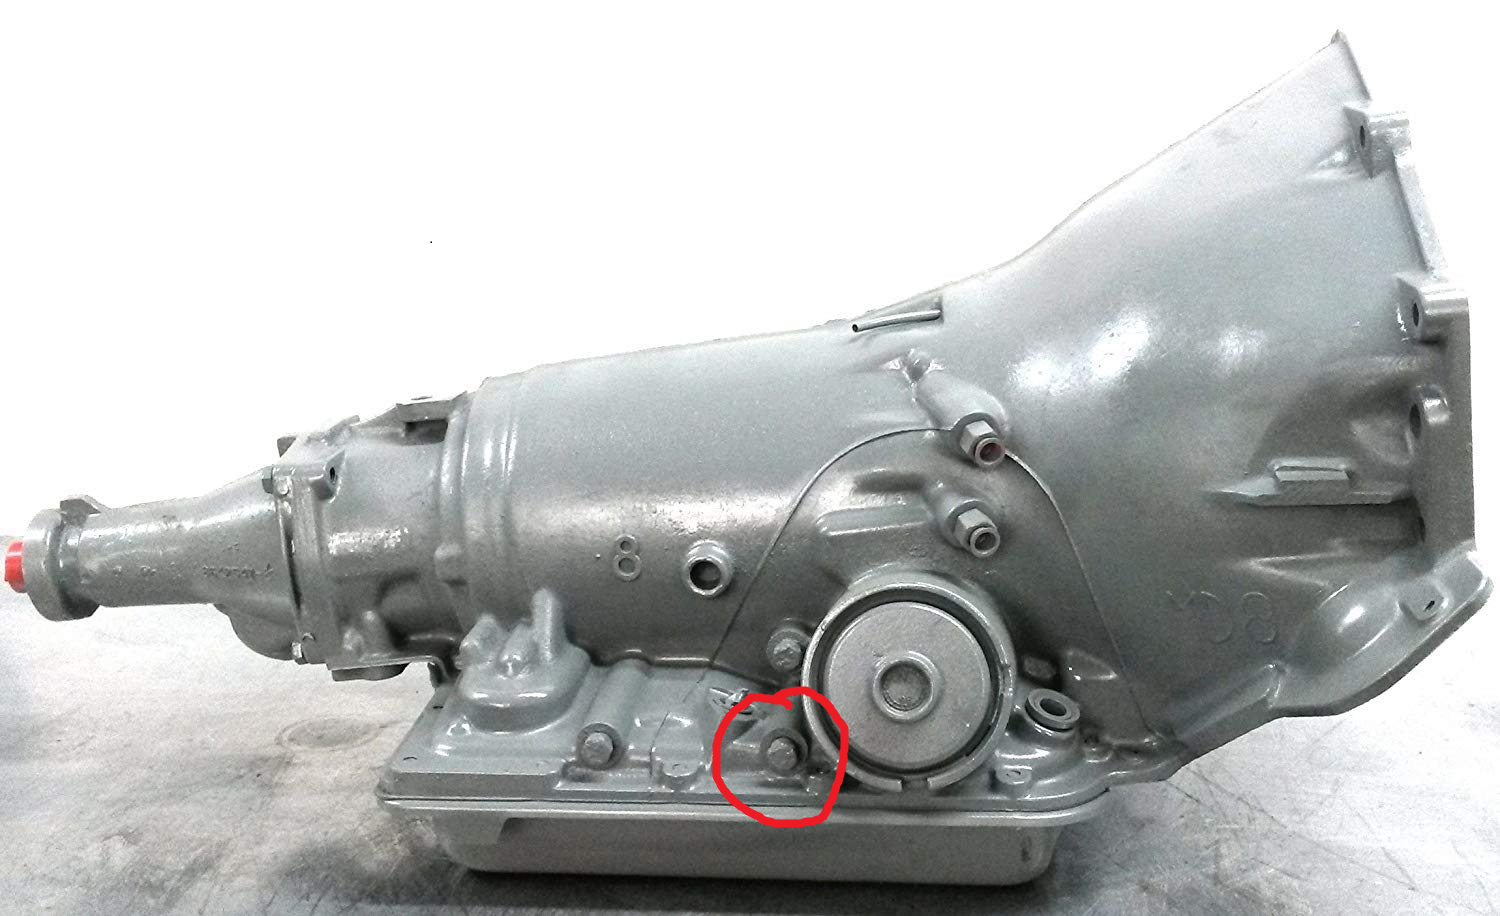 700R4_WithoutTestPorts.png (798.55 KB) 700R4_WithoutTestPorts.png (798.55 KB)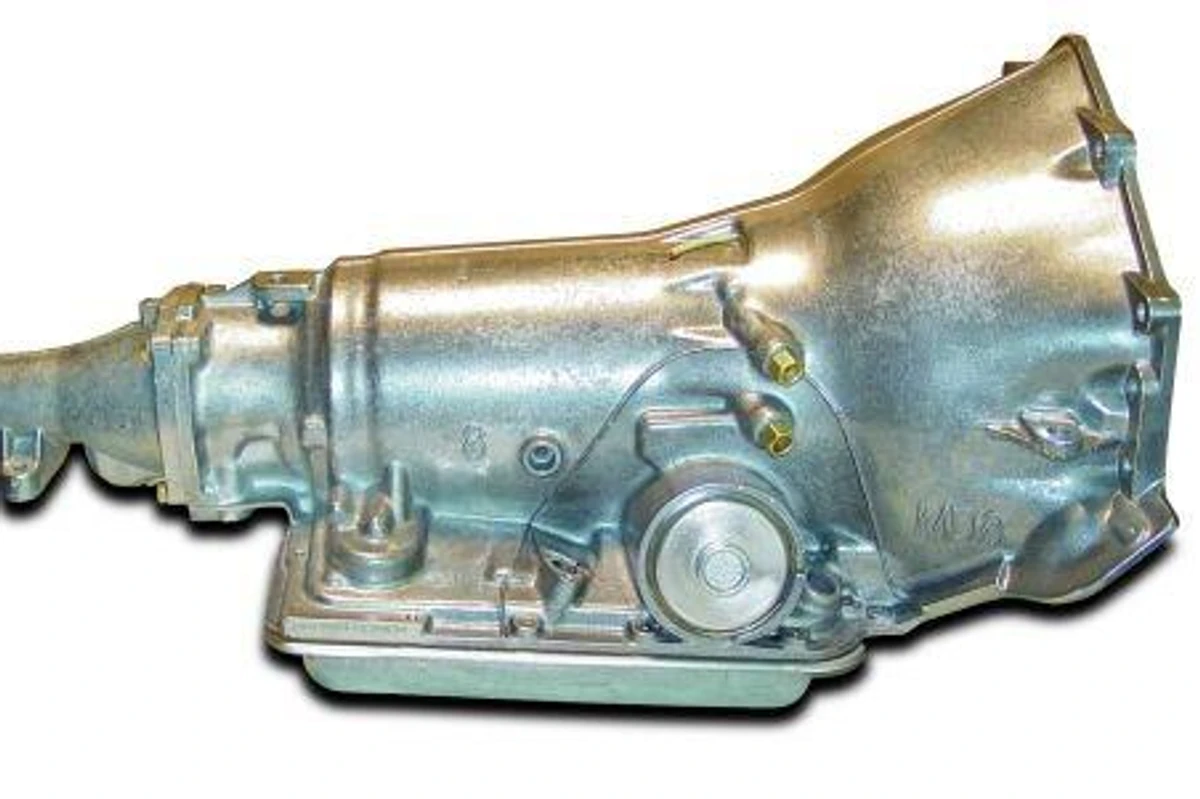
Posted on: 2023/8/24 13:10
|
|||
|
Stewart Ballard
|
||||
|
||||
|
Re: Stewart's 1955 Packard 400
|
||||
|---|---|---|---|---|
|
Home away from home
|
Last post of the day.
Removing the pan will not be as simple as I thought (it never is). The new cross member is covering 3 or 4 of the bolts on the pan. Now I have to support the tail end of the trans and drop the cross member. On the bright side, Howard will finally get that diagram of the 700R4 cross member that he asked for a long time ago. Attach file: 20230824_145113_resized.jpg (238.63 KB)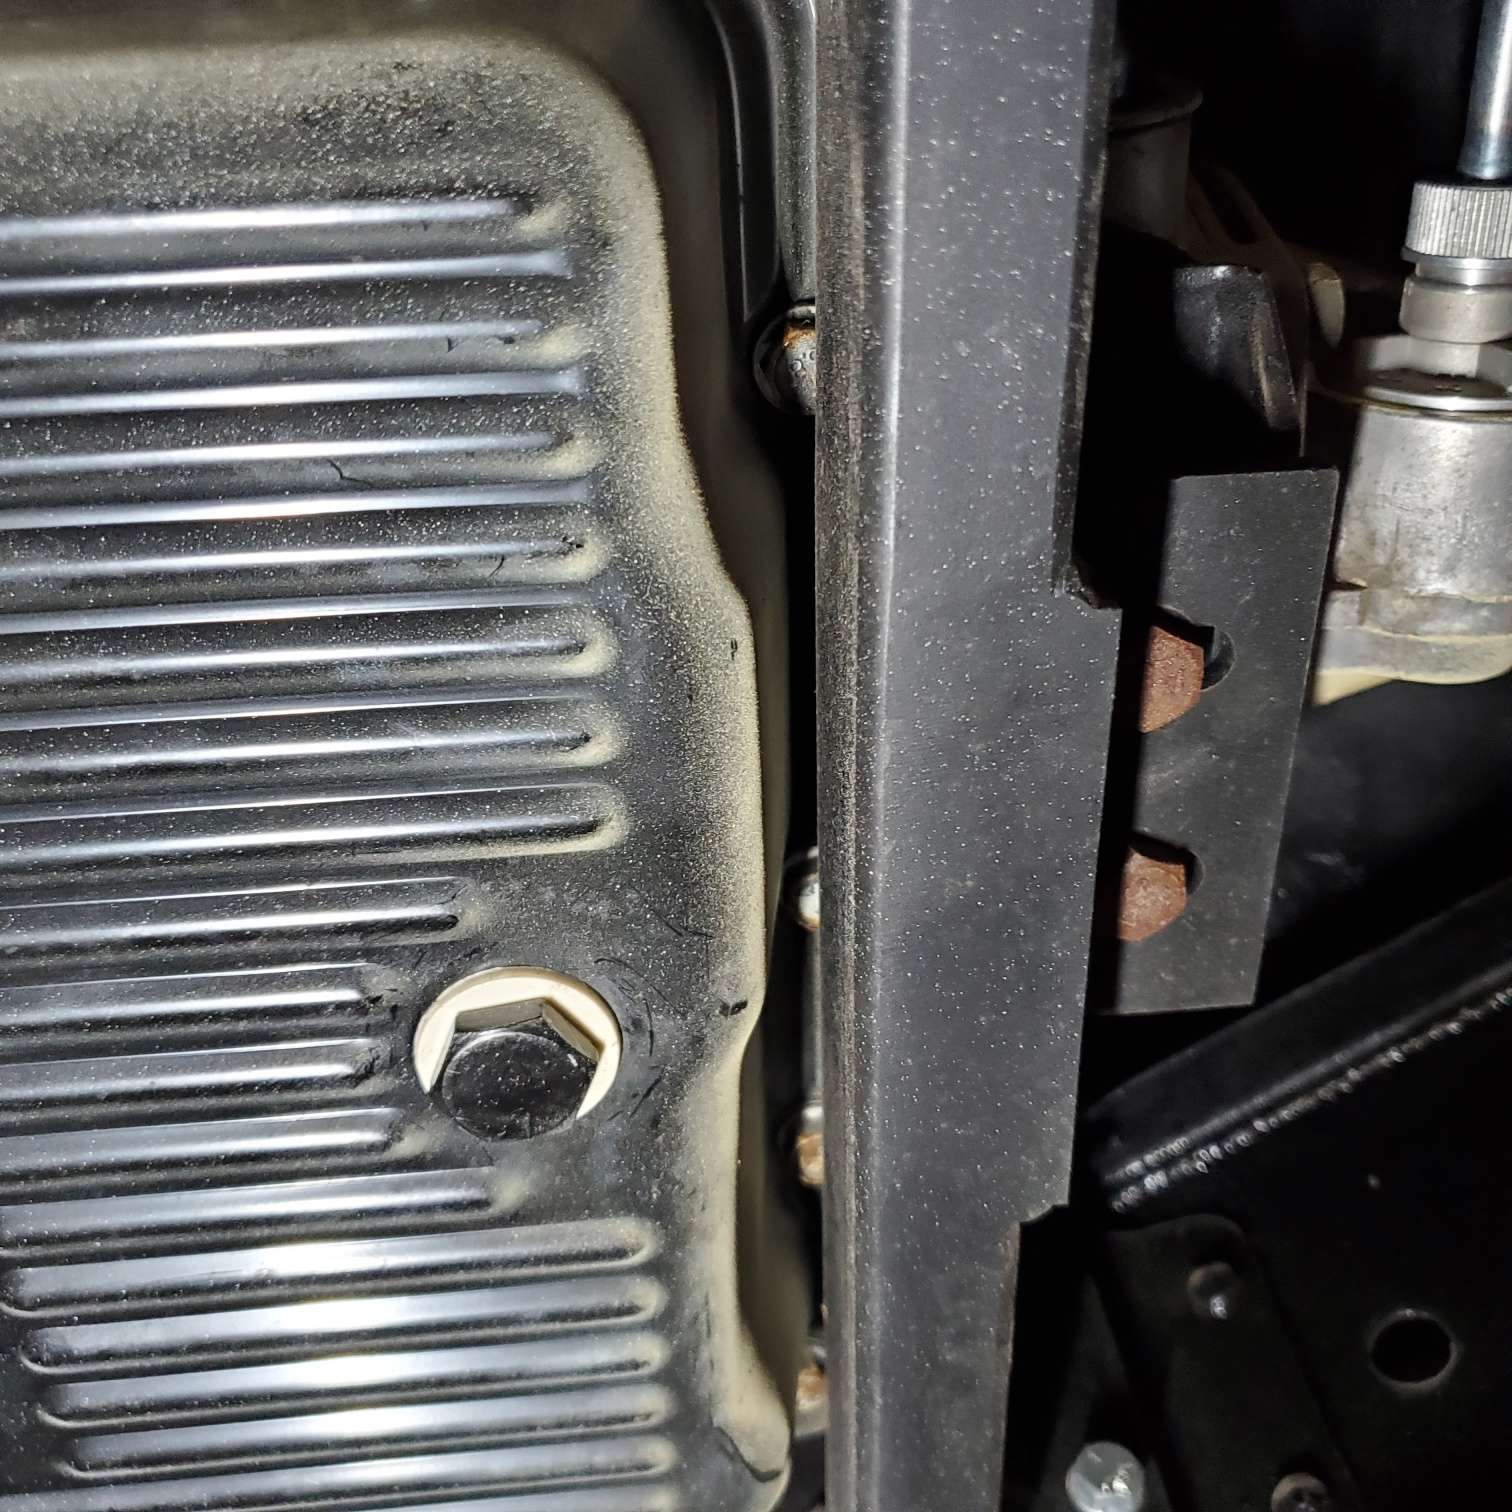
Posted on: 2023/8/24 18:07
|
|||
|
Stewart Ballard
|
||||
|
||||
|
Re: Stewart's 1955 Packard 400
|
||||
|---|---|---|---|---|
|
Home away from home
|
It's good to be lucky.
I already have the lockup wired exactly as described in this video from Monster Transmission. I also remember replacing the pressure switch but I do not know if there is a difference in the switch that I have and the one in the video. I already have everything else in their kit so I am not going to pay $100+ just for their pressure switch. It should work as it is, I can always change it later if I have to. I just need to pick up a new gasket. The image shows the valve body of the 700R4. A. is the location of the lockup solonid and B is the pressure switch. The harness runs between the two. Attach file: 20230825_114518_resized.jpg (191.44 KB)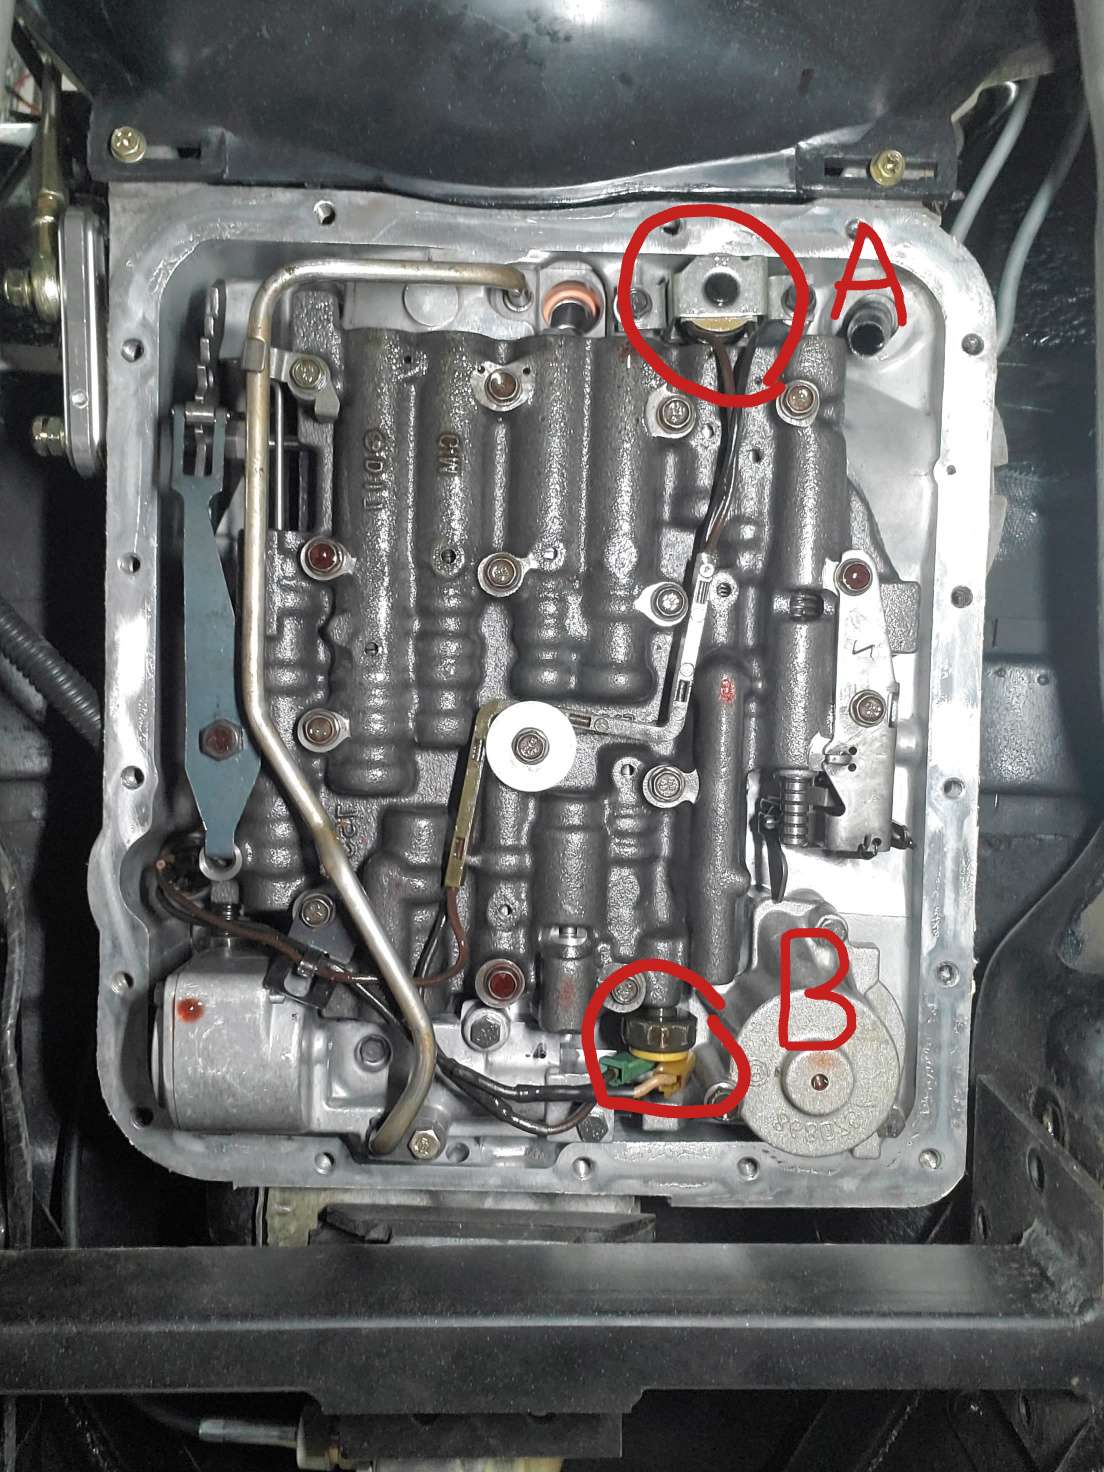
Posted on: 2023/8/25 14:44
|
|||
|
Stewart Ballard
|
||||
|
||||
|
Re: Stewart's 1955 Packard 400
|
||||
|---|---|---|---|---|
|
Home away from home
|
Over the last few month I have been working to mount a modern Dorman power window motor to my window regulators. I believe RH did the same thing in his project blog. That's where I got the idea. The difference is, I do not own a lathes and its been 30+ years since I have used one so I was not able to make some of the parts that he did.
I probably wasted $100 on parts through trial and error but I finally got it mounted and it fits in the door. I even tested it nearly 300 times before it went into the door and had no problems. I just made so many modifications that I did not bother to record much info. As I assemble the second regulator I will record what I do and post it here so, it is going to take multiple posts and some time to complete. I have all the wiring diagrams that Howard posted to RH about the relays and more. I started out trying to use the cheapest Dorman motor I could find ($25), pictured below. I believe it's the same one RH used. I did NOT have any luck with that motor. The gear on that motor was so large that I could not find anything to fit over it and still fit into the opening on the regulator. I then toyed with the idea that I could remove that little clip on top of the gear, remove the gear, and then use that shaft to power the regulator. As it turns out, that shaft does not turn. It is pressed fitted in the back half of the motor housing. This motor has gears within more gears to make it work. So, I searched through the huge Dorman catalog for another suitable motor and took a chance on one. I got lucky with it and it worked. I was lucky again that it was less than $50. Many of those motors are well over $300 each. I’ll cover all that info in future posts but the only part I really had to fabricate was the plate to mount the motor to the regulator. Attach file: 20230827_110944_resized.jpg (77.06 KB)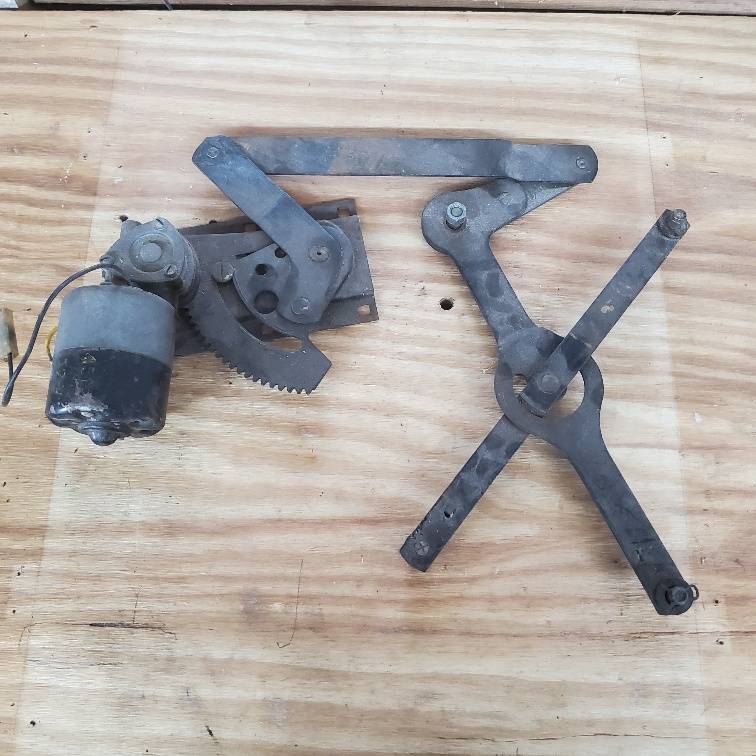 20230827_112152_resized.jpg (84.65 KB) 20230827_112152_resized.jpg (84.65 KB)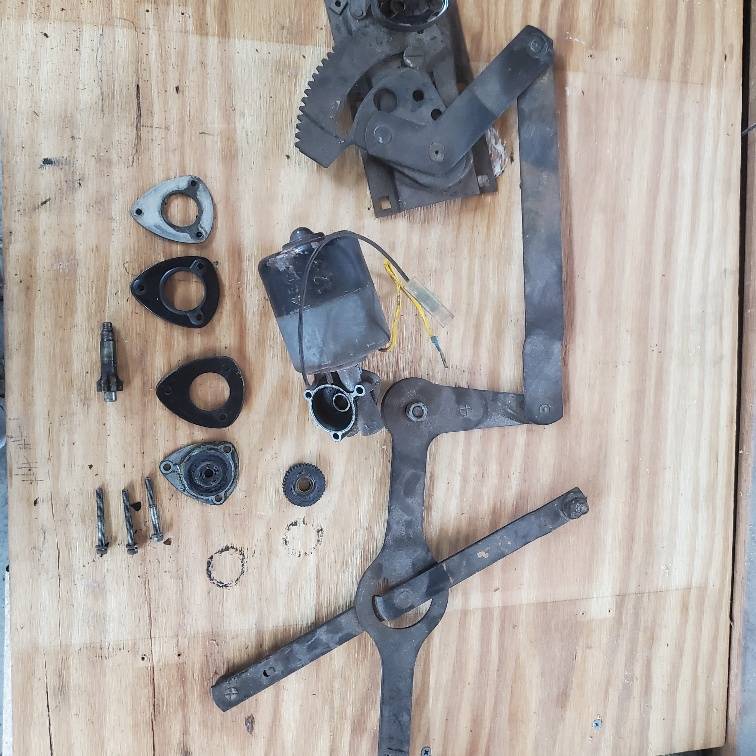 20230827_112555_resized.jpg (46.71 KB) 20230827_112555_resized.jpg (46.71 KB)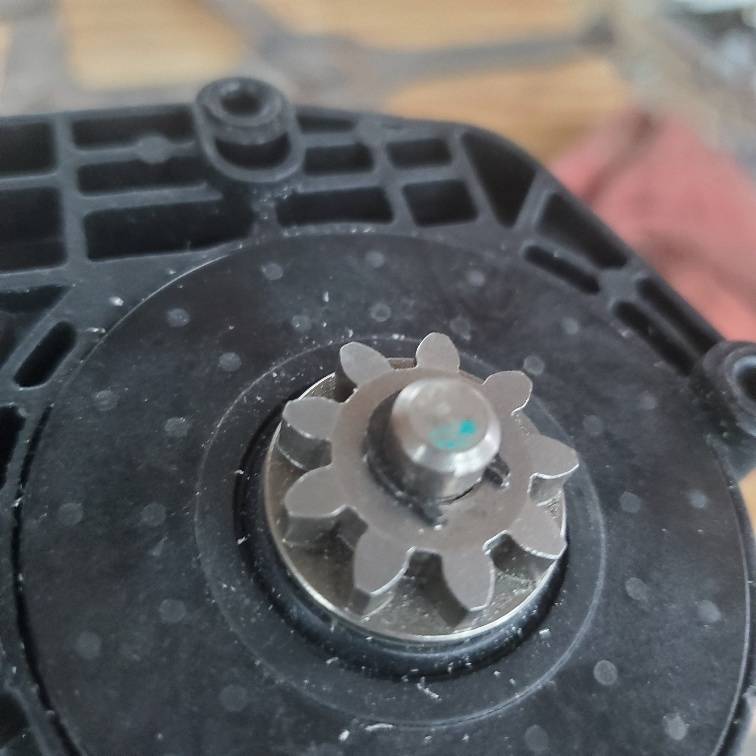 20230827_112555_resized.jpg (46.71 KB) 20230827_112555_resized.jpg (46.71 KB)
Posted on: 2023/8/30 21:06
|
|||
|
Stewart Ballard
|
||||
|
||||
|
Re: Stewart's 1955 Packard 400
|
||||
|---|---|---|---|---|
|
Forum Ambassador
|
When first starting this project I searched all the sites selling widow motors I could find looking for a motor with something approaching the correct pinion and that was easy to find and not too expensive. Someone had mentioned a Jaguar motor would work but he didn't remember the year or any specifics and during the search I was unable to find anything close even listed for Jaguar.
Problem with finding a modern motor to work the original regulator is the 6 tooth pinion Packard used. That configuration was apparently not that popular with anyone else and has become obsolete. The original pinion is almost like a 6 tooth ladder chain sprocket whereas a 9 tooth gear seems to be the lowest any modern car and motor use. Even a length of standard gear stock where you can cut off a piece and add a shaft to make a gear doesn't seem to be available in a 6 tooth count or anything close to the proper diameter. The Dorman motor I first used had a 9 tooth removable gear and a square drive socket it fit into. Original idea was to have a piece made with a square shaft to fit in the Dorman socket but longer and with a new sprocket on the end. Started talking with Riki about what could be made. Riki started working on the project to see what he could do with that idea but it was proving difficult and almost looking as if a custom gear would need to be made. Then he came came up with the fairly easy solution of using the existing pinion from the old motor and making a simple round adapter as a transition piece. That way it could be made to work with a motor of almost any tooth count. His first effort was not that successful because of the torque in the motor so also needed some refinement. As far as I know the second or third piece he made is still working. Am glad to see you decided to try the modern motor approach so with all your experiments, if you have come up with something even easier or simpler by all means please share it. I know used motors are still out there and not that hard to find. Some wonder why bother but the original motors will become scarce and already are expensive so it is just a matter of time.
Posted on: 2023/8/31 10:23
|
|||
|
Howard
|
||||
|
||||


