|
Re: Patrician Control Arm Bushing Removal
|
||||
|---|---|---|---|---|
|
Forum Ambassador

|
The use of rubber bushings in control arms was still fairly new at this point in automotive history. It was only in later years (after Packard's demise) that shop manuals went on to describe how to replace these pressed in bushings. I've seen the procedure covered in GM shop manuals of the 1960s and 1970s. It requires a some special tools: a remover/installer (with some adapters to fit the various sizes of bushings) and an apparatus to keep the control arm legs from collapsing/spreading during the process.
I've not tried this myself, yet, but a truck mechanic told me, many years ago, that after wire brushing dirt/rust away and a liberal dose of penetrating oil, these bushings could be removed and new ones installed with an air chisel/hammer and appropriate bit (something blunt/broad). I'd suggest working on a good heavy vise (as an anvil, if nothing else) and using scraps of pipe to support the control arm and receive the old bushing as it is worked out. Today there are ball-joint press kits with adapters that will also allow you to press these bushings in/out (handy for changing cross-type U-joints, too). I've seen some cases where a hammer and chisel was also used to help collapse the outer sleeve to aid with removal of the old bushing. However, with a control arm from a rusty old field car, burning the rubber out with a propane torch and then cutting the sleeve out might be your only hope. Also, my gut feeling is that you should note and mark the orientation of the shaft (front/rear and inboard/outboard), prior to disassembly, for later reinstallation. For installation, I suggest thorough cleaning the arm and application of some grease. I personally use Lubriplate (not just a white grease) for this and many other things, and buy it in the 14 oz. can. Hope this provides some help.
Posted on: 2008/3/8 17:28
|
|||
|
||||
|
Re: Patrician Control Arm Bushing Removal
|
||||
|---|---|---|---|---|
|
Just popping in

|
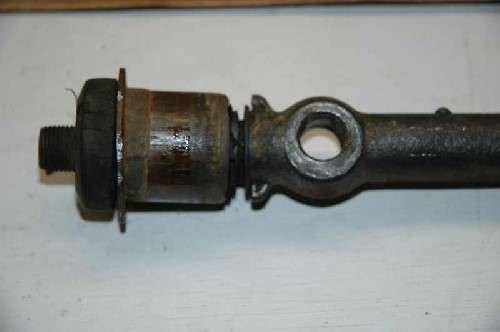
Thanks to all that provided information. I had a few free minutes today so I went to the garage and pulled out the Micrometer and checked the width of the "tabs" on the shaft and the diameter of the bushing. The tabs are indeed there to aid in pressing the bushing out. The job was actually simple and took only about 5 minutes. The pictures show the tabs and that the tabs fit thru the holes. Only caution here is that it is possible for the tabs to be off center and not hit the bushing which would gouge the control arm.
Even though I'm still preparing the frame for paint I wanted to remove these bushings (I did mark the orientation of everything) in case I needed to replace the shafts too. The bottom bushings will need a different operation to remove them but I didn't clean them yet so I haven't devised a plan for their removal. There is lots of bushing sticking out so a puller or bearing splitter may be appropriate for that job.
Posted on: 2008/3/8 19:58
|
|||
|
||||
|
Re: Patrician Control Arm Bushing Removal
|
||||
|---|---|---|---|---|
|
Forum Ambassador

|
A good job and also a good report and picture to demonstrate what you said. All in all a fine job!
 Vey helpful to the next fellow. Thank you. I hope your Packard is listed in the ownership directory. Vey helpful to the next fellow. Thank you. I hope your Packard is listed in the ownership directory.
Posted on: 2008/3/8 20:49
|
|||
|
||||
|
Re: Patrician Control Arm Bushing Removal
|
||||
|---|---|---|---|---|
|
Home away from home

|
To remove the LOWER control arm bushings u'll have to disassemble the control arm by cutting the rivets out of the plate that holds it togather. Go back together with BOLTS and nuts. ***** DO NOT WELD it !!! **** Ideally, the bolts should be a tite fit in the holes.
When u get the bushings let us know where u got them and the part number.
Posted on: 2008/3/8 21:19
|
|||
|
||||
|
Re: Patrician Control Arm Bushing Removal
|
||||
|---|---|---|---|---|
|
Home away from home

|
Orientation of the shaft is covered in the manual. The shaft is made so that it can be reversed to allow for extra camber adjustment if needed. I don't have the manual here in front of me but i know it's in ther.
Posted on: 2008/3/8 21:25
|
|||
|
||||
|
Re: Patrician Control Arm Bushing Removal
|
||||
|---|---|---|---|---|
|
Home away from home

|
what's the latest on the front end rebuild???
Posted on: 2008/3/26 21:08
|
|||
|
||||
|
Re: Patrician Control Arm Bushing Removal
|
||||
|---|---|---|---|---|
|
Just popping in

|
Now that spring is here I have a tree house to build and my lovely wife bought me a new lift for my birthday so I'll want to install that too! Frame is nearly all clean and ready for paint.
Posted on: 2008/3/31 20:51
|
|||
|
||||
|
Re: Patrician Control Arm Bushing Removal
|
||||
|---|---|---|---|---|
|
Home away from home

|
Does your wife have any single sisters for ME!!!
Posted on: 2008/3/31 21:20
|
|||
|
||||
|
Re: Patrician Control Arm Bushing Removal
|
||||
|---|---|---|---|---|
|
Home away from home

|
Just to complete the discussion about types of upper inner control arm bushings: in addition to the press-fit type, there was a screwed-in type. Although these are rare, my 1956 Executive 4-dr parts car has one upper arm that has screw-in bushings and the other side arm has press-in. Go figure.
I believe that the screw-in type is the one the manual refers to that must be replaced as an assembly. It's good to have several parts cars to get around this problem. Craig
Posted on: 2008/4/1 9:26
|
|||
|
Nuke them from orbit, it's the only way to be sure! Ellen Ripley "Aliens"
Time flies like an arrow. Frui |
||||
|
||||

 (18.03 KB)


