|
Re: 51Packard's....51 Packard
|
||||
|---|---|---|---|---|
|
Home away from home

|
I agree with you on bondo drawing moisture opposed to fiberglass. In my last auto body class last Monday we covered this very topic. I have the trunk off my 49 Packard which has a rusted out spot about 1 inch by 2 inches that I was going to fill with bondo, but the instructor said it would draw moisture and cause bigger problems later. He advised to use fiberglass. I asked him about leading the spot but he had never used lead for body work. Good luck with your project. Packardtaximan
Posted on: 2012/3/16 19:13
|
|||
|
||||
|
Re: 51Packard's....51 Packard
|
||||
|---|---|---|---|---|
|
Home away from home
|
Bondo absorbs water... Fibreglass does not absorb water but it will creep in between the metal and fibreglass, get trapped and cause rust.
Therefore, a trunk floor must be sealed with no pin holes before applying bondo or fibreglass. I suggest welding it as well as possible. Then, grind the welds down but not too far, just level off the high spots. You do not want to weaken the welds or grind the metal thin. Check carefully, hold a light real close or even put the light behind and look for "stars". When sealed with seam sealer, you can go over the rough areas with bondo to smooth them out. This is really unnecessary on a trunk floor which will be covered by carpet, but some guys feel better if it looks like it did when new. Then you must paint it to seal it or it will rust. A good rustproof paint like Rustoleum is best. If you want to use POR 15 it must go over the rust first then goes sealer, bondo and paint. Finally be sure to clean and paint the underside. Use at least 2 coats of rust paint. Do not use undercoating, it will cause rust in the long run unless it goes over a good painted surface. Undercoating will not seal or preserve bare or rusty metal. Hope this is clear. This may not be how they do it in the $200 an hour restoration shops but it is a good, durable low cost way to do things and reflects years of experience in body shops.
Posted on: 2012/3/16 22:48
|
|||
|
||||
|
Re: 51Packard's....51 Packard
|
||||
|---|---|---|---|---|
|
Home away from home

|
Thanks for the info. I didn't know you could put body filler over seam sealer. I am learning a lot!
Posted on: 2012/3/18 12:23
|
|||
|
[url=h
|
||||
|
||||
|
Re: 51Packard's....51 Packard
|
||||
|---|---|---|---|---|
|
Home away from home
|
I wouldn't put body filler over seam sealer. I'm sure you could, but why would you want to?
The purpose of body filler is to fill dents, and to level and smooth surfaces in preparation for primer surfacer, and ultimately, paint. Seam sealer is used to waterproof joints of panels, creating a smooth transition and neat appearance in the process. The seam will still be evident- but with a clean, finished appearance. If you are putting body filler over the seams, then you are attempting to hide the seams, which would be incorrect in a trunk, jamb, or floorboard area. Body seams on the exterior would be another story. Most panels that are joined with the intention of being smoothed and hidden, are blended with techniques using lead, except in modern applications, where the seam would be incorporated into a hidden area and covered with plastic or trim of some sort. The problem is that a seam, when covered with (1), a flexible sealer, and then (2) body filler (plastic) would be susceptible to cracking eventually. If you are trying to make a patch in a trunk disappear, where you've welded in a new piece of metal, I guess you could smooth the join with body filler. That would be a lot of work. The more accurate thing to do would be to replace the panel at the factory seams by drilling out the spot welds, and welding up the new piece at the holes where the spot welds were. Then seal the edges with Drip-Chek Sealer. For an area where you put in a small patch that you want to disappear, for example, on a trans tunnel, I wouldn't use a seam sealer. I would grind the area as smooth as possible, and use a waterproof filler such as Dyna-Glass first. That will seal off the moisture. Then follow with your body filler, primer surfacer, and paint. I would also undercoat the underside. That's my story, and I'm sticking' to it.
Posted on: 2012/3/18 13:19
|
|||
|
Joey
(?=#=?) "If chrome got me home, I'd for sure still be stuck somewhere." [url=http://pac |
||||
|
||||
|
Re: 51Packard's....51 Packard
|
||||
|---|---|---|---|---|
|
Home away from home
|
OK so now I'm really confused! My goal was to cover the welds for the patches I put in so they would not be noticed. I was not going to put a carpet in the trunk because from what I understand, it is not supposed to have one. I may do it anyway just to cover everything up.
Posted on: 2012/3/18 19:22
|
|||
|
[url=h
|
||||
|
||||
|
Re: 51Packard's....51 Packard
|
||||
|---|---|---|---|---|
|
Home away from home
|
3-18-12
I accomplished a lot today. I got a patch panel fabricated for the large hole in the trunk. I didn't think I could recreate that channel along the side with my limited tools so I decided to roll the edge against the fender and will weld it at the bottom forming a V shape. That will allow the welting to be added and give the illusion of a OEM look. I tried to recreate the channels bent into the metal to make it more rigid. Didn't come out too good so I only did one instead of two that would have been there originally. The welder I borrowed from work sucked! The trigger on the gun is gone so I had to hunt for a little white button with big, heavy welding gloves on. One of the regulator dials is broken. I was promised that there was gas in the tank and when I turned the knob...nothing! I tried to tack the panel in anyway without gas. After each tack, the wire backed up inside the welder. Had to take it apart and reset it. After three attempts, I gave up. All I got out of it were three tacks that didn't stick! I'm going to have some choice words for the maintenance guy at work tomorrow. Below is a pic of the panel being fitted. Sorry the pic is so bad. Sun was in a bad spot for the camera. Attach file:  (34.32 KB) (34.32 KB)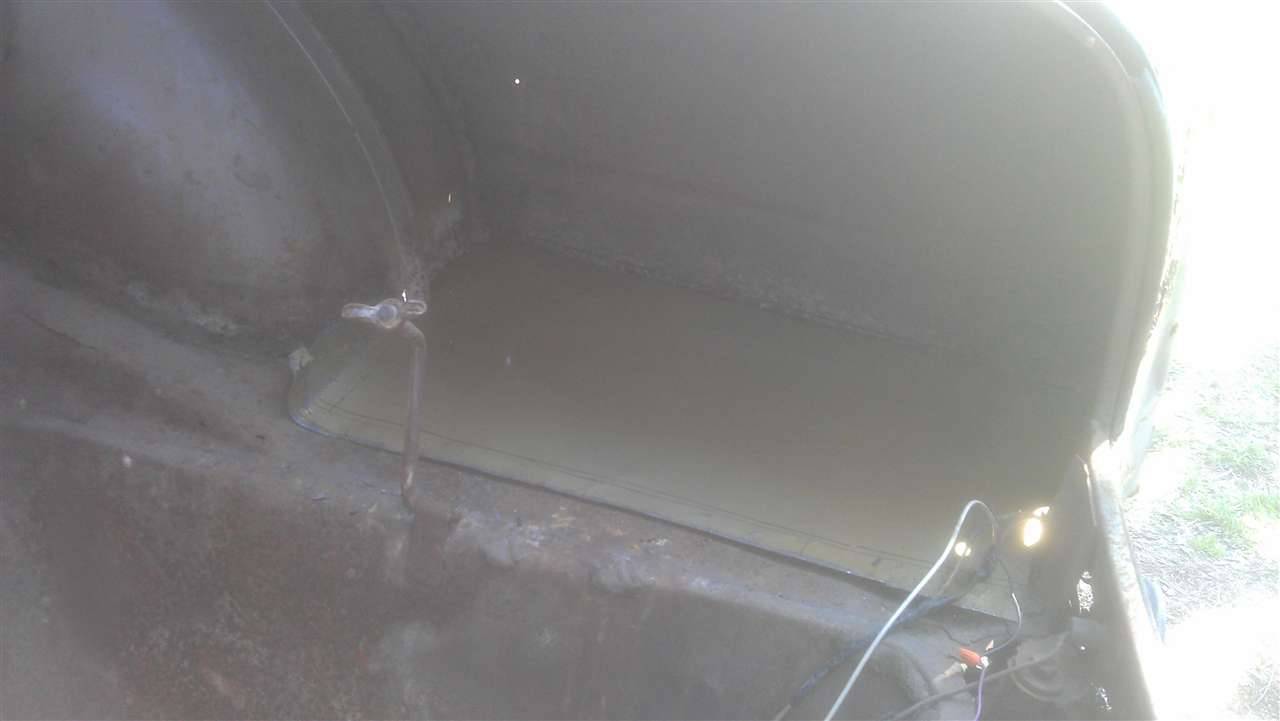
Posted on: 2012/3/18 19:37
|
|||
|
[url=h
|
||||
|
||||
|
Re: 51Packard's....51 Packard
|
||||
|---|---|---|---|---|
|
Home away from home
|
The fact that you keep trying is what makes your posts worth reading. The new patch panel WILL be welded in and it will look great. Never give up. I have yet to begin any body work on my '55 Clipper and reading your postings and others here give me the hope that I can do a good job too. When you get it welded in place please take another picture and share your progress with us.
Posted on: 2012/3/18 20:59
|
|||
|
||||
|
Re: 51Packard's....51 Packard
|
||||
|---|---|---|---|---|
|
Home away from home
|
Sorry for the confusion...
If you just want to hide the welds, see the last paragraph on my post. Dyna-Glass, body filler, etc. It doesn't have to be perfect like a body panel. But you will need to use a waterproof filler to keep it permanent. I'm sure it will look great. Keep up the good work!
Posted on: 2012/3/18 21:49
|
|||
|
Joey
(?=#=?) "If chrome got me home, I'd for sure still be stuck somewhere." [url=http://pac |
||||
|
||||
|
Re: 51Packard's....51 Packard
|
||||
|---|---|---|---|---|
|
Home away from home
|
Thanks for the encouragement guys! The maintenance guy at work was pretty embarrassed about the gas. I will have him refill the tank. Looking online, I may have had the tension too high on the wire. Will loosen and see if it feeds better. I have the wife convinced I need a better welder, just need to prove it to her now!
Posted on: 2012/3/19 19:56
|
|||
|
[url=h
|
||||
|
||||


