|
Re: R9 Overdrive
|
||||
|---|---|---|---|---|
|
Home away from home

|
I would hazard a guess that the unit was oriented correctly before you removed it. The spacer can separate from the main body easily.
The 2 little holes go to the rear and the solenoid when mounted looks like the attached from the rear. Just to reiterate. My OD, after sitting since 1986, made all the click sounds and the light came on, but it would not engage when I let off the gas pedal. As mentioned many times, I have no aptitude for this stuff, so I read the service manual which said the most common problem with ODs is that the lower set of contacts get burned and that a new set of contacts, not the whole solenoid...which is what the service people were doing..., needs to be ordered. Since the factory doesn't look that great these days, I cleaned the contacts, said a prayer, reinstalled the OD, and it immediately worked perfectly, so I took a drive in the country, in OD, and kicking down to third coming out of curves. Leaks...that was another problem. Touching one of the wires to the frame causing a loss of ignition, that was yet another problem, that happened in the course of fixing the leak. Attach file:  (23.93 KB) (23.93 KB)
Posted on: 2012/8/2 15:02
|
|||
|
||||
|
'40 Ignition cables recommendation
|
||||
|---|---|---|---|---|
|
Home away from home
|
I have Belden carbon cables on the Duchess, made from a universal set, and I hate everything about them. The look, the blue color, the inability to access the connectors, etc.
Who makes a great set of ignition cables for a 1940-50 356 engine? (I like the ones that stick straight up, not bent at 90 degrees, and have a low-resistance metal core.) Thanks for your recommendation. Joe
Posted on: 2012/8/1 0:17
|
|||
|
||||
|
Re: R9 Overdrive Solenoid Spacer direction
|
||||
|---|---|---|---|---|
|
Home away from home
|
David,
I was able to lie under the car, feet out toward the driver's side, put a 1/2" socket on the upper cap screw, and loosen it 1-5 clicks at a time with the handle in a hollow area of the frame. Then I removed the wrench. put my right hand thru a hole in the frame and my left hand up on the other (rear) side of the solenoid, and with the fingers of both hands helping each other, loosen it the rest of the way. You can move the lever forward and back. That might release the shaft if it won't come out. Putting it back in, there is some resistance. You have to hold the solenoid with a little pressure in order to start the cap screws. I marked my solenoid with a Sharpie with the wire number and the color for the wires, even though the housing is stamped with numbers. Then sprayed it with clear for posterity. Be sure to put your wires on, before you replace the cap screws. Two of the wires are very tough to tighten if you don't. Yes, the dash light goes out when the OD is engaged. The most common problem are the lower set of contacts needing a little cleaning. My OD didn't work, wouldn't actually go into OD until I cleaned them. Then it worked fine until I had a lead. The other problem was a leak after I replaced it. Also when my wires were loose, something touched something, and activated the cut out switch in the relay on the firewall. Then I had no ignition and didn't know why.
Posted on: 2012/7/30 13:17
|
|||
|
||||
|
Re: Tucson Packard
|
||||
|---|---|---|---|---|
|
Home away from home
|
You need to call them. I just emailed them to alert them of this thread so they could do something about it and take care of their customer...and my email came to me, as if I'd sent myself an email. The programming on their website email contact page is screwed up. You might mention that to them when you call.
Joe
Posted on: 2012/7/12 9:53
|
|||
|
||||
|
Re: R9 Overdrive Solenoid Spacer direction
|
||||
|---|---|---|---|---|
|
Home away from home
|
In the end, the mechanic was right.
The new oil seal helped, but I had to pull off the solenoid one more time and use a rubber gasket plus silicone, as the previous mechanic did, to stop all leaking. There is a good 1/16" space between the spacer and the overdrive housing after the cap screws are completely tight. Anyway, it's sealed now. Not even one drop.
Posted on: 2012/7/12 9:49
|
|||
|
||||
|
Re: reinstalling horns 1937 115c
|
||||
|---|---|---|---|---|
|
Home away from home
|
Sanford,
Here's a link to my experience on horns for my 40. There is also a link within this page that explains the horn mechanism in detail. https://packardinfo.com/xoops/html/modules/newbb/viewtopic.php?topic_id=5878&viewmode=flat&order=ASC&type=&mode=0&start=70 Hope this helps. Joe
Posted on: 2012/7/10 18:15
|
|||
|
||||
|
Re: R9 Overdrive Solenoid Spacer direction
|
||||
|---|---|---|---|---|
|
Home away from home
|
Try again.
I may have to remove the solenoid one more time to get the red light on the dash to work. But otherwise the OD works perfectly and doesn't leak after 2 days of use. So after all this I thought I would backtrack for posterity's sake with pix. 1. View from rear of 40 R9 OD solenoid. 2. View from rear showing two holes on the spacer. 3. View of OD lever and switch cable clevis. 4. Bottom of OD solenoid and cable 5. Solenoid 2 cap screws removed, hanging by wires 6. Solenoid opened showing contacts, spacer. 7. Pushing out washer and old seal. 8. Old seal out. 9. New seal 10. How a professional mechanic sealed the shaft. I'm thrilled the OD is working again. Last night drove around the lake here as people gathered to watch fireworks. Just so quiet and solid because there were 5 people in the car and the top was down. So back to the books to check that light circuit. Joe Attach file: (23.93 KB)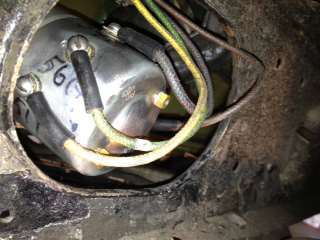 (15.51 KB) (15.51 KB)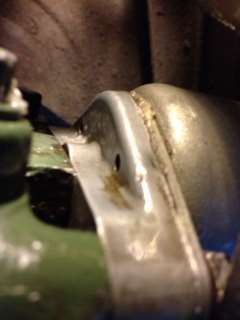 (21.14 KB) (21.14 KB)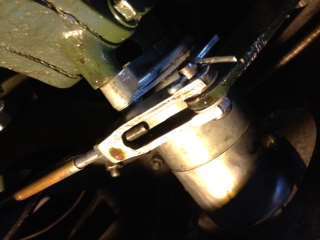 (30.85 KB) (30.85 KB)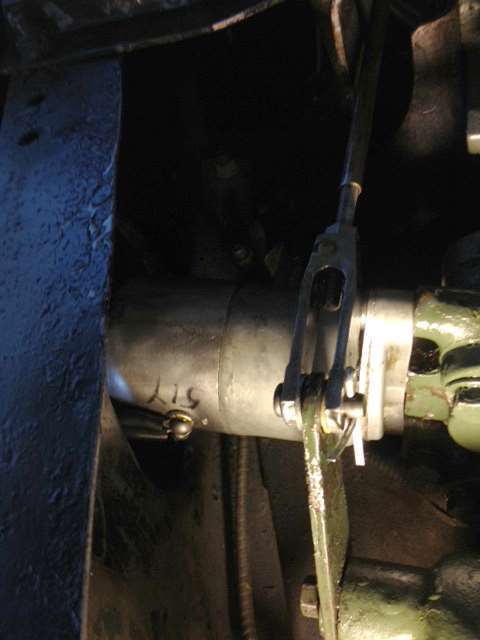 (42.11 KB) (42.11 KB)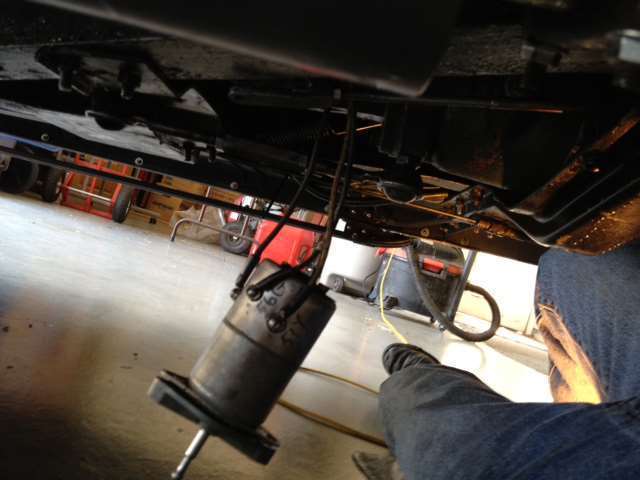 (25.88 KB) (25.88 KB)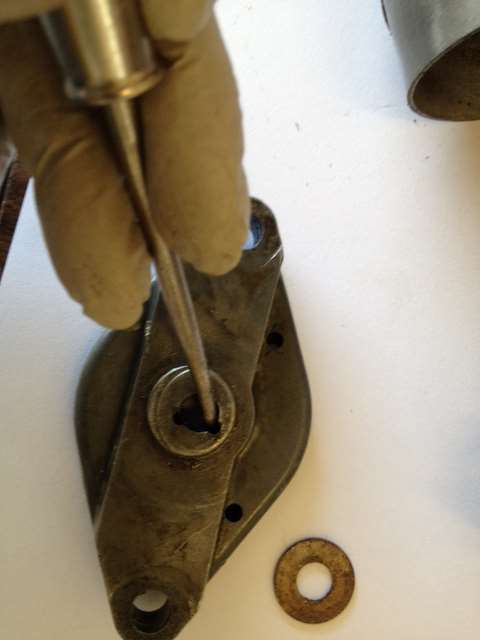 (15.80 KB) (15.80 KB)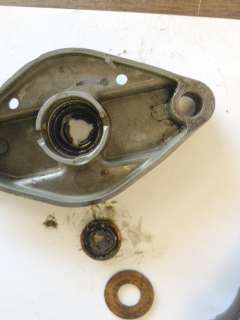 (22.24 KB) (22.24 KB) (18.08 KB) (18.08 KB)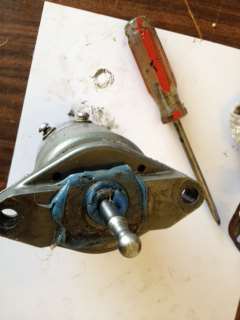
Posted on: 2012/7/5 21:43
|
|||
|
||||
|
Re: R9 Overdrive Solenoid Spacer direction
|
||||
|---|---|---|---|---|
|
Home away from home
|
Thanks West. Just got off the phone with McGuire Bearing. They have a CR 3060 that Dell recommended. Looking in the parts book I see there a seal, a gasket, washer that go with the spacer. This seal will eliminate all the gasket goop or silicone that a master professional mechanic put in there years ago? I have to admit the goop worked but I don't think it was the right thing to do to a clueless customer.
EDIT: ROSS, I just reread your post. Now I get this part of it: After I push the solenoid in getting ready to mount it with the cap screws, I should try to gently pull it out, and it should resist, so I know it's being grabbed inside. Then go ahead and mount it. I'm going to take pictures of removing the old seal, if it has one, and installing the new one. The washer retains the seal? You mentioned having to "stake" it. None of this is second nature to me. When I do it, I'm always grateful that I didn't break anything or hurt myself.
Posted on: 2012/7/3 16:33
|
|||
|
||||
|
Re: R9 Overdrive Solenoid Spacer direction
|
||||
|---|---|---|---|---|
|
Home away from home
|
Dell, thanks for the tips. I'll get to take solenoid out again. It's leaking. I am becoming an expert. I have almost 10,000 hours in removing and installing the solenoid...incorrectly mostly.
It didn't have a seal when I opened it. It had form-a-gasket or blue silicone inside the spacer/adapter around the flange that's around the center (off set) hole when I took it out the other night. I just took it for a drive and when I parked, a trail of leaks. (I didn't go far and the tranny/OD was just filled, part of the reason I went out was to get all my fittings greased at Fast Lane Oil). But now I'm home. Tomorrow I'll get an oil seal and I'll take the solenoid out again. At the moment, it's installed with the small holes to the rear, but it won't engage. The red light comes on and it goes into freewheeling. I'm going to read up on it tonight. I truly appreciate your post here. I'm not at all mechanically inclined. Otherwise I would have marked the solenoid before taking things apart. Usually I take pictures of everything, but it's so crammed under there and I don't want to mess up my iPhone. I thought the gasket was the seal. The old gasket was beat up so I made a new one. I thought that would do it, stop leaks. But it doesn't without an oil seal. EDIT...So what I'm calling a gasket is the washer? Made of gasket materials with 4 holes around the big center hole? I'll check my parts book, too. Should have in the beginning. Thanks, Joe
Posted on: 2012/7/2 22:34
|
|||
|
||||
|
Re: R9 Overdrive Solenoid Spacer direction
|
||||
|---|---|---|---|---|
|
Home away from home
|
Ross, thanks much.
I'll try that with small holes to the rear and we'll save West getting out and getting under. While the car was on the jack stands I tried to put it in reverse and it would not go, even tho it went into 2nd nd 3rd and 1st. I took the car off the jack stands, started it and moved it forward slightly in 1st gear. Then I was able to put it into reverse, so the overdrive lockout sleeve is free. Thank the universe.
Posted on: 2012/7/1 23:16
|
|||
|
||||


