|
Re: GearRat's '52
|
||||
|---|---|---|---|---|
|
Home away from home

|
For guys ona a budget and working on jackstands, here's my suggestion:
Try to avoid taking the trans out of the car unless you know it needs to for repairs. If you pop off the solenoid and governor--which you have to anyway-- you can just slide the trans straight back in the frame far enough to get it out of the clutch. Block and strap it place. Take out the clutch and have a look. If the pressure plate is not all scored up and blue or cracked, you can reuse it. Otherwise, tell the counterman you need one for a Ford in the same diameter. Take the clutch disc down to the auto parts store, slap it on the counter and tell them you need one the same size for a Cheby. Take a little dab of grease on your pinky and work it into the back of the pilot bearing and make sure it spins free. If the throwout bearing is doubtful, drill a small hole in the side of the sheetmetal and work a dab of grease in with your finger or a syringe. Plug the hole with some epoxy. Put it all back together and take it for a drive. That's how I did my 51 when bucks down 40K miles ago.
Posted on: 2012/8/15 20:38
|
|||
|
||||
|
Re: Rear Stabiliser Rubber Bushing Replacement
|
||||
|---|---|---|---|---|
|
Home away from home
|
Good luck--and be sure to mark the ends of the sway bars. There are so many interesting and confusing ways to put it together wrong.
Posted on: 2012/8/15 7:43
|
|||
|
||||
|
Re: Rear Stabiliser Rubber Bushing Replacement
|
||||
|---|---|---|---|---|
|
Home away from home
|
If you slide off the bushings from the center post, you will see that one of the two flat plates is welded to the center post and one is not. You can remove that plate by neatly grinding off the swaged portions of the outer pins on that side. With a bit of wiggling and tapping that plate will come off and you can replace the rubber bushings. There are kits available from the usual suspects.
With the help of two or three clamps or visegrips you can squeeze the thing back together. To hold it together you can drill and tap the outer pins for button-head cap screws to replace the factory swaging. Remember clearance with the mounting brackets on the car is limited. I prefer to put 3 equally spaced tack welds on each pin, cooling the assembly immediately after each tack so the rubber is not damaged. For best service, look into using shock absorber bushings in urethane which you can find at an off-road specialist. The diameters will be OK as these are standardized items, but you might have to grind down the thickness to get the assembly to squeeze back together.
Posted on: 2012/8/15 6:02
|
|||
|
||||
|
Re: Timing chain and gears.
|
||||
|---|---|---|---|---|
|
Home away from home
|
The older cover is deeper. I am pretty sure that when you put it together with the narrow timing set, the front seal will not push up against the cover as it should.
Posted on: 2012/8/14 7:47
|
|||
|
||||
|
Re: R9 Overdrive
|
||||
|---|---|---|---|---|
|
Home away from home
|
If Tim's suggestion doesn't work, it is still possible to effect most overdrive repairs in the car.
After removing the driveshaft and the rearmost crossmember it is possible to remove the overdrive housing. Its a bit fiddly to get that out and back, but then after that the rest of the components can be dealt with as need be. If you go that route be careful to catch all your freewheel rollers as you pull the housing back. Removing the whole transmission may seem appealing but on 39-50 cars it is one of the most frustrating jobs imaginable, especially if you are working on jackstands. And not to seem to nag, but you are certain the solenoid has actually engaged the pawl and is not sitting on top of it?
Posted on: 2012/8/12 6:41
|
|||
|
||||
|
Re: need to remove solenoid when installing OD trans?
|
||||
|---|---|---|---|---|
|
Home away from home
|
No problem at all to leave it on. In fact, you can even bolt the rear crossmember onto the rear mount and send it all in at one time. The crossmember will neatly catch in the x-member of the frame and hold the back of the tranny up while you are busy at the front. Then all you have to do is jack up the back of the tranny a few cm and stick the bolts in.
Might as well make the rear portion of your overdrive harness ahead of time and have it hooked up too.
Posted on: 2012/8/10 17:08
|
|||
|
||||
|
Re: R9 Overdrive
|
||||
|---|---|---|---|---|
|
Home away from home
|
It is almost impossible to turn the driveshaft in a way to make it possible for the pawl to slide in. Have rarely had success with it.
BUT, if when you unbolted the solenoid it sprang away from the case a bit, which I believe you mentioned once, then I can guarantee that the solenoid was not engaged in the pawl but was sitting on top of it. The overdrive will click all day but never engage. On the R9s you pretty well have to energize the solenoid with a couple of jumpers to get the shank to stick out far enough to catch the slot on the pawl. You'll know you have it when the solenoid will no longer pull straight out. If I recall, you tip the back of the solenoid toward the rear of the car to catch the entrance slot of the pawl. The little holes on the adapter plate do go the rear. By the way, the adapter should lay flat on the tranny. If the center sits high it has been warped by being installed backward in the past and will need to be lovingly flattened.
Posted on: 2012/8/8 14:25
|
|||
|
||||
|
Re: Swapping dashboards
|
||||
|---|---|---|---|---|
|
Home away from home
|
Welcome to a pleasant little website.
The dashes are the same between air and non air cars with some exceptions which would be easy to take care of while you had them out on the bench. These would center around the lengths of some of the control cables, and the little plastic labels for the ventilation controls which are not too hard to move from one to another. I believe all of the AC wiring is in its own harness that you may deal with as you will.
Posted on: 2012/8/8 5:38
|
|||
|
||||
|
Gas Tank Sender Shortcut
|
||||
|---|---|---|---|---|
|
Home away from home
|
When the tank is OK but the sender fails, this is the way I deal with it unless the customer prefers otherwise.
These dimensions are good for ANY 51-56 passenger car and limo. The horizontal dimension is from the inside edge of the spare tire well, and the vertical dimension is from the beginning of the pressed in ribs. Do not kneel on the trunk floor while cutting, and cut very shallow. I weld 4 little tabs on the "door" to support it in the floor and put a bit of duct tape around it to seal when done. Total time for a "replace the sunken float" repair was about 45 minutes. Attach file:  (80.91 KB) (80.91 KB)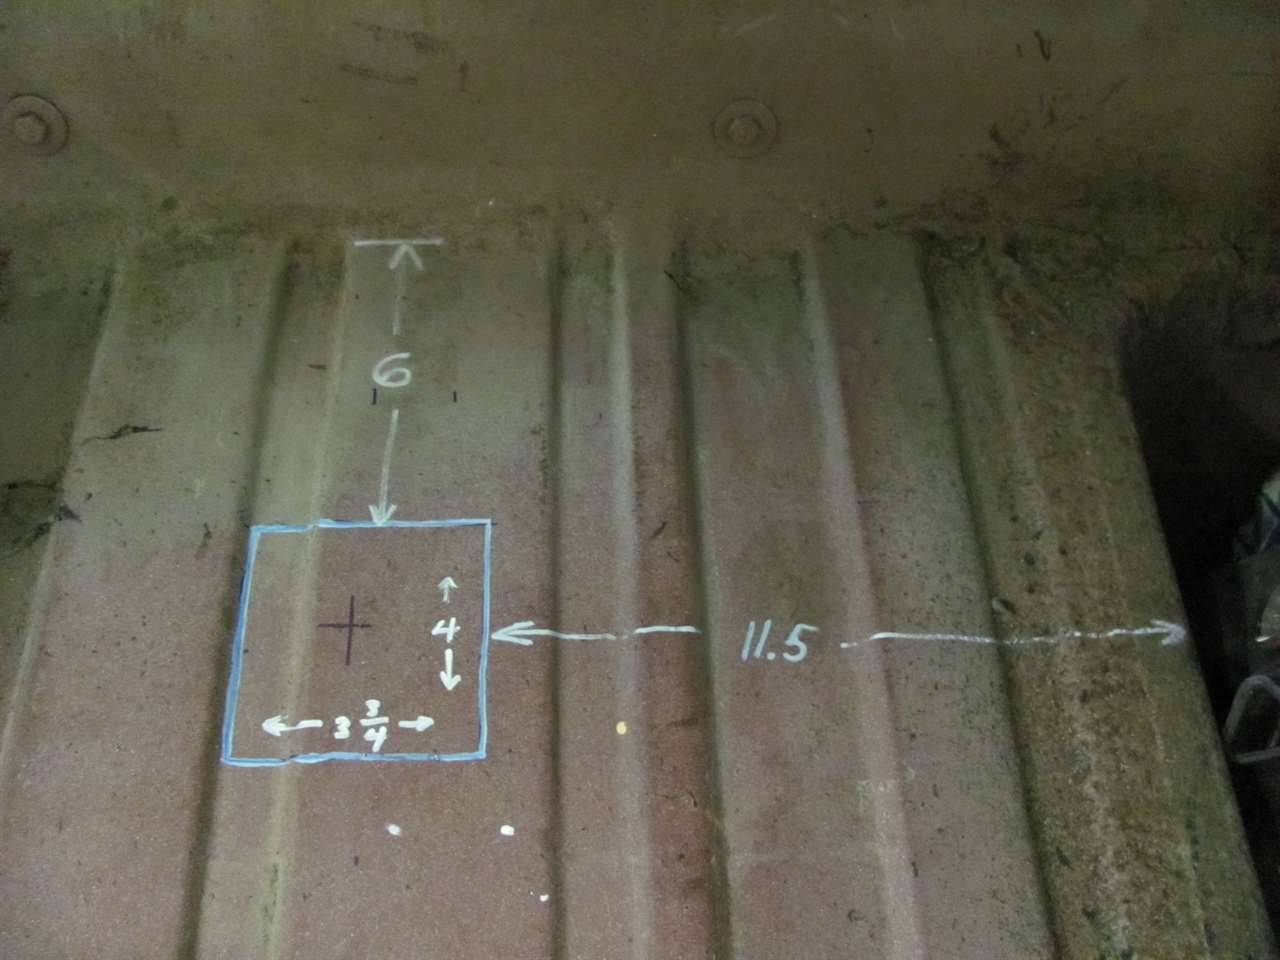 (83.14 KB) (83.14 KB)
Posted on: 2012/8/4 18:48
|
|||
|
||||
|
Re: '40 Ignition cables recommendation
|
||||
|---|---|---|---|---|
|
Home away from home
|
An easy trick is to lay a penny over the #1 sparkplug hole and bump the engine over til the penny floats. The next TDC is the one you want, and the rotor should be at 7 o'clock if the engine is assembled as standard.
Posted on: 2012/8/4 12:11
|
|||
|
||||


