|
Re: Overdrive Questions
|
||||
|---|---|---|---|---|
|
Home away from home
|
From the National Service Data publication:
1940 6 & 8: AS1-R9 1941-48 6 & 8: AS2R9 All Su8 and Custom 8: AS1-R9A I understand also that the clutch shaft can be misleading as Packard switched to the junior clutch shaft in later years for all applications. Picture attached. Hope this helps. Pat Attach file:  (22.70 KB) (22.70 KB)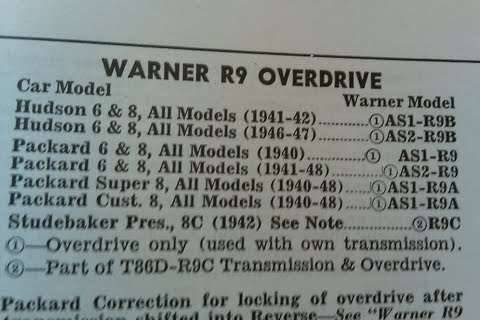
Posted on: 2012/8/14 20:28
|
|||
|
||||
|
Re: 37, 120 carb percolation problems
|
||||
|---|---|---|---|---|
|
Home away from home
|
For what it's worth, I had a very similar issue on my 39 Six with a Carter WA1.
Have you checked the integrity of the carb float? If the float has a hole and is sinking, the effective fill level will be higher than it should be. THe float is low, so the needle valve is open, pouring more fuel into the bowl. When the engine is running, it may not be noticed, especially if the idle speed and mixture have been recently adjusted, which may compensate and mask the issue. When the engine is shut down, the residual fuel line pressure between pump(s) and carb will just pour into the bowl and over the idle level port and right down into the hot manifold. The height relationship between float level and idle port flow circuit is critical. Further, the car may be able to be restarted if done within a minute or so of shutdown, or once the car has time to clear the flood. Before I determined that the issue was a sinking float, I checked the anti percolator function, other carb flow circuits, the idle, and all kinds of other things. Once repaired, all issues resolved. It is possible to make solder repairs to a carb float, but I recommend having a pro do that unless you are skilled at low heat soldering. You don't want to change the weight of the float with globs of solder as it will affect the bowl fill level. Hope this helps. Pat
Posted on: 2012/8/4 9:28
|
|||
|
||||
|
Re: R9 Overdrive Solenoid Spacer direction
|
||||
|---|---|---|---|---|
|
Home away from home
|
Packard1949,
When you reinsert the solenoid plunger, you'll need to tilt the outer end of the solenoid toward the front of the car such that the ball on the end of the plunger can engage the socket feature of the pawl. ALthough this is possible without energizing the solenoid, it can be very tricky. I recommend energizing the solenoid to make this easier. However, instead of relying on the normal electrical ground connection of the upper and lower bolts, I use a two foot piece of 10 gauge wire to make a reliable ground and have used this on many solenoid installations. I do this because it is difficult to maintain the ground connection while jostling the solenoid around and therfore difficult to keep the solenoid engaged. There is another reason, but I'll put that at the end of my rambling. The cable I created has an eyelet on each end: one that can attach to one of the two small threaded posts that hold the cap of the solenoid top cap; the other end can be whatever you choose to get a good ground to the car frame. As I wrote, I used a large eyelet to bolt to one of the crossmember bolts, but you could also use a large aligator clip that will carry the necessary current. I suppose you could strip enough wire and find a way to ground it, but I recommend making sure it will not come loose and that it can carry lots-O-current. Once you've done this and you have the other wires connected (or at least terminals 3 & 4), reach over to the governor (other side of the OD) and disconnect the lead (for cars with electromatic clutch, but sure to disconnect the correct wire). If you then ground this harness lead to any clean exposed metal of the frame, you can engage the OD so long as the OD dash knob is in and all other electrical components are working. You may wish to use an aligator clip or other means to hold this lead securely grounded. THis process will keep the solenoid engaged, giving you time to insert it and bolt it on with little frustration (make sure the adapter is not 180 degrees off). ALso, I highly recommend this method along with good connections since the solenoid, if quickly engaged and disengaged, has such windings that it can act like an ignition coil and shock you with a voltage high enough to get your attention and bust a few knuckles and perhaps illicit some unwanted vocal outbursts (not that I have ever done that). Good Luck. Let me know if you have any questions. Pat
Posted on: 2012/8/4 9:09
|
|||
|
||||
|
Re: Pinstripe colors for Packard and Centennial Blue
|
||||
|---|---|---|---|---|
|
Home away from home
|
All,
Thanks for the information. The references to line width and separation are helpful (Tim, Guscha!). I think I'll need to come up with my own interpretation of the definition of Gold Bronze and will be quite happy. PM
Posted on: 2012/6/1 15:28
|
|||
|
||||
|
Re: Pinstripe colors for Packard and Centennial Blue
|
||||
|---|---|---|---|---|
|
Home away from home
|
Still haven't been able to locate a photo or paint code for correct Gold Bronze pinstripe to with 39 Packard Blue. Searched the 36-41 photos one at time...no luck.
Posted on: 2012/5/30 15:33
|
|||
|
||||
|
Re: Front Grill, 1939 120
|
||||
|---|---|---|---|---|
|
Home away from home
|
William,
In the photo I posted, the curved slots are there to allow a post from yet more linkage pieces to connect to which are not in the photo. I'll try to get a photo of that, but post an explanation first (I expect there is already a similar photo here at packardinfo. Each of the left shutter slats and each of the right shutter slats are riveted to a left and right flat drive arm that moves all the slats of each pair together. The left and right drive arms each have a post sticking upward that goes through the curved slot in the photo and connects to the left and right push rods in the photo. So, if your chrome slats are removed from the radiator surround, you may want to look for the flat piece that has a rivet hole for each shutter slat. Pat
Posted on: 2012/4/30 11:42
|
|||
|
||||
|
Re: Front Grill, 1939 120
|
||||
|---|---|---|---|---|
|
Home away from home
|
William,
I could not locate (yet) any pushrod in my leftover parts, but do have several of the shutter linkages as shown in this photo. Also note, there is supposed to be a spring that goes from the post on the right side of the photo (just below and left of the curved slot) to the left most end of the cross bar above it. This spring is responsible for returning the shutters to the closed position as the radiator cools. The spring is about 1/4 inch in diameter. I thought I had that part also. I will keep looking. Hope this helps. Pat Attach file: (77.45 KB)
Posted on: 2012/4/27 11:13
|
|||
|
||||
|
Re: Front Grill, 1939 120
|
||||
|---|---|---|---|---|
|
Home away from home
|
William, the photos already posted look nearly identical to the pushrod on my 39 Six. Your posting mentioned "the top part with the two arms which sits under the maskot thats all." There are also two counter levers that help to transfer the motion to the right and left banks of shutters. I may have a set of these at home and will check when I can (hopefully tonight). I think the 6 and small 8 used the same part.
Pat
Posted on: 2012/4/16 12:22
|
|||
|
||||
|
Re: Pinstripe colors for Packard and Centennial Blue
|
||||
|---|---|---|---|---|
|
Home away from home
|
Tim,
Just saw your response from a couple months ago. If you know the year or any other keywords I could use to find the photo, I would greatly appreciate it. Pat
Posted on: 2012/2/8 12:28
|
|||
|
||||
|
Re: converting from Houdaille to Delco shocks
|
||||
|---|---|---|---|---|
|
Home away from home
|
David,
I'll try to address your points in order: Yes, the shop manual goes into great detail on this subject, including the fact that there where different valve choices within a car. I think the manual states something to the effect that "if a customer is not happy, replace with valve x or y to either stiffen or relax the ride. I don't expect my Delco specific parts book to tell me any more than the Packard Shop Manual, but will look (gotta dig that up). I can't comment on the Su8 placement of the rear of the shock vs. the pump as I have no experience with a vehicle with Houdalle shocks at the corners. On my 39 six, things are not too close (except when I am trying to get a wrench on the pump!). I guess this gets back to your stated concern of whether the four mounting holes are already there for the Delco. Regarding the rears, again, I can't comment on the Houdalle vs. Delco, but would be critical of the mounting scheme. However, I suspect the change of any parts to accomodate the Delcos would be much easier than effort to drill holes and add threaded mounts for the front pilot and mount bolts. The Delco parts suffix rule applies to rears as well. I have a set of shocks that turned out to be for a large eight, but I don't the exact year: 38-39-40. I'd need to do some research to check the exact valving. Let me know if you are interested. Pat
Posted on: 2012/1/6 12:52
|
|||
|
||||


