|
Re: 1930 (and many other years) fuse block
|
||||
|---|---|---|---|---|
|
Home away from home

|
Tom,
I almost forgot.... If you need mica sheet material try: http://www.mcmaster.com/#mica-sheets/=949qpa Regards, Dave
Posted on: 2010/10/3 15:15
|
|||
|
||||
|
Re: 1930 (and many other years) fuse block
|
||||
|---|---|---|---|---|
|
Home away from home
|
Tom,
The mica sheets are primarily for support of the wire that is wrapped around them. At the time mica was one of the only materials that would stand up to the heat. As you know this fuse block has a glass fuse in parallel with the wire wrapped around the mica. If there was a short in the system the fuse would blow and the wire wrapped around the mica would get red hot. The glass fuse would open but the wire wrapped around the mica would still permit current flow, so the engine wouldn't stop, unless the short was in the ignition system. Since the resistance of the wire wrapped around the mica increases greatly when it gets hot, the current flow from the generator to ground would actually decrease, protecting the generator from burning itself up. Pretty smart, those Packard Engineers...... Regards, Dave
Posted on: 2010/10/3 15:12
|
|||
|
||||
|
Re: 1931 833 boiling over
|
||||
|---|---|---|---|---|
|
Home away from home
|
Don,
Since you didn't have trouble before the car sat I'd check the following: 1. Is the radiator belt adjusted tight? 2. Are the Pines radiator shutters opening fully? 3. Check ignition timing, retarded timing will increase temp. 4. If checking the above doesn't solve the problem drain the system and back flush. If you have the original style honeycomb radiator these are more susceptible to clogging due to the smaller water passages that the tube and fin design. The best way to back flush is to use compressed air in addition to water. I've made up a fitting that connects into the bottom radiator pipe and has a connection for water and air. I flow the water first then slowly open the air fitting. The combination of water and bubbling air works well on dislodging accumulated rust and debris. If you do this be careful not to pressurized the radiator with more than 5 psi otherwise you risk damage. When I first tried this I had a pressure gauge on the fitting so I would know when to limit the air going in. If you have a lot of debris you may want to remove the water jacket plate and clean this out. You can also remove the shutter stat mounted on the radiator that controls the radiator shutters to gain access to the top of the radiator tank. Usually the top of the core here is caked with debris. If you pull the water jacket plate off check the water distribution tubes in the plate to make sure they are not rusted out. Regards, Dave
Posted on: 2010/10/3 8:02
|
|||
|
||||
|
Re: Floorboard - 1932 901
|
||||
|---|---|---|---|---|
|
Home away from home
|
Marston,
Congratulations on your acquisition! The rear floorboards measure 1/2 thick and are screwed to wood blocks that rest on the frame. There is a sheet metal lip on the front and rear of the rear compartment floor pan that the rear floorboards sit on. I looked at the ones on mine and it appears they are laminated wood, similar to plywood, painted with a dull black finish. The front floor boards are secured the same way, except there is a covering of sheet metal on the bottom of both front floorboards (one flat, one angled up). If you're looking for these or any other '32 parts I've had good luck with John Ulrich Packard parts at: http://julrichpackard.com/index.htm In addition to reproduction parts he also can help with old stock needs. Regards, Dave
Posted on: 2010/9/11 12:29
|
|||
|
||||
|
Re: housing bore for main bearings on 7th series 8
|
||||
|---|---|---|---|---|
|
Home away from home
|
Tom,
One process that I've used with success on worn cam bearings for the early Packard's is to bore the cam bearing oversize and metal spray or hard chrome the cam bearing journals oversize. The oversize journals are then ground down to provide the correct oil clearance to the cam bearings. Since the cam bearings for the early models are not Babbitt lined, but solid steel or cast iron, boring them oversize is one option. Another option would be to bore and re-bush them, but I don't like this option because you have to make sure the bushings will never loosen up and move. Some places will weld up the cam journals then grind them back to size but I prefer the metal spray or hard chrome option because these do not distort the cam due to the lower heat generated for hard chrome or metal spraying. I've had good luck with Delta Camshaft: http://www.deltacam.com/ A video of the metal spraying process at Delta: http://www.deltacam.com/services.php?p=2 You may want to contact: http://www.effinghamregrinding.com/aboutus.htm or http://www.elgincams.com/ A good house can take your cam bearings, bore them out and then respray or re-chrome your camshaft. They should also be able to supply written data on the re-ground cam lobes to show that the correct lift has been restored. One comment on checking the Packard camshaft on these models, a common problem with these camshafts is twist because of their length. Even if the cam lobes look OK and don't look like they need a re-grind, check each came lobe after checking the straightness of the camshaft bearing journals. The cam lobes can easily be checked by supporting the camshaft between centers in a lathe and then using a dial indicator to measure the base circle of each cam lobe. Slowly rotate the cam and read the run-out on the dial indicator. Stop just before the ramp on each side of the base circle. You want to have the run-out for each cam lobe base circle be .001 or less. After checking the cam lobe base circles check the cam bearing journals to make sure they have run-out .001 or less. Once again a good cam rebuilding shop will do this for you, this is part of the re-building and quality verification process. I would HIGHLY recommend you do this if the shop you deal with does not know how to do this. I had a poor running condition with an engine that took me two months to find, the root cause problem was with the camshaft. The shop I brought the cam to to told me the cam was fine, and I believed them. I later found out a few of the cam lobes were bent off center .010 from the center of the cam journals. This made adjustment of the .006 tappet clearance impossible. After tearing the engine back apart and having the cam straightened and re-ground everything was fine. Removing the cam on these early model is not an easy job and you want to make sure everything is right before you bolt the block on. Regards, Dave
Posted on: 2010/9/8 21:38
|
|||
|
||||
|
Re: housing bore for main bearings on 7th series 8
|
||||
|---|---|---|---|---|
|
Home away from home
|
Thomas,
I noticed something mentioned at the start of this post that should be checked out. It was mentioned the mains were line honed. I hope this was not the case, and the mains were line bored. Soft Babbitt type bearing should never be honed, only bored. The reason, abrasive particles from the hone will break off during the honing process and become embedded in the soft Babbitt. Hard type bearings such as brass, bronze, steel, and cast iron can be honed because the material is not soft enough to allow the honing stone particles to embed into the bearing, and can be washed away with thorough cleaning. Regarding the bearing clearances for your engine, data from a Motors manual listing '31 Packards is as follows: Main bearing clearance - .001 Main bearing end play - .003 Thrust on main bearing #7 Rod bearing clearance - .0015 Rod bearing end play - .003 Plastigage is the best method for checking main & rod clearance because it measures the actual oil film clearance. If one used a micrometer to measure the crankpin diameter and a bore gauge to measure the I.D. of the main bearing you could have a tight bearing even if you measured .001 clearance between the bearings. Why, if the crankshaft had a .001 bow in it, this bow would eliminate the .001 oil clearance that was measured. Plastigauge can be purchased in .001 to .003 range. The bearing and crank should be clean before you make your measurement. Cut a length of plastigauge the full length of the bearing you want to measure. You may want to check out: http://www.plastigaugeusa.com/how.html Torque the bearing caps to the correct torque, Motors lists 65-70 ft. lbs for the mains and 40-45 ft. lbs. for the rods. The Motors data on the '31 only shows one value for the clearances, not the service limits. Just as reference info Motors shows the following service limits for a '35 model 120: Main bearing clearance - .001 to .003 Crankshaft endplay - .003 to .008 Rod bearing clearance - .0008 to .0028 Rod bearing endplay - .004 to .010 Good luck, Dave
Posted on: 2010/9/6 10:29
|
|||
|
||||
|
Re: 32 Transmission woes
|
||||
|---|---|---|---|---|
|
Home away from home
|
Tbirdman,
A paragraph from a transmission shop manual listed below, although this is for later transmissions with helical cut gears, the section about worn detent balls and springs applies to the '32 gear box. Another common mechanical problem with transmissions of this type is slipping or jumping out of gear. Actually, the transmission is much less likely to slip or jump out of first or reverse than out of second-, third-, or fourth-speed gear. The most likely causes of the transmission slipping out of gear are worn detent balls or springs in the shifter shaft cover. These spring-loaded balls hold the shifter shaft in position. If the spring does not have enough tension or if the balls are worn, the transmission will almost certainly slip or jump out of gear. Synchronizer damage will also cause the transmission to jump out of gear. Slipping out of any gear is most likely to occur when the driver suddenly takes his or her foot off the accelerator pedal, especially when descending a steep hill. The thrust produced by the helical gears will tend to move all rotating gears and shafts to the rear of the transmission, as long as the torque provided by the engine is being delivered to the rear wheels by the transmission. However, when the driver takes his or her foot off of the a accelerator pedal, the situation is changed. The rear wheels now try to drive the engine through the transmission. This reverses the direction of the torque being delivered through the transmission gears, and the thrust is now toward the front of the transmission. If this thrust is not controlled by the thrust washers and bearing retainers, it is likely to force the shifter shaft to move in spite of the spring-loaded ball that holds it. When this happens, the transmission slips out of gear. Regards, Dave
Posted on: 2010/8/14 18:15
|
|||
|
||||
|
Re: housing bore for main bearings on 7th series 8
|
||||
|---|---|---|---|---|
|
Home away from home
|
Some additions comments:
If possible find out if the mains in the crankcase were line bored while it was bolted to the block. To do the line boring operation correctly the crankcase must be bolted securely to the block. If it is not, there is a good chance the alignment of the mains will not be on the same axis when it is attached to the block. End result, a tight crank and improper or non-existent oil film, which will destroy the babbitt bearings quickly. Tightening the crankcase to the block will distort the crankcase slightly, this is why it must be bored with the block attached. I've seen work where the crankcase was line bored without the block attached and the engine re-builder attempted to correct a tight crank by selective tightening of the block to crankcase nuts, trying to bow the crankcase to correct improper main bearing alignment. If the line boring operation was performed with the block attached I would attach the block securely to the crankcase before checking clearance in the mains with Plastigauge. If the crankshaft has been stored horizontal for two years, check it for straightness before you check clearance in the mains. You should always store a crankshaft vertical, if it is stored horizontal for a length of time it could have bowed. Regards, Dave
Posted on: 2010/8/12 18:06
|
|||
|
||||
|
Monobloc 12
|
||||
|---|---|---|---|---|
|
Home away from home
|
Anyone seen one lately?
Attach file:  (148.08 KB) (148.08 KB)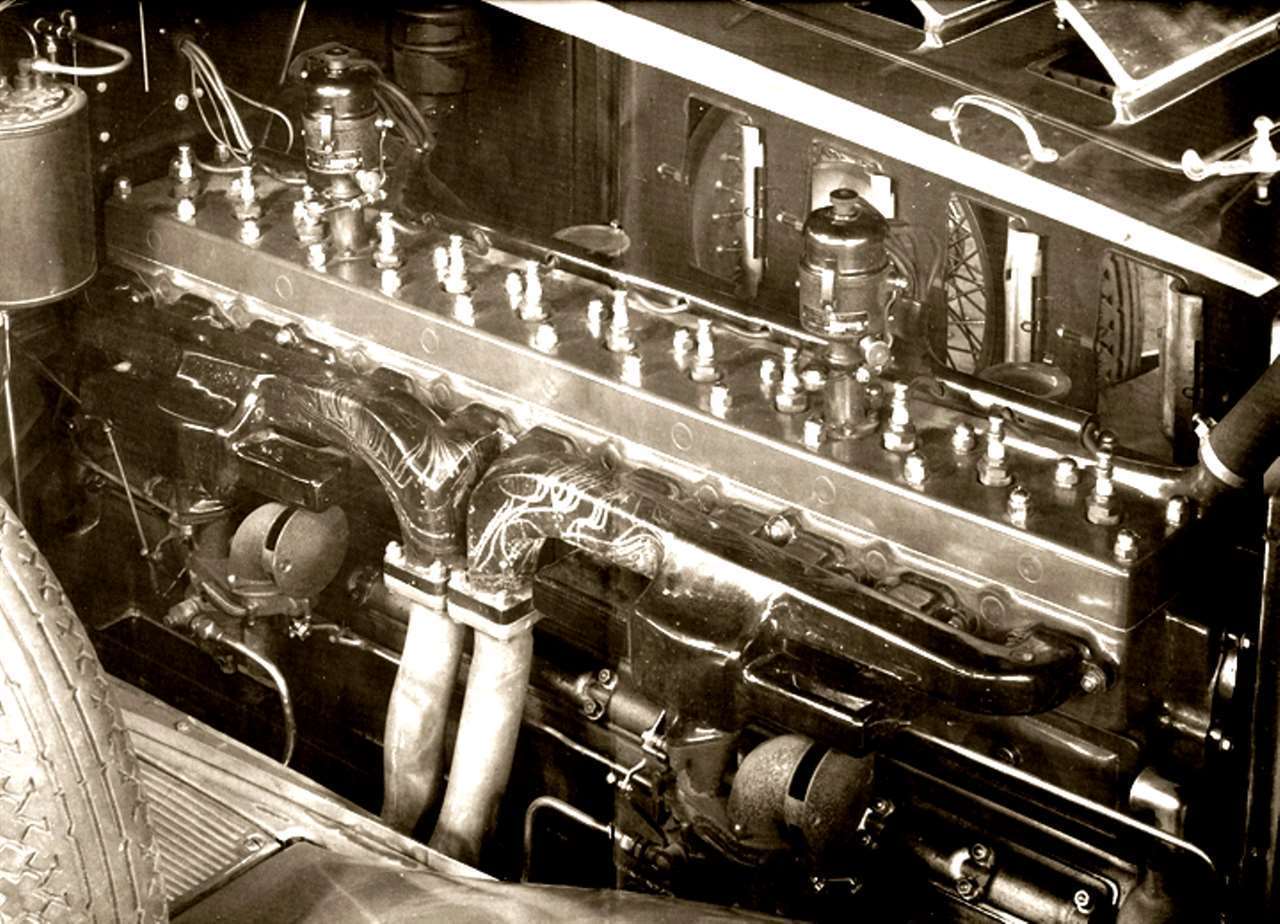
Posted on: 2010/7/17 13:20
|
|||
|
||||
|
Re: '39 Packard 110 Transmission Fluid (& Rear Dif Fluid)
|
||||
|---|---|---|---|---|
|
Home away from home
|
Owen,
I had it for a while before I even realized there was a lower 1st gear. Because you have to pull the gear shift lever to the left and down against a spring and I'm sure there were a few that never realized this extra gear. I never use the low low, at a slow idle in low low I can almost walk around the car. Couple this with the high low end torque of the engine and it's no wonder these cars were turned into service station wreckers. One comment on the '32 transmission, it has a very unusual sound. I've met people at shows that drove these cars when they were new and they told me it was called a "singing transmission". The transmission produces a sound in 1st and second that is hard to describe. Almost a musical note, not a gear whine. Regards, Dave
Posted on: 2010/7/11 15:50
|
|||
|
||||


