|
Re: 39 1700 map/reading lights, where were they mounted???
|
||||
|---|---|---|---|---|
|
Not too shy to talk
|
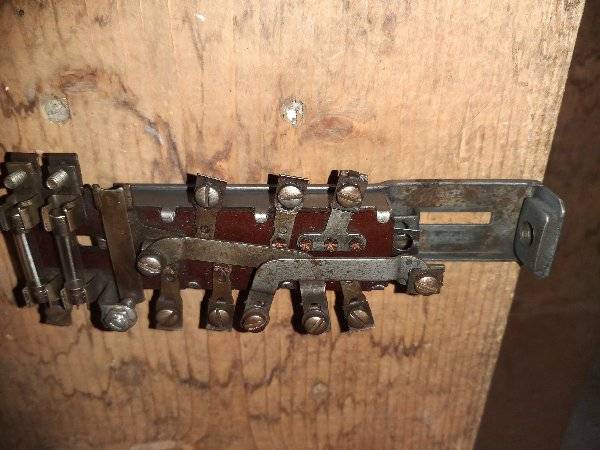
Guys, Thanks, you're the best. I see how the reading lights are mounted now. All I need to do is make a couple brackets. I have the light sockets. As for the light in the clock. I wonder where you'd get the mercury switch socket. I really appreciate the pictures and the wiring diagram. That makes things much clearer.
Posted on: 2016/6/27 23:25
|
|||
|
||||
|
39 1700 map/reading lights, where were they mounted???
|
||||
|---|---|---|---|---|
|
Not too shy to talk
|
My 39 1700 has two lights just laying under the dash. After taking out the radio head and a few other things I figured they must be my missing reading/map lights. It looks like they go over the recess where the key and starter button are mounted but there is no bracket to mount them. The holes over the key and starter button are square. I'm thinking someone just took them out to mount the radio. Does having the radio eliminate the lights or is there some kind of special mounting bracket I should have? Any info on this subject would be of help. Also, are there two lights that go in the factory clock? One to light up the clock and another to shine into the glove box when the glove box door is open??? Any insight and or ideas where to get the required parts if I have something missing would be appreciated. Thanks!!!!!
Posted on: 2016/6/26 14:23
|
|||
|
||||
|
Recomendation of wiring harness suppliers.
|
||||
|---|---|---|---|---|
|
Not too shy to talk
|
Found the best price with a limited warranty from Harnesses Unlimited.Seems they build it with modern insulated wire then cover it to look like the original. Can anyone tell me if they are reliable and make a good product? Thanks!!!
Posted on: 2016/6/24 23:01
|
|||
|
||||
|
Recomendation of wiring harness suppliers.
|
||||
|---|---|---|---|---|
|
Not too shy to talk
|
Found the best price with a limited warranty from Harnesses Unlimited.Seems they build it with modern insulated wire then cover it to look like the original. Can anyone tell me if they are reliable and make a good product? Thanks!!!
Posted on: 2016/6/24 23:00
|
|||
|
||||
|
Re: 39 1700 Deluxe Heater Color and type of paint
|
||||
|---|---|---|---|---|
|
Not too shy to talk
|
All,thanks for the replies. I've looked for the elusive wrinkle paint but can't find it. I've found satin, flat, crackle, stone, hammered and currently have a rough texture dark brown but the color, if my memory serves me, that you guys are describing was textured with a slight sheen. What I have appears to be flat. Do you have any other suggestions where I might find this paint?
Posted on: 2016/6/24 7:54
|
|||
|
||||
|
39 1700 Deluxe Heater Color and type of paint
|
||||
|---|---|---|---|---|
|
Not too shy to talk
|
Need to find out what color and type of paint was used on a 39 1700 deluxe heater. Also where I might find the paint or how to create the finish. Thanks!!!
Posted on: 2016/6/21 13:02
|
|||
|
||||
|
Headlight Wiring and Operation in a 39 1700 Series.
|
||||
|---|---|---|---|---|
|
Not too shy to talk
|
I'm sorting thru the rats nest of past owners under the dash and trying to get the car back to it's original wiring sans maybe another wire going back from my turnsignal switch so my stop lights work as turnsignals too, but that's another issue.
I have a wiring diagram of my car but I can't make sense of the wiring from the headlight switch to the dimmer switch and out to the headlights. I'm reading that the car had a city and country position on the headlight switch but can't find a detailed explanation of what that means or how it worked. It would be great if I could get a wiring diagram showing the system in action but I know that is probably going to be nearly impossible. If anyone can help me with this issue I'd appreciate it. I did manage to rebuild my rheostat for the instrument lights but would like to get a new one if I could. Can't find that either. Let me know. Thanks again...
Posted on: 2016/4/15 23:12
|
|||
|
||||
|
Re: Locking door handle cylinder removal 1940
|
||||
|---|---|---|---|---|
|
Not too shy to talk
|
Thanks for the link. Made copies of the info there. There were some slight discrepancies between what he posted and what I found on my car. I don't know if it was the difference in model years or what. Got my lock cylinders out now just have to figure out how to reinstall them. My 39 has no lock ring inside holding the the spring and washer with the dog ears on it in.
Posted on: 2015/2/27 0:49
|
|||
|
||||
|
Re: Locking door handle cylinder removal 1940
|
||||
|---|---|---|---|---|
|
Not too shy to talk
|
On the Packard Owners website there is an article about removing the door lock cylinders on a 1937. After reading that article I was able to remove the door lock cylinders on my 1939, 1700 sedan. Here is a quick synopses of the procedure that worked on my 1939 car. Insert the key into the lock and turn as far clockwise as it will go. Locate the largest wire that will fit in the tiny hole on the rim of the lock cylinder. Note: a heavy duty paper clip would not work for me. With the lock cylinder in the extreme clockwise position insert the wire holding the wire with a pair of pliers to provide adequate pressure. You may feel the wire meet resistance then insert slightly further at some point. Once the wire goes in that tiny bit more try to turn the key at little bit more clockwise. If it does turn it will only go about an 1/8th of an inch. While still holding slight clockwise pressure on the key remove the release wire and continue turning the key clockwise and the cylinder should come out.
Posted on: 2015/2/24 16:18
|
|||
|
||||

 (234.30 KB)


