|
Re: '41 & '42 160 Temp Gauge Removal
|
||||
|---|---|---|---|---|
|
Home away from home

|
You mite be able to get at it from the back there is only four screws. Otherwise you need to pull the whole dash. G
Posted on: 2017/7/28 16:50
|
|||
|
||||
|
Re: '41 & '42 160 Temp Gauge Removal
|
||||
|---|---|---|---|---|
|
Just can't stay away
|
Quite disappointed that I did not get any responses to my post. I have looked over the situation and I cannot as yet see any real plan of action. It all seems impossible but there must be a solution to remove the temp gauge from my 160. The immediate instrument cluster does not seem to be able to be disconnected from the complete instrument dash unit. Thus what's the answer? Surely there must be a solution that is feasible.
Since no replies, I guess I will have to go into this project COLD TURKEY which I hate to do. It means I might go through a whole lot of extra work that might not be required. Will start advise or no advise in a day or two. Lee Noga
Posted on: 2017/8/7 19:14
|
|||
|
||||
|
Re: '41 & '42 160 Temp Gauge Removal
|
||||
|---|---|---|---|---|
|
Forum Ambassador

|
I can't offer any more than has been suggested before. The gauges are mounted in pairs on plates which are fastened to the rear of the cluster. The plate for each pair of gauges has 4 screws holding it to the cluster. The temp and oil pressure gauges share the same plate and each gauge is connected to the engine by a length of copper tubing.
The plate will need to be unscrewed from the cluster and dropped down into a working position before the gauge can be removed from the plate. The copper tube and temp sensor bulb will need to be disconnected from the engine head and pulled into the drivers compartment before the temp gauge can be removed from the plate. The removal of the sensor from the head may be a project in itself if yours has been in the engine a long time. If it has I would suggest several liberal applications of PBBlaster or the like paying particular attention to the center opening where the tubing enters the nut. Start a day or so before beginning the project. Even with help the flange and sensor may be cemented in by sediment and will twist off the copper tubing Since the oil pressure gauge is mounted on the same plate, if you want to completely remove the plate assy to a workbench in order to remove the temp gauge the oil pressure line will also need to disconnect from the engine and be pulled into the drivers compartment. I can't speak to how congested the 41 dash is underneath or if it is worse than other models. I know on the 41-50 Clipper based models and actually on all postwar cars the gauges can be removed from the cluster without removing the dash or removing the cluster from the dash. While it is definitely not a pleasant job and will require some flexibility and dexterity, I would think the gauges can also be removed on a 41 without dash removal. Somehow I just can't see Packard forcing their mechanics to pull a dash which is a MAJOR project just to replace a gauge. Here is a photo off ebay showing the 41 gauges. Note that the gauges are held to the plate by a single nut on each gauge. The nut has to be removed and then the gauge with the copper tube still attached is pulled thru the hole until the gauge and tubing clears the plate. Unfortunately the person that removed these gauges chose to cut the copper tubing making the gauges worthless without sending to a repair shop to have new tubing and a temp sensor installed. Attach file:  (173.82 KB) (173.82 KB)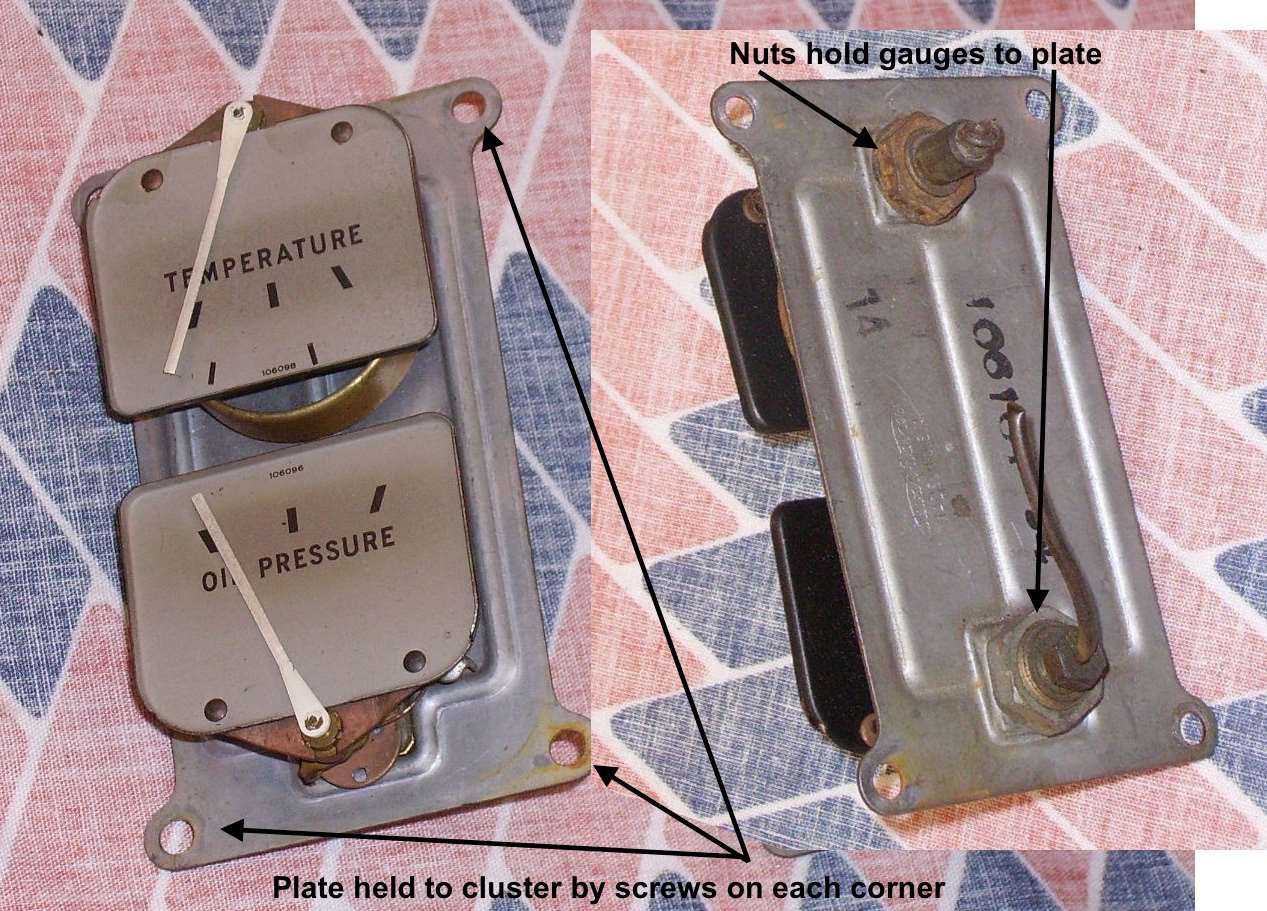
Posted on: 2017/8/7 20:17
|
|||
|
Howard
|
||||
|
||||
|
Re: '41 & '42 160 Temp Gauge Removal
|
||||
|---|---|---|---|---|
|
Just can't stay away
|
Yes I know exactly how the gauges are mounted on the back of the instrument panel. But how to get this double mounted gauge mounted with 4 screws removed?? THAT IS THE PROBLEM!!
No way to just get to the 4 screws and remove it. I have loosened all of the screws I could find to hopefully pull out the whole dash unit in order to have enough room to get at the back of the instrument panel but it still will not budge. Have no idea of what is holding it in place. Up a creek without a paddle!! Lee
Posted on: 2017/8/8 16:46
|
|||
|
||||
|
Re: '41 & '42 160 Temp Gauge Removal
|
||||
|---|---|---|---|---|
|
Home away from home
|
To pull the whole dash you need to remove the windshield garnish a lot of screws and two nuts far rt and lt. G
Sent you a PM
Posted on: 2017/8/8 19:03
|
|||
|
||||
|
Re: '41 & '42 160 Temp Gauge Removal
|
||||
|---|---|---|---|---|
|
Just can't stay away
|
Yes I was aware of that also. Removed all the screws under the garnish and also all the screws below but dash will not budge. You say there are two screws on the end of the dash?
I do not see those. Lee
Posted on: 2017/8/9 10:13
|
|||
|
||||
|
Re: '41 & '42 160 Temp Gauge Removal
|
||||
|---|---|---|---|---|
|
Home away from home
|
1/4" nut lower rt and lt. On the back of the dash.
Send me your ph# and I'll send you a photo Greg
Posted on: 2017/8/9 11:16
|
|||
|
||||
|
Re: '41 & '42 160 Temp Gauge Removal
|
||||
|---|---|---|---|---|
|
Home away from home
|
I've been watching this post to see what I could learn, as I had to remove the gas/ammeter gauge cluster in my '39 Six and was fearful I might have to remove the dash, which I was NOT looking forward to.
Although I realize the oil/temp set present a much more complicated removal dynamic due to the contiguous plumbing, the actual disconnection of the cluster pod from the back of the dash is the same for both sets. I did attempt the task today and was very pleased to find I was able to get the cluster pod out without incident. I taped each wire-end off so I didn't have to worry about shorts. A 5/16" nut driver made getting 'at' the nuts quite easy. and I found the 2 right hand nuts had their own studs, while the 2 left hand ones 'share' studs with the speedometer. I bring this up on this post as the cluster I found on the net to replace my 'sprung' ammeter gauge was listed as being from a '41, and the gauges, pod-'can', and hole pattern are identical to the '39 pod I removed. The only discernible difference I could see was the glass/limit(s)-painting. I imagine this is moot for the owner working on the 160, as he has likely figured out the removal procedure for his gauges by now, but wanted to post just in case anybody else is involved with gauge R&R in this year-range.
Posted on: 2017/8/20 18:03
|
|||
|
'If you think you can, or you think you can't - you're right!' Henry Ford.
1939 Packard Six, Model 1700 |
||||
|
||||


