|
Re: Ultramatic Disassembly
|
||||
|---|---|---|---|---|
|
Forum Ambassador

|
Quote:
The only stock rubber hoses Packard used were on the 23rd series Ultras but after that, as Kev said they were all metal. One reason you might have hoses at the cooler would be if some mechanic installed them after needing to move the cooler out of the way to change the lower radiator hoses. Sometimes the steel lines can be a pain and need to be disconnected because the cooler won't go very far and provide much extra clearance if they stay attached.
Posted on: 4/8 11:48
|
|||
|
Howard
|
||||
|
||||
|
Re: Column Shift Levers Stuck - 1941 Packard 160
|
||||
|---|---|---|---|---|
|
Forum Ambassador
|
One of the issues on the 41 Clipper thru 50 style linkage is lack of shifter lubrication in general and particularly of the upper 2-3 shift lever. I strongly suspect that aside from the shape of the levers, the conventional body cars may have a similar shifter construction and issue.
On Clippers there is an oil hole where by applying a few drops, oil will run down and hit the shift tongue and splines with a bit running out slots to catch the lower R-1 lever. The upper 2-3 lever has absolutely no lube provision and in addition catches any water and dirt that can condense and run down the tube to pool at the retaining clip and washer and then work its way behind the lever. Corrosion and rust seizing the upper lever to the tube is a frequent result. To remove the Clipper shift assy the operator lever needs to be removed and also an anti-vibration wire spring pressing against a grooved piece inserted in the tube at the upper end of the steering column just below the wheel. Not sure if conventional bodies are exactly the same there but suspect similar and it does require a bit of work and disassembly to separate the shift assy from the column. I found it was easier to work on the shifter out of the car by removing column with shifter still attached. Here are a some photos of a Clipper style linkage showing what I expect you will find. First shows rust and corrosion on the tube between the slot and retaining clip groove where the upper lever rotates. It took heat and brute force to remove seized lever from tube, second shows assy cleaned up, third is lube points, fourth is upper column and anti vibration spring. Attach file:  Clipper shift- dirty.jpeg (107.48 KB) Clipper shift- dirty.jpeg (107.48 KB)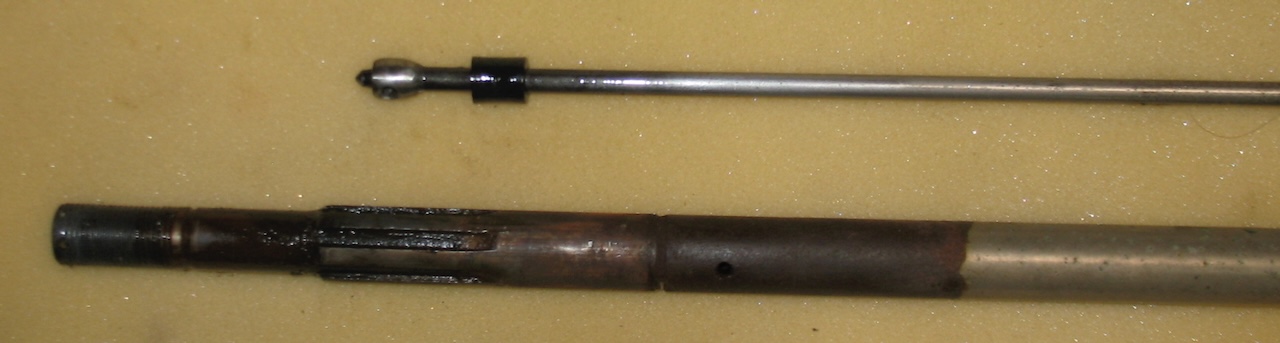 Clipper shift tube.jpeg (195.89 KB) Clipper shift tube.jpeg (195.89 KB)  shift tube lube copy.jpg (199.13 KB) shift tube lube copy.jpg (199.13 KB)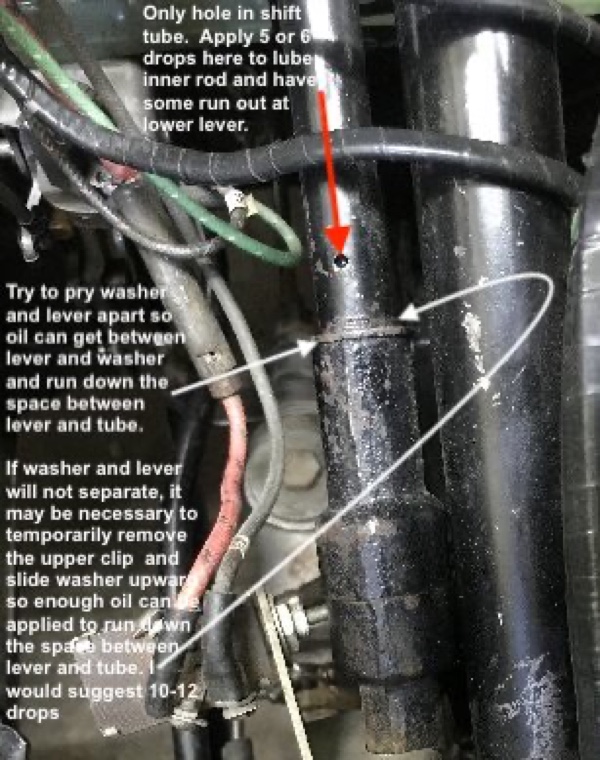 anti vibration spring.jpeg (267.42 KB) anti vibration spring.jpeg (267.42 KB)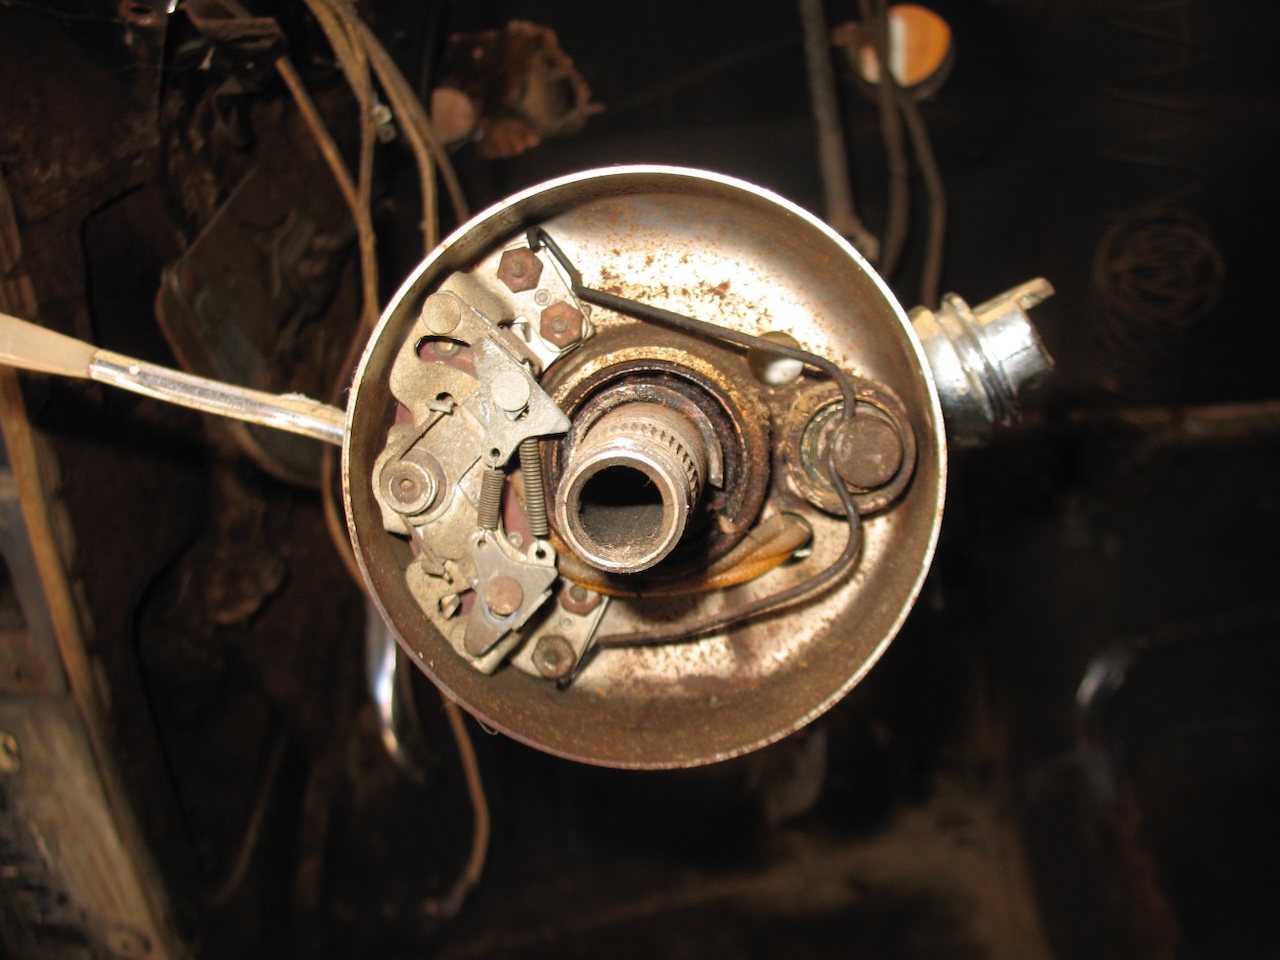
Posted on: 4/8 10:16
|
|||
|
Howard
|
||||
|
||||
|
Re: Resurrecting my 56’ Patrician
|
||||
|---|---|---|---|---|
|
Forum Ambassador
|
For the extra sender, I seem to recall a plug just below the regular sender and at an angle pointing toward the passenger side. It may be slightly hidden under the breather vent tube coming off the lifter galley cover. I believe it is larger than the sender port -- maybe a 1/4 plug -- but think it also opens to the same passage the sender uses.
Another option is since the heads are interchangeable right to left there will be an unused port on the rear of both heads. Look to see where the oil filter supply tube is at the front of the left head to see where it will be positioned at the rear. Not sure you will be able to use those because of the closeness to the firewall if the sender is very large. As to the hoses, I believe the vendors have them but you might also be able to have them made locally at a hydraulic shop. If replacement fittings are much larger or different in shape than the originals there could be issues with the two short hoses on a Bendix system. There is also a restriction in the main pressure hose that factory articles said is supposed to cut down on noise. I know hoses made locally don't have that restriction and seem to work OK so don't know how important it really is.
Posted on: 4/7 17:31
|
|||
|
Howard
|
||||
|
||||
|
Re: Wanted: Dial-Gearshift Indicator (23rd Series)
|
||||
|---|---|---|---|---|
|
Forum Ambassador
|
I don't know if the Ultramatic indicator piece carried on with the Flite-Glo instrument lighting theme since the owners manual says it is illuminated any time the ign switch is on. If so and it still glows, the paint in the letters may be cracked and barely hanging on. Just like the instruments, when you disassemble to polish the indicator try to protect the paint on the pointer and take care with the paint in the letters on back of the plastic. If the paint is damaged or chunks fall off the pointer or letters they will become splotchy or not glow at all.
Posted on: 4/7 10:11
|
|||
|
Howard
|
||||
|
||||
|
Re: Don’s 1937 (120) 138CD Deluxe Touring Limo
|
||||
|---|---|---|---|---|
|
Forum Ambassador
|
If your Chrysler generator is the late 40s early 50s style with the end cap and keyed armature shaft that can mount and drive a power steering pump a couple of Packard owners having cars that can only accommodate a single fan belt have used them to add power steering to their cars.
Posted on: 4/6 16:12
|
|||
|
Howard
|
||||
|
||||
|
Re: 1937 120 Conv. Sedan - Blanche
|
||||
|---|---|---|---|---|
|
Forum Ambassador
|
Quote:
...... as well as the horn button (H). I don't know if that is a typo but if that is how it is currently wired the button should be on S (switch) and horns on H.
Posted on: 4/6 14:33
|
|||
|
Howard
|
||||
|
||||
|
Re: 1937 120 Conv. Sedan - Blanche
|
||||
|---|---|---|---|---|
|
Forum Ambassador
|
That sounds good as to where you have power. Where you do not also sounds good because unless the engine is running the cutout relay in regulator would be open so nothing on A, F and G or ground.
There is a bit of discrepancy between the factory and AEA wiring diagrams on exactly where a wire connection to the starter switch is located but both agree the voltage comes from the same place. AEA diagram is easiest to trace and it shows voltage originating at the starter solenoid BAT terminal and going to ammeter via a red wire. AEA shows black wires out of ammeter passing that voltage to the regulator, ign switch, headlight switch input terminal and the starter button. Discrepancy is where the starter button is actually tied to be powered from. AEA has it from ammeter, factory has it from the headlight switch input terminal which comes from ammeter so essentially the same place. You might see if you have power on the power input to the headlight switch. What can be confusing is the factory originally had the starter being able to crank engine at all times although the engine would not start without the key on. When later models came out with the starter button powered thru the ign switch so it only worked with the key on some changed their earlier cars with always active starters to match later models. In that change the starter switch is fed from the ign sw GA terminal instead of ammeter or light switch. As to not having power on one side of starter switch and solenoid, that would be correct unless the button was pushed. Power on the other side would depend on whether the feed wire came from ammeter or ign sw. Horns take a lot of current so make sure the feed wire is 12 ga and has good tight terminals. Might also double check to make sure the wires are on the correct relay terminals. B is bat, H is horn and S is the button. If the battery feed is not on the correct relay terminal nothing works. No reset button on the regulator.
Posted on: 4/6 13:17
|
|||
|
Howard
|
||||
|
||||
|
Re: Don’s 1937 (120) 138CD Deluxe Touring Limo
|
||||
|---|---|---|---|---|
|
Forum Ambassador
|
Others can better answer the pulley question but on a two brush generator, one brush will connect to wiring going to the field coils and A terminal while the other brush will connect to case metal for the ground. If you check carefully where the braided lead from the brush with no other wire connects it is most likely being grounded to the case end plate by the brush holder or where ever the braided lead terminates.
Attach file: generator.jpg (61.08 KB)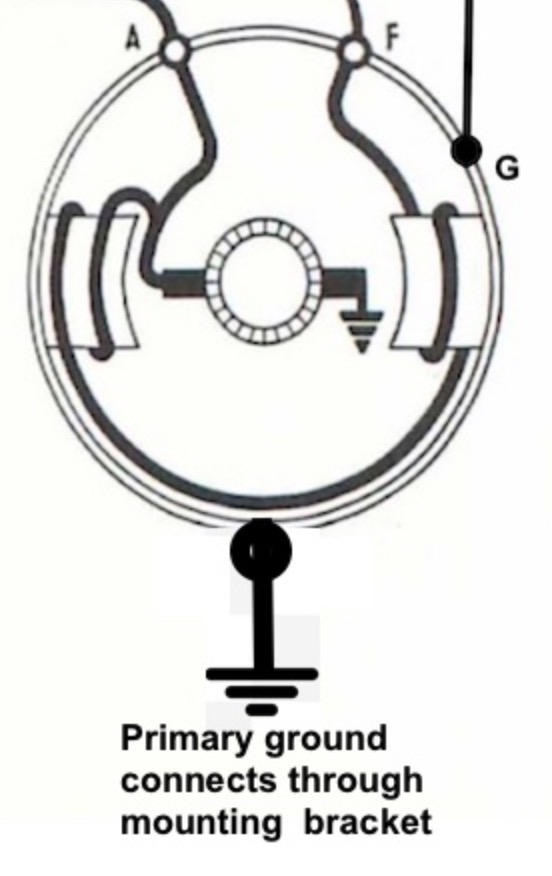
Posted on: 4/6 12:45
|
|||
|
Howard
|
||||
|
||||
|
Re: monroe p/s control valve stud
|
||||
|---|---|---|---|---|
|
Forum Ambassador
|
I don't know if Lares Corporation might have or would even sell individual components or only sell and rebuild complete assys but they do advertise in Hemming's. I believe they have rebuilt steering systems for a few Packard owners who post on the forum. Don't know if other mfgs used exactly the same unit as Packard but Monroe steering was also used on some Plymouth models and their vendors might be worth checking.
Don't remember where this page is from but here is a bit showing Mopar (Plymouth) part numbers. Again, do not know if it exactly the same unit as I believe the typical Packard was heavier and might have had a larger unit than Plymouth. Attach file: Monroe.jpg (400.95 KB)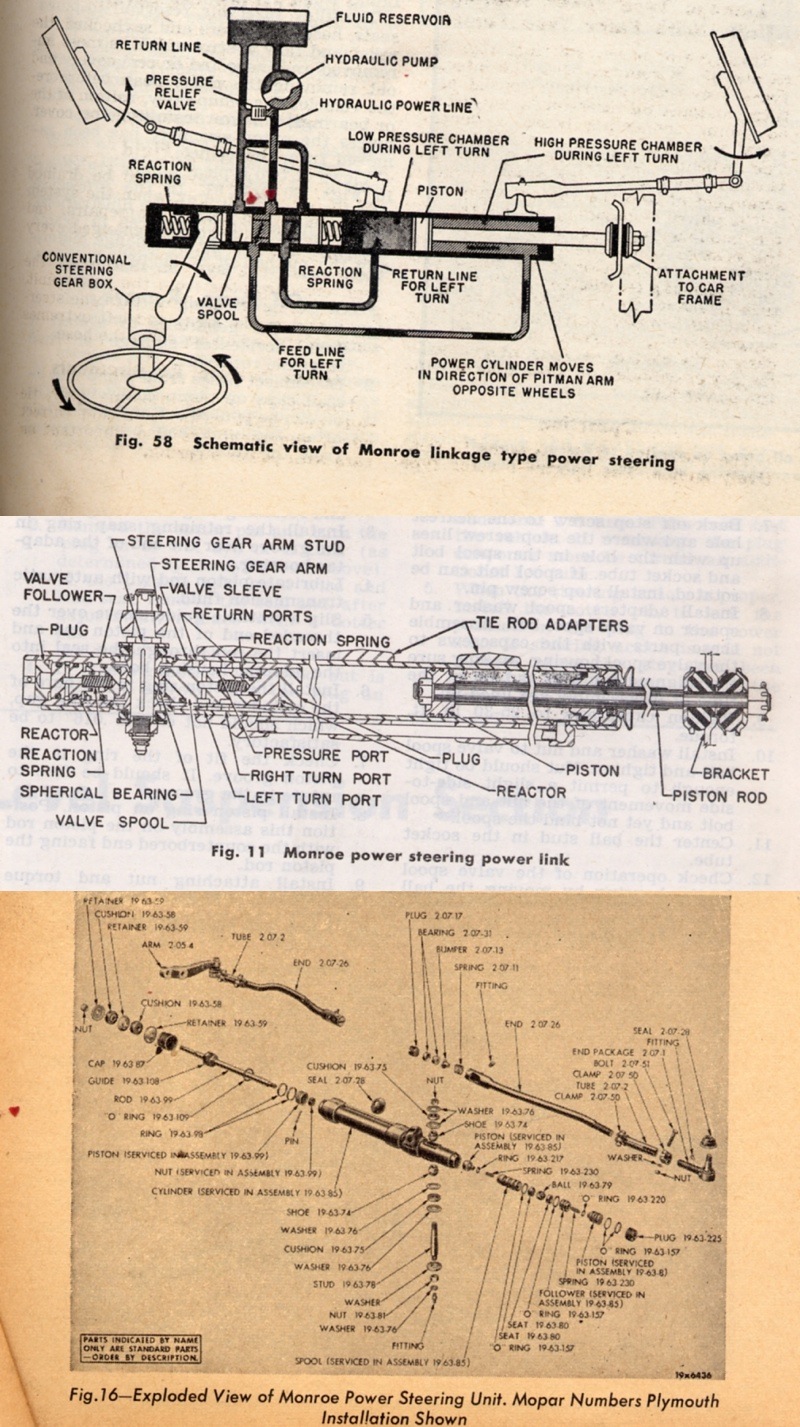
Posted on: 4/4 17:42
|
|||
|
Howard
|
||||
|
||||
|
Re: Carter carb assistance
|
||||
|---|---|---|---|---|
|
Forum Ambassador
|
I suspect the biggest difference between numbers would be in jet size and adjustments that were specified by the various mfgs engineering depts to be optimized for the engine it was going on.
The correct WDO carb core for your model Packard should be available relatively inexpensively from those on the forum with parts cars or some of our used vendors. If you are handy and a bit mechanically inclined rebuild kits are also easily found. You could probably do something like that for far less than the cost of a professionally done rebuild. Another option which recently came on the market is a replacement universal 2 barrel carb from Daytona Parts. Daytona has been around for years and has done rebuilds for many of us. Their new carb may or may not need some kind of adapter to bolt to the manifold but from the description and the fact it is a new carb it might be worth looking into. I expect the price would be in the same neighborhood as a rebuilt original though. Aside from the visual differences, probably the biggest downside to going with a universal carb is you would need to add a pushbutton to start the engine as the accelerator pedal carb start switch would no longer be there.
Posted on: 4/4 14:35
|
|||
|
Howard
|
||||
|
||||


