|
Re: Lights Blackout
|
||||
|---|---|---|---|---|
|
Forum Ambassador
|
Hopefully your cluster will co-operate and come out as you describe. Sometimes the loom is behind the steering column brace and the cluster won't move more than an inch or so because there is not enough slack. If the original studs and nuts are still holding the bottom of pot metal housing, sometimes those are a pain to get to with all the switches in place. If they are still there, once you get them loose, many leave the nuts off when replacing the cluster and just rely on the studs, gravity and friction to hold the bottom. If the cluster is a bit loose, a thin strip of felt will minimize any future vibration.
Unless you have a different radio, dial lights are usually independent of the dash lights. Sams shows a single lamp being supplied directly from the on/off switch. One place I've seen shorting problems in on the end of the sockets. The insulation shrinks back or even cracks off exposing the conductor as it goes thru the hole in socket base. Sometimes a good jar is enough to make it short.
Posted on: 2014/2/3 16:23
|
|||
|
Howard
|
||||
|
||||
|
Re: Lights Blackout
|
||||
|---|---|---|---|---|
|
Home away from home
|
The dash panel is easy to remove. After the four screws are removed, put some blue painters tape along the dash, just under the panel to protect it from being scratched. Check to make sure that the battery is disconnected, then pry the top of the panel back slightly. Make sure that you have disconnected the speedometer cable as well! I like to use a small flat blade screwdriver for prying, but a rigid plastic trim knife would probably be safer. It won't take much effort, then once the top is free, pull the whole thing back. As noted above, check all of the wires to see if any of them are cracked, frayed or loose. I bet some of them will be. There are some circuit breakers to the left and right of the speedometer. I've had one go bad on my 51, but they are usually quite robust. I suspect that the headlight switch is the culprit, and needs to be removed and cleaned. I like to clean the points with a newish folded dollar bill. There is enough tooth in the paper to act like very fine emery cloth. Course, a hundred dollar bill would probably work better.....The headlight switch is the most common culprit after shorting wires. Good luck!
Posted on: 2014/2/3 17:50
|
|||
|
||||
|
Re: Lights Blackout
|
||||
|---|---|---|---|---|
|
Home away from home
|
Having briefly looked at this problem . . . . As soon as time permits, I will remove the ashtray assembly (three screws) which gives a good view of the headlight switch.
I always disconnect the battery when working on automotive electrical systems especially under the dash. As I understand to remove the switch, required a notched tool that engages the nut / screw on the knob side and then the knob and its rod disengage from the switch allowing the switch to come out. I would like to hope the short is downstream from the switch. I believe the dash lamp socket suggestion is the direction to look. I do recall the radio dial light dimming with the dash lamps. The rheostat still works on the headlight switch. There appears to be a circuit breaker for the headlight circuit as when the lights went out I turned off the headlight switch a couple of times thinking dirty contacts. While off I heard the "tink" sound a circuit breaker makes and then is when I discovered that dimming the dash lights to off the headlights would stay on. It is almost impossible to get your hands behind the dash panel to disconnect the Speedo let alone change a light bulb. Jim
Posted on: 2014/2/4 11:24
|
|||
|
||||
|
Re: Lights Blackout
|
||||
|---|---|---|---|---|
|
Home away from home
|
Sorry to drag this on here:
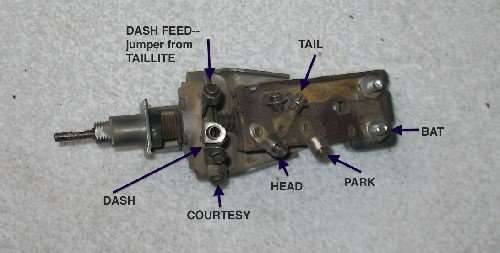
To be as prepared as possible, would any of you have a decent picture of the headlight switch used on my 54 Cavalier? I expect it has screw terminals which will be on top as installed in the car as the ashtray bracket is almost up against the bottom of the switch. It looks like the dimmer rheostat part is separate from the switch section all assembled on the same bracket. . It looks like a wire from the battery connection on the starter solenoid comes in directly to the switch. I'm guessing there is a circuit breaker attached to or part of the switch. It looks like a wire or solid connection goes from a connection for the tail lights to one terminal of the rheostat. Another rheostat connection could go to the interior courtesy lights but I don't believe this car uses that feature. Another terminal feeds the dash lamps so they can be dimmed. I have an ultrasonic cleaner which cleans up brass nicely and I have taken apart many switches with the crimped over tabs. You get about one good chance. This may be the time to use a relay to control the headlamps and save the switch. Jim
Posted on: 2014/2/4 14:28
|
|||
|
||||
|
Re: Lights Blackout
|
||||
|---|---|---|---|---|
|
Forum Ambassador
|
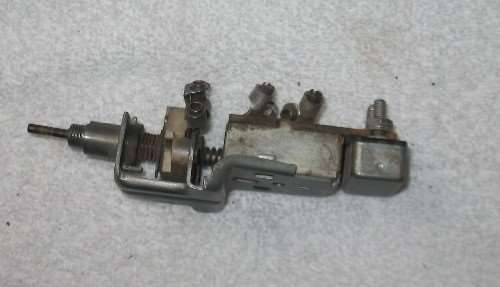
Switch has bullet style connectors for all connections except the bat feed. That goes directly to the breaker and output of breaker feeds the bussbar & switch.
Switches are the electrically the same 51-6, difference being the shaft size and mounting thread portion is different 55-6. Here is a 51-4 switch having the narrow shaft for the setscrew type knob. The layout or representation in the wiring diagram is as if looking down at the switch from the top
Posted on: 2014/2/4 15:14
|
|||
|
Howard
|
||||
|
||||
|
Re: Lights Blackout
|
||||
|---|---|---|---|---|
|
Home away from home
|
Howard
Thanks for the pictures. I see the circuit breaker and that explaines the sound. Jim
Posted on: 2014/2/4 16:05
|
|||
|
||||
|
Re: Lights Blackout
|
||||
|---|---|---|---|---|
|
Home away from home
|
The weekend came and the headlight switch came out as suggested.
Same switch as in the pic's with a set screw knob. After I disconnected the switch a wire slid out of the steering column which was the transmission indicator lamp and I am expecting it was the source of the short. When I disconnected the switch the Headlight terminal broke loose. I have epoxied this back and will wait for the cure before I try it. The switch did work but was a little quirky at the headlight position; maybe time for a relay. I work in electronics and have succeeded with this Epoxy fix before although I would like to find a more perfect switch. My switch has been apart before so I didn't bend the tabs. It was also replaced some time ago and they cut the wires loose from the junk car and then spliced them to the cut wires in my harness. As I unplugged them I took the time to do a proper splice with solder and heat shrink tubing. The old plastic wires under the dash are stiff but they don't crack. The wire up the column was stiff as a board and I'm sure the movement of the shift lever caused it to twist loose. Removing and replacing the little light bulb in the indicator is a total PITA. I only lost the little spring clip one time and recovered from inside the column. The little aluminum foil shroud with the green lens almost collapses in your hand before you get it into the indicator and not drop the lens. Then all you have to do is put the spring clip back on and hope it works. My car has an ashtray directly beneath the headlight switch which I removed (three screws) which makes it fairly easy to unplug the wires. Jim
Posted on: 2014/2/10 18:10
|
|||
|
||||
|
Re: Lights Blackout
|
||||
|---|---|---|---|---|
|
Home away from home
|
This project has been completed, Howard thanks for the pictures.
The switch mounts with the terminals facing down and removing the ashtray makes it fairly easy to disconect wires. Jim
Posted on: 2014/2/12 10:36
|
|||
|
||||

 (55.33 KB)


