|
Re: 51Packard's....51 Packard
|
||||
|---|---|---|---|---|
|
Home away from home

|
Thanks HH56...appreciate it!
Posted on: 2011/2/24 8:28
|
|||
|
[url=h
|
||||
|
||||
|
Re: 51Packard's....51 Packard
|
||||
|---|---|---|---|---|
|
Forum Ambassador

|
Your armature shorting appears OK. Mine is the same.
One thing I found is even if motor doesn't turn, there is a significant arc and "thunk" when trying--both directions. If you don't have that there is a continuity issue somewhere. You also mentioned that square piece of insulation. It lies or spreads across the frame halves between the wires going down to bottom and the frame about half way up to keep wires away from turning armature. Mine also didn't work first few times back together. Found the alignment is critical. The screws on the bottom are a bit temperamental as well. They have to pull the frame down and keep it straight inside the case and are too short to do it alone. Since the frame is not easily accessible with brush plate attached to push or maneuver, I wound up using a combination of pressure on the armature to collapse the spring and a longer screw to reach a hole in frame to thread a couple of turns to both guide and pull it down so the 1/4" regular screws could grab. Also screws can't be much longer than 1/4 because they can thread into coil. Anyway, got that done & armature appeared to be free but still wouldn't work. Found in addition to small ball at bottom end of shaft, there is another at top end which had fallen out. This allowed the armature to lift up and bind against bottom of brush plate. Once both balls were back in and housing screwed together, by putting pressure and trying to rotate the nylon worm gears, the armature would move approx 1/32 up and down. Tried power again and all was well. Pulls about 20 amps starting and settles down to approx 12-15 when running. Assume you're using the battery. I don't have one and my small charger wouldn't drive it so had to get a big 50amp charger on it. With all the electrical on yours looking like it is OK, think I would concentrate on mechanical. It took me several tries back together before it worked. Appears to be fairly unforgiving in that respect but once free, it goes like a bat out of ......
Posted on: 2011/2/24 15:44
|
|||
|
Howard
|
||||
|
||||
|
Re: 51Packard's....51 Packard
|
||||
|---|---|---|---|---|
|
Home away from home
|
Thanks again for checking your motor HH56. I'm glad that the electrics appear to be good on mine. Hmmm...I didn't think of the charger not having enough power to move the motor. My battery is dead, maybe shot at this point, so I have been testing with the charger. It is a 6v/12v charger (can be changed with a switch). Just looked and it says it is 10 amps. I guess that's not powerful enough! Maybe it will work with more power. Just for fun, I tried it with the motor out of the housing and the paper still between the armature and the electromagnet housing. I got the loud humming sound again, but no turning. The armature did move to the side, probably from the electromagnet pulling it. Also saw some smoke coming from the brush (probably because it was just sitting there). I tried to turn it by hand and that didn't help.
Thanks for confirming the location of the insulating plate. I thought that was where it went because mine has scratch marks that looked like it had rubbed the armature at some point. I wonder if I messed up using that glue on the felt because it got really stiff. I might put some nail polish remover on it to try to soften it. I have my battery on the charger now. Hopefully it will keep a charge and I can try the motor with that tomorrow. Great tip with using a longer screw to get it started. I had a heck of a time fighting that spring. That probably made it go in crooked. I checked the gear section and I still have my ball bearing in it so I'm good there. I had no idea it was there! Maybe I'm closer than I thought! Keep your fingers crossed!
Posted on: 2011/2/24 19:42
|
|||
|
[url=h
|
||||
|
||||
|
Re: 51Packard's....51 Packard
|
||||
|---|---|---|---|---|
|
Webmaster

|
The alignment was the problem with mine as well. I noticed that bolt in the bottom of the housing locks the bottom bushing in place so it will not swivel. The alignment has to be perfect for it to work.
Posted on: 2011/2/24 23:16
|
|||
|
-BigKev
1954 Packard Clipper Deluxe Touring Sedan -> Registry | Project Blog 1937 Packard 115-C Convertible Coupe -> Registry | Project Blog |
||||
|
||||
|
Re: 51Packard's....51 Packard
|
||||
|---|---|---|---|---|
|
Home away from home
|
Even with all the wonderful help you guys have been giving me with my antenna motor, I still haven't gotten it fixed. I took it apart 3 times and still no movement. I also had my battery on the charger to make sure I had plenty of juice for the tests. Problem is, I forgot about it for a couple of days only to return to the battery making a bubbling noise and registering a 1/4 charge instead of almost full. I probably ruined the battery. I don't have a hydrometer to test it, but not charging is a bad sign.
I see that Kanter sells a manual antenna for $33.00. I might just do that and be done with it, unless I find another one at a reasonable price (couple on e-bay over $100 = too much for me). Luckily this is not a critical system and only a winter project. I'll also have to find a replacement antenna wire or try to fix my existing one. The prong that goes into the antenna is very loose with only a strand of wire holding it together.
Posted on: 2011/3/10 20:49
|
|||
|
[url=h
|
||||
|
||||
|
Re: 51Packard's....51 Packard
|
||||
|---|---|---|---|---|
|
Home away from home
|
3-14-11
The weather is finally warming up and most of the snow around the car is now melted. No real progress today. Just took about a 1/2 hour to get my bearings on the project. I'm going to put my new harness back in the car soon and I wanted to get an idea of which wires I had left in the car. Looks like I only have the wires for the door switch, the wire for the glove box light and switch, and the passenger side courtesy light. Not too bad. I removed my glove box so I would have access to the wires at another time. The other wires go up the drivers side pillar to the rear of the car. I was going to leave those alone, but now I noticed that my headliner is now sagging terribly. Looks like it might have to come out. I was hoping to avoid that, even though it is nothing to look at. When I removed the glove box, I found an OK mark and possibly some initials written under the dash. Of course, no build slip was to be found though. I also found an old wasp nest. Luckily it was deserted! Attach file:  (76.70 KB) (76.70 KB) (52.74 KB) (52.74 KB)
Posted on: 2011/3/14 20:55
|
|||
|
[url=h
|
||||
|
||||
|
Re: 51Packard's....51 Packard
|
||||
|---|---|---|---|---|
|
Home away from home
|
3-14-11 continued...
The end of my antenna wire is broken, with the inner terminal only holding on by a fine wire. Can this be repaired or do I need a new cable? I took stock of what I have to work on. I plan on rebuilding the carb and doing A LOT of metal work. Both fenders have rot around the headlights. The drivers fender is separating from the inner fender and the bottom is really bad by the rocker panel (at least where they should be!). It would be nice to just buy 1 or 2 fenders, but I never see them for sale locally. Shipping them would cost a fortune. I guess I'll try to fix what I have. Below are some pics of the rear of the car. I posted in the wanted section the panel for the back up lights, but didn't get anywhere. Called a couple of people that were suggested and they didn't have it. I don't think I could hammer this thing out and make it look nice. I'm thinking of cutting right below the channel where the rubber would go and the bottom corner and weld a piece of metal in, using the channel as a guide to put the curved shapes in it. Or I could weld a panel right over the damaged panel, but that would create a pocket that could collect dirt and cause rust in the future. There is also bondo on the passenger side and under the brake light. I also included a pic of the fit of the trunk. It looks really off, but gets better if I jack up the body on the passenger side because the body mount in the trunk is rotted through. I have no metal working skills what so ever so all of this will be VERY interesting. I wonder how it will come out? I will be using a flux wire feed welder with an auto-darkening helmet. Both should be the easiest for me to use to give me the best chance of a decent weld. Attach file: (65.73 KB) (152.38 KB) (152.38 KB)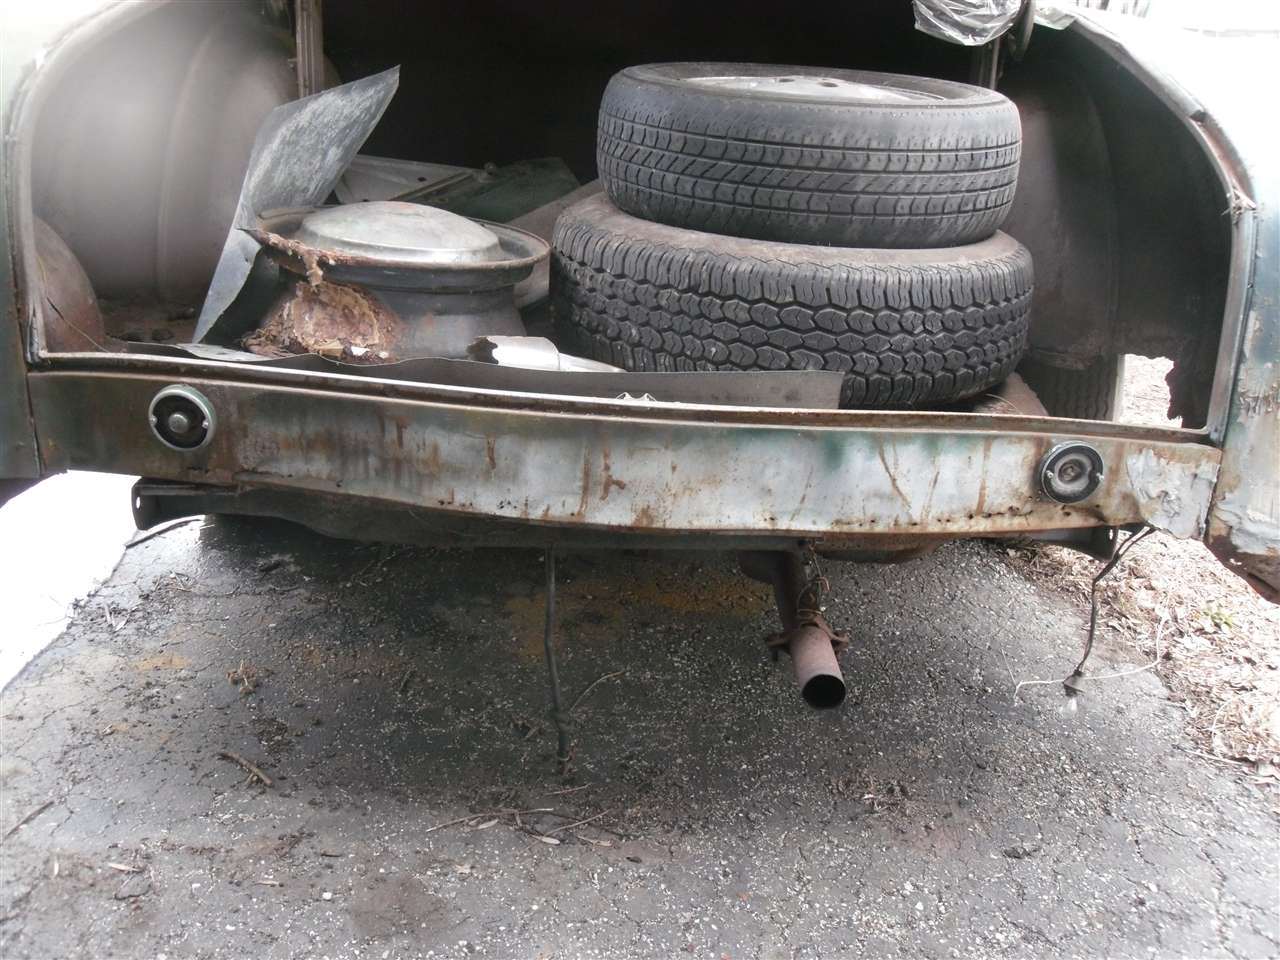 (109.48 KB) (109.48 KB)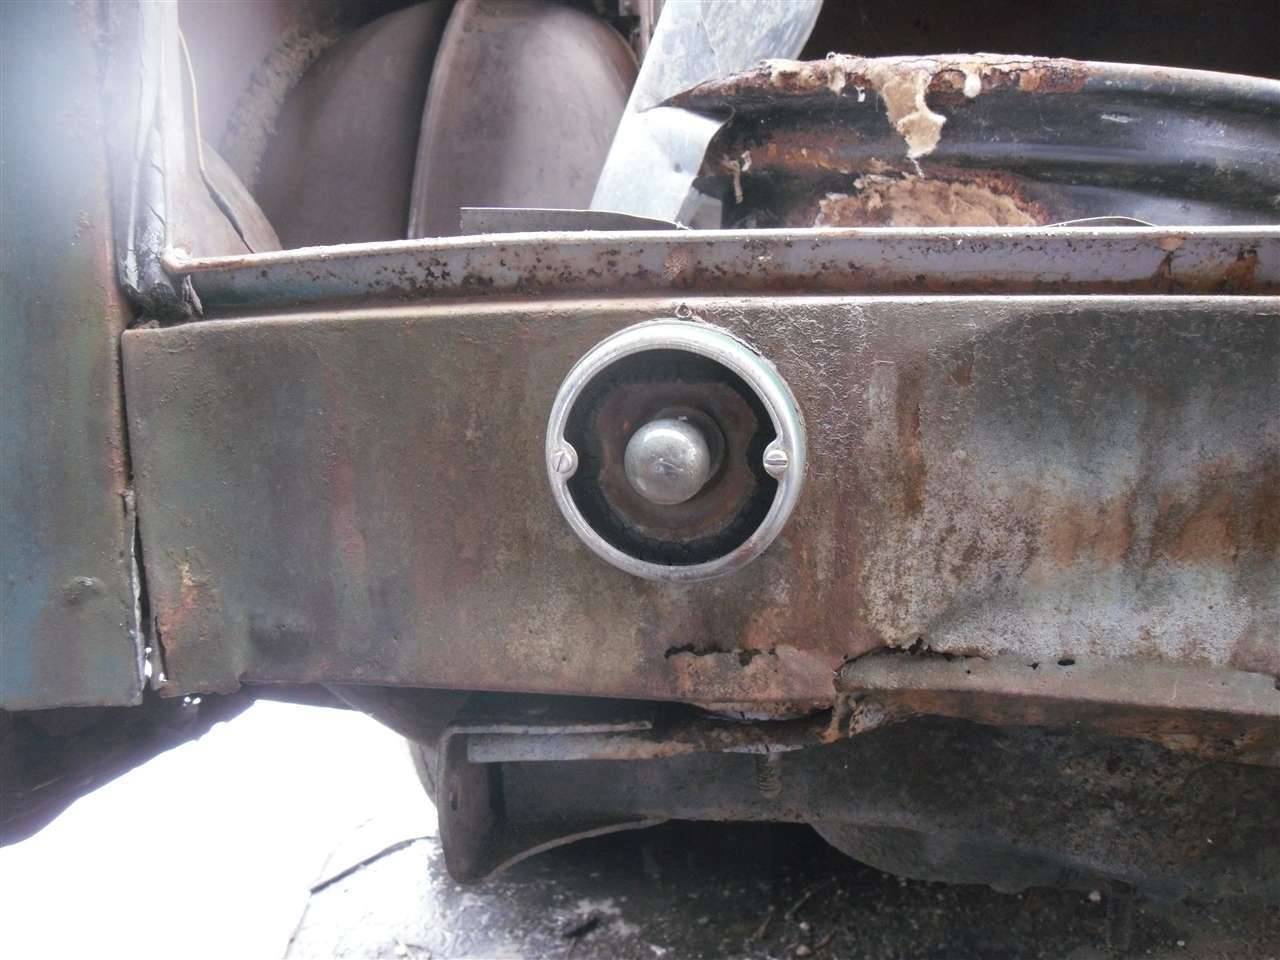 (131.23 KB) (131.23 KB)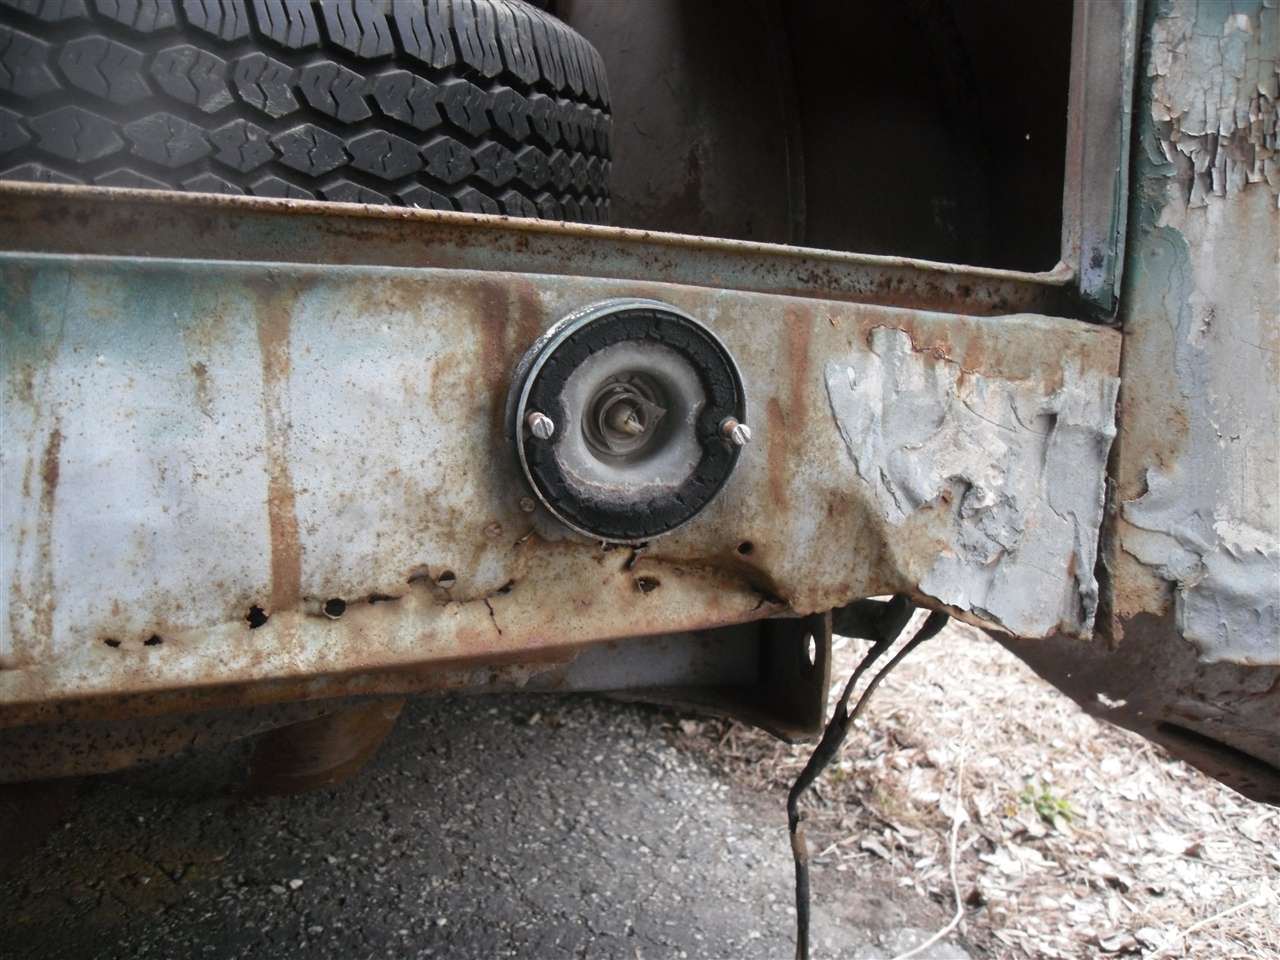 (89.50 KB) (89.50 KB)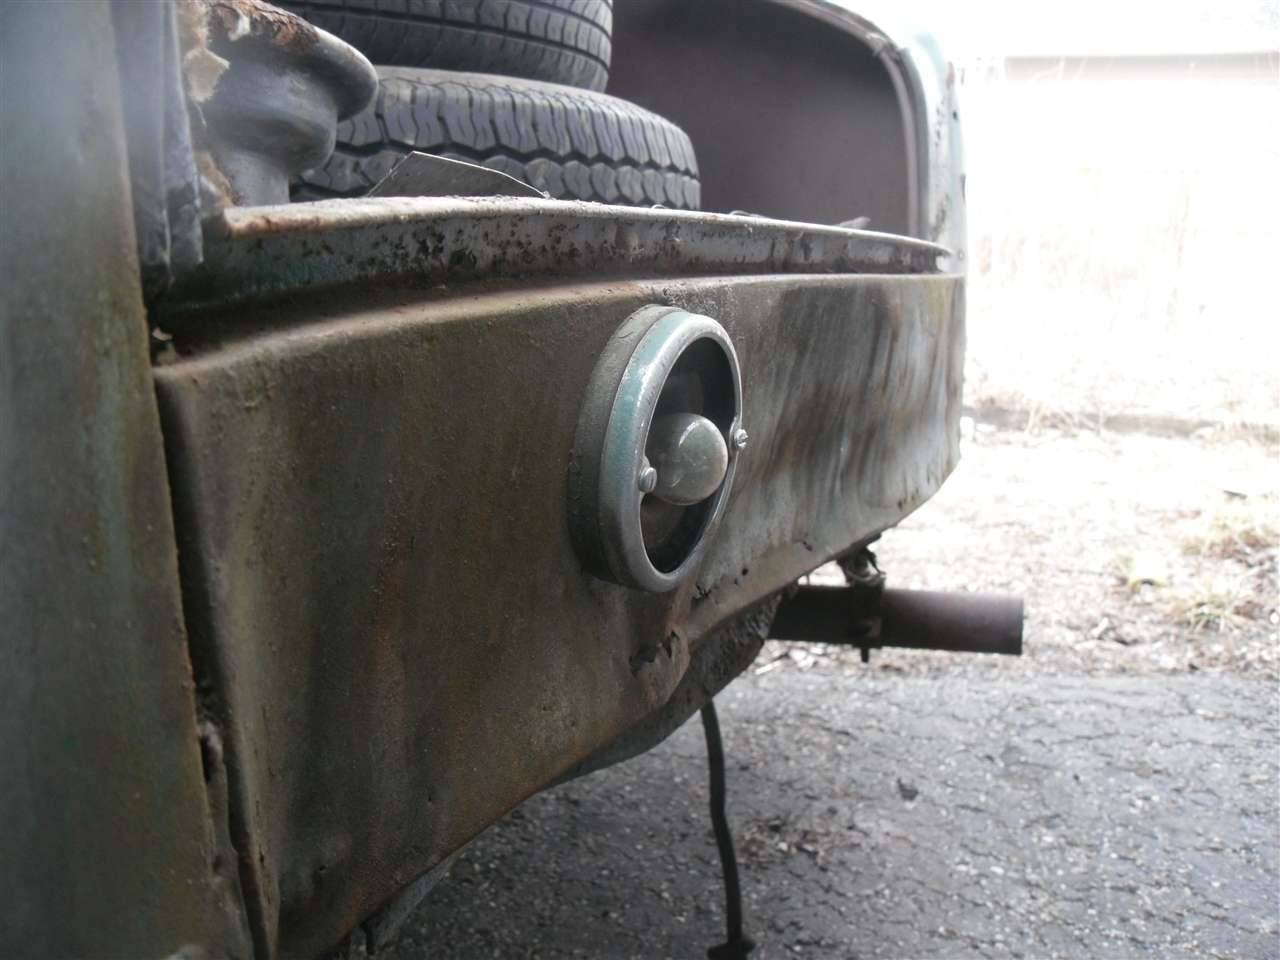 (99.03 KB) (99.03 KB)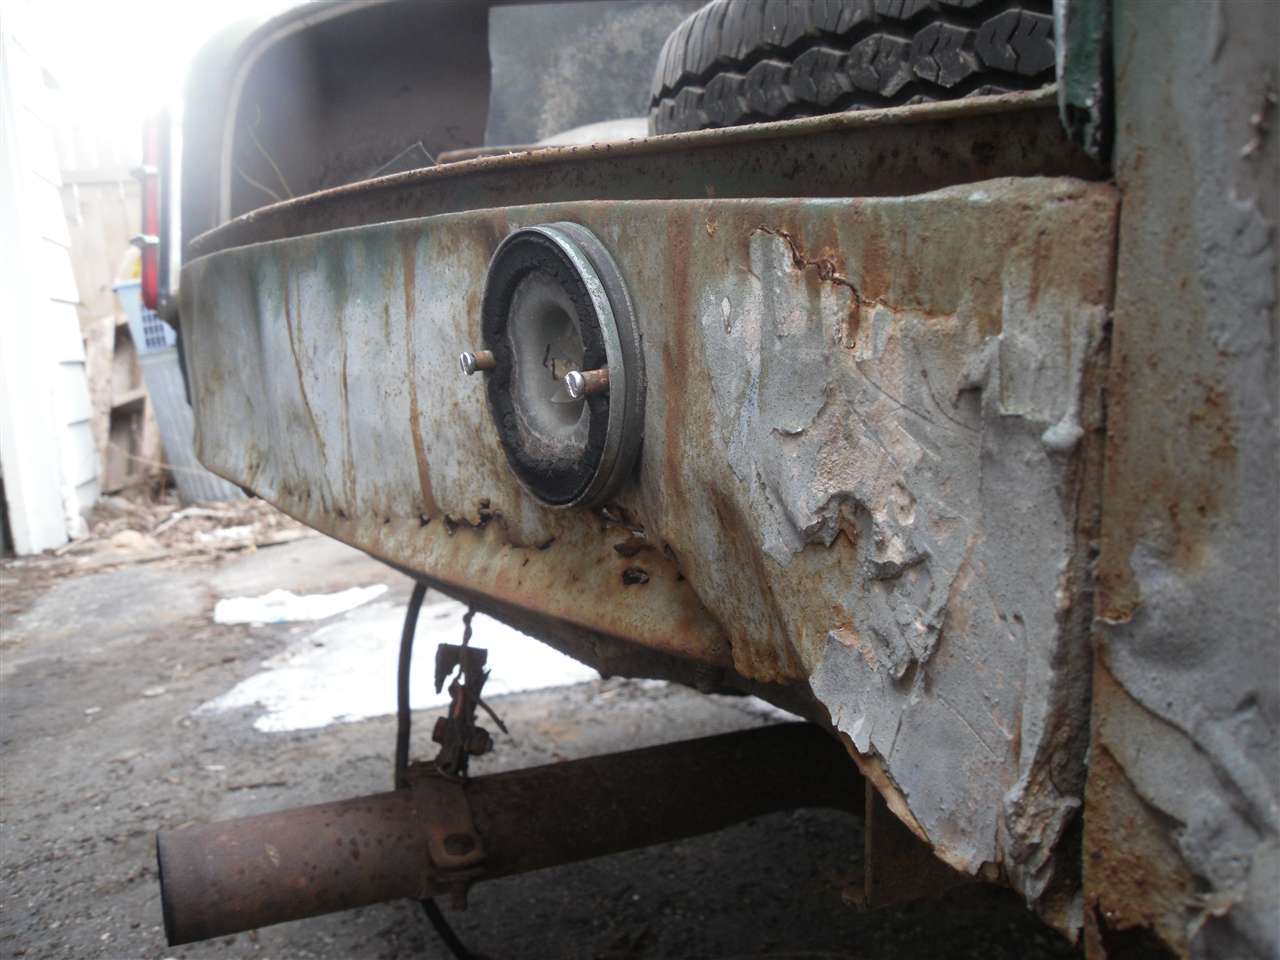 (146.32 KB) (146.32 KB)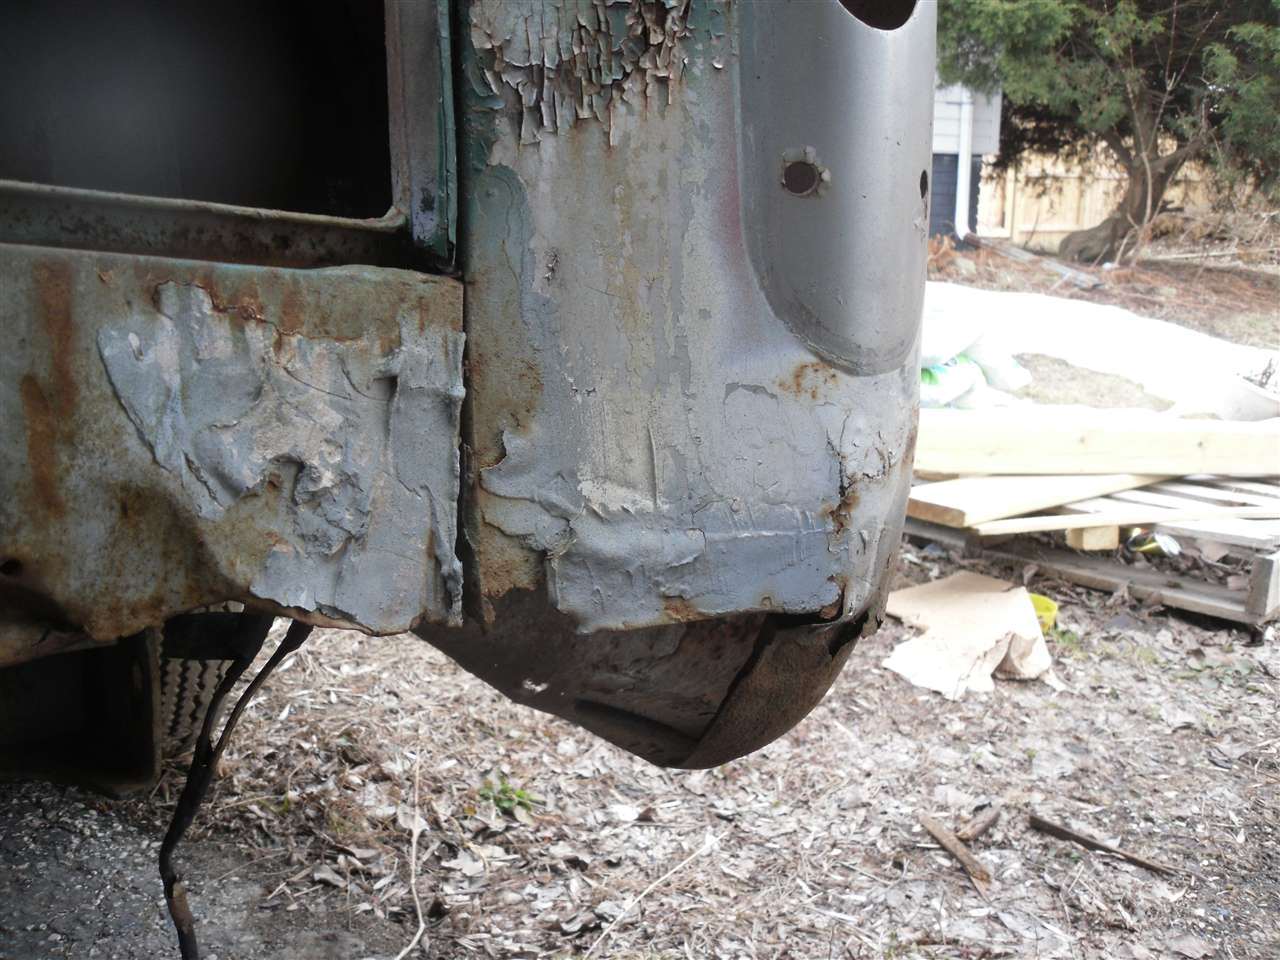 (104.79 KB) (104.79 KB)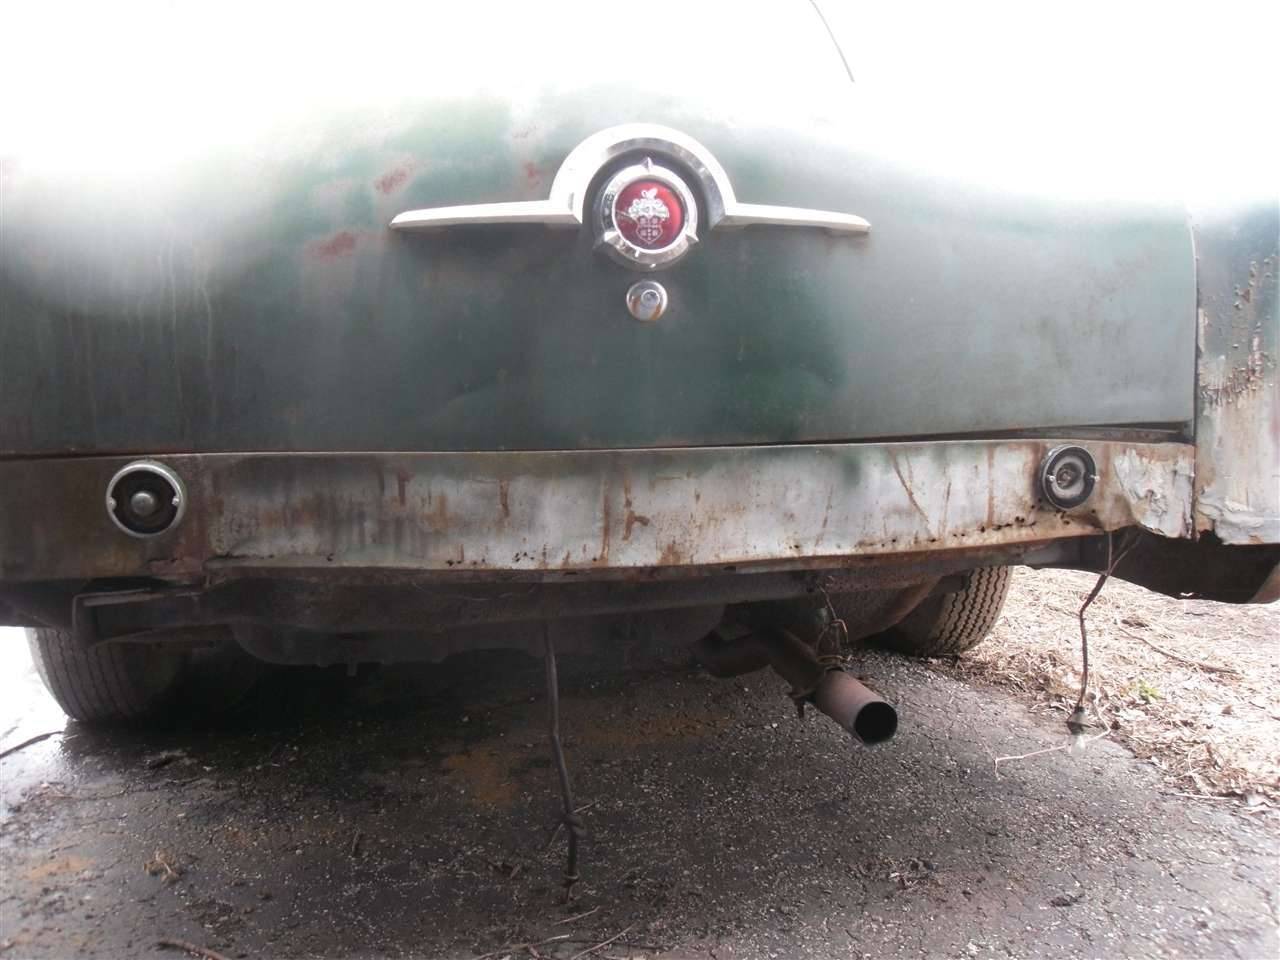
Posted on: 2011/3/14 21:13
|
|||
|
[url=h
|
||||
|
||||
|
Re: 51Packard's....51 Packard
|
||||
|---|---|---|---|---|
|
Forum Ambassador
|
That's a lot of wire hanging out but may be repairable depending on why the excess length. Is it still continuous to center pin on other end or is wire broken allowing it to pull out. Is the pin or center conductor shorted to metal ground--the screw part on that end or the outer metal shell on other?
Posted on: 2011/3/14 21:25
|
|||
|
Howard
|
||||
|
||||
|
Re: 51Packard's....51 Packard
|
||||
|---|---|---|---|---|
|
Home away from home
|
3-19-11
Followed the wires on the passenger side and found the one that goes up the roof to the switch for the dome light. It was bundled with the wires for the courtesy light and door switch so I cut it. I'll deal with it when I remove the headliner. In the meantime, I'll put a quick disconnect on the new wires so I can disconnect it there in the future if I ever have to remove it. I'll make the new wires I took out later in preparation for putting in the wire harness I made. Then I removed the carb for rebuilding. I have been having problems with high idle and engine speed not going down when I take my foot off the gas. Looks like this has been rebuilt before. The gaskets were hard, but not deteriorated from modern gas. Everything came apart pretty easy. Just followed the instructions in the kit from Daytona Parts. You disassemble it in the order of the parts shown in the diagram. They number them so you know the proper order. Everything was fine until I got to item #37, the pump check needle. I couldn't figure out where that part was on the carb. The small picture was hard to follow. Noticed they provided one in the kit and I realized that the one on my carb was missing! It should go in the hole under the pump jet housing. The gasket was also missing there. Another issue I came across was the needle and seat assembly that the float attaches to. The one provided in the kit (and shown in the pics) didn't have the long extension on it and the seat itself was wider than the original one. I decided to use the original. Following the directions for adjusting the float, they tell me where to measure but fail to give me the measurement it should be! Found the info in the service manual, but it is in 64ths. Not sure how I could measure that. Hopefully it is not out of whack and I can just leave it as is. Lastly, are you supposed to lubricate anything when reassembling a carb or does the gas act as a lubricant? Before tearing it apart, everything seems to move easily. Not that it is all clean, it binds a little in places. Not sure if I should put some grease on parts or leave it dry. Attach file: (77.61 KB)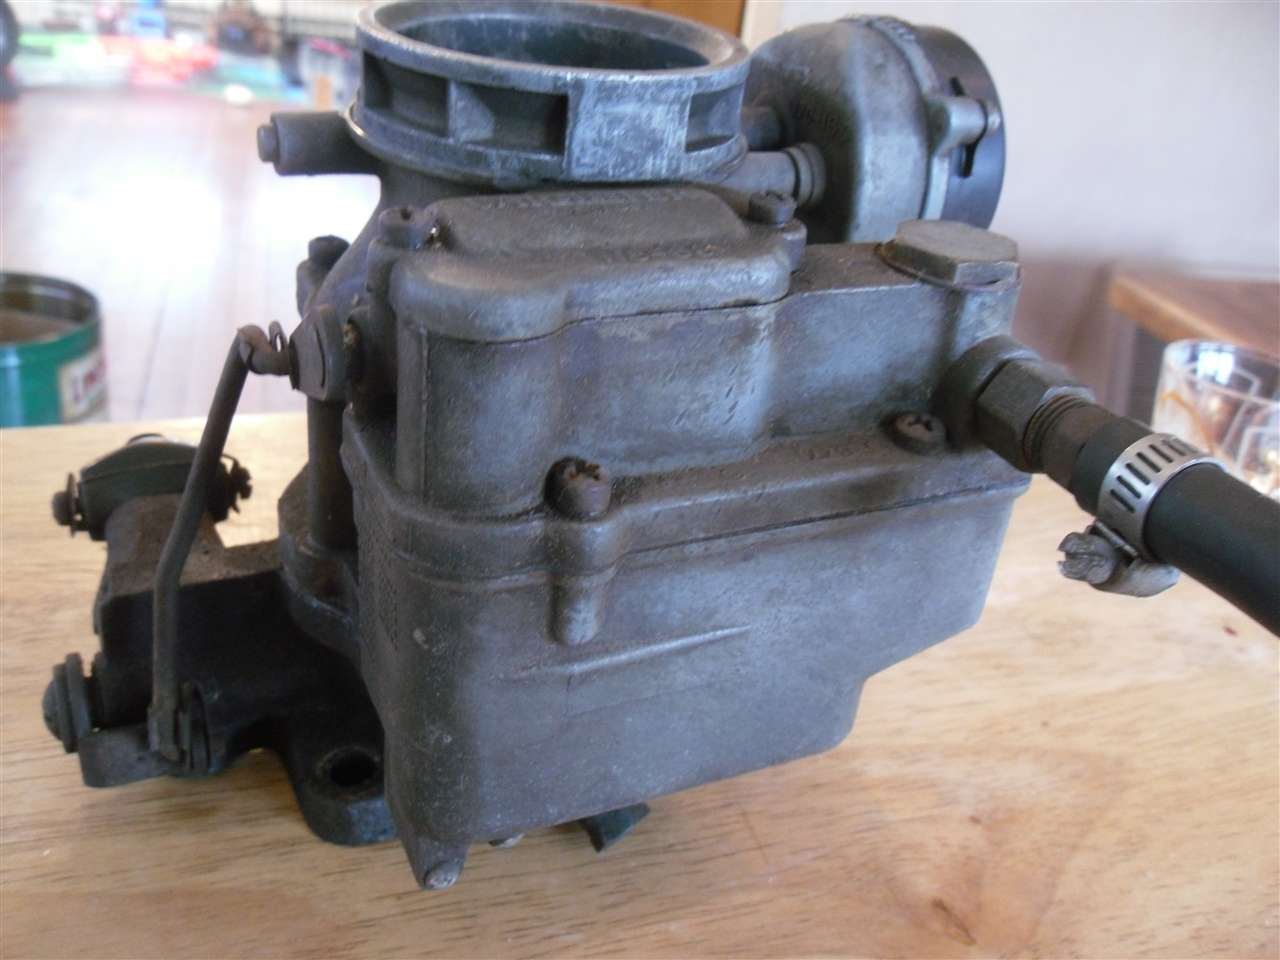 (85.51 KB) (85.51 KB)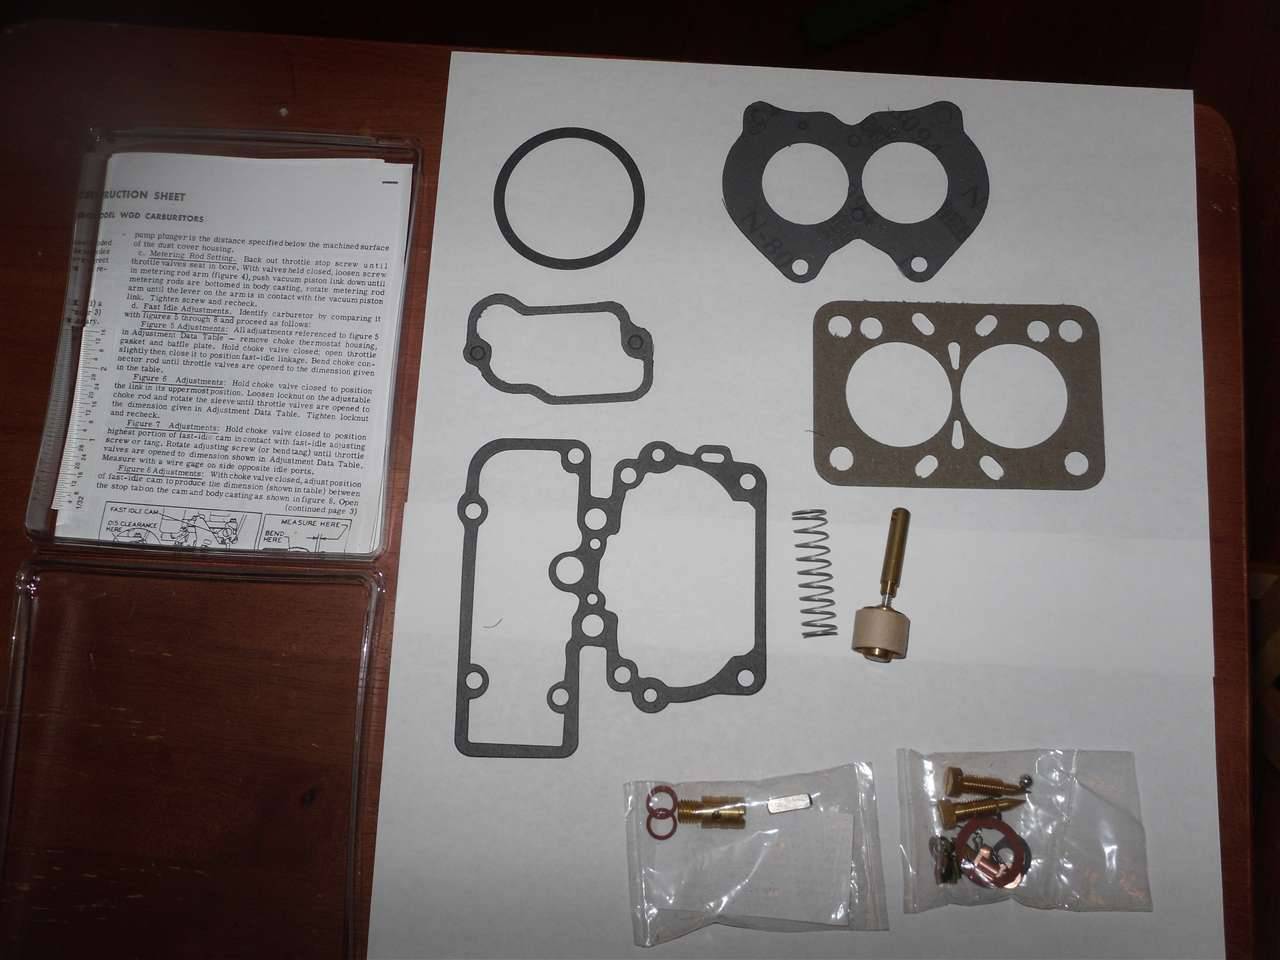 (93.70 KB) (93.70 KB)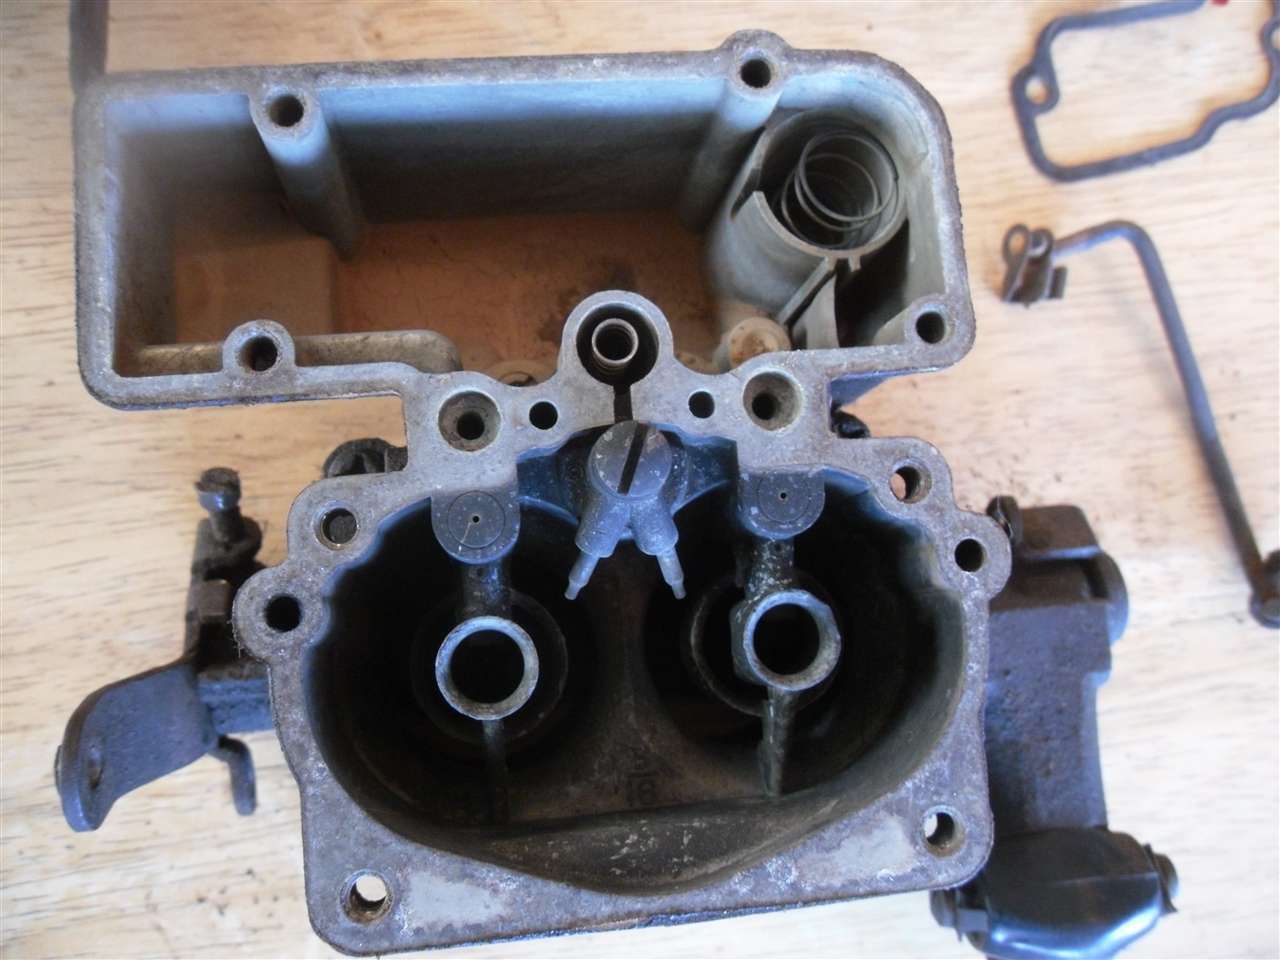 (61.06 KB) (61.06 KB)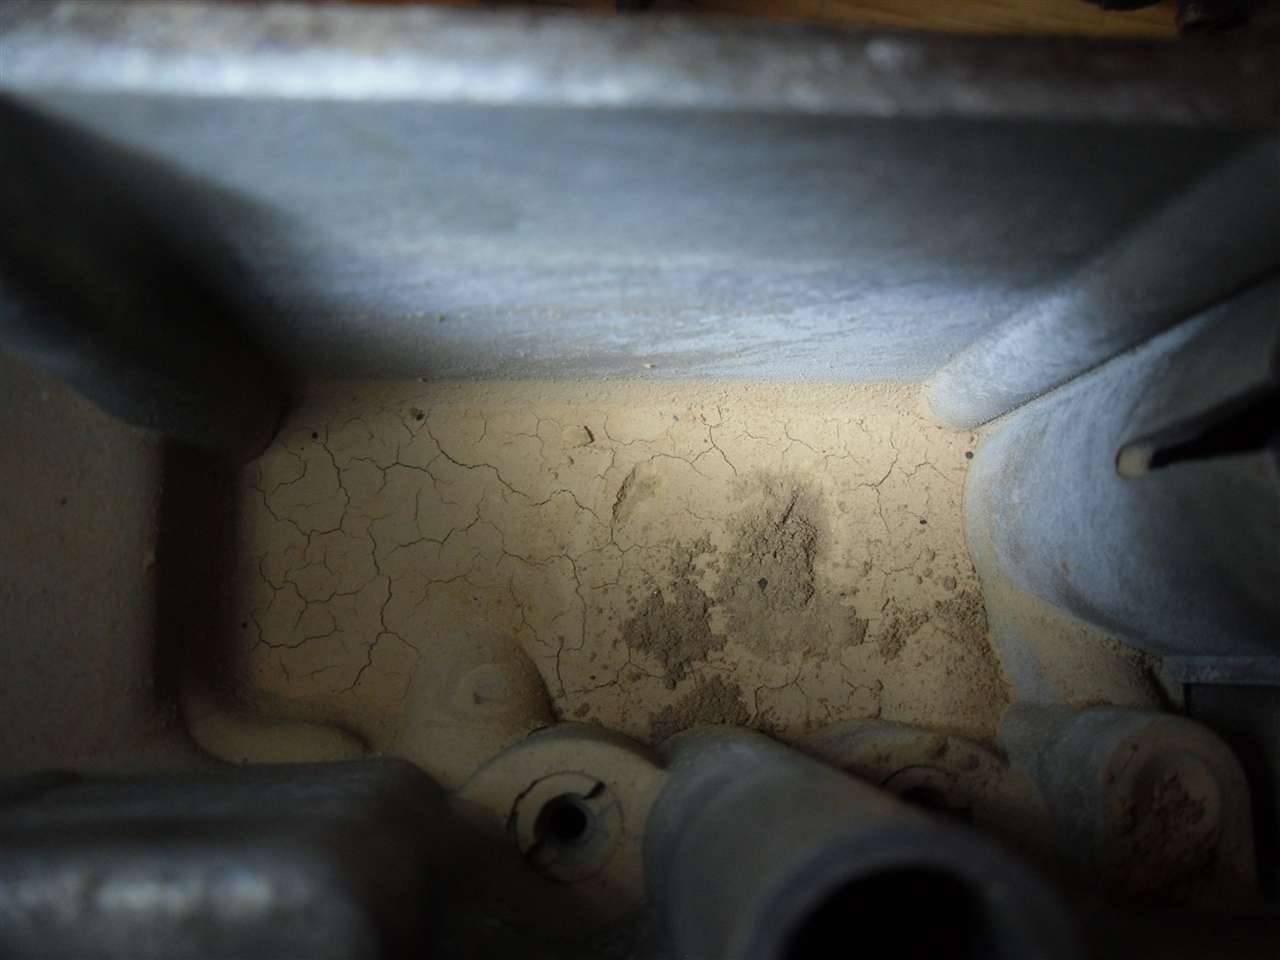 (43.07 KB) (43.07 KB)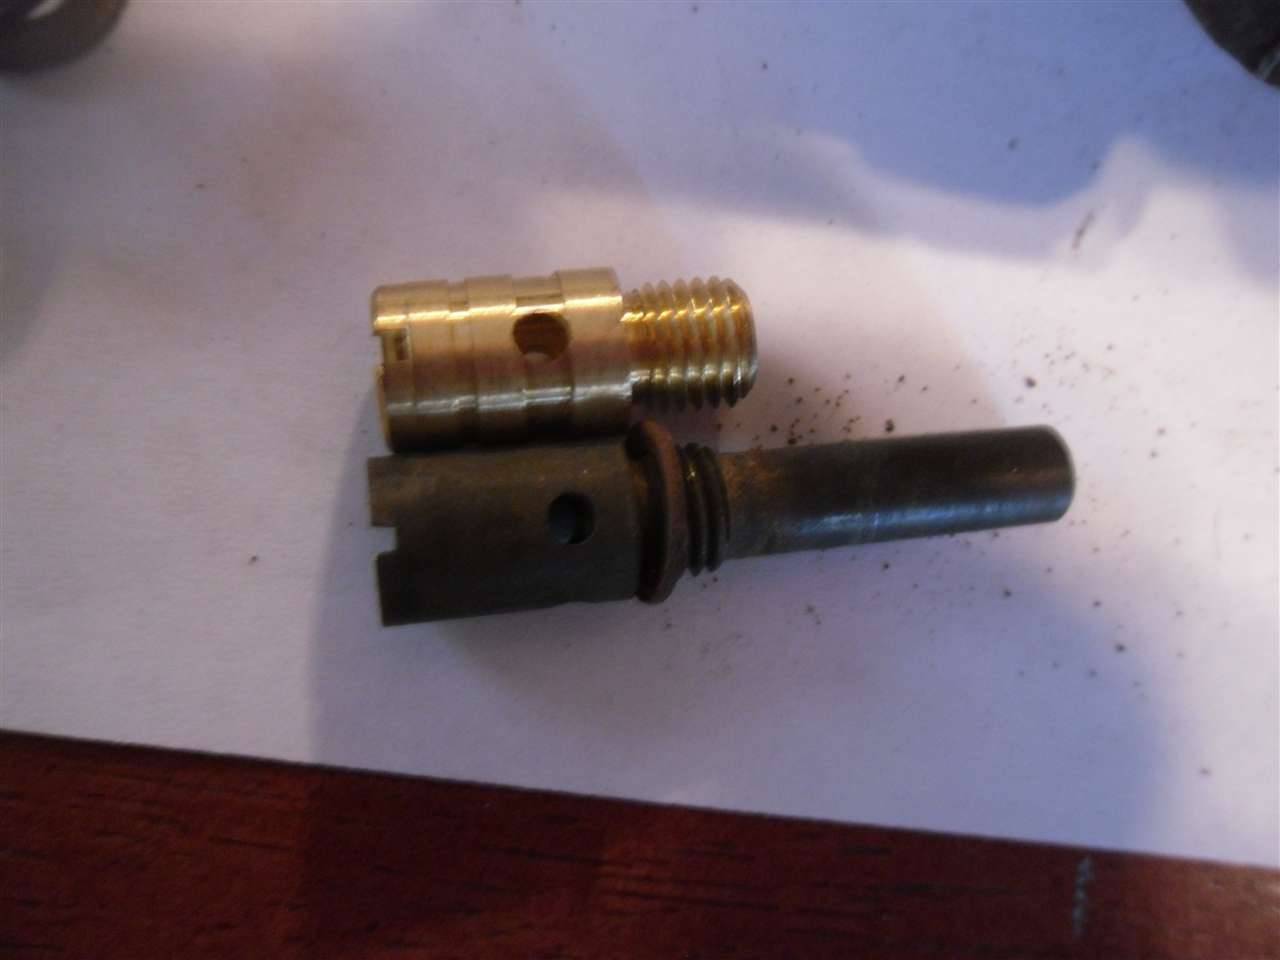
Posted on: 2011/3/19 20:04
|
|||
|
[url=h
|
||||
|
||||


