|
Re: Now for the padded dash......
|
||||
|---|---|---|---|---|
|
Forum Ambassador

|
I separated the pieces when replacing my pad, but frankly I don't think it can be done with the dash in the car and components still assembled. If anyone has done it, sure would like to learn how myself. If consensus says removal is needed, there is a dash removal procedure in the AC install manualhttps://www.packardinfo.com/xoops/html/downloads/55-56ACInstall.pdf Obviously, the engine mechanical side and several other steps don't need to be done since you're not installing the factory AC but dash part gives things to disconnect, look for or check.
If you go for it, once dash removed and on a bench there are several screws holding the halves. As I recall, they are spaced about 6 - 8 inches apart. Because of the angle and small space, a couple toward the ends were difficult to get a screwdriver on -- even with dash out of the car and disassembled. Some others are above the cluster and radio so those items need to be removed or at least in case of the cluster, worked around. Once screws are removed and courtesy light removed, the halves will separate. I believe my pad may have been cemented to the flange but it could have just been age. All in all, it was a project. It was done before digital cameras so I don't have any pictures.
Posted on: 2012/4/11 22:10
|
|||
|
Howard
|
||||
|
||||
|
Re: Now for the padded dash......
|
||||
|---|---|---|---|---|
|
Forum Ambassador

|
Pat, by all means if you have the inclination to have it done professionally and have the $, I've seen some done by "Just Dashes" which, though not exactly true to the original in terms of grain and stitching pattern, were nothing short of spectacular.
BUT, if your vinyl cover sheet is in good condition, you can do a credible job yourself for just a few dollars. I used a heat gun to warm the vinyl a bit and loosened it at the windshield and pulled it back. Thoroughly cleaned the steel shell and purchased some adhesive-backed closed cell polyurethane foam in a couple of thicknesses,built up the pad, and then refastened the vinyl cover. There appear to be some waves in it, but that's just reflection thru the windshield from the hood. The cost of the materials was about $20, but success depends entirely on the vinyl skin being in good condition. Attach file:  (133.49 KB) (133.49 KB)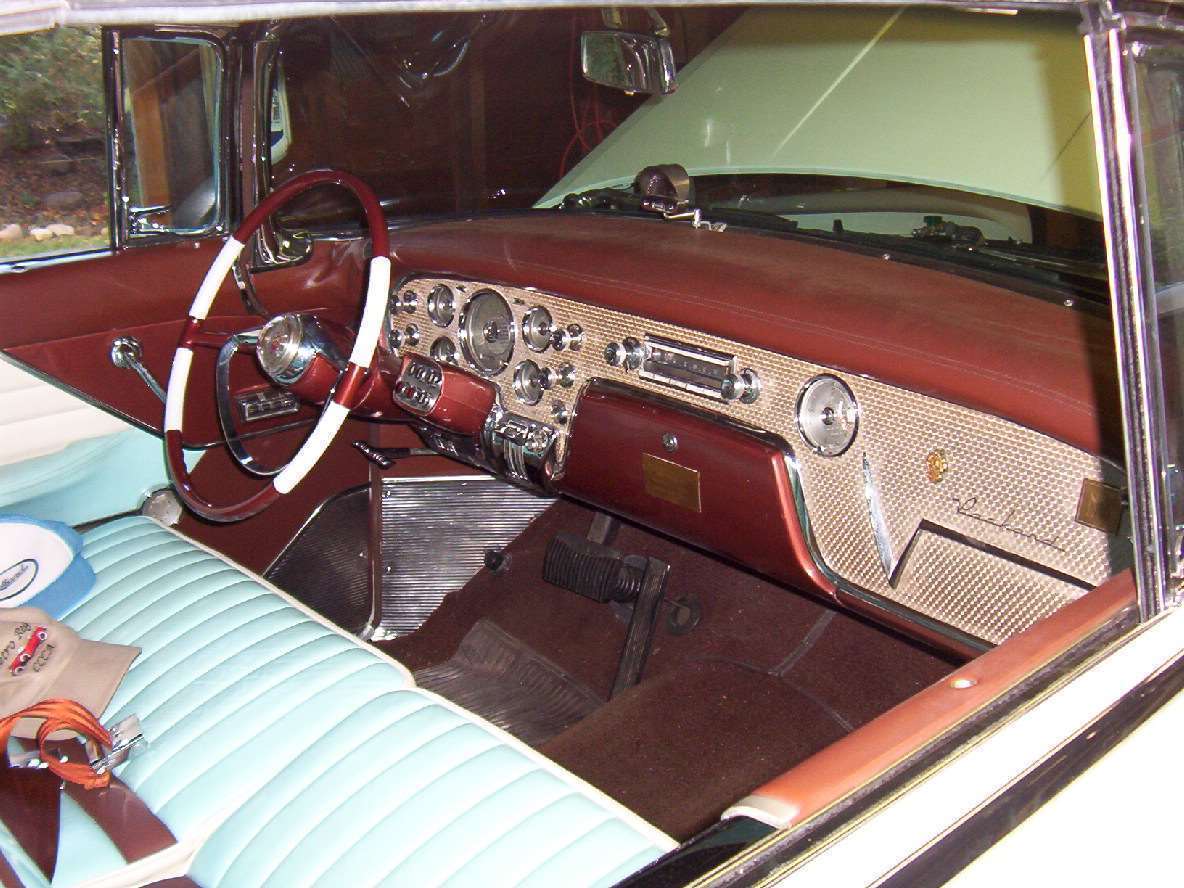
Posted on: 2012/4/12 10:08
|
|||
|
||||
|
Re: Now for the padded dash......
|
||||
|---|---|---|---|---|
|
Home away from home
|
The vinyl has been pronounced DOA.... So......
I don't have the $, but I may do it anyhow and pass the hat.... Printed the a/c guide, but the pictures are rough. I have also printed images from the parts plates file; again, they are not as detailed.... Anyone? Pretty please?
Posted on: 2012/4/12 13:28
|
|||
|
When two men ride the same horse, one has to be in the back...
|
||||
|
||||
|
Re: Removing the top of the senior dash.....
|
||||
|---|---|---|---|---|
|
Home away from home
|
Hi, you would need to remove steering wheel unit, then you can rotate dash down, but it is still tough to get to the screws.
been there, done it... rik
Posted on: 2012/4/13 19:52
|
|||
|
Riki
|
||||
|
||||
|
Re: Removing the top of the senior dash.....
|
||||
|---|---|---|---|---|
|
Home away from home
|
I don;t have picture of it, but, a co worker does sewing, he used a soft naugahyde?,,,any way,, he double stitched it
then pulled and wrapped it, to fit curve. its been like that for over a year.. maybe i will get it out and take a picture. anyway there is no stitch piecing that curve. that people do. rik
Posted on: 2012/4/13 21:36
|
|||
|
Riki
|
||||
|
||||
|
Re: Removing the top of the senior dash.....
|
||||
|---|---|---|---|---|
|
Home away from home
|
Supposedly on the senior cars the top of the dash can be unscrewed and lifted up; the dash itsself stays put. As I understand it....
So how do you do it? How hard is it? Can you do what is needed by simply removing the chrome bezel around the gold part? I'll be having this done, but I really want to head off any unneeded side trips. HHHHHEEEEELLLLLLLLPPPPPPPPPPPPPP!!!!!!!!!!!!
Posted on: 2012/4/13 22:13
|
|||
|
When two men ride the same horse, one has to be in the back...
|
||||
|
||||
|
Re: Removing the top of the senior dash.....
|
||||
|---|---|---|---|---|
|
Forum Ambassador
|
55-6 dashes junior and senior are all constructed the same way. The pad and jr-sr model cosmetics are the only differences. The two halves are screwed together with a screw and speed nut about every 6-8" on the back via a flange on each piece. That flange is about 1/2 inch wide and just above the chrome molding and all the way across. The pad is sandwiched between the two flanges. The chrome molding does press in from the front and is held with spring clips but is decoration to hide the edges of the gold screen and also provide a means of fastening the edges of the screen. It does not touch the top piece or hold anything else together.
As far as top just lifting up, it won't because the top piece is screwed to cowl under the windshield trim molding and is essentially what holds the dash in. A screw about every foot or so. Once those are removed, as was mentioned by riki it may be possible to leave the two large bottom ones in on the sides and pivot. He mentioned you would need to remove or lower the steering column to let it fold forward. IMHO, the 56 half column should be removed since there would be no support after the dash clamp is gone. The toe board would need to loosen to let it drop. Once that is gone, unless you find a way to support it, the column would only be pulling against flex coupling & shift linkage and things could be damaged. Better safe than sorry and you gain extra room. At the dash, there is just the clamp held via two bolts to the main cowl to column support. Unfortunately the dash is in the middle. You also need to remove the radio tuner rear brace to cowl. In some cars the wiring loom is intertwined around the steering column brace so you probably couldn't move more than an inch or so without disconnecting several things. Something else to watch out for. Here is a breakdown from parts manual and a picture of the back of dash from that AC install book. You can see 5 of the screws holding the top and bottom halves (one I neglected to highlight is in the middle of the others just to the right of corner of parts photo) and that arrangement is all the way across. The top does not hinge up. Attach file: (106.95 KB)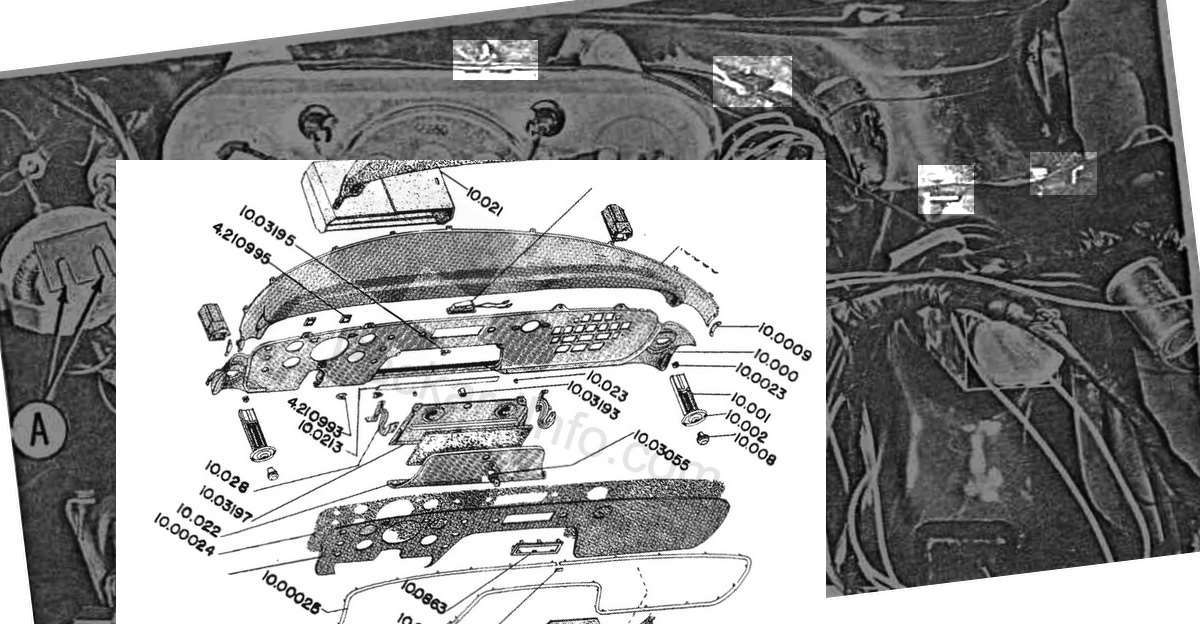
Posted on: 2012/4/13 23:13
|
|||
|
Howard
|
||||
|
||||
|
Re: Removing the top of the senior dash.....
|
||||
|---|---|---|---|---|
|
Home away from home
|
Thank you. I do indeed have the diagram shown from the parts plates, but never having been there it seems confusing.
Oh well, here goes.....
Posted on: 2012/4/15 15:59
|
|||
|
When two men ride the same horse, one has to be in the back...
|
||||
|
||||


