|
Re: Removing front clip
|
||||
|---|---|---|---|---|
|
Just can't stay away

|
Ok HH 56 you called it I hit all with penetrating oil let the sit for about 2 hours and 2 came off great one is about half off before it started spinning so i think i can get that one and the 4th just spins the nut has not backed off at all. Any segestions to get that 4th one off?
Posted on: 2012/9/12 13:27
|
|||
|
||||
|
Re: Removing front clip
|
||||
|---|---|---|---|---|
|
Forum Ambassador
|
There doesn't appear to be any way to get anything behind them. It's a smooth head carriage bolt about 1" or so long and only about 1/4" clearance before it runs into outside of fender. Sawing them off looks to be extremely difficult as well. About all I can suggest to avoid doing damage to the fender where the sheet metal bolt holders attach is to dose again with penetrating oil and let it sit some more. After some time, try again.
If still stuck hold the bolt right on the end with some vise grips and turn the nut out as far as possible. Once nut hits grips, transfer the vise grips to the bolt area behind the nut and continue. You may have to use needle point vise grips to fit behind nut. Since the threads will probably have been messed up by vise grips you may have to restore them before the bolt will go farther. Use a chase or threading die to repair them. The bolts look to be standard 5/16-18 thread.
Posted on: 2012/9/12 14:15
|
|||
|
Howard
|
||||
|
||||
|
Re: Removing front clip
|
||||
|---|---|---|---|---|
|
Home away from home

|
Best to let the penetrating oil soak for a week with periodic reapplication. The method I use is to use t-bars to work rusty fasteners back and forth with frequent use of air to get rid of thread locking grit. Really stubborn stuff requires heat.
Since you have the bolt half off I would see if you can weasel a new hack saw blade between fender and body and cut the bolt off. It's tough, but once a muffler shop screwed up a 7/16 bolt on an old Dodge I owned and I laid on my back for an hour sawing the dumb thing off to remedy a nasty rattle. When reassembling clean all reused bolts on a wire wheel and coat with Pennzoil 705 white grease or equivalent.
Posted on: 2012/9/12 16:23
|
|||
|
||||
|
Re: Removing front clip
|
||||
|---|---|---|---|---|
|
Home away from home

|
How about a nut splitter?
Posted on: 2012/9/12 17:36
|
|||
|
[url=h
|
||||
|
||||
|
Re: Removing front clip
|
||||
|---|---|---|---|---|
|
Forum Ambassador
|
Quote:
Excellent idea if there is enough room. Be a tight squeeze but you might find one large enough for the nut but small enough to fit in that small space on door hinge side. Access to work the screw on the splitter might be an issue on the top bolt if that's the one causing problems.
Posted on: 2012/9/12 17:48
|
|||
|
Howard
|
||||
|
||||
|
Re: Removing front clip
|
||||
|---|---|---|---|---|
|
Just can't stay away

|
I can't work on it again till Friday but i am going to get a nut splitter to have on hand! You guys are great I had never even heard of a nut splitter before!
Posted on: 2012/9/12 17:55
|
|||
|
||||
|
Re: Removing front clip
|
||||
|---|---|---|---|---|
|
Home away from home

|
All good info as I will eventually tackle front clip removal. Thanks. Howard, for posting the photos! The more the better.
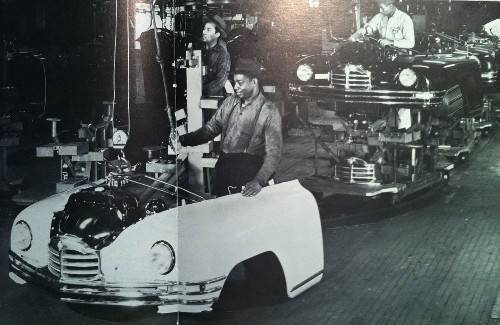
I was encouraged when I saw the image in the Packard "Bible" (pgs. 526-527) of the assembly line depicting the fully assembled clips being readied for mating. The radiator is even pre-installed! Looks like everything but the bumper and hood! Additionally, I have found a 50/50 mix of acetone and ATF works well on rusty bolts.
Posted on: 2012/9/12 20:31
|
|||
|
Joey
(?=#=?) "If chrome got me home, I'd for sure still be stuck somewhere." [url=http://pac |
||||
|
||||
|
Re: Removing front clip
|
||||
|---|---|---|---|---|
|
Home away from home

|
another suggestion.
Use a product called Evapo-Rust. Clean the penetrating stuff off first the soak a rag in Evapo-Rust and cover the nuts and bolts. Evapo-Rust is an enzyme that eats only rust and nothing else. I used it on my wife's Subaru Impreza that had rusty disc brake slides. It worked like a charm. No beating on the pins, no torches just Evapo-Rust. You can find it at most auto parts chains, Auto Zone has it. Just make sure that the rag stays soaked in the stuff and the enzymes will do the job.
Posted on: 2012/9/12 22:15
|
|||
|
||||

 (69.23 KB)


