|
Re: Ken's 1937 120 Touring Sedan
|
||||
|---|---|---|---|---|
|
Forum Ambassador

|
Just an FYI guideline as a worst case scenario if your local shop can't fix the old one and says you need a new core. There might be others who do repros but this one comes to mind for some reason.
Posted on: 5/29 11:02
|
|||
|
Howard
|
||||
|
||||
|
Re: Ken's 1937 120 Touring Sedan
|
||||
|---|---|---|---|---|
|
Home away from home
|
Howard and Don, thanks for the info and input! Glad to know they are at least obtanium!
I'll drop it off at the shop today and see what they say. Mine appears to be in excellent condition, there is just a little corrosion on the core and rust on the housing that indicates a leak; it has never left coolant on the floorboard.
Posted on: 5/30 11:29
|
|||
|
1937 120 1092 - Original survivor for driving and continued preservation. Project blog / Registry
1937 115 1082 - Total basket case, partial restoration, sold Hershey 2015 Project blog / Registry |
||||
|
||||
|
Re: Ken's 1937 120 Touring Sedan
|
||||
|---|---|---|---|---|
|
Home away from home
|
A few updates.
Water pump: I sent the pump back to AG Rebuilders. While mine was there, I took apart a second pump, just to put eyes on how the bushing is constructed. It turns out the way the bushing is installed, the only leakage path from the bushing to the rear oiler is via the packing. I talked to Parker at AG Rebuilders yesterday. He confirmed my understanding and I learned a few things about my pump: - On driver cars, the normal procedure is to install a grease zerk at the rear oiler position. They rebuild the pump with waterproof grease, which lubricates better than oil. - On the original pumps, there was a heavy cotton wick underneath the oiler. They (AG Rebuilders) don't duplicate this. Sounded to me like it would be cost prohibitive. - Also, apparently some of the aftermarket pumps cannot be rebuilt, because the casting is too thin. Just interesting. I'm going to run it with the grease zerk for now. Long term, I am either going to try and figure out a solution for replacing the original cotton wick, or I will seal an oiler shut, then remove it once a year and add grease instead of oil. I haven't decided yet. Either way, I should have a pump back this week that doesn't leak, so once I get the paint on the block touched up, I'll be good to go, and have a driving car again. There was a grease zerk on the pump that was on the car when I bought it, so perhaps it had a rebuilt water pump on it. Packard handling improvements: I bought a sway bar last fall from John Uhlrich, and finally made time to install it. No driving impressions yet, but install was fairly simple. I got the sway bar, new torque arm brackets, the frame brackets, and all the rubber from John. I got four 7/16-20x1 bolts along with washers, lock washers, and nuts from the local hardware store. Took about an hour to install. No driving impressions yet. Not looking for a race car, especially since I still run bias ply tires, but I'm sure it will take some of the "wallow" out of the car, especially when turning. New torque arm brackets  Old vs new torque arm brackets  Sway bar installed 
Posted on: 6/3 9:31
|
|||
|
1937 120 1092 - Original survivor for driving and continued preservation. Project blog / Registry
1937 115 1082 - Total basket case, partial restoration, sold Hershey 2015 Project blog / Registry |
||||
|
||||
|
Re: Ken's 1937 120 Touring Sedan
|
||||
|---|---|---|---|---|
|
Home away from home
|
Got the pump back today, touched up the paint on the engine block and the water pump. I don't have any Packard green in a can, so to touch up the block, I sprayed some spray paint into a solo cup, then applied that to the block with a brush. Fun fact - a Bill Hirsch spray can will melt a solo cup in about ten minutes.
Once the paint dries tomorrow, I'll install the water pump, test everything, then we've got a tour with my local car club scheduled for Saturday. Should be about 175 miles, assuming the weather holds. Looking forward to it! Block after touchup  Solo cup casualty 
Posted on: 6/5 20:38
|
|||
|
1937 120 1092 - Original survivor for driving and continued preservation. Project blog / Registry
1937 115 1082 - Total basket case, partial restoration, sold Hershey 2015 Project blog / Registry |
||||
|
||||
|
Re: Ken's 1937 120 Touring Sedan
|
||||
|---|---|---|---|---|
|
Home away from home
|
Got the water pump all installed. I've done that job several times now, and it doesn't get any more fun, or any easier, whenever I do it. The biggest trick I have found is to put a small stud in one of the holes on the fan hub while the water pump is out of the car, so you don't have to try and line up the hub, pulley, and fan all by braille. Once I get two bolts in, I pull the stud and continue.
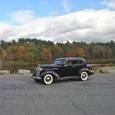
Installed the pump last night, topped off the coolant, and then this morning washed the car and went on a tour with my local car club. About 175 miles all told, speeds from 40 to 60 mph. Car performed well, no leakage from the water pump, and temperatures were fine. I took my ten year old daughter with me, and we had a ball, even when the temperature outside went up on the drive home after lunch. Driving impressions with the sway bar. It is not a sports car, but I can say the sway bar made an immediate and noticeable difference. I had to turn aggressively into a parking lot due to driver error (I wasn't paying attention) and my immediate reaction was, "Oh d*&n!" It turned much more assertively and with much less body roll. Overall, the car just feels less wallow-ey. It also seemed like it tracked better when I was driving today, with the bias ply tires less prone to wander. I spent most of the day driving with a thumb or one finger, and it's very comfortable to have an arm up on the back of the seat, so super happy with how it is handling. A few pictures of the car from the tour today:     A really neat old spark plug tester at the museum we were at today: 
Posted on: 6/7 16:59
|
|||
|
1937 120 1092 - Original survivor for driving and continued preservation. Project blog / Registry
1937 115 1082 - Total basket case, partial restoration, sold Hershey 2015 Project blog / Registry |
||||
|
||||
|
Re: Ken's 1937 120 Touring Sedan
|
||||
|---|---|---|---|---|
|
Home away from home

|
Looks like a fun time! I also learned the stud trick when installing the water pump. It makes it go back together much quicker!
Posted on: 6/7 21:04
|
|||
|
||||
|
Re: Ken's 1937 120 Touring Sedan
|
||||
|---|---|---|---|---|
|
Home away from home
|
The heat index has been triple digits for the last few weeks, so, logically, I have been working on the heater.
First, I got the core back from the shop. They were able to fix a couple of the leaks, so full success there. I need to touch up the paint on it. I bought a can of Eastwood's radiator paint, and I'll spray it shortly. Second, the heater motor. On my heater there is only one motor. The field wire was in terrible shape, with multiple cracks in the insulation and missing insulation. In order to replace the field wire, it is required to completely disassemble the motor:  While the motor was disassembled, I also cleaned everything, inspected the brushes, and cleaned up/undercut the commutator. Everything else looked good, so once I soldered in a new field wire, I re-assembled the motor, and it tested satisfactorily. The trickiest part was getting the brushes back over the commutator because there is no provision to hold the brushes back, against spring tension, with a piece of wire or similar. I found a deep well sprocket of the same external diameter as the piece the thrust washer rides against did the trick. I held the brushes in with a socket, then slid the rotating assembly up and withdrew the socket until the brushes were seated on the commutator.  Once all the paint dries, I'll re-assemble everything and then not use it until this winter, or never, but at least I'll know it works and doesn't leak.
Posted on: 7/24 11:42
|
|||
|
1937 120 1092 - Original survivor for driving and continued preservation. Project blog / Registry
1937 115 1082 - Total basket case, partial restoration, sold Hershey 2015 Project blog / Registry |
||||
|
||||
|
Re: Ken's 1937 120 Touring Sedan
|
||||
|---|---|---|---|---|
|
Home away from home
|
Looks good. I’m sure it will at least help some in the winter time. I not sure how after 88 years, but both of my motors (I have the defroster as well) wear still working well and the field wires were in good shape.
Were your brushes in good shape or did you have to replace them? I’m curious if you took measurements of the brushes.
Posted on: 7/24 14:52
|
|||
|
||||
|
Re: Ken's 1937 120 Touring Sedan
|
||||
|---|---|---|---|---|
|
Home away from home

|
I was able to install my 120 water pump, fan, and pulley as an assembly. I covered the radiator with cardboard, then hung the belt over the pulley, then very carefully placed the pump/fan/pulley in position. I was not able to start the fan bolts with the pump in place. My hands are too big, or too stiff.
Posted on: 7/24 15:34
|
|||
|
||||


