|
Re: Stewart's 1955 Packard 400
|
||||
|---|---|---|---|---|
|
Home away from home

|
Here are the motors that I used in my power window conversion.
They were made for Chrysler & Dodge minivan models. I chose these due to the size of the drive gear. The two different models are for the the left and right side doors of the vans BUT, I am reversing them for my Packard. The left side motor (742-446) will be on the right side of my Packard and the right side motor will be on the driver's side. I am doing this because I want the motor housing to hang downward as the original motor did (see the last two photos). If I use them as Chrysler uses them the motors will point upward and will be difficult to get in and out of the door. I just have to remember to reverse the wires on the door switch. The whole process was like trying to figure out “right tighty - left loosy” when you are on your back under the car and reaching up out of sight. I am working on the adapter plate now and will post again tonight or tomorrow. Remember, I have already done this once. The passenger-side window regulator is already in the car and working. I ran it up and down nearly 300 times before I even put it into the car. I am just making a record here as I build the driver's side door. When this is complete, I will move on to the rear windows. I have no idea yet if this same conversion will work the same way on those windows. Attach file:  MotorNumbers.jpg (284.71 KB) MotorNumbers.jpg (284.71 KB)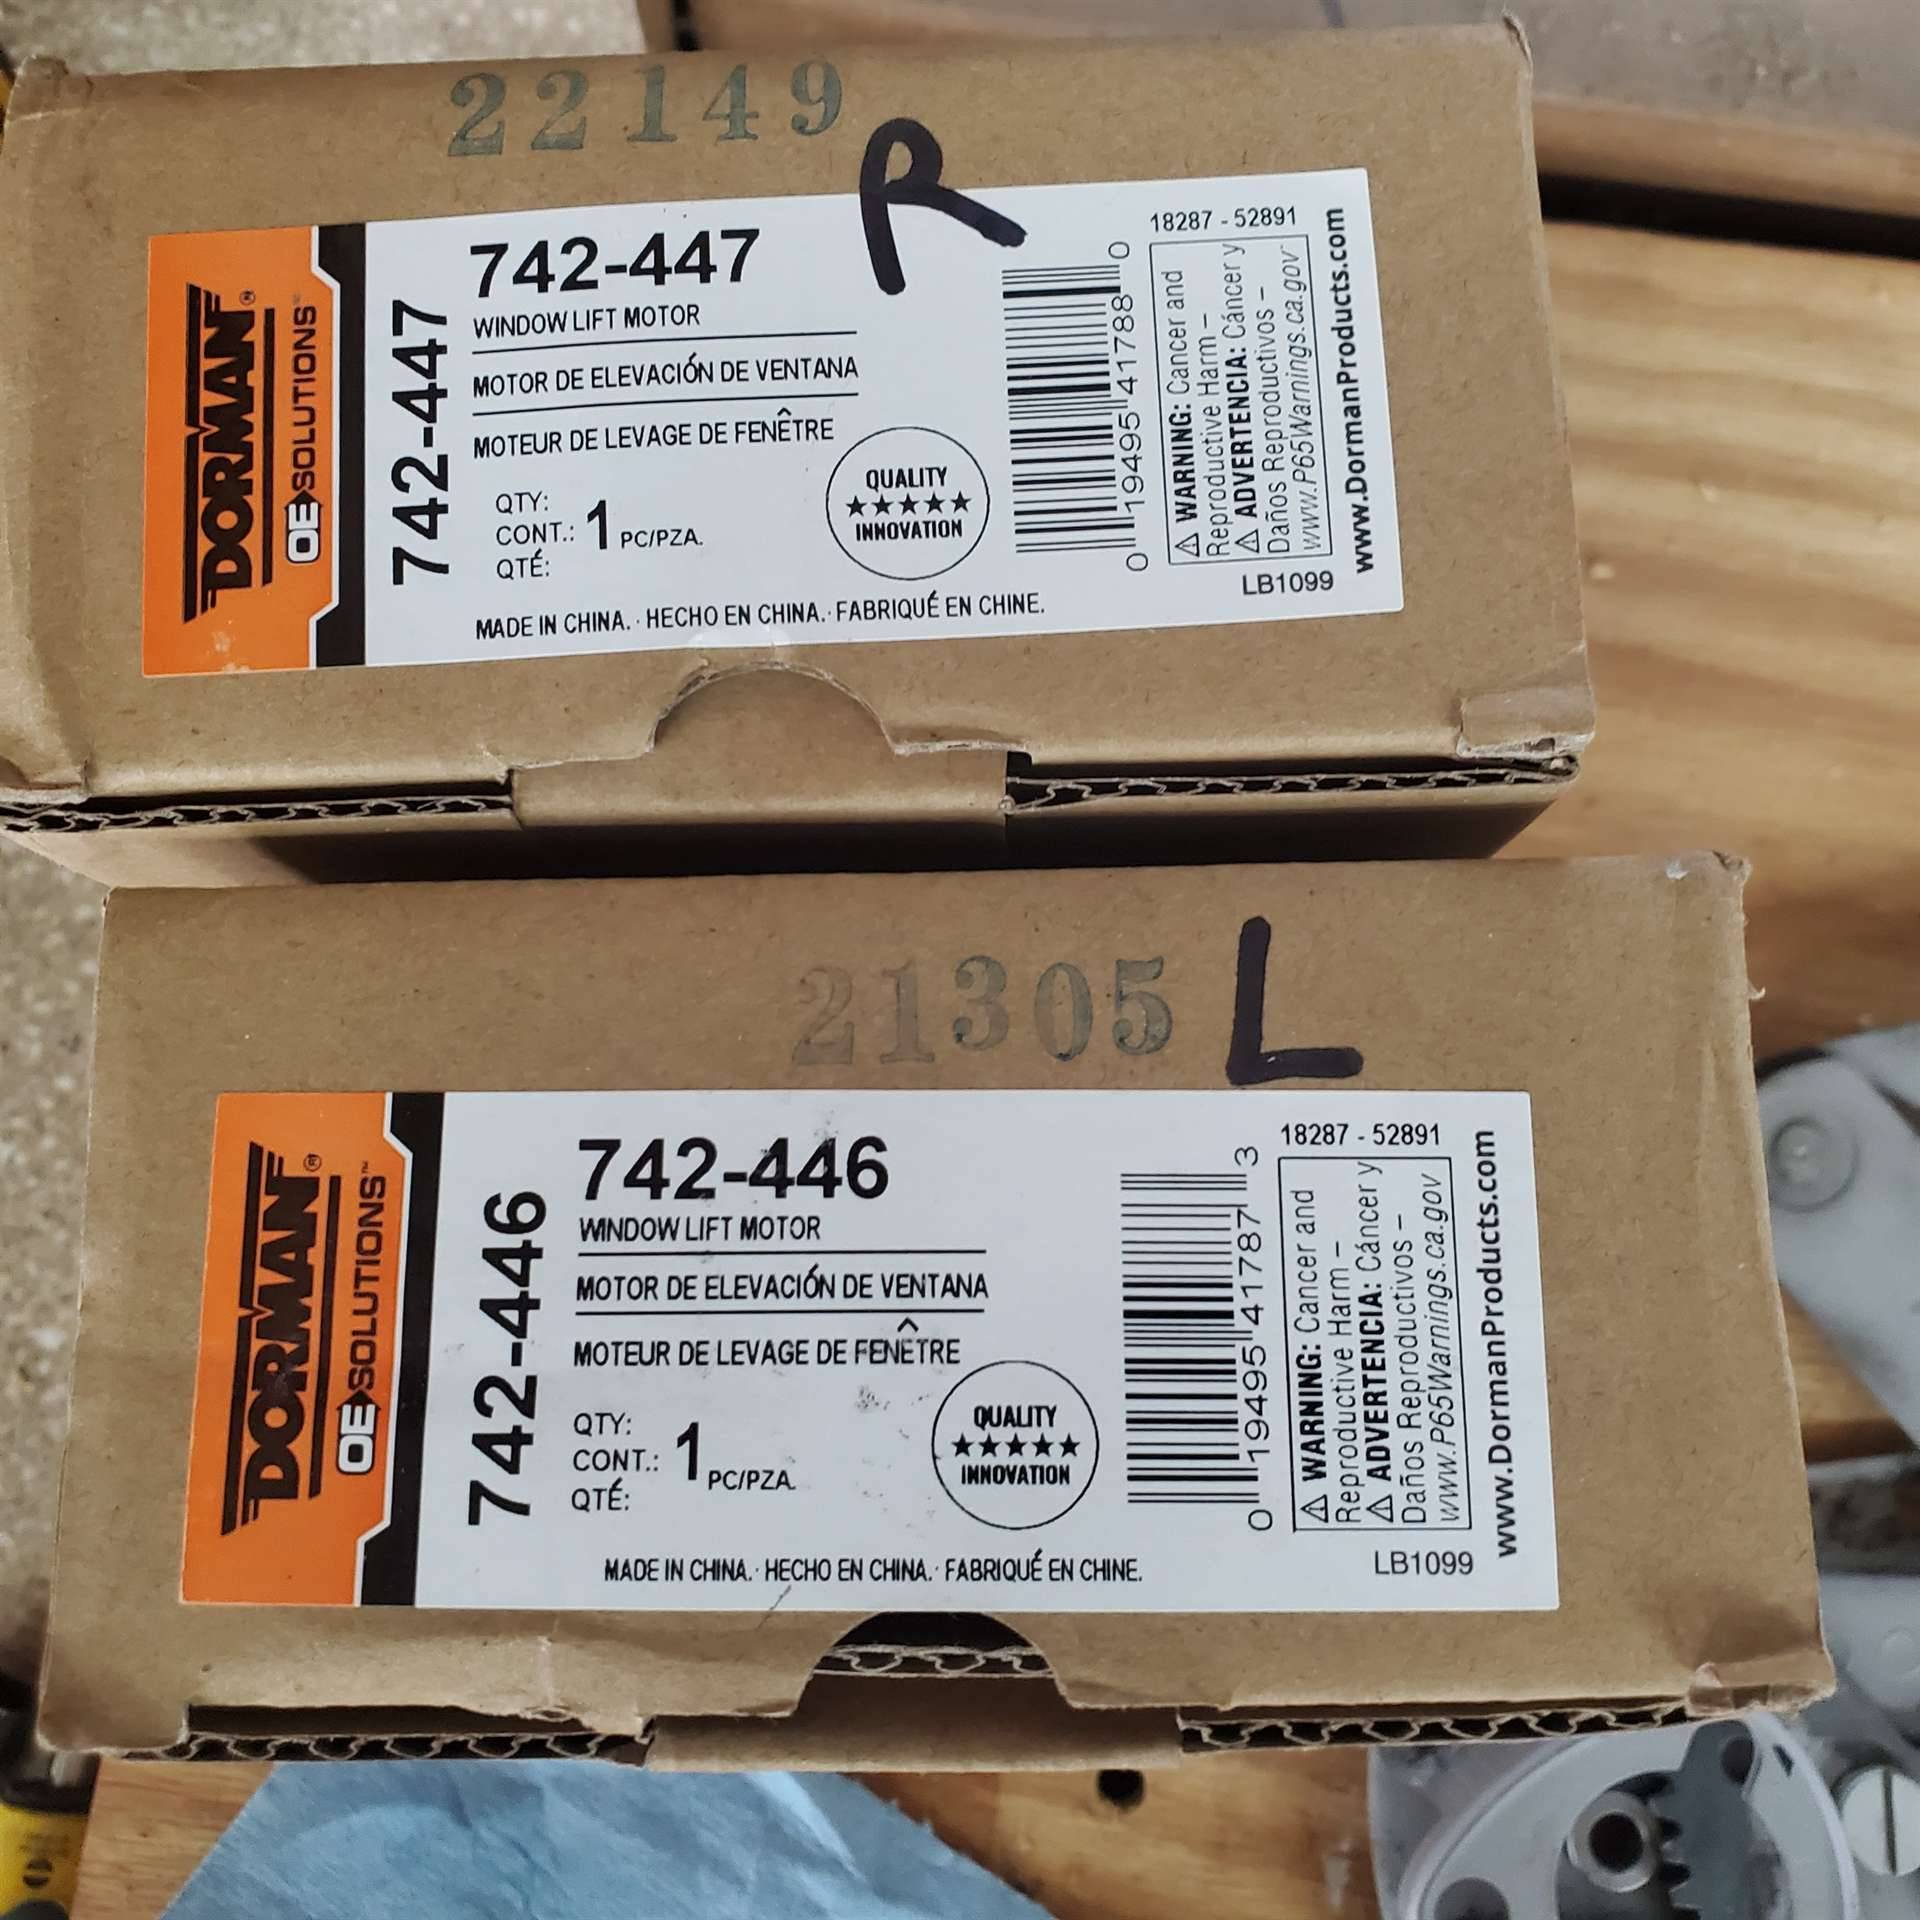 SideOne.jpg (259.95 KB) SideOne.jpg (259.95 KB)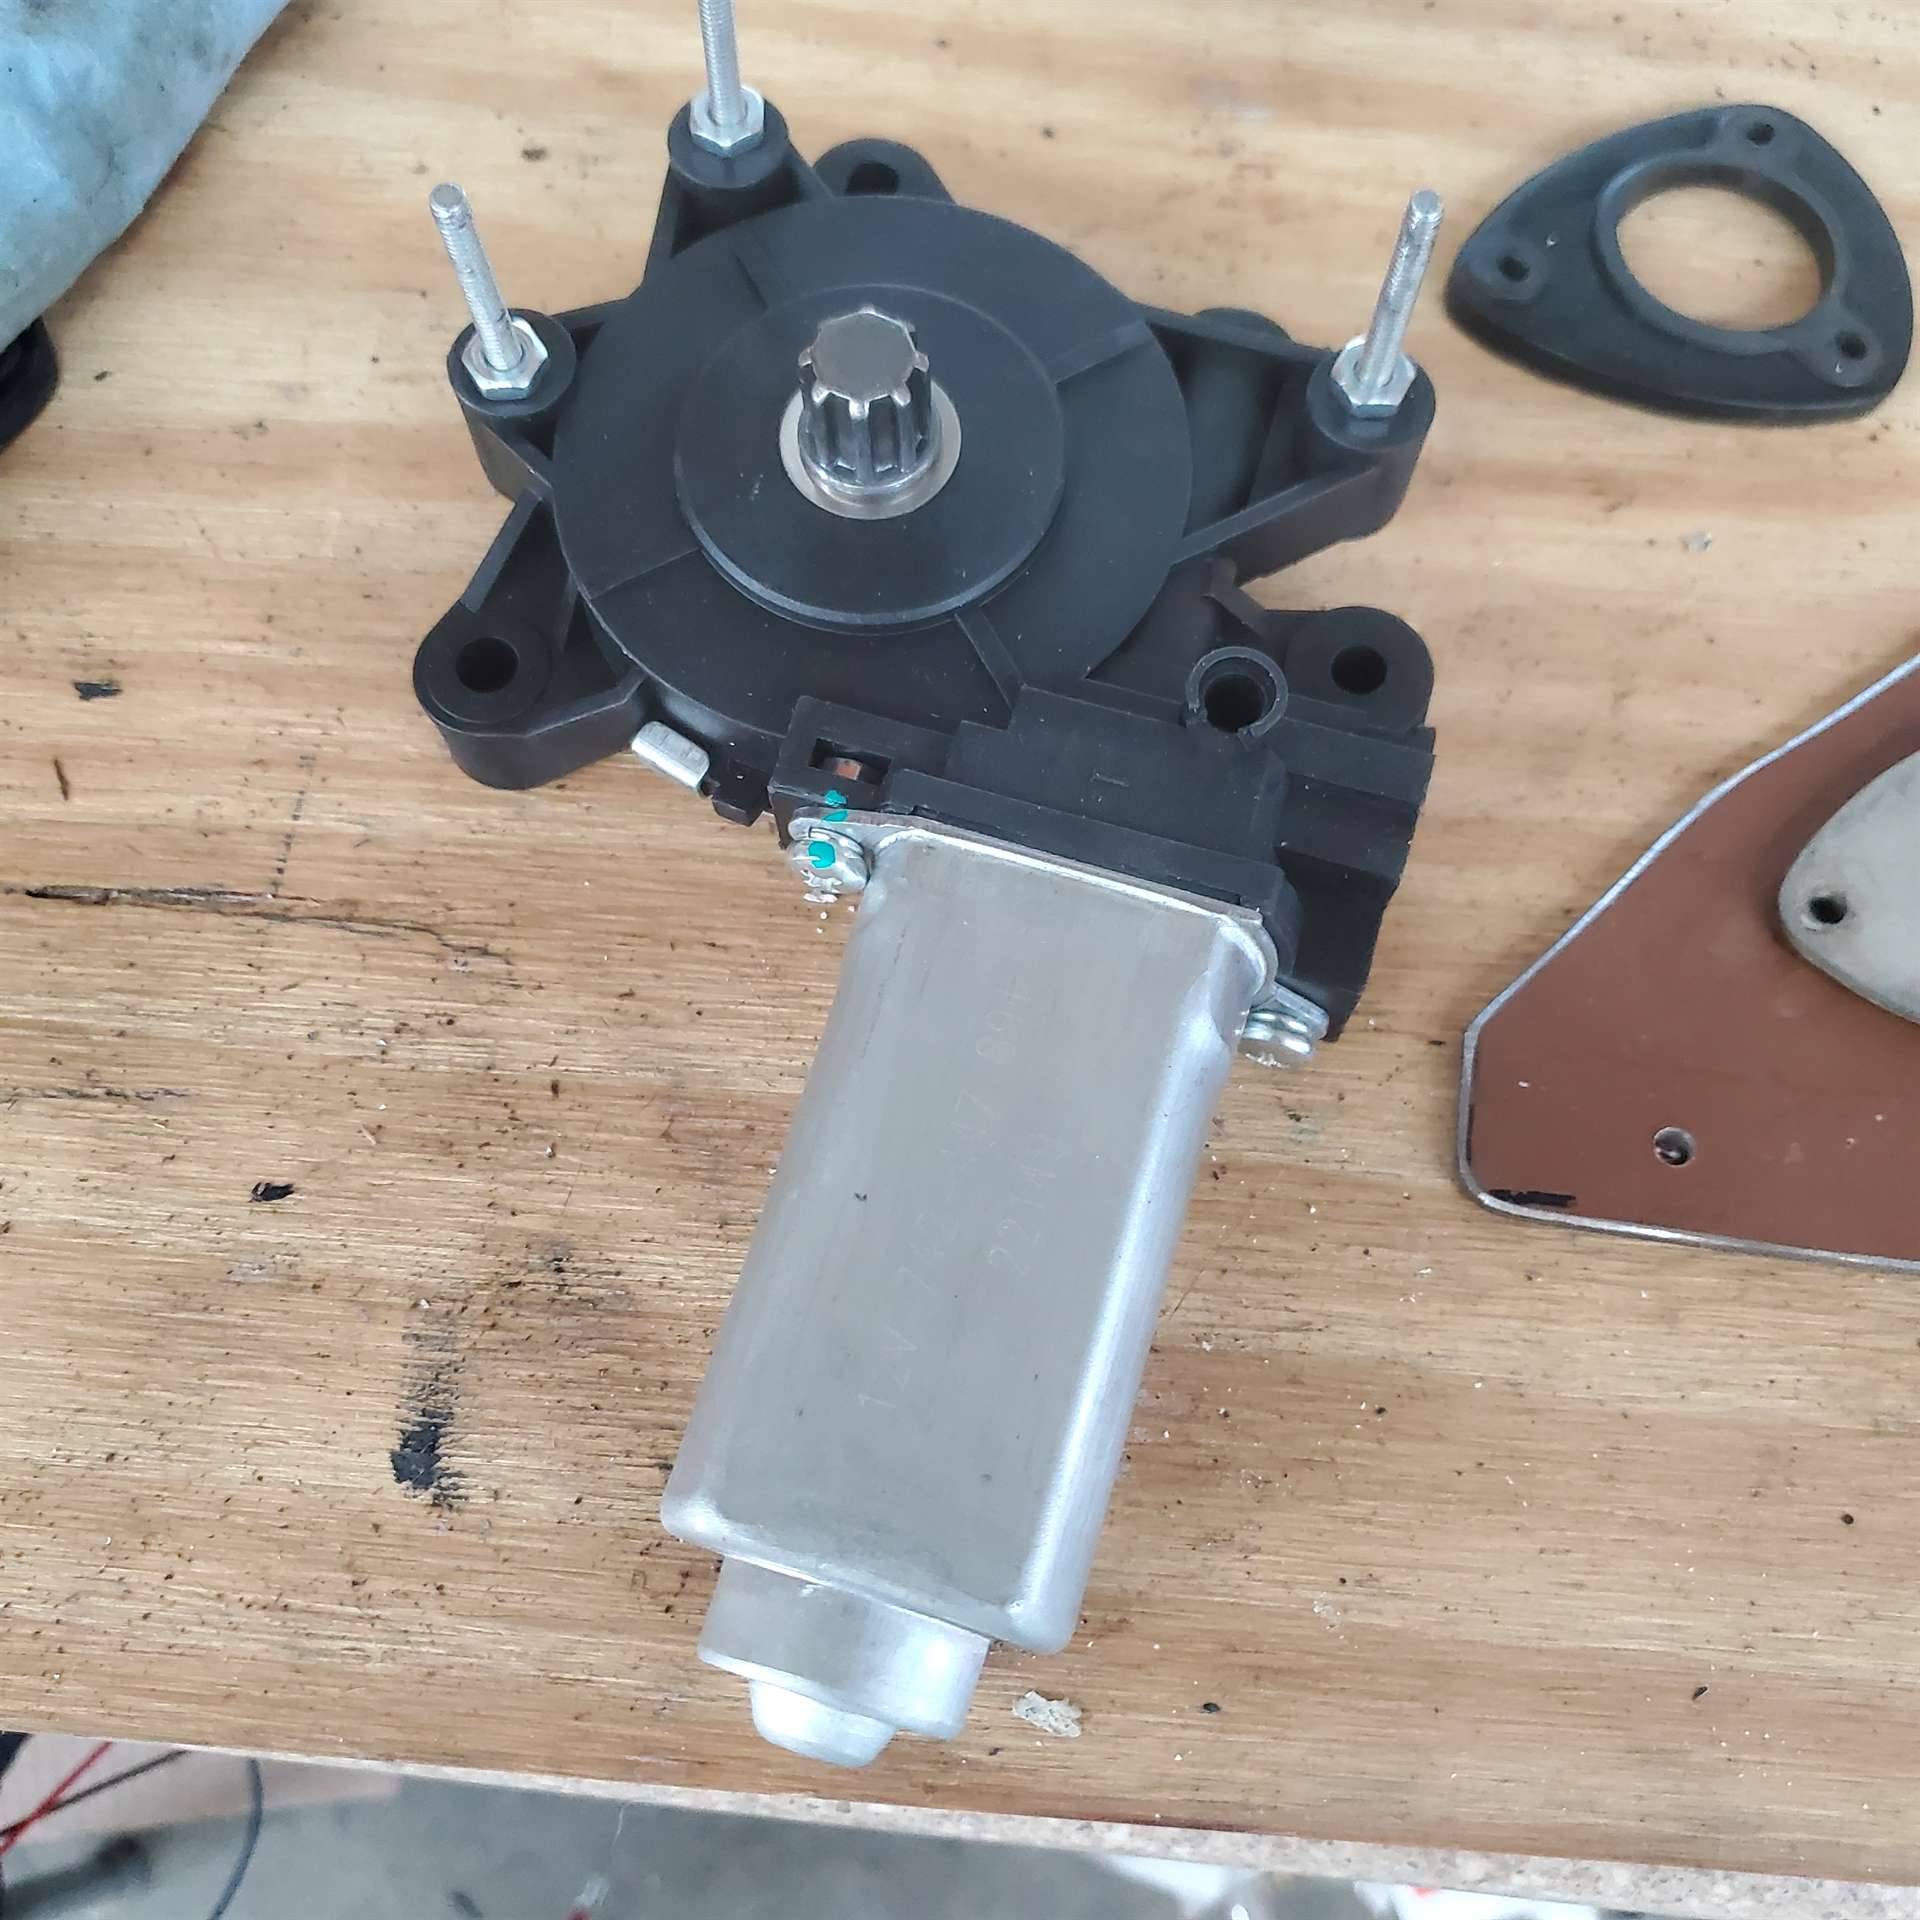 SideTwo.jpg (287.16 KB) SideTwo.jpg (287.16 KB)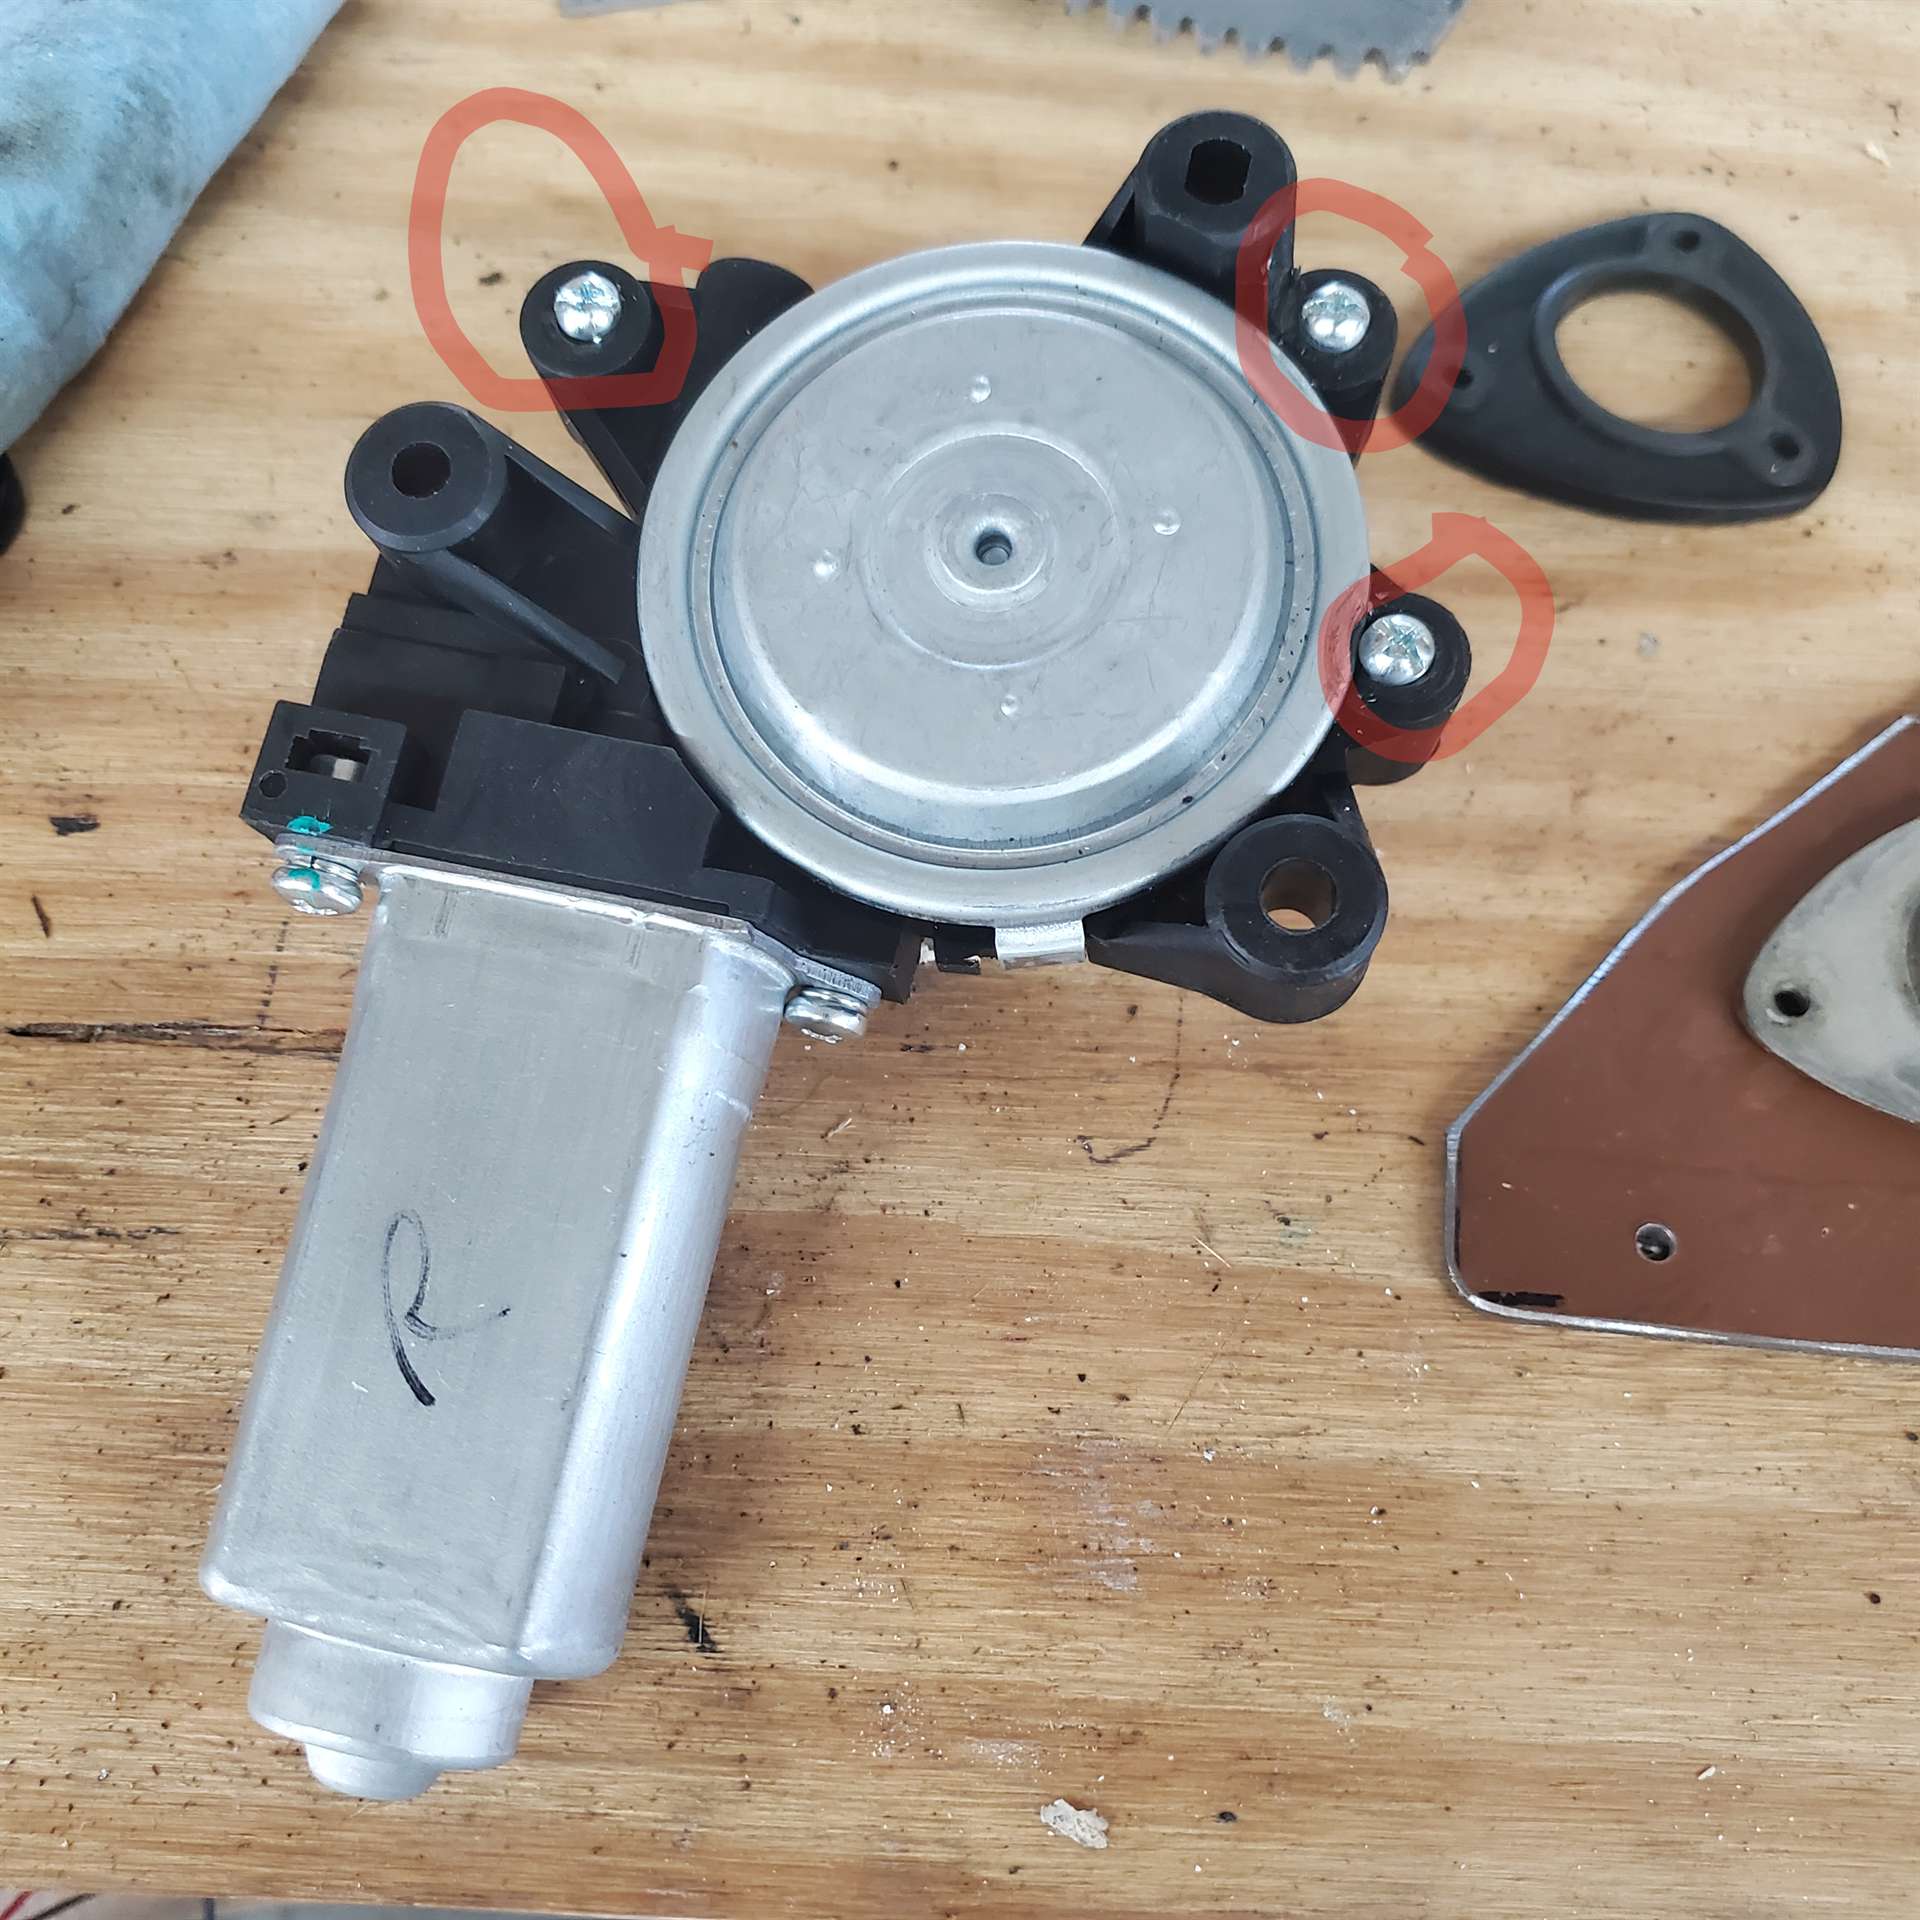 SidewaysView.jpg (103.64 KB) SidewaysView.jpg (103.64 KB)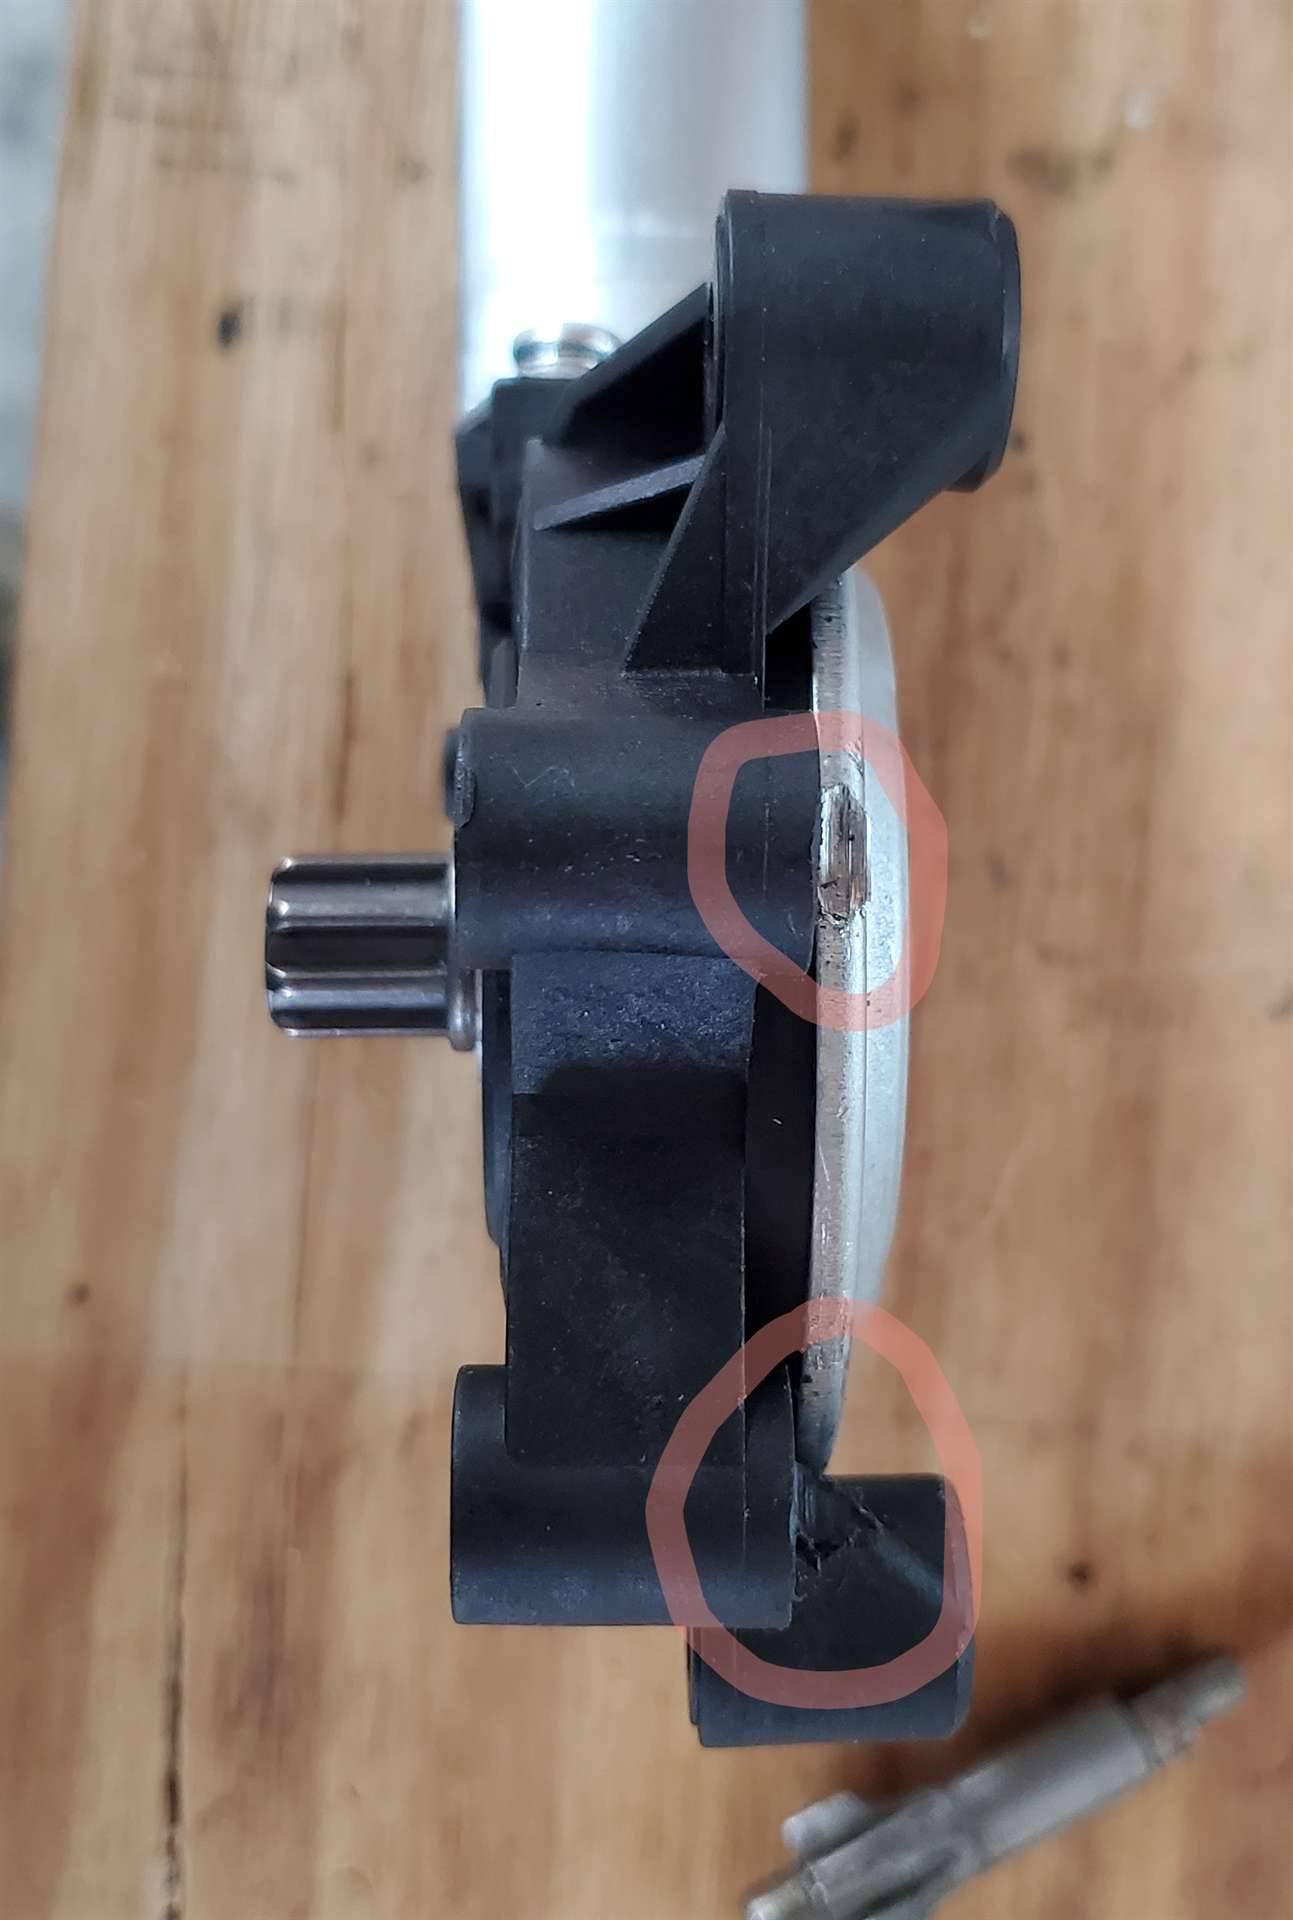 Original.jpg (77.44 KB) Original.jpg (77.44 KB)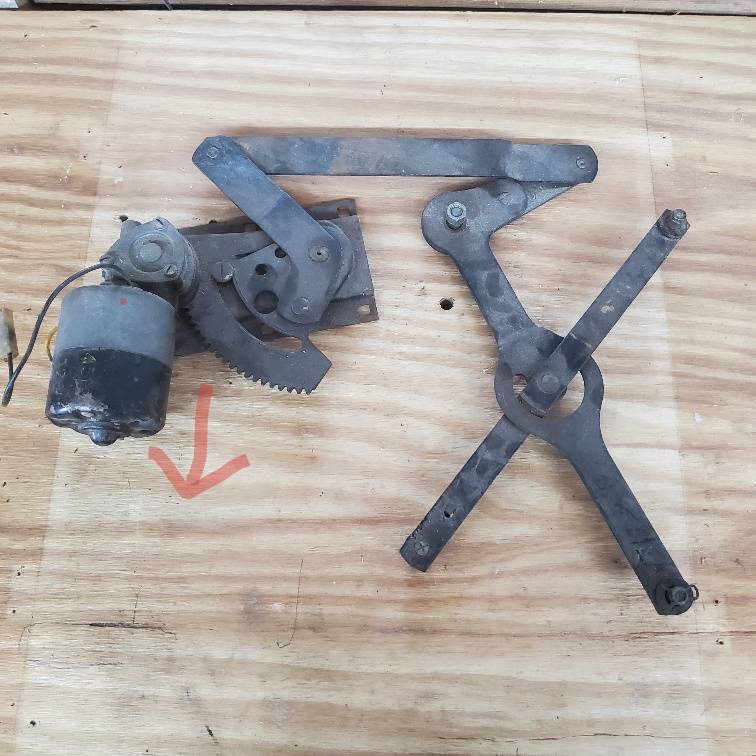 Replacement.jpg (352.70 KB) Replacement.jpg (352.70 KB)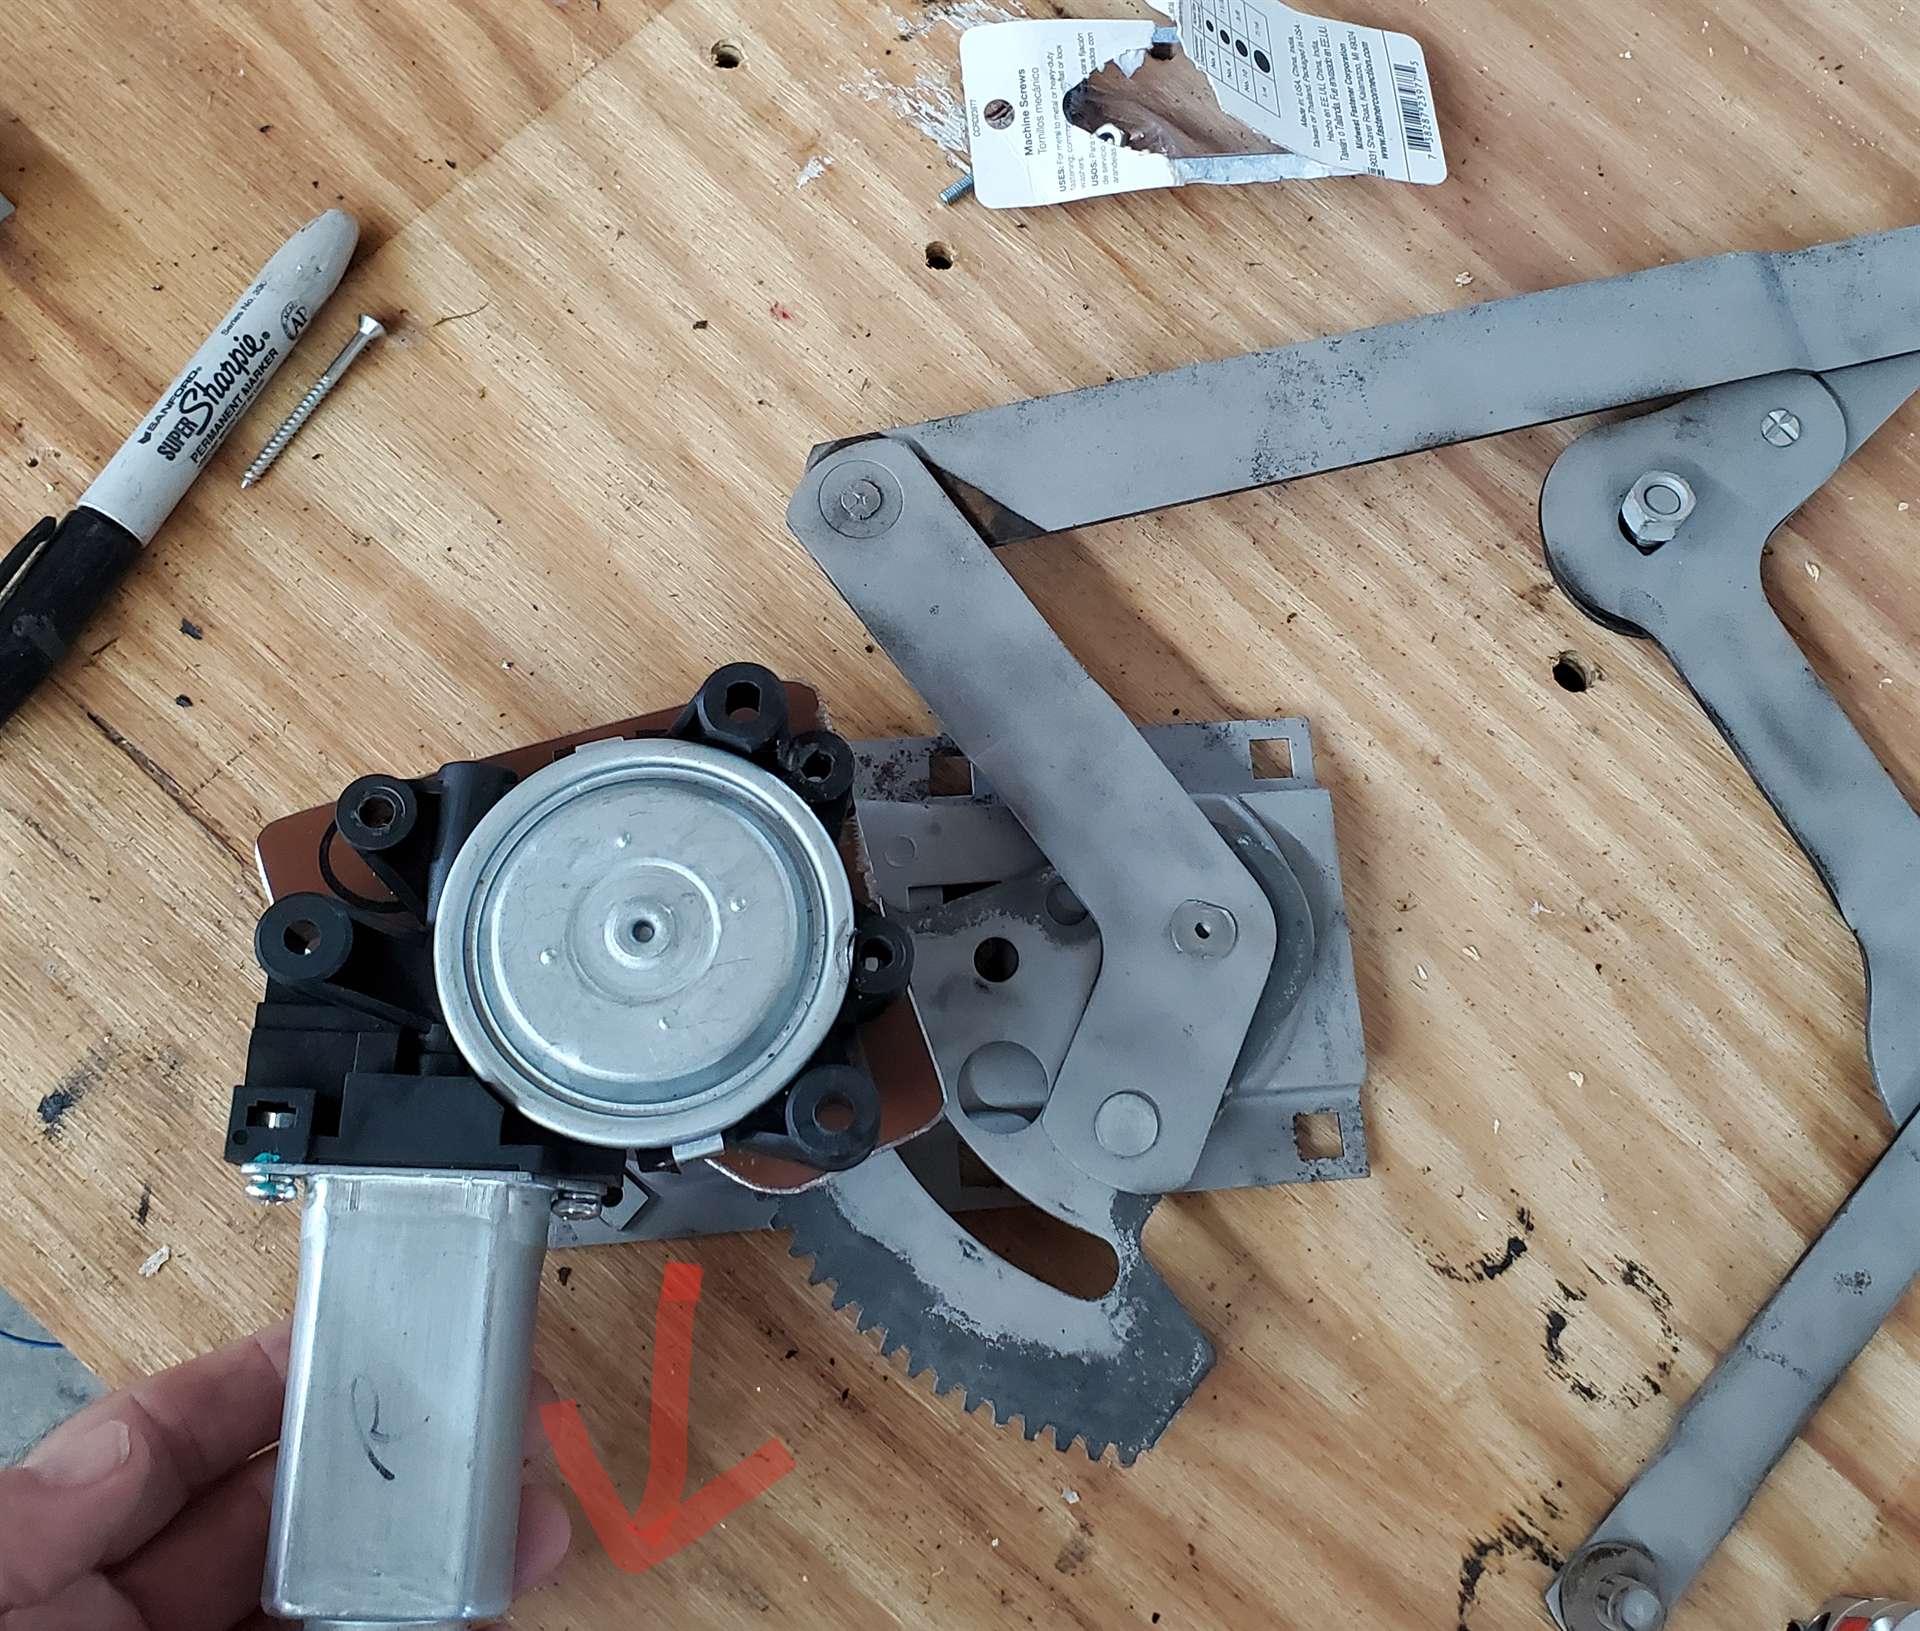
Posted on: 2023/9/1 11:45
|
|||
|
Stewart Ballard
|
||||
|
||||
|
Re: Stewart's 1955 Packard 400
|
||||
|---|---|---|---|---|
|
Home away from home
|
Let me retract something from that last post.
I have a working DESKTOP model of this mod. The regulator is in the door but the glass is not yet installed. I'll go work on that today and see if it will lift the glass before I go any further.
Posted on: 2023/9/1 12:21
|
|||
|
Stewart Ballard
|
||||
|
||||
|
Re: Stewart's 1955 Packard 400
|
||||
|---|---|---|---|---|
|
Forum Ambassador

|
I count 8 teeth on what appears to be a fairly long pinion. Are you using the pinion teeth to directly drive the regulator segment or is there some sort of adapter?
Posted on: 2023/9/1 12:25
|
|||
|
Howard
|
||||
|
||||
|
Re: Stewart's 1955 Packard 400
|
||||
|---|---|---|---|---|
|
Home away from home
|
Stewart
Can you take a side shot. One thing. The gear isn't supported at bottom. Isn't there flexing.. What you have. Does cut down on mods. Looks like you just make a plate..
Posted on: 2023/9/1 14:41
|
|||
|
Riki
|
||||
|
||||
|
Re: Stewart's 1955 Packard 400
|
||||
|---|---|---|---|---|
|
Home away from home
|
You guys are getting ahead of me. I can't explain it all in a single post and still have it make sense.
Yes, I have an adapter for the shafts between the motor and the regulator. The difference is that mine is store-bought not homemade. All that may be irrelevant now because, like an idiot, I started writing about it before I put the glass in the door. The motor does not appear to be able to handle the weight of the glass. I have a pair of original motors that work. I was just trying to avoid putting 70-year-old motors in the doors where they are hard to access. Trying to decide on a way forward at this point.
Posted on: 2023/9/1 17:17
|
|||
|
Stewart Ballard
|
||||
|
||||
|
Re: Stewart's 1955 Packard 400
|
||||
|---|---|---|---|---|
|
Webmaster

|
Wouldn't a modern window lift kit be something to look at 12v and hidden in the door and I am sure the electrical could be made to work from the stock switches.
Posted on: 2023/9/1 17:31
|
|||
|
-BigKev
1954 Packard Clipper Deluxe Touring Sedan -> Registry | Project Blog 1937 Packard 115-C Convertible Coupe -> Registry | Project Blog |
||||
|
||||
|
Re: Stewart's 1955 Packard 400
|
||||
|---|---|---|---|---|
|
Home away from home
|
Well, I am still an idiot but as I lay awake last night it dawned on me that I was using my tabletop power source to try to raise the window glass. It works well to test the motor and regulator on my workbench but does not have enough power with a load on the motor.
I rolled the battery over to the passenger door today and hooked it up (through the relays of course) and the window goes up and down link a champ. I'll sleep much better tonight. I finish up my modification posts after I assemble all the photos I took. Also, I finally got the steering wheel painted today. Attach file: SteeringWheel.jpg (407.40 KB)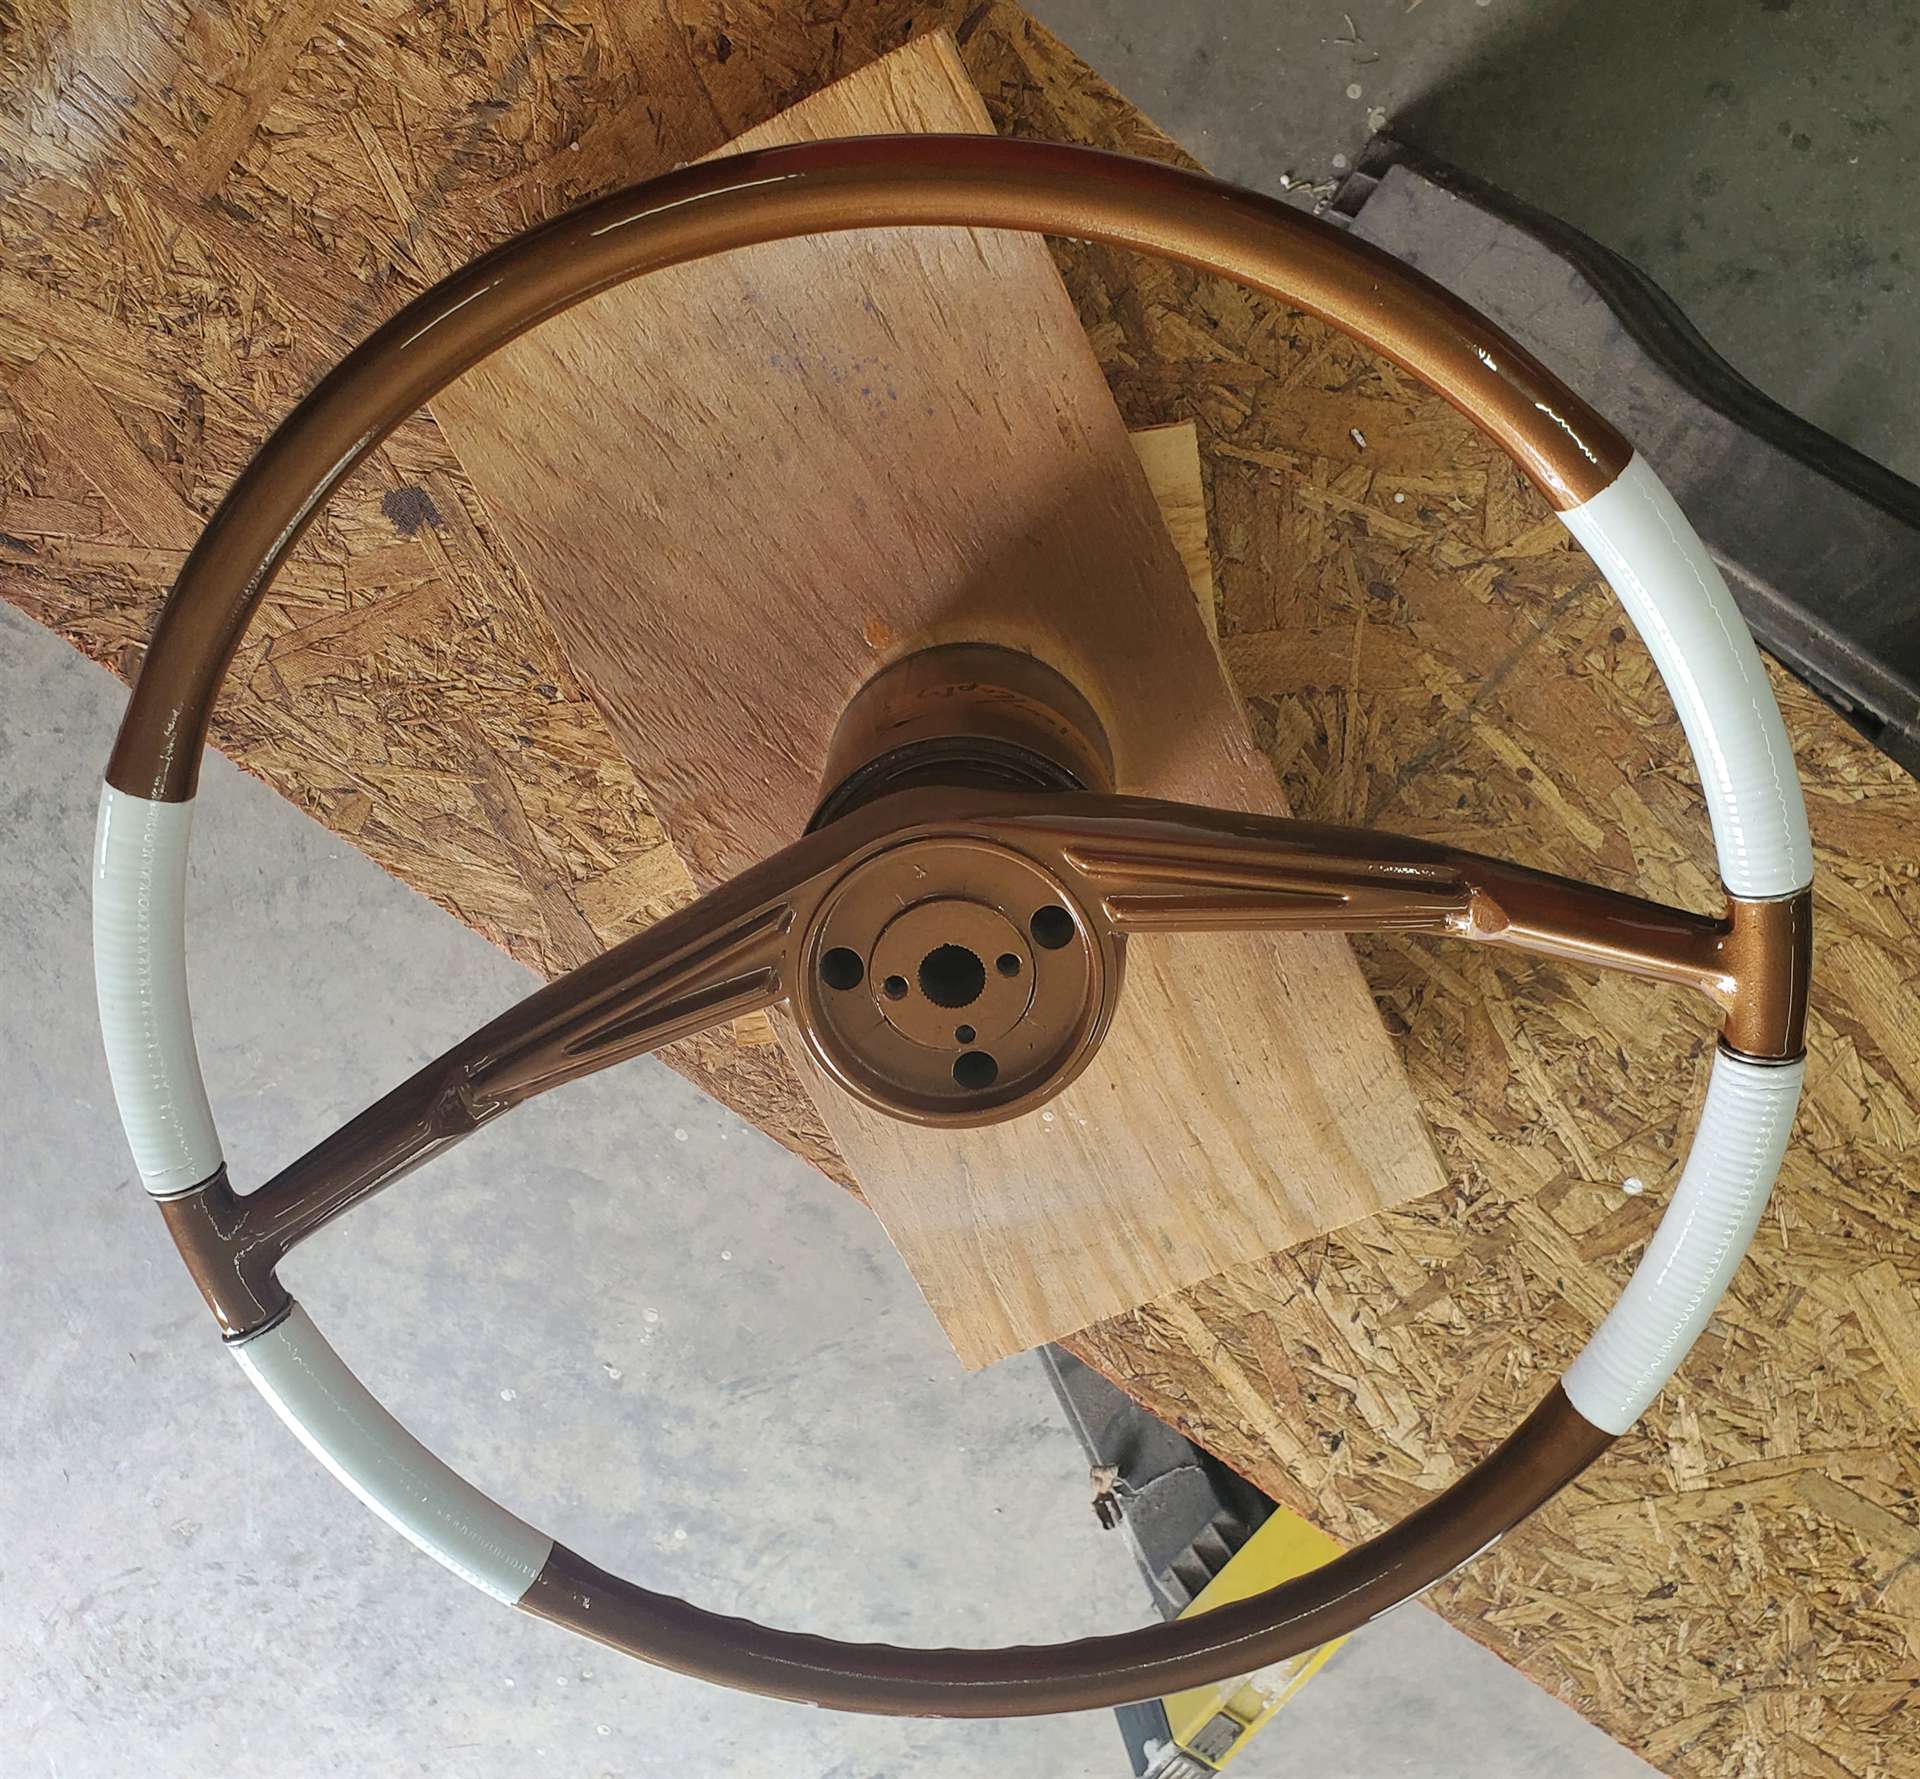
Posted on: 2023/9/2 15:04
|
|||
|
Stewart Ballard
|
||||
|
||||
|
Re: Stewart's 1955 Packard 400
|
||||
|---|---|---|---|---|
|
Home away from home

|
You've got to have amps to do work. DC motors like to have a good power supply that can keep voltage up when the motor is loaded.
Posted on: 2023/9/2 16:47
|
|||
|
||||
|
Re: Stewart's 1955 Packard 400
|
||||
|---|---|---|---|---|
|
Home away from home
|
Here is how I created the adapter plate for the Dorman PW motor to my Packard regulator.
I am not smart enough to provide a detailed blueprint /diagram of hole placement and measurements but will do my best to show you how I got this done. I used some scrape ⅛” plate metal that I had left from another project. Then I used one of the “egg” shaped, rubber bushings from the original motor and traced its shape onto the metal plate. That gave me the center hole and the 3 holes to mount it to the window regulator (Adapter1.jpg). Again have the regulator lying nearby so you can keep up with the orientation of the motor. It's easy to get turned around. Another hint is getting the shaft of the new motor aligned over the center hole so you can mark the location of the three holes that will be used to attach the motor to the adapter plate. First, I drilled those first 3 mount holes out to ¼. I then drilled the center hole just large enough so that the new gear/shaft of the new motor fits through it, about ½” (adapter2.jpg). I’ll drill the center hole out more later but for now, I need it smaller. Once those first 4 holes are drilled, I put the gear/shaft of the motor through the center hole and use a scribe to mark the 3 holes for mounting the motor. Sidetwo.jpg shows the 3 holes that I used to mount the motor to the adapter. There are 6 mount holes on the motor itself but I only used the 3 lower holes, shown in the image. Now I drilled those 3 holes out to ¼” as well. I also enlarged the center hole out to ⅞” (adapter4.jpg). I use ¾” - #10 screws to attach the adapter plate to the regulator (adapter6.jpg). I tried to show how I used some of the original parts in the mounting (adapter5.jpg). Now the motor is ready to mount on the adapter. For those of you that cannot wait the last photo is for you. It shows the adapter that I am using to tie it all together(coupling1.jpg). I’ll explain that in the next post. The only special tool that I use in this whole project is a drill press. I am sure I have forgotten something. If so, I’ll pick it up in a later post. Attach file: Adapter1.jpg (49.38 KB)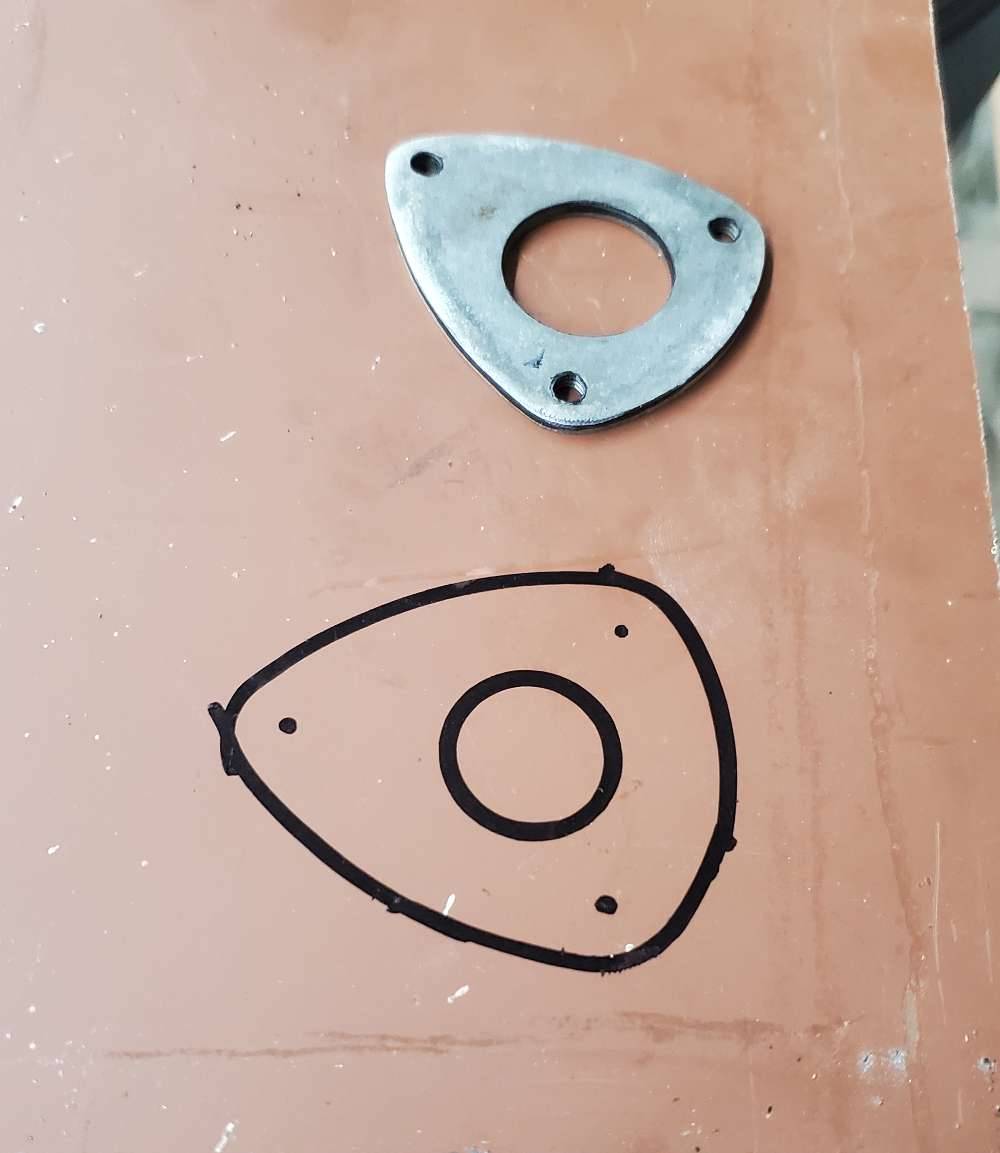 Adapter2.jpg (136.11 KB) Adapter2.jpg (136.11 KB) SideTwo.jpg (103.57 KB) SideTwo.jpg (103.57 KB) adapter4.jpg (72.11 KB) adapter4.jpg (72.11 KB) adapter6.jpg (156.22 KB) adapter6.jpg (156.22 KB) adapter5.jpg (96.43 KB) adapter5.jpg (96.43 KB)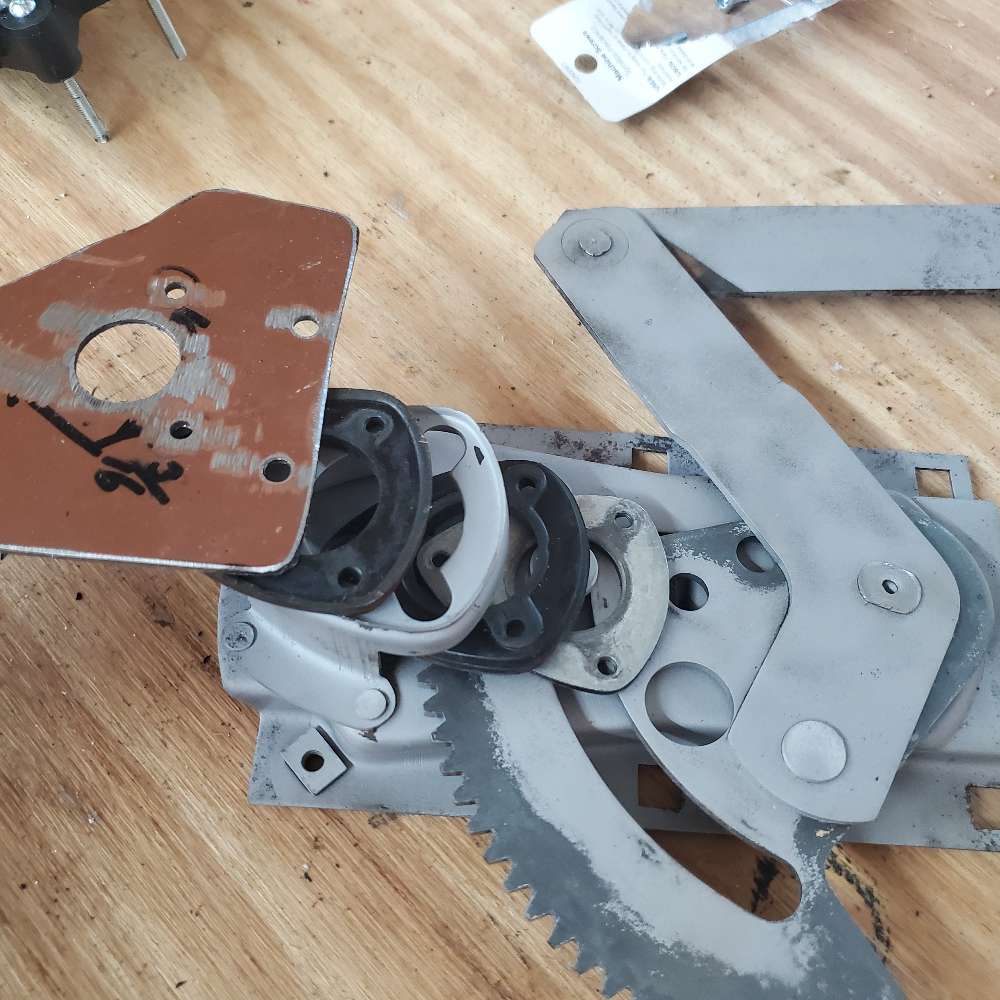 coupling1.jpg (79.02 KB) coupling1.jpg (79.02 KB)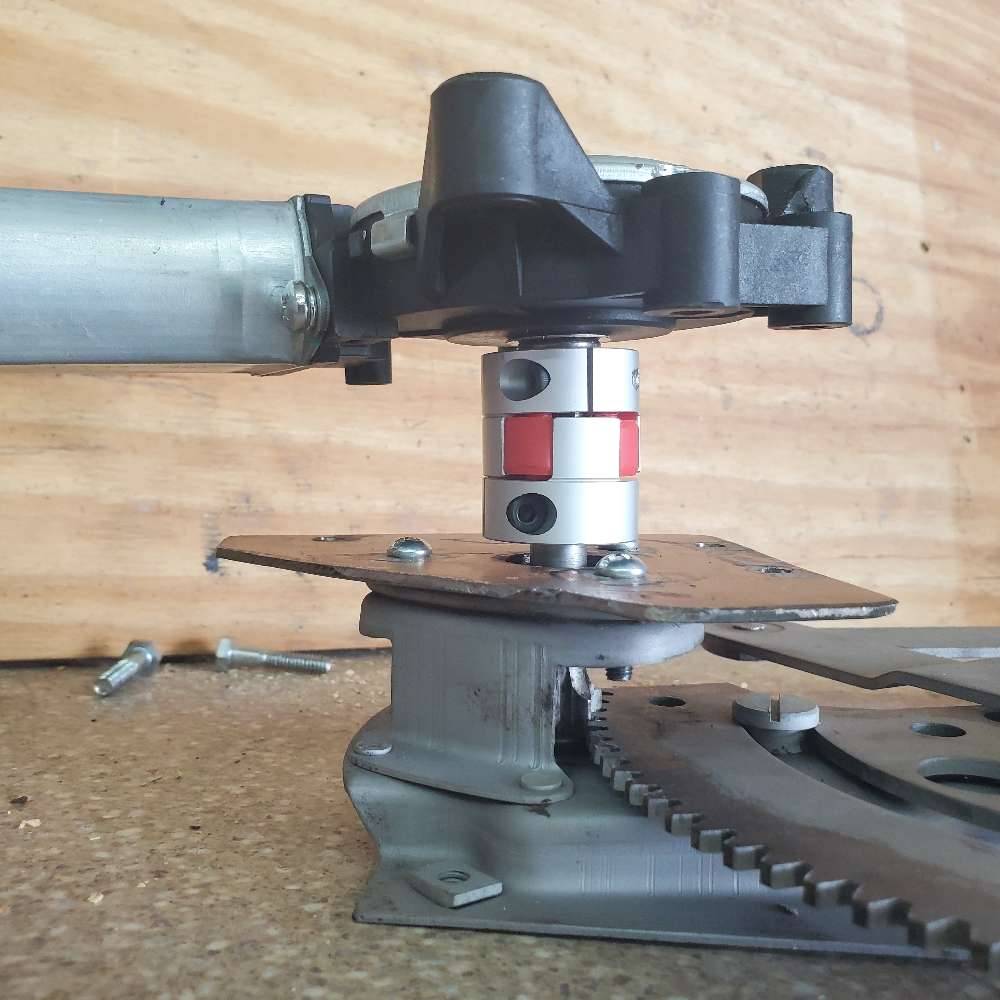
Posted on: 2023/9/2 19:37
|
|||
|
Stewart Ballard
|
||||
|
||||


