|
Re: Interior restoration question
|
||||
|---|---|---|---|---|
|
Home away from home

|
It's the Upholstery I dread the most. The ? and $ depend I guess if you want a faultless show car, or just a good looker. You have to look on the positive side of everything, in this case it does at least have leather on the
Seats, all be it in awful condition. It's a start anyway. Carpet will be a big job too. As car will be Bellevue green, and Galahad, will try to match carpet to the Galahad color. All nightmare jobs. Door panels should be no problem. A cheaper option is to have Vinyl not leather, but it's not so original .
Posted on: 2010/12/29 5:53
|
|||
|
||||
|
Re: Interior restoration question
|
||||
|---|---|---|---|---|
|
Home away from home

|
Carpet shouldn't be difficult at all - molded kits are not much more than roll goods. Reliable suppliers will send you swatches to check the match.
Posted on: 2010/12/29 8:34
|
|||
|
||||
|
Re: Interior restoration question
|
||||
|---|---|---|---|---|
|
Home away from home
|
Would kanter supply these swatches ?
On convertible models, was the door trim always in Vinyl?
Posted on: 2010/12/29 9:08
|
|||
|
||||
|
Re: Interior restoration question
|
||||
|---|---|---|---|---|
|
Forum Ambassador

|
My recommendation would be to go to Bill Hirsch for carpet samples, and then for the final carpet kit. The Hirsch kit I bought for my 56 convertible was a very close match in material texture and color, and was properly cut and bound. Installation was a snap and is easier if the front seat happens to be removed.
Posted on: 2010/12/29 9:12
|
|||
|
||||
|
Re: Interior restoration question
|
||||
|---|---|---|---|---|
|
Home away from home
|
10 Steps to re dye your leather seats.
How To Change The Colour Of Leather Car Seats http://www.furnitureclinic.co.uk/How-To-Change-The-Colour-Of-Leather-Car-Seats.htm This guide will show you how to change the colour of a leather car seat. We will be changing the colour of this car interior from red to cream, but it is possible to change to any colour you want. A colour change can be made from any colour to another, i.e. black to white, or white to black, with just as successful results. The leather colourant kit used in this guide can be used to change the colour of all leather, vinyl, plastic, PVC & leather cloth car interiors. Pic one. This photo shows a red leather car seat from a Rolls Royce. This guide will show you how to change the colour of the leather car interior. Products Required Heavy Filler - To fill cracks Leather Colourant Kit - Used to change the colour of leather The first stage is to prep the leather using an abrasive pad. This process removes the transparent manufactured finish applied to leather. Removing the finish allowing colour to properly adhere to the leather. As shown in the photo, as the finish is removed, so is the colour (but not all the colour). Basically, when you remove some colour form an area, that indicates the finish has been removed, and so, you can move onto the next area. Pic 2 Once you have prepped an area with the abrasive pad, you often get a lot of prep and colour sitting on the surface. This is very common with old Rolls Royce, jaguar, Bentley, Aston Martin and other cars that used Connolly leather. So, we wipe the leather with a cloth to remove the excess prep & colour. This tends not to happen as much with modern cars (1980's +) as the way leather was made changed, becoming more resilient against the prep. Not to worry though, it doesn't affect the end result! Pic 3 The photo to the left shows what the leather should look like after being prepped. You can see where the colour has almost completely been removed in the middle flutes of the seat. This is indicated by the light tan/brown colour that is showing through - the original leather. Notice that the shine has also gone making the leather look more matt. This is the main indicator of correctly prepped leather (no shine), as the colour will not always be removed. Pic 4 Important Note: Leather is painted, that is how a wide variety of colours are achieved. When leather becomes old, it looks as though it cracks, but most of the time it is actually the paint that is cracked, not the leather itself. So, when you prep the leather, the painted layer is either removed or reduced greatly (as shown in the above picture) and so all the cracks are removed as well. This makes for a very smooth finish and excellent end result. Pic 5 Using a cloth, wipe the leather down with the alcohol cleaner. This process removes any waxes, oils or silicones that may be on the leather. Removing these gives better adhesion of colour. As you can see so far, like any job, preparation is the key to success. Take your time when doing it and your end results will be great. Its not a hard job to do - it can just be quite time consuming! Pic 6 After prepping the leather, there were still a few small cracks in the leather. These are fixed by spreading the heavy filler over the leather with a pallete knife. The filler only sits in the cracked leather. The leather is then sanded smooth using fine 1200 grit sand paper. Pic 7 Once the leather has been properly cleaned and all repairs have been made, it is then time to apply the colour. The first coat is applied by sponge. This is done to work the colour into hard to reach areas and to also minimise later spray applications. As you can see by the photo, the colourant used is highly concentrated and so, changes the colour of the leather quickly. Pic 8 This photo shows roughly what the leather should look like after one base coat of colour has been applied. When applying the base coat do not rub too hard for too long. Instead, applying gentle pressure, wipe the colourant onto the leather with a sponge. To speed up drying use a hair drier and it should take no more than 5 minutes to be thoroughly dry. Pic 9 The next step is to spray the leather colourant onto the leather using the airbrush in the kit. To start with, spray the colour around the edges of the piping and in between the seat flutes. This is covering the harder to reach areas first, which in the end, makes the job easier, and uses less colourant. Then proceed to spray the colour all over the seats until it looks nice and uniform. Always let the colourant dry before spraying more on top. Finished Result Pic 10 This photo shows the two front seats from the car, totally colour changed. We changed them to a specially selected cream by our customer and applied satin finish. The finish is applied in the exact same way as the colour. The benefit of a finish is, it makes the leather look & feel softer and more natural, as well as offering protection from wear & tear. Attach file:  (8.05 KB) (8.05 KB)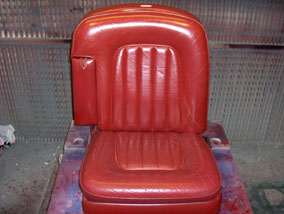 (7.25 KB) (7.25 KB) (7.63 KB) (7.63 KB)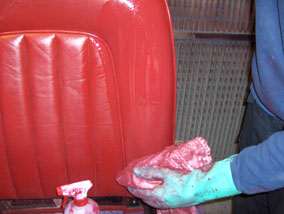 (6.09 KB) (6.09 KB)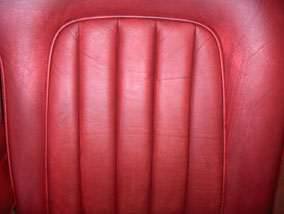 (6.46 KB) (6.46 KB)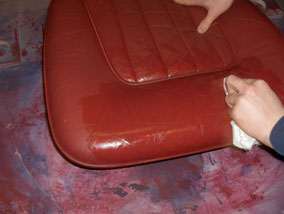 (6.03 KB) (6.03 KB)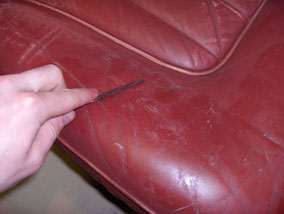 (6.63 KB) (6.63 KB)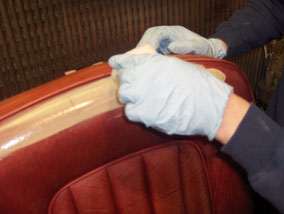 (7.85 KB) (7.85 KB)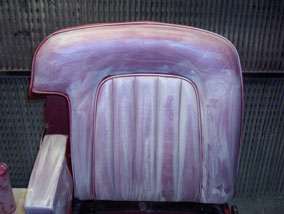 (6.78 KB) (6.78 KB)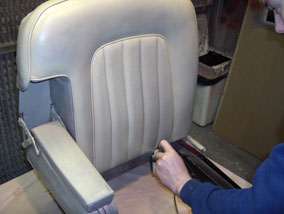 (8.89 KB) (8.89 KB)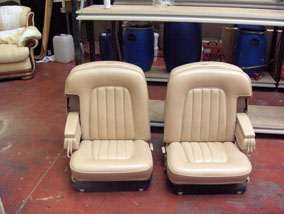
Posted on: 2011/1/3 13:23
|
|||
|
||||
|
Re: Interior restoration question
|
||||
|---|---|---|---|---|
|
Forum Ambassador

|
Gary -
Thanks for re-posting that link on leather refinishing under an appropriate topic, where other viewers can easily find it. It contains some very good info. However, you needn't have copied the text and pix form that page. Why not just let the reader follow the link? Also, although that particular page doesn't have a specific copyright notice, it's still bad form to copy and display other's intellectual property. However, in addition to providing a link, you are certainly welcome to share your persoanl thought and opinions on that page, here.
Posted on: 2011/1/3 16:32
|
|||
|
||||
|
Re: Interior restoration question
|
||||
|---|---|---|---|---|
|
Home away from home

|
My ?55 Clipper has the interior code 6(DARK GREEN GENUINE LEATHER/LIGHT GREEN GENUINE LEATHER).It is still the orginal on the seats.Attached is one photo from the front seat
Attach file: (137.45 KB)
Posted on: 2011/1/4 12:13
|
|||
|
||||
|
Re: Interior restoration question
|
||||
|---|---|---|---|---|
|
Forum Ambassador
|
Thanks for picking up where we left off with Owen_Dyneto's post #44.
The 56th Series cars seem to follow pattern of using perforated vinyl headlining for all-leather, cloth/leather, or cloth/vinyl interiors, but cloth headlining for all-cloth interiors. Ross later advised that 55th Series cars with interiors trimmed in leather or vinyl used a plain (not perforated) vinyl headlining. So, I believe the question, now, is what type of headlining material was installed for the all-leather interior in your '55 Clipper.
Posted on: 2011/1/4 13:33
|
|||
|
||||
|
Re: Interior restoration question
|
||||
|---|---|---|---|---|
|
Home away from home
|
Actually, I inquired about the original headliner in a 56 Executive with interior code 43 in post #27. It kinda wandered from there

Posted on: 2011/1/4 14:04
|
|||
|
Bob
IF EVERYTHING IS COMING YOUR WAY ... - - - - - - - - - - - - - - - - - - - - - - - - YOU'RE IN THE WRONG LANE! '56 Executive Touring Sedan |
||||
|
||||


