|
Re: Getting started
|
||||
|---|---|---|---|---|
|
Forum Ambassador
|
Welcome and congratulations on selecting a very nice car. Best of both worlds -- Packard styling cues and name with the Clipper shorter wheelbase and dexterity.
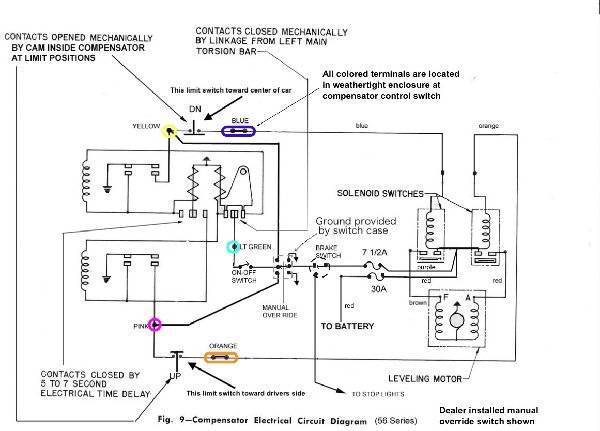
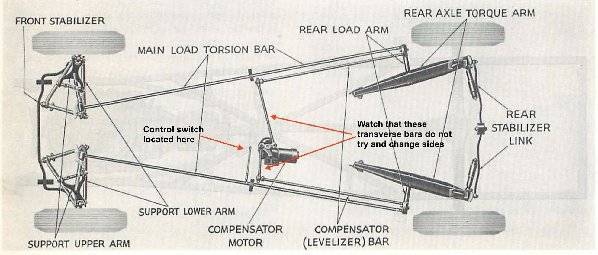
First off be very careful in bypassing anything electrically in the suspension. It is easy to bypass the limit switches and If you go the wrong direction and wind up trying to run the transverse bars thru the compensator mechanism there will be serious damage. It is best to be able to have the car raised enough to watch what is happening when doing any bypassing. Before resorting to that I would check a few things. There are two fuses involved and in 56 both are located in fuse holders in the left under fender area by the cowl and near the motor control solenoids. The main fuse is a 30 amp and protects the motor and solenoids and also feeds power to the second fuse. The second fuse is smaller and protects the brake lights and torsion level control switch. If both fuses are good next check to see if the brake lights are working when you apply the brakes. If they are then at least power is getting to the brake switch. When brakes are relaxed that power is fed to the torsion level on off switch under the dash edge and on to the control switch. If no brake lights the switch is suspect or someone could have installed the wrong one. Normally there is a 3 terminal brake switch located on the frame under the round vent tube and almost directly below the battery. The original 3 terminal switches are expensive and hard to find so people have done some interesting substitutions over the years, not all of which worked well. Assuming you have power make sure the small toggle switch on the left dash edge is on (toggle lever toward center of car). In 56 there was a manual over ride option which might be on the car. If the car has that option there will be a push pull switch mounted vertically slightly in front of the toggle switch. It is a 3 position switch with a center and up and down position. Make sure that switch is in the center position. If switch(es) are good then time to crawl under the car. The control box and compensator are in the area under the front door. In 56 the wires enter a weather resistant enclosure protecting the terminals. Remove the small cover and with a volt meter check the center light green wire for 12v as measured to ground. If you have voltage the brake and on/off switch are OK. No voltage check the brake switch first and make sure the wires at the on/off switch are both tightly plugged in. If nothing has happened and the car hasn't moved yet, the 56 system is a bit different in bypassing from the 55 instructions in the service manual. To bypass the 56 controls use a clip lead or some wire with one end grounded. Touch ground to either the pink or yellow wire next to the center wire being careful not to touch and short the light green wire. That bypasses the control switch but still keeps the limit switches in the circuit. Still, observe the movement and direction as there could be some strange wiring changes over the years. If touching the pink or yellow does not make it move then possibly a limit switch is bad so ground orange or blue. That will bypass a limit switch and absolutely watch that the transverse bars do no try to change sides by wrapping themselves around the compensator. If no movement then possibly the solenoids, motor, brushes or internal damage in the compensator is a problem. Solenoids are special and not the usual starter solenoids found at parts stores. People trying to fix a system have been known to install the wrong ones and give up if the problem wasn't fixed. Just something to be aware of. Here is a complete schematic showing all the relays and switches including the optional manual over ride switch. The illustration from the factory manual shows the two transverse bars to watch out for. Make sure during any uncontrolled movement the long bar does not try to move around to the front side of the compensator and vice versa. If you run into problems give a shout or if something fails at a step let us know and we will suggest a part or help you over it.
Posted on: 2019/6/21 12:33
|
|||
|
Howard
|
||||
|
||||
|
Re: Getting started
|
||||
|---|---|---|---|---|
|
Not too shy to talk

|
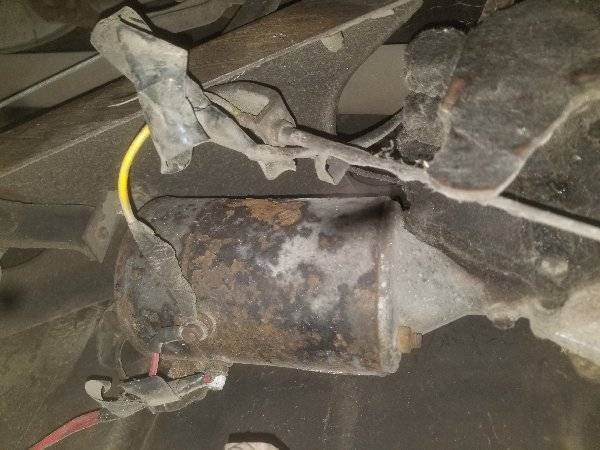
Fantastic write up. I crawled under this morning and there is a large gauge black cable removed and taped off probably a ground or main power to the motor. I will attempt to upload a pic or 2.
Posted on: 2019/6/21 13:25
|
|||
|
||||
|
Re: Getting started
|
||||
|---|---|---|---|---|
|
Not too shy to talk

|
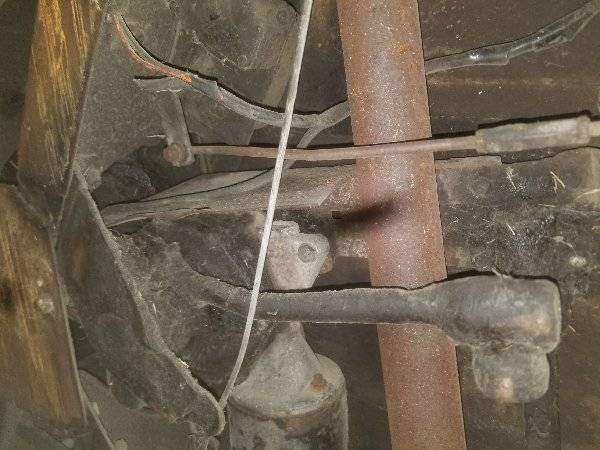
Is this ok I have no idea what the shape should be on the short bars
Posted on: 2019/6/21 13:30
|
|||
|
||||
|
Re: Getting started
|
||||
|---|---|---|---|---|
|
Not too shy to talk

|
Oh and Misspoke it is an exec touring sedan. The 4 door model. It is a pretty complete car but is missing all trim from the hood ie hood ornament and lettering.
Posted on: 2019/6/21 13:51
|
|||
|
||||
|
Re: Getting started
|
||||
|---|---|---|---|---|
|
Forum Ambassador
|
Can't tell if the short bar is bent or if that was just camera angle. If bent and the long bar is in the same condition something failed or someone bypassed the switch and wrapped the bars. Whether there is damage is unknown.
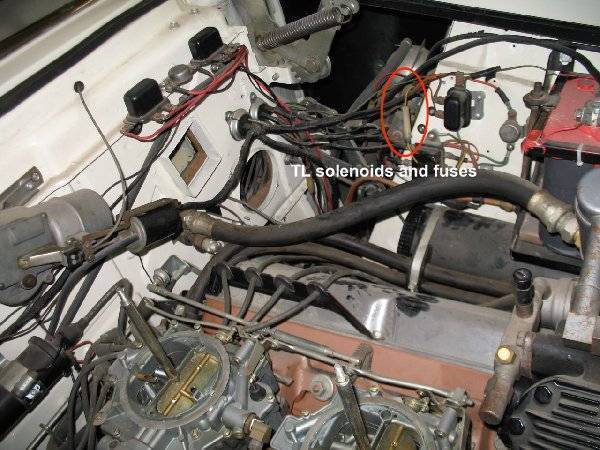
One thing I see is there are two wires -- a yellow and red on one motor terminal and what appears to be a larger something else on the other. That is absolutely wrong and no telling what is going on. Packard postwar reversible motors mostly have two independent reverse or mirror image wound field windings and the motor case is the ground. The same principle is on the window, seat and antenna reversible motors. The only exception is the 56 PB shift motor and some 54 electric seats and immediate postwar heaters. In the case of the level motor it gets ground thru the case and when commanded one solenoid will send 12v to one motor terminal to energize one field coil. To go the other direction the other solenoid powers the other terminal and its mirror image coil. At no point are both terminals energized at the same time because the motor will want to go both directions and hopefully the fuse will blow before any damage is done. If the wire on the other terminal is a ground then very possibly the motor has been damaged. Your first project is follow the schematic and verify and correct any misdirected wiring. NO telling what else you will find. In 56 there is a single main loom from the weathertight enclosure and compensator motor area up to the solenoids on the fender side panel. Limit switches are threaded into the bottom of the compensator housing and terminals connect via short 2 wire looms inside the weathertight enclosure. Here is a view of the 56 solenoid and fuse location. One nice thing is you have 7 fewer pieces to look for. Executives did not have lettering on the hood -- just the Packard crest and hood ornament. The name was in script and on the rear fenders and trunk lid. If you have holes in the hood for letters it is probably a Clipper hood and would need the holes filled.
Posted on: 2019/6/21 14:28
|
|||
|
Howard
|
||||
|
||||
|
Re: Getting started
|
||||
|---|---|---|---|---|
|
Not too shy to talk

|
Thank you for the help. Both short bars are bent long bars didnt appear to be. I will update as I go this weekend. I intend to work through starting at the compensator and work to the interior.
I will also be checking compression and prelubing the cylinders. i won't put voltage to the car until I look into the suspension system. Do the Packard's have one key or two for ignition and doors/trunk.
Posted on: 2019/6/21 15:24
|
|||
|
||||
|
Re: Getting started
|
||||
|---|---|---|---|---|
|
Home away from home

|
There is a lot of information on this site,
packardinfo.com/xoops/html/downloads/56ExecOwnersManSuppl.pdf packardinfo.com/xoops/html/downloads/56_Pack_OM.pdf
Posted on: 2019/6/21 15:38
|
|||
|
||||
|
Re: Getting started
|
||||
|---|---|---|---|---|
|
Forum Ambassador
|
Two keys. Round is for doors and ignition, octagonal for trunk and glovebox.
Posted on: 2019/6/21 15:44
|
|||
|
Howard
|
||||
|
||||
|
Re: Getting started
|
||||
|---|---|---|---|---|
|
Home away from home

|
Does this car have a radio antenna?
Posted on: 2019/6/21 16:06
|
|||
|
||||

 (89.00 KB)