|
Re: '56 Patrician Bendix Steering Ram
|
||||
|---|---|---|---|---|
|
Forum Ambassador

|
Glad to hear my technique helped, but I'm not quite clear about direction of your leather seal, as you've installed it.
The illustration of seals provided in SC Vol. 30, No. 8 (p. 32) shows the lip of the inner (rubber) hydrualic seal pointing toward the cylinder. However, you can't see the lip of the outer (leather) dust seal in that view because its pointing away from the cylinder. Though that might seam backward, keep in mind that this particlular seal has nothing to do with containing hydraulic fluid, but is intended to keep foreign material OUT of the cylinder bore. As mentioned in my previous post, I have had to use a dental-type pick tool to remove this outer seal. To explain further, I hook on, just inside the outer rim of the dust seal assembly and pull a bit from one side, then move to a position 180^ opposite and pull a bit, and keep alternating to walk that seal out of the bore.
Posted on: 2012/10/3 9:13
|
|||
|
||||
|
Re: '56 Patrician Bendix Steering Ram
|
||||
|---|---|---|---|---|
|
Home away from home

|
Thanks Brian. I'm now starting to realise why my confusion. I used a Max Merritt seal kit and the first rubber seal looks just like the diagram and was easy to fit correctly, but the second is different to what you describe. It too is a rubber type material with surrounding spring, encased in a metal outer, similar to the modern lip seals I have used as axle oil/grease seals. The other side, which I thought should be the outer side, has almost a flat rubber face bonded to the metal. That is, the fine spring providing tension around the seal is pointing inwards. This explanation is probably a bit vague and I apologise for that, so what I will do when I get the new MM kit is take a photo of both sides and post it for all to see. Kind regards, John
Posted on: 2012/10/3 18:26
|
|||
|
||||
|
Re: '56 Patrician Bendix Steering Ram
|
||||
|---|---|---|---|---|
|
Forum Ambassador
|
Thanks for the clarification. Sounds like your new-type outer seal is installed backward.
Again, you can service the seals without removing the unit completely from the car. (Can't recall if I even had to remove the tire/wheel.) Remove the castellated nut (and related details) from the end of the piston, disengage the rod from the frame. Lower the end of the cylinder to clear the frame, but support it to avoid straining the hoses (at the fittings). After you remove the large snap ring (and pay attention to its orientation per the SC), give a tug on the piston rod and the scraper washer and that outer seal might just come right out - since this was such a recent install. Else you might need to baby the outer seal out of the bore. (I suspect the hydraulic seal will remain in place - leave it alone.) Once you get the outer seal back out, you should be able to reverse it without risk of introducing a leak. Just work carefully and patiently.
Posted on: 2012/10/3 18:52
|
|||
|
||||
|
Re: '56 Patrician Bendix Steering Ram
|
||||
|---|---|---|---|---|
|
Home away from home
|
Thanks Brian, I should have asked you first. I guess I didn't really understand that it was to seal entry from the outside, not the inside where the fluid is. I'll still reseal the ram I've removed and then decide whether to tackle the other one while on the car or off. I'm thinking it's going to be a lot easier on the bench. When I get the new MM kit, before fitting I'll check with local bearing suppliers whether they have an equivalent seal as it's quite possible there might be some damage in the removal process. By the way, when fitting the inner seal I just slid it and the spacer along the shaft until they bottomed. Is this correct, or does there have to be some push to ensure the seal is seated? Kind regards, John
Posted on: 2012/10/3 22:49
|
|||
|
||||
|
Re: '56 Patrician Bendix Steering Ram
|
||||
|---|---|---|---|---|
|
Forum Ambassador
|
You'd be surprised at how easy is it is to service on-car. I've no lift, here - only a 2-ton Walker floor jack, a variety of sturdy jack stands, and an old Army bottle jack. I do most of the work laying on a creeper (and have been known to nod off there, on occasion).
Yet, what's right for you is whatever you're most comfortable with. WRT fitting the inner seal, keep in mind that the outer seal goes into a counterbore that's actually larger than the OD of the hydraulic seal. Of the few units that I've resealed, I always had to massage the new hydraulic seal down into its bore, before installing the machined aluminum spacer. I NEVER use anything metallic to do that as it might nick the hydraulic seal, leading to a leak. I always save a few "popsicle" sticks that can easily be "tooled" to fit the immediate need. Everything else just drops right in. BTW, in lieu of a protective seal installer (similar to what's shown in the BTV rebuild in the SM) I used to wrap some tape around the end of the piston, but have since found that a short piece of heat shrink tubing works even better. Now, if the hydraulic seal isn't properly seated in its bore, it would be extremely difficult, if not impossible, to get the snap ring in its groove. Sounds like you got lucky and the seal lined right up with the bore, with the spacer finishing the job. IIRC, the OE leather seal had a number stamped on the metal housing that could be cross-referenced to the modern seal. The little hydraulic seal is the one that's hard to find, locally; no numbers on it.
Posted on: 2012/10/4 8:47
|
|||
|
||||
|
Re: '56 Patrician Bendix Steering Ram
|
||||
|---|---|---|---|---|
|
Home away from home
|
Thanks Brian, it does look like I might have got lucky as I had no trouble fitting the snap ring. In any event, when I remove the back to front outer seal, I'll try to ease out the aluminium spacer and have a good look in there. Unfortunately, I pretty much destroyed the other outer seal removing it so I doubt that I'll be able to find any numbers there. However, I'll try to carefully remove the one on the leaky ram that I replaced and look for a number on that one. I've actually asked Max Merritt if they could add a second outer seal in the seal kit that I propose to buy, but haven't had a reply as yet.
Like you, I don't have a lift (we call it a hoist) and would love to have one as it's getting increasingly more difficult to crawl around under there. Cheers for now, John
Posted on: 2012/10/5 0:38
|
|||
|
||||
|
Re: '56 Patrician Bendix Steering Ram
|
||||
|---|---|---|---|---|
|
Home away from home
|
G'day Guys, I wasn't going to make another comment on this topic until I'd resealed the ram on the car, but I found something quite strange when removing the seals from the now spare ram.
Firstly, the snap ring had lost both rings so removing wasn't easy. Next, after destroying the outer seal, I was surprised to say the least at what I found with the inner rubber seal, and no doubt this is why the bloody thing was leaking. The groove in the rubber seal had a ring of copper wire inserted into it and there was what seemed like teflon tape between the seal and the shaft (see pic). It seems to me that somebody has come up with there own way of sealing the ram, probably using the copper wire to apply pressure over the tape onto the shaft. The shaft has a lot of black marks on it, but more like stains than pitting, so I'm wondering whether this might be have been caused by the redesigned inner seal. Brian, you once mentioned you have been able to dress the shafts on your rams - how did you do this? It might be something that I should try on this one. Kind regards, John Attach file:  (131.37 KB) (131.37 KB)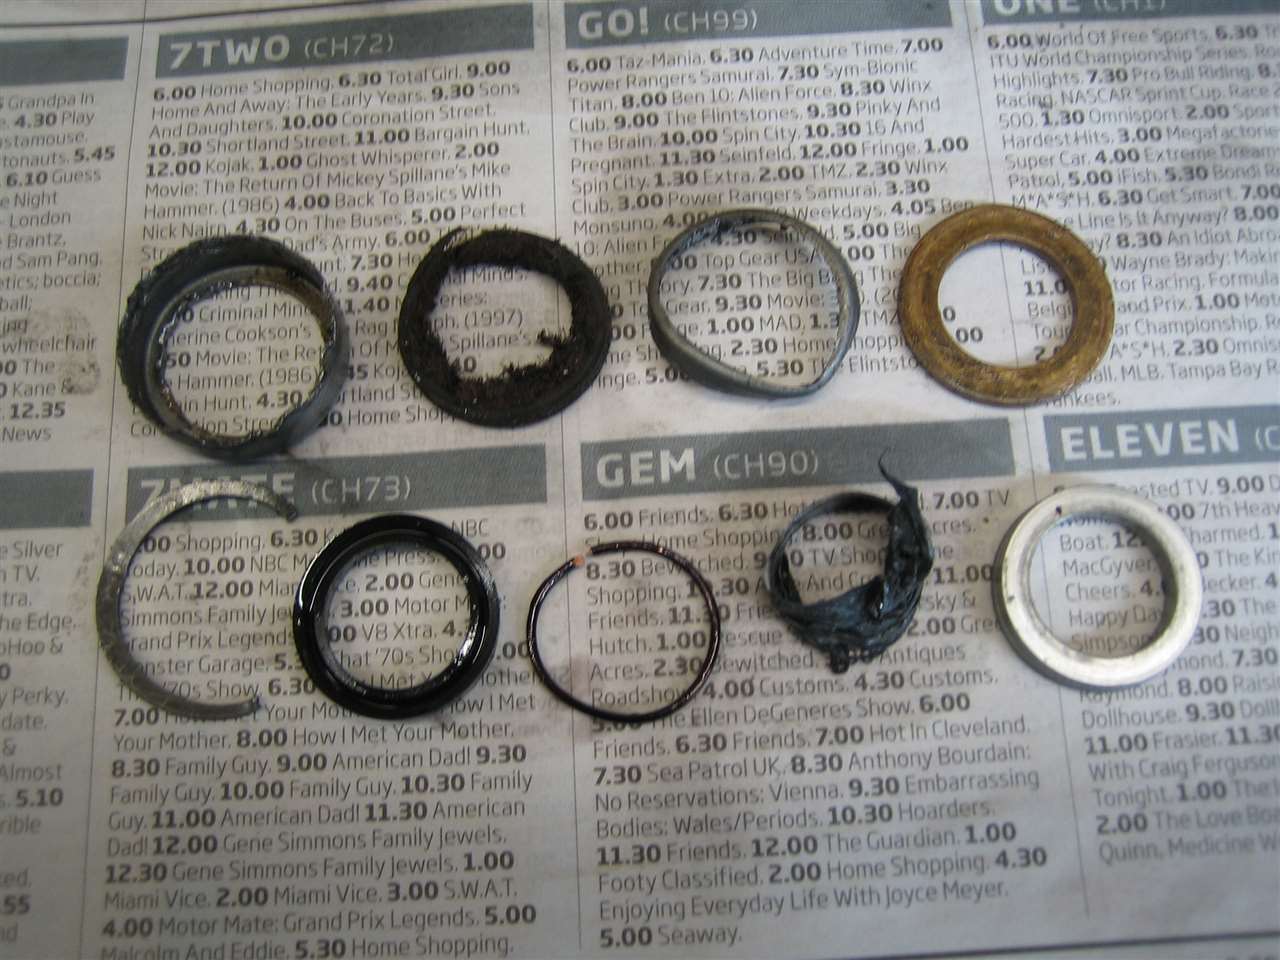
Posted on: 2012/10/10 0:05
|
|||
|
||||
|
Re: '56 Patrician Bendix Steering Ram
|
||||
|---|---|---|---|---|
|
Forum Ambassador
|
Quite a mess there.
Years ago, that hydraulic seal was hard to come by, and my only source was a fella in CA, who only provided the two seals. That was no problem for me, as I was able to reuse all of the metal parts, back then. As such, I can imagine how someone - especially 'down under' - might hope to expand a worn seal to get a little more life. However, that tape on the shaft looks like an especially bad idea; gotta wonder if any of that schitt wound up inside the cylinder. Perhaps with seals out, you can rig up something to push some ATF through the cylinder and maybe flush it out - just to be safe. Don't understand why they'd cut the ears off the snap ring, either - unless they had a problem going back together (which should have been their first warning). Hopefully, MM's seal kit includes a new snap ring, as OE did. To dress a little roughness on the piston, I've used strips of very fine grit emery/crocus cloth, soaked liberally with oil - much the way you'd polish a crank journal, manually. I did this without removing the piston from the cylinder. I wrapped the strip around the rod and pulled, alternately, on the ends of the strip, back-n-forth, working my way around the circumference and the length of the rod. In your case, I would first try a little fine cut rubbing compound on a strip of clean cloth wetted with water. Either way, when finished, flush the piston thoroughly to remove all traces of grit BEFORE installing seals.
Posted on: 2012/10/10 10:39
|
|||
|
||||
|
Re: '56 Patrician Bendix Steering Ram
|
||||
|---|---|---|---|---|
|
Home away from home
|
Thanks for the advice Brian, I'll certainly follow it and do my best to clean this thing up. The "mess" was actually caused by someone from over your side of the world and probably in CA where the car came from. I'm not suggesting the previous owner did it as I have no doubt he had the integrity and mechanical skills to do the job properly. However, many moons previously he had bought the stock of a retired Packard wrecker and this possibly came from that. It came as a spare when I bought the car and I fitted it a couple of years ago as the one on the car was leaking (now back on the car with the backwards facing rear seal). And yes, the MM kit comes complete with new snap ring. Kind regards, John
Posted on: 2012/10/10 17:06
|
|||
|
||||


