|
Re: 37 115c starter
|
||||
|---|---|---|---|---|
|
Forum Ambassador

|
If it's electrically the same, then except for the knurled cap looks similar to the one on the left in picture. Max lists that for the 37 six. He also shows another as applicable for all models 35-40. Either one looks as if it will need a copper buss bar connecting the solenoid and motor terminals together. Flackmaster or one of the other 37 experts will be the authority.
Attach file:  (19.78 KB) (19.78 KB)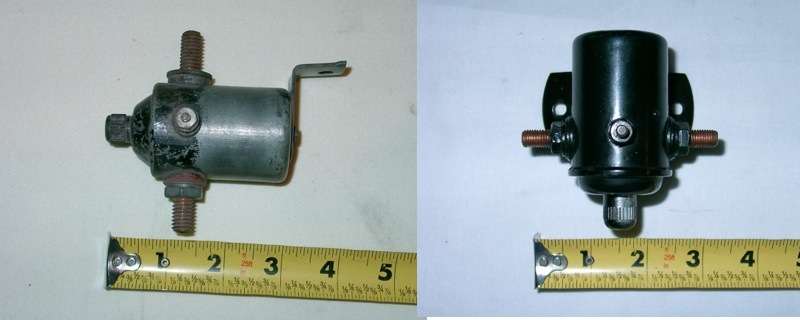
Posted on: 2011/3/23 19:22
|
|||
|
Howard
|
||||
|
||||
|
Re: E-bay 400 Hardtop
|
||||
|---|---|---|---|---|
|
Forum Ambassador
|
Doesn't sound like an anxious seller wanting to communicate with an informed buyer.
Very possible or it may be buried in snow, washed down a hill or the seller has lost his power. Nevada City is up in the mountains further north than Truckee (which set records) and the storm this last week has done a job on lots of places. Some of the mountain communities much further south near here at lower elevation than Nevada City have been without power for almost a week.
Posted on: 2011/3/23 13:48
|
|||
|
Howard
|
||||
|
||||
|
Re: 1939 120 firewall grommet
|
||||
|---|---|---|---|---|
|
Forum Ambassador
|
One other way to make very clean holes in rubber that thick is to use a piece of thin wall brass tubing in appropriate size in a drill press or drill or even a lathe.
Bevel one end with a reamer, grinder or sanding belt so it has a reasonably sharp chamfer all around the diameter. Mount the straight end in the chuck. Place a scrap of wood under the rubber and drill away using slow speed. I use a foot pedal on my drill press for ease and can just hold the rubber but clamps can be figured out if wanted and don't distort the rubber. With slow speed and a little water or other lube if needed the tubing will neatly cut a hole. After one hole is made, remove the tubing and push out the scrap piece from inside before making another. I have done this with rubber bottle stoppers an inch or so thick many times. Can go to a half inch diameter or the max size of your drill chuck. Larger if you want to get fancy and figure out how to solder or connect different size tubes together so one end fits the chuck.
Posted on: 2011/3/23 9:42
|
|||
|
Howard
|
||||
|
||||
|
Re: The front seat 1948 Packard 22nd Series Touring Sedan
|
||||
|---|---|---|---|---|
|
Forum Ambassador
|
If you pull up on the handle all you can expect is that the detente releases correctly. Once re-installed with the 'return' spring re-attached (see photo/example [2]), pulling up the release lever should cause the seat to pull rearward.
Howard, I think the spring assist is correct. The spring is stretched as the seat moves backward (to the right in the picture), and "assists" with return as the seat moves forward (to the left in the picture). Maybe so. I can't see enough of the 48 spring attachment to figure it out and all the Packards I've had with seats I remember were power.
Posted on: 2011/3/22 23:01
|
|||
|
Howard
|
||||
|
||||
|
Re: The front seat 1948 Packard 22nd Series Touring Sedan
|
||||
|---|---|---|---|---|
|
Forum Ambassador
|
Interesting the way the return spring is installed. Guess I never paid attention to them so what am I missing in why they do it that way. Going backwards you have the tracks sloping downward, your weight and the legs to push. It would seem the spring would be more beneficial helping the seat forward. Does anyone need more room on entering so just lifts the lever on getting into a car? Having the seat go backwards only with spring assist in that scenario would be the only benefit I could see.
Posted on: 2011/3/22 22:42
|
|||
|
Howard
|
||||
|
||||
|
Re: Need Halogen Headlight Help
|
||||
|---|---|---|---|---|
|
Forum Ambassador
|
I think I would also add a couple of relays to work the lights directly from a good voltage source rather than run them thru the headlight and dimmer switch. The extra current may not be excessive but the switches are still 70 years old so why push them. Halogens as well as the old style bulbs could also take advantage of the extra voltage with brightness output as well. Maybe take a line protected by a circuit breaker from the bat solenoid terminal or other good source to hidden relays near the lights and have the switches operate the relays via the old wires. Believe there is a schematic on site for doing that. A good relay to use is the 6v headlight relay for VW's or the one from Newark listed in the FAQ and other posts.
Posted on: 2011/3/22 16:38
|
|||
|
Howard
|
||||
|
||||
|
Re: BigKev's 1954 Packard Clipper Deluxe Sedan
|
||||
|---|---|---|---|---|
|
Forum Ambassador
|
Progress at least. We'll keep good thoughts the old mastic and fiber remnants didn't contain asbestos.
Posted on: 2011/3/21 21:26
|
|||
|
Howard
|
||||
|
||||
|
Re: Under floor modern booster update.
|
||||
|---|---|---|---|---|
|
Forum Ambassador
|
In spite of a modern booster, I chose to keep the rest of the car 100 percent stock (except the carpet) so the BTV and floorplate will unbolt, lift out and go on the shelf.
The new bracket and booster and a couple of tubes and residual valves goes in it's place. All new items use same original mounting holes everywhere. The pedal has an adapter piece that bolts in the regular location using that saddle and spans the distance needed to line up the new rod. I made it with dimensions that it should also work for the 55 pedal but haven't tried it on one. That may be able to be shortened but may also run into the vertical piece if it is. There is flexibility though so relocating a hole may clear that if it loses an inch. If the modern unit is no longer wanted maybe by a new owner, all unbolts and the BTV assy goes back in. Attach file: (28.82 KB)
Posted on: 2011/3/21 19:00
|
|||
|
Howard
|
||||
|
||||
|
Re: Under floor modern booster update.
|
||||
|---|---|---|---|---|
|
Forum Ambassador
|
Stopping is nice too. The elephant would dent my hood and that poor car has been going thru enough indignity as it is.
Posted on: 2011/3/21 18:36
|
|||
|
Howard
|
||||
|
||||
|
Re: Under floor modern booster update.
|
||||
|---|---|---|---|---|
|
Forum Ambassador
|
I thought a few might get a kick out of seeing my "works in progress" 0993. Have another (fortunately smaller) pile of new components too. Amazing what can look good in the mind & sometimes on paper but you can find fault with after the fact or plain doesn't fit. Damn bracket has probably cost as much as the car by now. Chalk it up to being stubborn or stupid--take your pick.
Will go ahead and organize and finish the writeup in next few days. Between my verbosity, the BOM with some sources, photos & drawings it will probably need to be in 2-3 sections to keep the download size reasonable. Organizing it will be the big issue on this end. Since I have to be in the mood to do this stuff anymore, would rather not get into the kit business. This will only be showing what I used and did on my car. Once all the info is out, maybe it will be decided this is not a good project after all. There is one thing that may give pause and that is cutting the stem on the booster so it fits probably voids the warranty. With that in mind and a bill of material, some sources & lots of photos and drawings, hopefully anyone can either feel comfortable doing it using that info or if not comfortable or have the tools, take it to a welder or machinist and have it done. As Craig pointed out, some of the pieces may be overkill and by the owner doing the building, he is free to choose whatever he is comfortable with. Also, many minds are usually better so if anything is glaringly wrong, unsafe, undersized or could be done better, hopefully it would be found and mentioned. Was hoping to get feedback on the quality of the component drawing I posted last week but guess it was detailed enough so will follow along those lines for the easier items. Most are just cut and drill or cut, drill and weld. Three that are a bit more involved have 1:1 drawings. If your printer can print real size, then those can be cut out and pasted onto metal for layout. I may go back and do more that way depending on the time it takes.
Posted on: 2011/3/21 18:01
|
|||
|
Howard
|
||||
|
||||


