|
Re: Under floor modern booster update.
|
||||
|---|---|---|---|---|
|
Home away from home
|
This is a brilliant design and takes the replacement of the BTV to the next, if not final perfect solution
 I am very interested in the drawings and specifications to follow and possibly make the assembly. Any chance that I can purchase a completed assembly? Your timing is perfect for me, as I have ordered a new carpet kit for installation. There is no hole cut out yet. Thanks for your contribution to us all!
Posted on: 2011/3/21 16:19
|
|||
|
Bob
IF EVERYTHING IS COMING YOUR WAY ... - - - - - - - - - - - - - - - - - - - - - - - - YOU'RE IN THE WRONG LANE! '56 Executive Touring Sedan |
||||
|
||||
|
Re: Under floor modern booster update.
|
||||
|---|---|---|---|---|
|
Home away from home
|
Re: IMG_0993.jpg: That's a heck of a kit, Howard! I imagine that most guys couldn't make heads nor tails of it. Good work (not). Just kidding...that picture is funny.
The install inside the car looks cosmetically beautiful. Well done. Craig
Posted on: 2011/3/21 16:22
|
|||
|
Nuke them from orbit, it's the only way to be sure! Ellen Ripley "Aliens"
Time flies like an arrow. Frui |
||||
|
||||
|
Re: Under floor modern booster update.
|
||||
|---|---|---|---|---|
|
Home away from home

|
Howard, Image 0993 reminds me of a scene from "The World's Fastest Indian" where Burt is in his shed and points out all the failed pistons on a shelf. I think he called them sacrifices to the God of Speed. I guess your parts are sacrifices to the God of Stopping? Great work, and thanks for sharing your experiences developing this substitute system.
(o{I}o)
Posted on: 2011/3/21 17:10
|
|||
|
We move toward
And make happen What occupies our mind... (W. Scherer) |
||||
|
||||
|
Re: Under floor modern booster update.
|
||||
|---|---|---|---|---|
|
Forum Ambassador

|
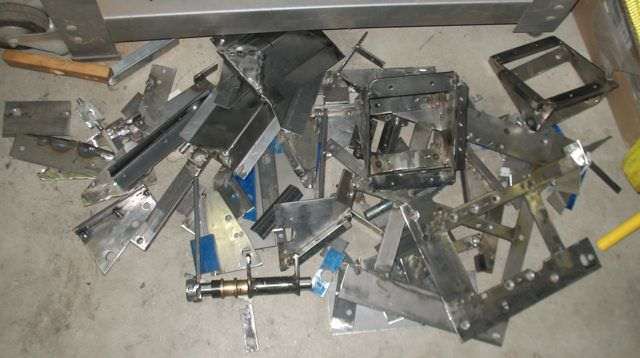
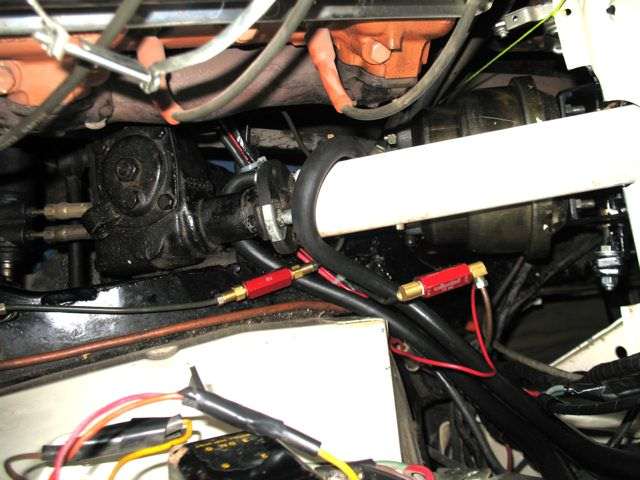
I thought a few might get a kick out of seeing my "works in progress" 0993. Have another (fortunately smaller) pile of new components too. Amazing what can look good in the mind & sometimes on paper but you can find fault with after the fact or plain doesn't fit. Damn bracket has probably cost as much as the car by now. Chalk it up to being stubborn or stupid--take your pick.
Will go ahead and organize and finish the writeup in next few days. Between my verbosity, the BOM with some sources, photos & drawings it will probably need to be in 2-3 sections to keep the download size reasonable. Organizing it will be the big issue on this end. Since I have to be in the mood to do this stuff anymore, would rather not get into the kit business. This will only be showing what I used and did on my car. Once all the info is out, maybe it will be decided this is not a good project after all. There is one thing that may give pause and that is cutting the stem on the booster so it fits probably voids the warranty. With that in mind and a bill of material, some sources & lots of photos and drawings, hopefully anyone can either feel comfortable doing it using that info or if not comfortable or have the tools, take it to a welder or machinist and have it done. As Craig pointed out, some of the pieces may be overkill and by the owner doing the building, he is free to choose whatever he is comfortable with. Also, many minds are usually better so if anything is glaringly wrong, unsafe, undersized or could be done better, hopefully it would be found and mentioned. Was hoping to get feedback on the quality of the component drawing I posted last week but guess it was detailed enough so will follow along those lines for the easier items. Most are just cut and drill or cut, drill and weld. Three that are a bit more involved have 1:1 drawings. If your printer can print real size, then those can be cut out and pasted onto metal for layout. I may go back and do more that way depending on the time it takes.
Posted on: 2011/3/21 18:01
|
|||
|
Howard
|
||||
|
||||
|
Re: Under floor modern booster update.
|
||||
|---|---|---|---|---|
|
Home away from home
|
Let us not forget the immortal words of Ettore Bugatti "I make my cars to go, not to stop!"
Have you considered an elephant as a hood ornament?
Posted on: 2011/3/21 18:19
|
|||
|
When two men ride the same horse, one has to be in the back...
|
||||
|
||||
|
Re: Under floor modern booster update.
|
||||
|---|---|---|---|---|
|
Home away from home
|
Howard,
I wish I had the talent and resources to develop such a thing. With the plans and photos, I'm sure that all who want to replace their BTV will have no reservations about making the assembly. As you mentioned, possibly the cutting of the booster stem (IMHO worth the result). Does the stem attach to the pedal with it's original pin (needing the 'eye' adapter? I didn't alter my original pedal (except to have the pedal detached and re-welded about an inch to the left). I think that I can still use it with this assembly.
Posted on: 2011/3/21 18:35
|
|||
|
Bob
IF EVERYTHING IS COMING YOUR WAY ... - - - - - - - - - - - - - - - - - - - - - - - - YOU'RE IN THE WRONG LANE! '56 Executive Touring Sedan |
||||
|
||||
|
Re: Under floor modern booster update.
|
||||
|---|---|---|---|---|
|
Forum Ambassador
|
Stopping is nice too. The elephant would dent my hood and that poor car has been going thru enough indignity as it is.
Posted on: 2011/3/21 18:36
|
|||
|
Howard
|
||||
|
||||
|
Re: Under floor modern booster update.
|
||||
|---|---|---|---|---|
|
Forum Ambassador
|
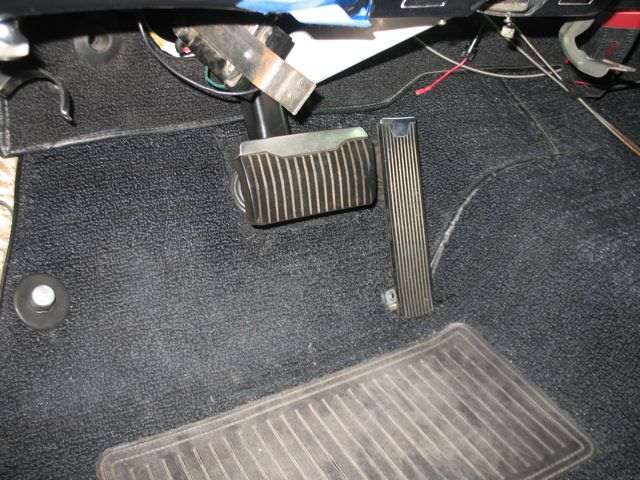
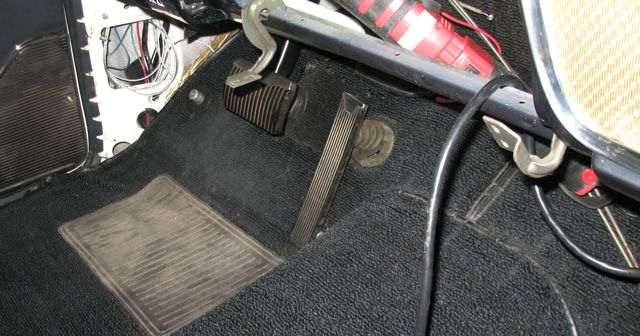
In spite of a modern booster, I chose to keep the rest of the car 100 percent stock (except the carpet) so the BTV and floorplate will unbolt, lift out and go on the shelf.
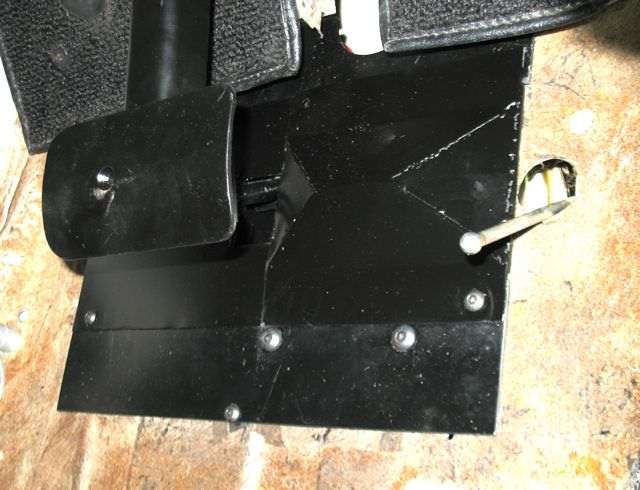
The new bracket and booster and a couple of tubes and residual valves goes in it's place. All new items use same original mounting holes everywhere. The pedal has an adapter piece that bolts in the regular location using that saddle and spans the distance needed to line up the new rod. I made it with dimensions that it should also work for the 55 pedal but haven't tried it on one. That may be able to be shortened but may also run into the vertical piece if it is. There is flexibility though so relocating a hole may clear that if it loses an inch. If the modern unit is no longer wanted maybe by a new owner, all unbolts and the BTV assy goes back in. Attach file:  (28.82 KB) (28.82 KB)
Posted on: 2011/3/21 19:00
|
|||
|
Howard
|
||||
|
||||
|
Re: Under floor modern booster update.
|
||||
|---|---|---|---|---|
|
Forum Ambassador

|
Howard -
Though I've no need to replace the BTV in any of my Packards, I commend you for the high-level of craftmanship in this project - as well as all the other work that I've seen from you. At a glance, the casual observer would never think anything had been changed. I especially appreciate that your adaptation retains the convenience of heel-toe pedal operation that Packard engineers intended with their original installation.
Posted on: 2011/3/21 20:28
|
|||
|
||||


