|
Re: Packard Plant
|
||||
|---|---|---|---|---|
|
Forum Ambassador
|
Early Sunday mornings are a safe bet. Anyone you would be worrying about is sleeping it off.
Posted on: 2008/2/13 6:59
|
|||
|
||||
|
Re: Happy Birthday BigKev!
|
||||
|---|---|---|---|---|
|
Forum Ambassador
|
Happy Birthday Kev, Mine is tommorow (2-5)
I'll be 49!
Posted on: 2008/2/4 20:45
|
|||
|
||||
|
Re: Timing for 1951 invloving the points
|
||||
|---|---|---|---|---|
|
Forum Ambassador
|
If you are changing the points you need to
a) change the points--remove the old set, install the new, and "bump" the starter until the points are fully open on one of the high cam lobes of the distributor. That is where you: b) Set the dwell--by using the proper feeler gauge to adjust the point gap to the correct specified distance by means of the adjustments built into the new set of points c) Set the timing--the final step in replacing points (plugs,cap and rotor are usually changed at this time too)
Posted on: 2008/1/29 22:40
|
|||
|
||||
|
Re: Timing for 1951 invloving the points
|
||||
|---|---|---|---|---|
|
Forum Ambassador
|
Dan is describing the dwell adjustment, which should be performed first. To adjust the timing you loosen the bolt at the base of the distributor and turn the distributor while watching a timing light that is aimed at the timing marks on the vibration damper (the large pulley at the bottom-front of the engine). It is important to keep the rpms below the point of centrifugal advance (usually around 500-600 rpm), or your adjustments will be in error.
Posted on: 2008/1/28 9:13
|
|||
|
||||
|
Re: An open letter to all who might work on a 1956 Packard with pushbutton shifting
|
||||
|---|---|---|---|---|
|
Forum Ambassador
|
You can do that--they will actually work for quite a while.
I just can't send anything out my door like that, with my name on it so it's solder and shrink tubing for me, then re-tape the harness. Can ya'll read how exasperated I was last night? Some amber liquid (from Tennessee)on ice helped that situation immensely.
Posted on: 2008/1/27 23:53
|
|||
|
||||
|
Re: An open letter to all who might work on a 1956 Packard with pushbutton shifting
|
||||
|---|---|---|---|---|
|
Forum Ambassador
|
Eric:you cheated--you know how to solder
Posted on: 2008/1/27 22:35
|
|||
|
||||
|
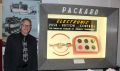
An open letter to all who might work on a 1956 Packard with pushbutton shifting
|
||||
|---|---|---|---|---|
|
Forum Ambassador
|
To whom it may concern:
The Packard electronic pushbutton shift system is a unique, one-year only feature that Packard engineered and had built by Auto-Lite. It was very sophisticated for its day, and apparently is still quite sophisticated to many mechanics/techs of today. A Packard automobile is a wondrous piece of fine engineering, and some features they have or parts they use don't look anything like a GM, Ford or Chrysler car. This does not make them bad, it just makes them different. If different=bad in your mind, perhaps you should refer further work to someone who specializes in Packards. Some parts or features of a Packard are exactly like those used by the big three. Should you be asked to attempt repair on a 1956 Packard with electronic shift that is inoperable there are a few things you need to know right off the bat. DON'T CUT ANY WIRES--ANYWHERE--looking at the electronic shift actuator under the car there are no disconnects there. DON'T CUT ANY WIRES There are two harnesses that come off of that assembly--one that exits the body of the motor, you will see four heavy gauge (12Ga) wires that are taped into a harness soon after leaving the motor. That harness is terminated at the motor control relay (which is a miniature reversing contactor of sorts) on the driver's side inner fender and at the circuit breaker and (perhaps) the automatic park relay, which may or not be there, it was eliminated from production cars and field cars. UNSCREW THE WIRE TERMINALS AT THE RELAYS AND CIRCUIT BREAKER AND FEED THE HARNESS UNDER THE CAR before attempting to remove the actuator. The second harness is for the contact finger segment, it exits the actuator at the metal cover over the gearing and contact segment. Its harness goes along the firewall and enters the car interior through the grommet near the hood hinge on the driver's side. Remove the two screws on top and bottom of the metal grommet housing, spread it apart and go under the instrument panel and pull apart the quick disconnect there, near where the harness enters the steering column. Employ a gentle oscillating (going around in circles) motion as you pull the two halves apart. DO USE PLIERS,DO NOT FORCE ANYTHING. It will come apart with some patience and understanding. Feed the actuator end of the harness back out the hole in the firewall and now the actuator is free to be removed. DON'T CUT ANY WIRES In the event (likely) that the car is stuck in a gear and will not shift, be advised that the actuator will have to be manually adjusted to the reverse position in order to access and successfully remove the actuator. There are two screws in the motor end cap that hold the motor on to the actuator. Before touching these, get a piece of tubing about 3/4" in diameter, 3?-5? long--anything--conduit, copper plumbing scrap, pvc, hobby brass tubing, anything. Make two slots across from each other (at 12 O'clock and 6 O'clock) about 3/16" wide by about that deep. This will (hopefully) be your tool to rotate the actuator gear around to where you need it and can access it. Before removing the motor screws let me say that your life will be considerably easier if you manage to keep the motor armature in the motor body and prevent the commutator from leaving the brushes. Get a flat blade screwdriver and some mechanic's wire handy. Remove the two screws, keep one hand on the motor while doing this so that the motor doesn't fall off (not likely, but it has happened) after the screws have come off don't just pull the motor straight off the actuator, start employing a slow oscillating motion to the end of the motor while gently pulling it away from the actuator. With this method you stand about a 60/40 chance of keeping the armature in the motor and the brushes on the commutator and not snapped together as happens when the armature is removed. Use the tool described above, don't use the armature as the tool. Immediately rotate the whole motor assembly so that the open end is facing up and find a place to wire it to facing up--a frame rail, inside a box, whatever. Getting the motor back together after the armature has been removed is a real B___h under the car, and hard enough on the bench. All I ask is that you respect the fine men at Packard for their professional education and experience, there were intelligent people back then too, many worked in the automotive engineering field. It is a well respected theory in electrical design to reduce the number of places a fault could occur--that is why there are no quick disconnects at the transmission. They lacked the sealing technology available today to make connectors that could live in an oily (much oilier) environment, and placed them where the least amount of corrosion will occur. That's smart. You be smart too and DON'T CUT ANY WIRES
Posted on: 2008/1/27 0:41
|
|||
|
||||
|
Re: Big dollars brought at Barrett Jackson
|
||||
|---|---|---|---|---|
|
Forum Ambassador
|
Are my eyes going wacky or is there blue upholstery on the seats in the eighth picture from the top (#485) on a white/green car ?
Posted on: 2008/1/22 10:30
|
|||
|
||||
|
Re: neg. vs. postive ground
|
||||
|---|---|---|---|---|
|
Forum Ambassador
|
Your '53 has been converted to 12V? negative or positive ground? (I think I know the answer to this one)
Lemmie guess, GM alternator, right?
Posted on: 2008/1/14 22:13
|
|||
|
||||
|
Re: solenoids inner fenders for T/L Unit
|
||||
|---|---|---|---|---|
|
Forum Ambassador
|
Look up, the number is on my update post
Posted on: 2008/1/11 13:52
|
|||
|
||||


