|
Re: 51Packard's....51 Packard
|
||||
|---|---|---|---|---|
|
Home away from home

|
Oh crap...I just realized I wrote that I backed the band adjusting bolts out 2-3/4 turns and it should be 1-3/4 turns. Now I can't remember if I did it right and typed it wrong or both. ARGH!
HH56...That service bulletin you posted for the rod length. Is that 28-29/32? If so, that's pretty precise! Doubt I can achieve that precision. I tried to look at the copy on this website, but it is of lower resolution.
Posted on: 2010/9/2 16:32
|
|||
|
[url=h
|
||||
|
||||
|
Re: 51Packard's....51 Packard
|
||||
|---|---|---|---|---|
|
Forum Ambassador

|
That is the dimension -- 28 29/32. Ross would be the best to answer how precise it actually has to be in the real world. They did make an early change in how it was adjusted with one gauge. They issued a bulletinhttps://www.packardinfo.com/xoops/html/downloads/STB/51T-35.pdf instructing the field to add so many thousands in form of a shim under the adjusting tool before making the adjustment--so that does seem pretty precise..
Attach file:  (12.40 KB) (12.40 KB)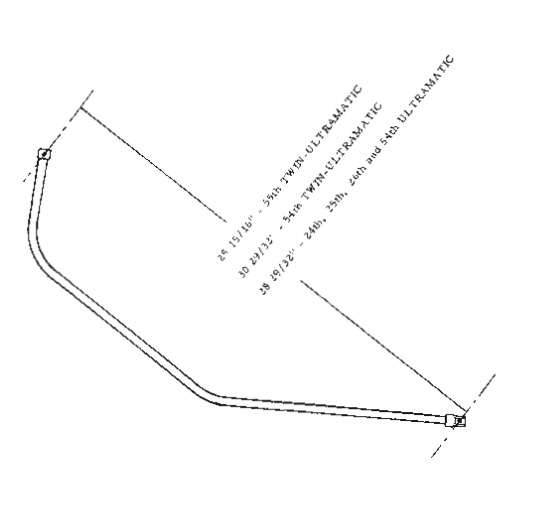
Posted on: 2010/9/2 17:33
|
|||
|
||||
|
Re: 51Packard's....51 Packard
|
||||
|---|---|---|---|---|
|
Webmaster

|
This document was one of last ones issued on the subject of linkage adjustment. Read pages 4-8 as it covers just about all of the various Ultramatic Versions.
https://www.packardinfo.com/xoops/html/downloads/SC/SB-340.pdf Also check the "Packard Service Index" feature on the website to locate any and all service related document on various subjects. It will help you find all the Service documents related to the topic you are looking for.
Posted on: 2010/9/2 19:45
|
|||
|
-BigKev
1954 Packard Clipper Deluxe Touring Sedan -> Registry | Project Blog 1937 Packard 115-C Convertible Coupe -> Registry | Project Blog |
||||
|
||||
|
Re: 51Packard's....51 Packard
|
||||
|---|---|---|---|---|
|
Home away from home

|
It has to be better than plus or minus a hammer handle, say within an 1/8", which is not too hard to achieve.
Posted on: 2010/9/2 21:22
|
|||
|
||||
|
Re: 51Packard's....51 Packard
|
||||
|---|---|---|---|---|
|
Home away from home
|
Thanks Ross...I think I can handle 1/8". Otherwise, I was thinking of making a jig by drilling two holes in a board exactly the right distance apart and use the pins from the rod as an anchor. When they fit nicely in the holes, I'll know it is the right size. The offset on the end of the one by the carb might make that idea go out the window though.
BigKev...thanks for the link. Those drawings are a lot easier to understand than the manual. That will be a lot more helpful. 
Posted on: 2010/9/3 20:10
|
|||
|
[url=h
|
||||
|
||||
|
Re: 51Packard's....51 Packard
|
||||
|---|---|---|---|---|
|
Home away from home
|
Just enjoyed watching Packard: An American Classic Car on PBS...
Posted on: 2010/9/5 10:01
|
|||
|
[url=h
|
||||
|
||||
|
Re: 51Packard's....51 Packard
|
||||
|---|---|---|---|---|
|
Home away from home
|
OK...here is another one of my stupid questions...
Is reverse in my car supposed to be in a detent? I'm trying to do the control valve adjustment shown in the pic below. Before the adjustment, I put the car in reverse. Reverse appears to ride on a little ramp on the detent selector lever. I thought this might be wrong so I put the lever in the next closest indent and made the adjustment. Now when I put the car in gear, everything is shifted. There appears to be a gear between P and N now so it's like everything shifted. Before I go and put it back, I'm wondering if the whole selector thing is screwed up and needs adjusting, or was it correct before where R is kind of like pulling the gear select down until it stops, not necessarily in a detent. I hope this makes sense. Attach file: (17.88 KB)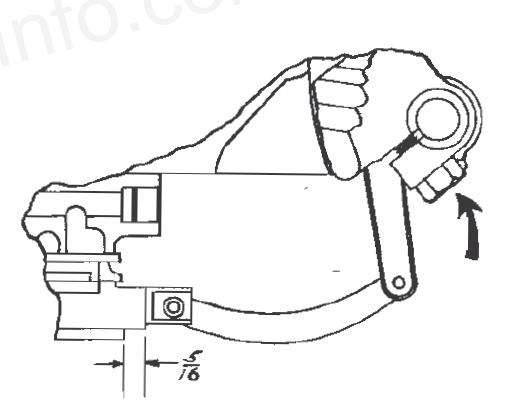
Posted on: 2010/9/5 12:04
|
|||
|
[url=h
|
||||
|
||||
|
Re: 51Packard's....51 Packard
|
||||
|---|---|---|---|---|
|
Home away from home
|
9-05-10
More progress/observations made today. First thing I tried to do was the control valve adjustment. See my previous post on that. Since I'm pretty much stuck on that one, I moved on to readjusting the bands. Turns out I had it right at 1-3/4 turns and I had just typed it wrong. After that, I tackled the throttle rod. First I hammered it so the oddball bends were straightened out more. Since I don't have a straight metal ruler, I decided to use my jig idea, but keep it simpler. I marked a straight line on a scrap board. Then I marked a spot on the line on the 1" line on my tape measure. I marked another line at 29-29/32". This gives me the 28-29/32" distance I need. I was going to drill some holes for the pin, but instead I just lined it up by eye and matched the mark on the opposite end through the holes in the rod. After a little bending back and forth, I think I have it about as good as I'm going to get it. Rubbed it with some sand paper to clean it up and painted it with my Rustoleum rusty metal primer. While that dried, I moved on to something else.
Posted on: 2010/9/5 15:34
|
|||
|
[url=h
|
||||
|
||||
|
Re: 51Packard's....51 Packard
|
||||
|---|---|---|---|---|
|
Home away from home
|
9-05-10 Continued...
While the paint was drying, I thought it might be a good idea to make sure the torque converter was drained. I was pretty sure I lost all the fluid from the broken trans cooler line, but I thought it would be good to make sure. That way I'll be starting with all fresh fluid. Removed the flywheel cover and pumped the starter a couple of times until I could see one of the drain plugs. Took that off and nothing came out. I noticed that the flywheel moved a little while loosening the bolt. Instead of using the starter, I tried to turn it with my hands and was able to. This made it a lot easier. Should I be able to do that? I'm guessing the reason I could was because the converter was empty. Turned it around to the other drain bolt and removed that one as well. The previous bolt will act as a vent to allow fluid to come out. Still nothing came out so I replaced both bolts and the flywheel cover.
Posted on: 2010/9/5 15:38
|
|||
|
[url=h
|
||||
|
||||


