|
Re: A Tale of Two Patricians
|
||||
|---|---|---|---|---|
|
Home away from home
|
Thank you, Howard. I had looked yesterday and didn't see any but I also had poor lighting. I'll check again but I'll go into the trunk to see if there is anything visible once I dig through all the parts in it.
Posted on: 2018/6/27 16:08
|
|||
|
All generalities are false.
Once I thought I was wrong but I was mistaken. Don Pierson Packard / IMPERIAL page CA DMV Licensed Vehicle VIN Verification 1951 Henney-Packard 3-Door Long Wheelbase Air Force Ambulance The 1951 Henney-Packard is For Sale! 1954 Packard Patrician 1954 Packard Patrician Parts Car 1956 Clipper Custom Sedan |
||||
|
||||
|
Re: A Tale of Two Patricians
|
||||
|---|---|---|---|---|
|
Home away from home
|
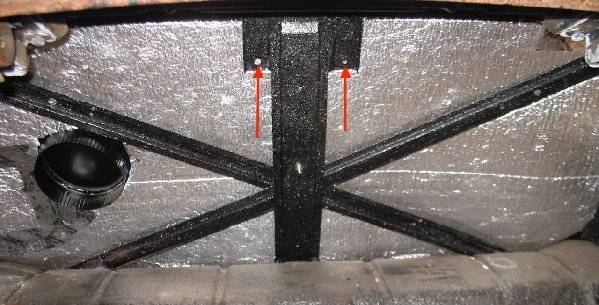
Howard, you were absolutely right! There was a pair of long hex-head bolts holding it to the rear shelf edge. Got it out at last thanks to you and man is it heavy! No wonder these cars weighed so much. Fortunately the upholstery used was stiff enough that there was no cardboard behind it so access was fairly easy. The springs are in good condition but didn't look like it from the other side!
Posted on: 2018/6/27 16:21
|
|||
|
All generalities are false.
Once I thought I was wrong but I was mistaken. Don Pierson Packard / IMPERIAL page CA DMV Licensed Vehicle VIN Verification 1951 Henney-Packard 3-Door Long Wheelbase Air Force Ambulance The 1951 Henney-Packard is For Sale! 1954 Packard Patrician 1954 Packard Patrician Parts Car 1956 Clipper Custom Sedan |
||||
|
||||
|
Re: A Tale of Two Patricians
|
||||
|---|---|---|---|---|
|
Home away from home
|
After getting the rear seat backrest out thanks to Howard's assistance, the rest of the day was just more disassembly, such as the removal of the Treadle-Vac and getting the steering column almost ready to pull out, other than the Pitman arm still being attached which, believe it or not, I forgot about! The dash was taken out years ago and hanging on the wall so nothing was even holding the column in other than that.
Lots of stuck bolts and even screws are proving difficult. One might come out easily but the one next to it is stuck, even on little things like trim retainers. Taking off one of the fender's stainless pieces, three retainers but it appeared that those three had regular nuts rather than speednuts as the others had. Is that the way it should be? One ither question. The 1954 Patrician has stainless trim around the rain gutters and I had such a difficult time getting them off from the other Packard that I hesitate to do it on the parts car. Is there a good, safe way to remove them without damage? They seem to just snap on but they are thin and very fragile, especially where the drain slots are.
Posted on: 2018/6/27 20:40
|
|||
|
All generalities are false.
Once I thought I was wrong but I was mistaken. Don Pierson Packard / IMPERIAL page CA DMV Licensed Vehicle VIN Verification 1951 Henney-Packard 3-Door Long Wheelbase Air Force Ambulance The 1951 Henney-Packard is For Sale! 1954 Packard Patrician 1954 Packard Patrician Parts Car 1956 Clipper Custom Sedan |
||||
|
||||
|
Re: A Tale of Two Patricians
|
||||
|---|---|---|---|---|
|
Forum Ambassador
|
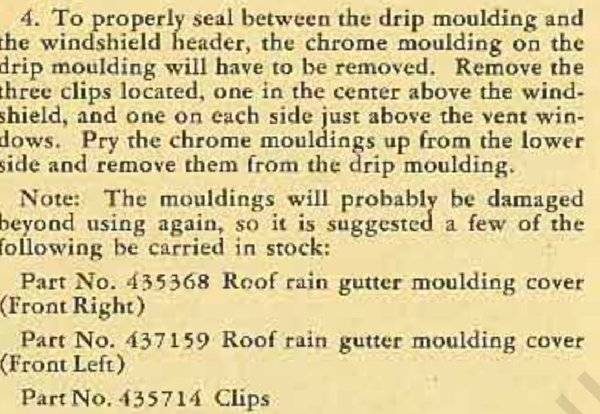
I didn't have much luck getting the chrome drip edge molding off a Pacific without some bending but with a bit of care it is possible to minimize the damage. IIRC, it is the upper edge that needs to uncrimp a bit and that is where the bending comes in as you try to straighten the crimp with a tool down in the gutter. In addition to being crimped over the gutter they also have some sealant in spots which makes it so much easier to bend where they are stuck.
There is an article in SC 25#11 on early leaks and here is an excerpt where my take on the removal is even Packard said they would probably be damaged. Believe the same molding was used thru 54.
Posted on: 2018/6/27 21:01
|
|||
|
Howard
|
||||
|
||||
|
Re: A Tale of Two Patricians
|
||||
|---|---|---|---|---|
|
Home away from home
|
Thank you, Howard! I feel better knowing that it was just carelessness of youth when I first removed them. They are probably usable and I even found two of the clips today when I wasn't looking for them.
Another question, that I forgot to ask earlier. Is anyone reproducing the spanner tool for removing the antenna nut for the 1951-1954 models? I used to have one that I had made decades ago and I know I saw it since moving everything to the current location but I've been unable to locate it.
Posted on: 2018/6/27 21:12
|
|||
|
All generalities are false.
Once I thought I was wrong but I was mistaken. Don Pierson Packard / IMPERIAL page CA DMV Licensed Vehicle VIN Verification 1951 Henney-Packard 3-Door Long Wheelbase Air Force Ambulance The 1951 Henney-Packard is For Sale! 1954 Packard Patrician 1954 Packard Patrician Parts Car 1956 Clipper Custom Sedan |
||||
|
||||
|
Re: A Tale of Two Patricians
|
||||
|---|---|---|---|---|
|
Forum Ambassador
|
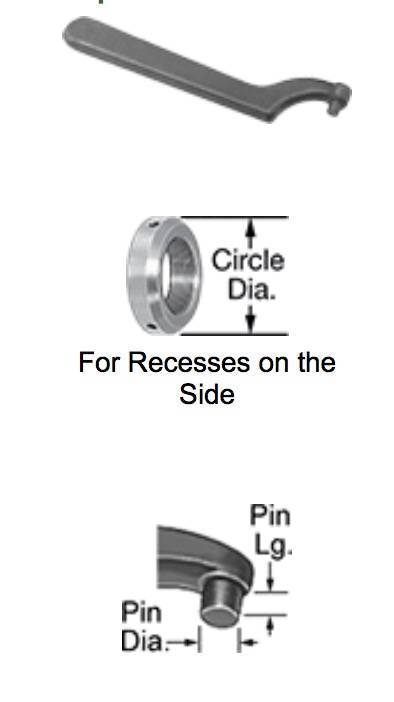
I don't recall ever seeing a repro tool for the outer nut. Does the nut have the typical round depressions or holes for a pin? If so maybe a commercial pin spanner wrench would work. McMaster has a fairly large selection of types and sizes.
The switch bezel can be removed with small 90 degree needle nose pliers instead of the tool but it does need a bit of care so the pliers do not slip.
Posted on: 2018/6/27 21:33
|
|||
|
Howard
|
||||
|
||||
|
Re: A Tale of Two Patricians
|
||||
|---|---|---|---|---|
|
Home away from home
|
I have little here to work with, even limited power, so making anything is difficult and even going anywhere to buy something is as it's very rural. If I had specifics, such as a brand and part number, I could order and have it here for the next visit but I do keep hoping I'll come across the one I had made!
To answer your question, this nut is round with a single hole on the side. The tool I had made when I was a prototype machinist was an aluminum ring with a hole and pin through the side which fit into the nut's hole. I don't recall how it was turned but I don't think it was by any special means other than a vice-grips or something like that.
Posted on: 2018/6/27 21:46
|
|||
|
All generalities are false.
Once I thought I was wrong but I was mistaken. Don Pierson Packard / IMPERIAL page CA DMV Licensed Vehicle VIN Verification 1951 Henney-Packard 3-Door Long Wheelbase Air Force Ambulance The 1951 Henney-Packard is For Sale! 1954 Packard Patrician 1954 Packard Patrician Parts Car 1956 Clipper Custom Sedan |
||||
|
||||
|
Re: A Tale of Two Patricians
|
||||
|---|---|---|---|---|
|
Forum Ambassador
|
You need to measure the diameter of the nut and the diameter of the hole. I would guess nut is around 1 1/4 and maybe 1/8 for the pin. You could pick up some 1/8 thick flat stock as narrow as possible and use a vise and hammer to sort of bend in the shape of the commercial tool. Drill a hole in the curved end and thread for a 6 or 8-32 screw for the pin. A bit crude but should work.
Attach file:  (16.70 KB) (16.70 KB)
Posted on: 2018/6/27 22:01
|
|||
|
Howard
|
||||
|
||||
|
Re: A Tale of Two Patricians
|
||||
|---|---|---|---|---|
|
Forum Ambassador

|
Here's the one I made some years back from scrap lying around the shop, some ?" square aluminum stock and a piece of broken drill bit, probably took about 30 minutes to make.
Posted on: 2018/6/27 22:11
|
|||
|
||||


