|
Re: Wade's Workshop
|
||||
|---|---|---|---|---|
|
Forum Ambassador

|
Wednesday 25th August 2010
Had almost reached the workshop this morning when I get a call from Wade telling me to bring the '41 in because Michael's '54 front wheel bearings are done! A quick U-turn, not really that would have been much too dangerous, and back home for the '41. Down at the workshop, the '41 was backed into the space previously occupied by the '54, jacked up and jackstands put under both ends. Then, while I removed carpets and the trans cover plate topsides, Wade was down below disconnecting tailshaft, speed cable, overdrive cable and wiring and the many nuts and bolts holding it all together and in place. Very tight confines meant some of the nuts/bolts presented problems but as usual Wade got them all. Trickiest part was lowering the trans/OD unit down and back on a floor jack while trying to manouvere it to clear linkages/frame/OD solenoid/etc. Again difficult but in the end out it came complete with a trans oil spill cleaned up a little later by yours truely. The Trans/OD unit was put on the bench and so was the spare unit for comparison purposes. We already knew the spare unit differed in that it had the mounting position for the OD on the left side while the '41's is on the right side. Plan A was to transfer the trans top from the '41's trans onto the spare unit. However a test with the top on revealed the Low/Reverse lever interfered with the body of the Solenoid. Right, onto Plan B, which encompassed removing the OD housing from each unit and seeing what we could find. Found the spare unit looked very good with both the sprag clutch and the planetary gear system in good condition. The same couldn't be said for the '41's unit. It's planetary gear system was starting to deteriorate into an asteroid belt. The planetary system was very floppy, starting to come apart with small pieces of metal making appearances. Because of the interference problems with the spare unit it was decided, sorry Wade decided, it was best to use the '41's trans and OD cases and transplant the planetary system from the spare unit. The trans itself wasn't touched, it looked good, had performed well and given no trouble. Cleaned up the '41's OD housing, found more metal rubble, but otherwise it cleaned up well. Didn't need to clean up the spare planetary system. PeterL had done that when he re-assembled the unit earlier in the year. The spare planetary unit was then transplanted onto the '41's trans. While the cage for the '41's sprag clutch was re-assembled in preparation for tomorrows fun with installing the rollers. Believe a rubber band is used to hold them in place while it's all going back together! And at the end of the day drove Old Blue home, a bit like musical Packards! Attach file:  (28.78 KB) (28.78 KB)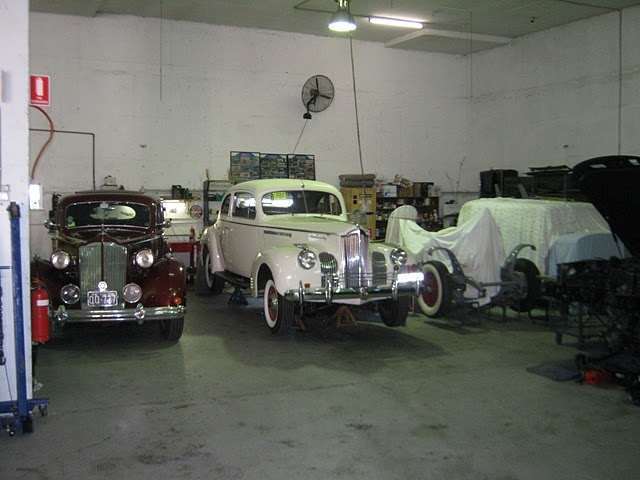 (35.65 KB) (35.65 KB)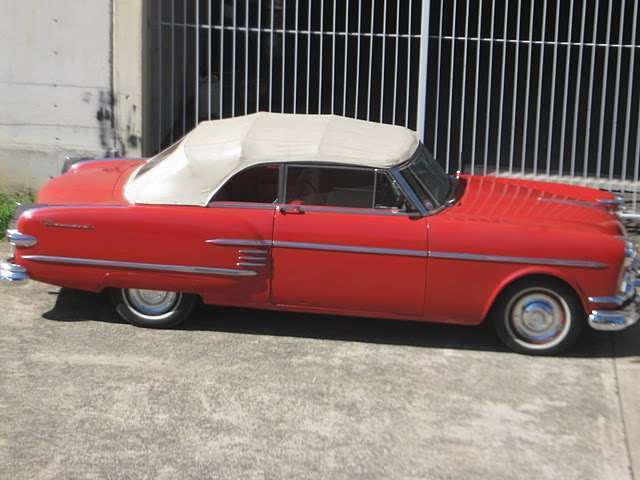 (49.78 KB) (49.78 KB) (42.10 KB) (42.10 KB) (34.56 KB) (34.56 KB) (30.95 KB) (30.95 KB)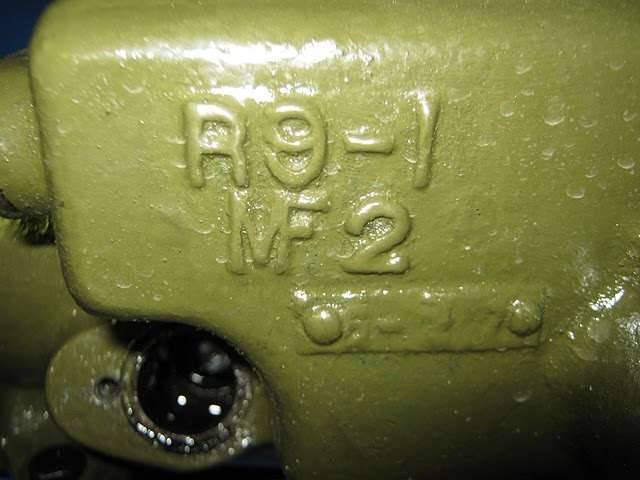 (31.49 KB) (31.49 KB) (33.76 KB) (33.76 KB)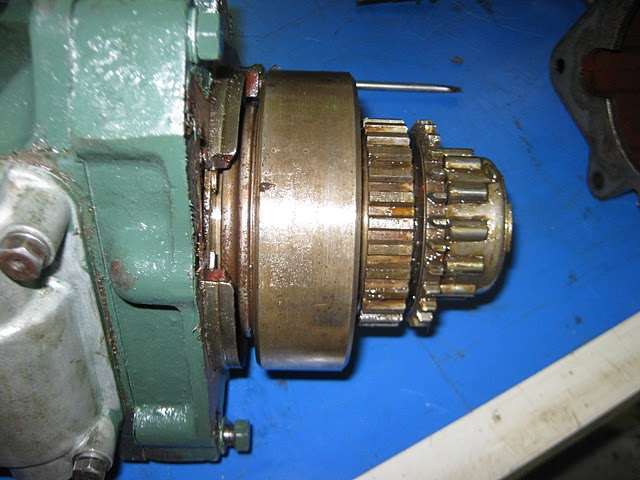 (32.67 KB) (32.67 KB) (42.17 KB) (42.17 KB) (31.88 KB) (31.88 KB)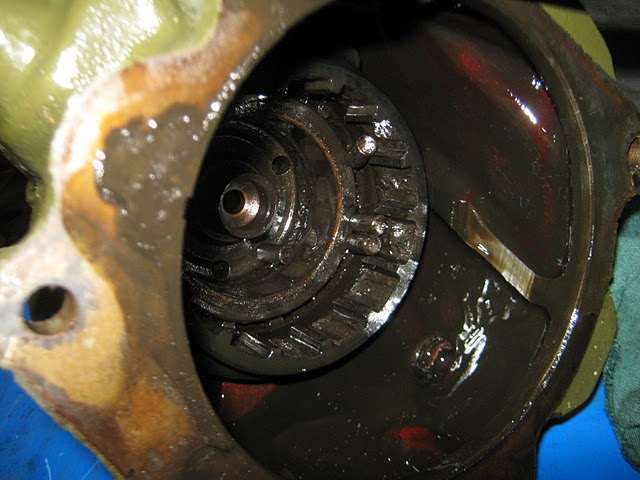 (46.25 KB) (46.25 KB) (40.53 KB) (40.53 KB) (40.24 KB) (40.24 KB) (39.11 KB) (39.11 KB)
Posted on: 2010/8/25 4:26
|
|||
|
Mal
/o[]o\ ====  Bowral, Southern Highlands of NSW, Australia "Out of chaos comes order" - Nietzsche. 1938 Eight Touring Sedan - SOLD 1941 One-Twenty Club Coupe - SOLD 1948 Super Eight Limo, chassis RHD - SOLD 1950 Eight Touring Sedan - SOLD What's this?  Put your Packard in the Packard Vehicle Registry! Here's how! Any questions - PM or email me at ozstatman@gmail.com |
||||
|
||||
|
Re: Wade's Workshop
|
||||
|---|---|---|---|---|
|
Forum Ambassador
|
Thursday 26th August 2010
A morning of frustration, more so for Wade than me, in re-assembling the last parts of the OD. The sprag clutch has 12 loose rollers in a cage and for re-assembly this was where the rubber band would be utilised to hold them in place in the cage. First, though, was working out where the loose spring and washer came from when the OD unit was dis-assembled yesterday. Thought was they were part of the reverse lock out setup but reference to 1) the spare OD and 2) the Parts List didn't help at all. The spare OD has a slightly different set up without a spring while the illustrations in the Parts List don't show it, although they are listed! Anyway after some study and deduction there was only one place they could go, so that was that. While Wade was trial fitting clutch hub and sleeve and marking parts for alignment on assembly, probably not required but it helped to have a point of reference in the assembly process, I was making a gasket for the OD housing. That done, re-assembly started. Although assembly should be by fitting the clutch sleeve and rear shaft assembly into the OD housing and then "mating" that with the clutch hub attached to the rear of the trans Wade wanted to experiment to see if it could be done by "mating" the OD housing to the assembled clutch unit on the rear of the trans. It soon became apparent, after only one attempt, that that way would never work and was promptly abandoned. Back to the "right" way to do it. Here, although a rubber band had been mooted to hold the clutch rollers in place during assembly, Wade used thick, sticky grease to hold the rollers and it worked successfully time after time after time. It WAS a very frustrating morning with many attempts to get it all together. The rollers weren't a problem. Alignment was difficult working with a heavy OD housing, shaft assembly and clutch sleeve but most times worked OK. The reverse lockout rod/bar wasn't really a problem just requiring a little manipulation in the process. It was just getting it all together. The units when dis-assembled came apart easily and trial fits between the separate components/parts all went together easily. Only in getting almost everything together did it all bind up! There were numerous attempts, even resorting to reversing the clutch sleeve in case that was the problem although both OD's had the same clutch sleeve orientation on dissembly. We, or rather Wade, was going nowhere. At this point of time I called a time-out, Wade needed a breather, besides I was having difficulty keeping up with the very colourful language that accompanied each failed attempt. My ears were ringing! Cleaned up and went and had a cup of tea, for me, and a short black for Wade. After the refreshments, first checked the Parts List and it confirmed the clutch sleeve was correct in the way it had been disassembled. Then another attempt to put it all together and what do you know, it slipped together so easily it just wasn't funny. Hadn't done anything different, maybe there was something in the water for the tea and coffee. Whatever it was, it worked! Triumph! That done the trans top and shifter top surfaces were cleaned up, a gasket made, with another little fight to get something back together that came apart so easily. Wade also began re-assembling the spare trans/OD unit to keep it all together to avoid the potential of parts being mislaid. Attach file: (31.01 KB) (25.35 KB) (25.35 KB) (20.43 KB) (20.43 KB)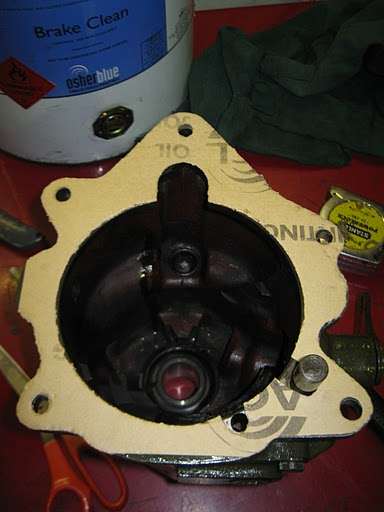 (32.58 KB) (32.58 KB) (49.06 KB) (49.06 KB) (32.92 KB) (32.92 KB) (36.05 KB) (36.05 KB) (30.05 KB) (30.05 KB)
Posted on: 2010/8/26 0:23
|
|||
|
Mal
/o[]o\ ==== Bowral, Southern Highlands of NSW, Australia "Out of chaos comes order" - Nietzsche. 1938 Eight Touring Sedan - SOLD 1941 One-Twenty Club Coupe - SOLD 1948 Super Eight Limo, chassis RHD - SOLD 1950 Eight Touring Sedan - SOLD What's this? Put your Packard in the Packard Vehicle Registry! Here's how! Any questions - PM or email me at ozstatman@gmail.com |
||||
|
||||
|
Re: Wade's Workshop
|
||||
|---|---|---|---|---|
|
Forum Ambassador
|
Quote:
traumjaegercat wrote:......When are we coming back to the 34? I must say Mal that all the practice you're getting on the gasket making they are beginning to look like shop bought ones.......Terry Return to the '34 shouldn't be too far away. At the moment focus is on getting ready for the 2010 Packard National Rally at the end of September to Kangaroo Island, about 850 miles each way. Because of that a number of Packards are being readied for the trip including mine, the '37 115c Coupe recently and the '54 Convertible. There's also a '39 Convertible Coupe coming in soon for "the Rally treatment". Wade's taking a touring holiday in Big Red on the way home, and is expected back late October, so maybe then. As to gaskets,  but todays weren't the prettiest, purely functional, so don't bear comparison to store bought ones. but todays weren't the prettiest, purely functional, so don't bear comparison to store bought ones.
Posted on: 2010/8/26 1:53
|
|||
|
Mal
/o[]o\ ==== Bowral, Southern Highlands of NSW, Australia "Out of chaos comes order" - Nietzsche. 1938 Eight Touring Sedan - SOLD 1941 One-Twenty Club Coupe - SOLD 1948 Super Eight Limo, chassis RHD - SOLD 1950 Eight Touring Sedan - SOLD What's this? Put your Packard in the Packard Vehicle Registry! Here's how! Any questions - PM or email me at ozstatman@gmail.com |
||||
|
||||
|
Re: Wade's Workshop
|
||||
|---|---|---|---|---|
|
Forum Ambassador
|
Quote:
Ozstatman wrote:.....the very colourful language that accompanied each failed attempt. My ears were ringing!...... Arrived at the workshop to find the trans/OD unit sitting on the bench all on it's lonesome. Yesterday, after my departure, Wade had completed re-assembly of the spare trans/OD unit and, wouldn't you know, it went together without a hitch. Maybe Wade's subconscious has now mastered the knack after so many failed attempts on the '41's unit. Balanced the trans/OD unit on a floor jack, wheeled it around to the back of the '41 and slid it under in readiness for raising it into position. Fortunately, and it was very fortunate, Graham came over and slid under the right side of the '41 while Wade was on the left making me tail-end charlie operating the jack. Then the fun started, that is if you can call it fun, with two men wrestling a large roughly cylindrical object of cast iron and steel on their backs/sides in a confined space and trying to fit that object into another confined space. The one thought everybody must have had at the back of their minds would have been "if it came out, then it must be able to go back in". Although at various time during the process that mantra didn't look like holding up. The unit was prepared for re-installation with the trans top on, complete with shift levers, and with the OD lockout lever in place. Although it came out with the trans top loose, but that presented problems in itself. And to install it without the trans top and levers and installing them later through the cabin floor poses it's own set of problem. The unit was turned slightly sideways for the levers on either side to clear the frame and jacked up with Wade on the left side instructing and guiding and Graham on the right following instructions and lending muscle as required. After numerous attempts the unit was in a likely position but Wade was having difficulty with mating the clutch fork and throw out bearing because of the angle things were on. And further numerous attempts were made resulting in more and more "colourful language", don't know if this helped or not but it certainly allowed feelings to be vented. Yesterdays "colourful language" was a distant cousin in comparison. Finally, after the unit was raised/lowered/tilted/levelled/reset after many, many attempts, it slid into place. Some bolts to secure it to the bellhousing and Graham could now go and relax after the strenuous under-car session he'd just gone through. Then it was onto bolting things back together like clutch linkages, shift linkages, trans mounts, trans crossmember and the like. Still haven't finished the under car work which will re-commence next week. During the course of bolting things back together Jeff and Margaret arrived to pick up El Presidente Michael's '54. Just as well they didn't arrive earlier when magic words were being bandied around quite liberally. It also gives time for the NOS Support Insulator Assembly from PACA and PackardInfo member Pepe to arrive to replace the delaminated one on the '41. And I'll finally be installing the new DAF enterprises snubber. Attach file: (46.25 KB)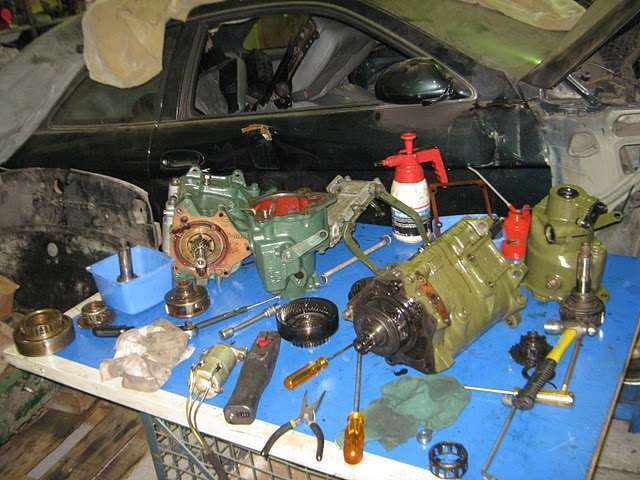 (24.81 KB) (24.81 KB)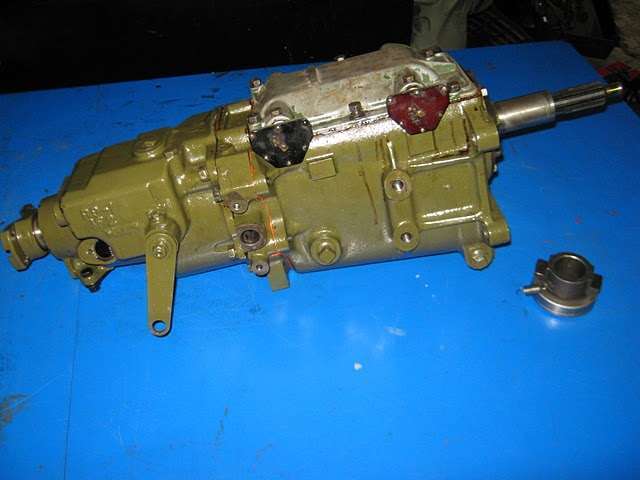 (44.48 KB) (44.48 KB)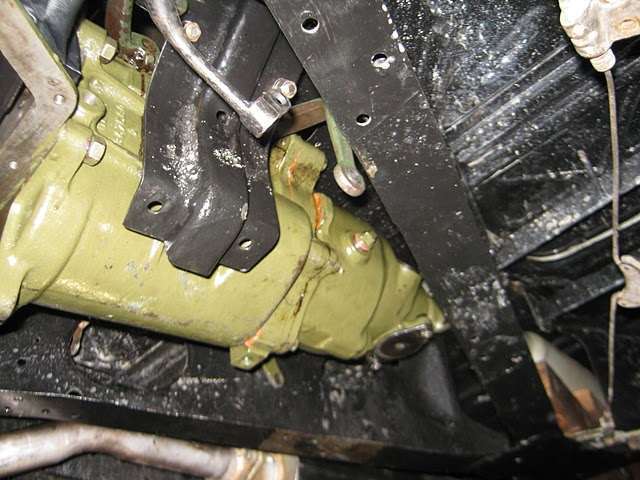 (45.41 KB) (45.41 KB)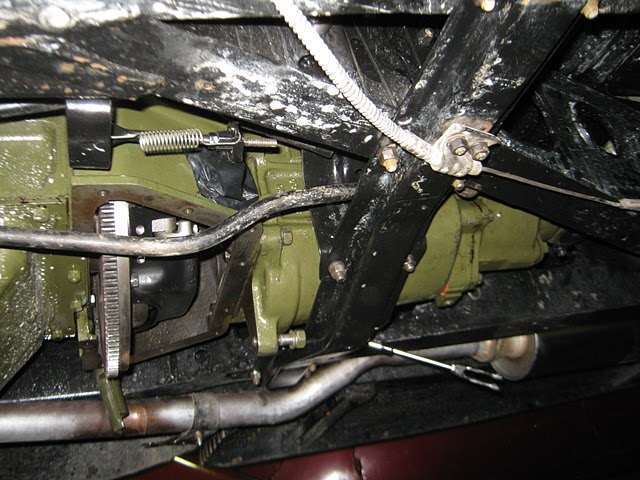 (45.32 KB) (45.32 KB) (47.25 KB) (47.25 KB) (45.58 KB) (45.58 KB) (32.19 KB) (32.19 KB)
Posted on: 2010/8/27 2:13
|
|||
|
Mal
/o[]o\ ==== Bowral, Southern Highlands of NSW, Australia "Out of chaos comes order" - Nietzsche. 1938 Eight Touring Sedan - SOLD 1941 One-Twenty Club Coupe - SOLD 1948 Super Eight Limo, chassis RHD - SOLD 1950 Eight Touring Sedan - SOLD What's this? Put your Packard in the Packard Vehicle Registry! Here's how! Any questions - PM or email me at ozstatman@gmail.com |
||||
|
||||
|
Re: Wade's Workshop
|
||||
|---|---|---|---|---|
|
Forum Ambassador
|
Monday 30th August 2010
Quote: Ozstatman wrote:.......It also gives time for the NOS Support Insulator Assembly from PACA and PackardInfo member Pepe to arrive to replace the delaminated one on the '41...... Support Insulator Assembly from Pepe arrived in the mail this morning. Will be installed on the '41 tomorrow when I'm back at the workshop. Attach file: (30.97 KB)
Posted on: 2010/8/29 18:42
|
|||
|
Mal
/o[]o\ ==== Bowral, Southern Highlands of NSW, Australia "Out of chaos comes order" - Nietzsche. 1938 Eight Touring Sedan - SOLD 1941 One-Twenty Club Coupe - SOLD 1948 Super Eight Limo, chassis RHD - SOLD 1950 Eight Touring Sedan - SOLD What's this? Put your Packard in the Packard Vehicle Registry! Here's how! Any questions - PM or email me at ozstatman@gmail.com |
||||
|
||||
|
Re: Wade's Workshop
|
||||
|---|---|---|---|---|
|
Forum Ambassador
|
Tuesday 31st August 2010
Last day of Winter here down-under and what do I do? Why, go to the workshop as I've done many a day over these last few years. At the workshop Wade had a number of matters to first attend to being: a) an OD cable for a '39 needing repair or replacement for PP, b) an R9 OD schematic for a PACA member in South Australia and, c) Wade contacting Graham Wilkens on behalf of another PACA member regarding balancing crankshaft/balancer/flywheel/clutch assembly for a Twelve. Then it was time to get dirty. Most of the work remaining on the '41's OD overhaul was undercar stuff bolting things back together. First a MBM gasket was made for the OD Solenoid to OD housing seal. While I was doing that Wade was undercar re-installing the OD Governor and the NOS Support Insulator Assembly courtesy of Pepe. That done the front universal joint was reconnected and preparations for re-installing the OD Solenoid were undertaken including an Optima battery and leads for OD energisation purposes. It only took about a half dozen attempts or so to get the Solenoid energised, manouvered so that it connected and held and bolted up. The OD wiring harness was also looped up and over the back of the trans and wiring connections made. I bolted the OD harness and earth strap clamps to the top of the trans and re-installed the trans cover plate at this stage. The speedo cable was also reconnected at this time. That done, the small crossmember that anchors the Support Insulator Assembly and rear mount of the somewhat mythical Snubber was re-installed. Next came an event that I thought I'd never see happen, installation of an Engine Snubber of this '41 Coupe. It was thanks to the Flackmaster that a newly manufactured replacement Snubber arrived at the workshop a couple of months ago in anticipation of this time. This installation is going to be somewhat of a test mule for these Snubbers. At the end of September our trip to the Packard National Rally to South Australia and return will provide well over 2,000 miles of driving which should be a good test for the Snubber. There were a few minor matters in the Snubbers installation 1) being the bolt hole in the small crossmember wasn't big enough for the mounting bolt for the new Snubber, and 2) an extra nut was used on the Snubbers rear mount as a spacer to help align the Snubber and prevent it being loaded up on installation. Correspondence with the Flackmaster revealed this "rear bolt was left larger to compensate for worn out holes, and to maintain best integrity of snubber i.e. machining cost/heat to cut down rear threaded portion would only add risk element, and machining cost" and "On your point#2 concerning being out of alignment, I will have to see the photo/thin nut you refer to". Some photos below but I will take more if necessary. And did you know that you can file a square hole using a round file? I didn't, but almost did! Undercar, in a confined space, in an uncomfortable position, on your back seems to be an environment in which weilding a round file in which this amazing task can be accomplished! Fortunately I saw what was happening and took corrective action before things went too far pear shaped, oops square shaped, and the hole in question was enlarged without ending up square! Snubber installation over, next was re-connecting and re-mounting the OD lockout cable. Then onto the re-installing the bottom of the bellhousing and exhaust pipe and road draft tube brackets which all mount together. And it must be said the Metric nut and bolt(sacrilege) that Tony used on the exhaust pipe bracket when he installed the S/S exhaust system back in June was replaced with a 9/16" bolt and nut. 'Nuff said! The cover plate, with new felt strip, that covers and bolts to the front of the bottom of the bellhousing was also re-installed. That left me to re-filling the OD and Trans with fresh oil while Wade took Big Red for a run to take PP's OD cable over to General Instruments for rebuilding. Started on the filling OD and I was still going when Wade returned after dropping off the OD cable. I was using a baster for filling purposes and it takes time, plenty of time, so much so I hadn't finished filling the OD by the time I had to leave for granddaughterly baby sitting duties in the afternoon. Will pick up the running again tomorrow and, to speed up the process, will borrow John's oil filling setup. Oh.....one other thing. When Wade took the OD cable over to General Instruments and told them he was the guy who had been pointing Packard speedo/OD/hand brake cable business to them over the past few years he was informed they'd prefer not to do those jobs. Like Wade, I was quite taken back by this news as I thought they welcomed the business. Was I ever wrong! As Wade said, if he had another source for these repairs he would have told them then and there to go jump!!! Because they are "car guys" and because of my contact and conversations with them I thought they had some understanding and connection of our needs, little did I know. Attach file: (41.21 KB) (27.51 KB) (27.51 KB)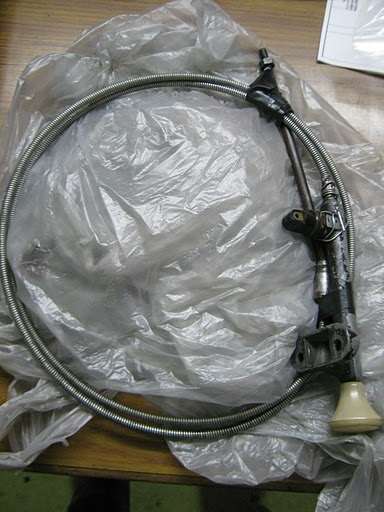 (30.82 KB) (30.82 KB)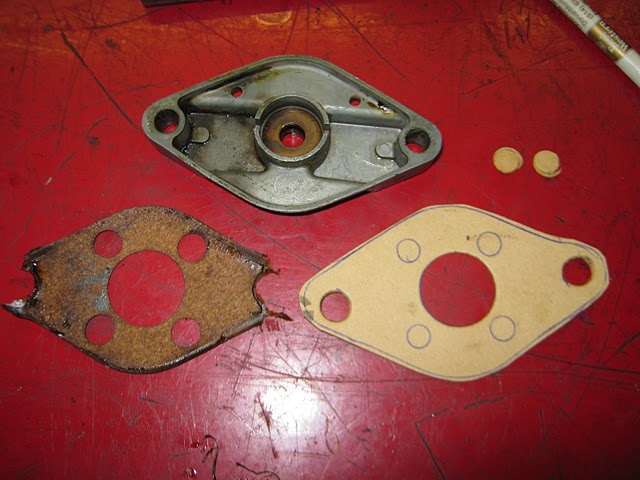 (31.79 KB) (31.79 KB)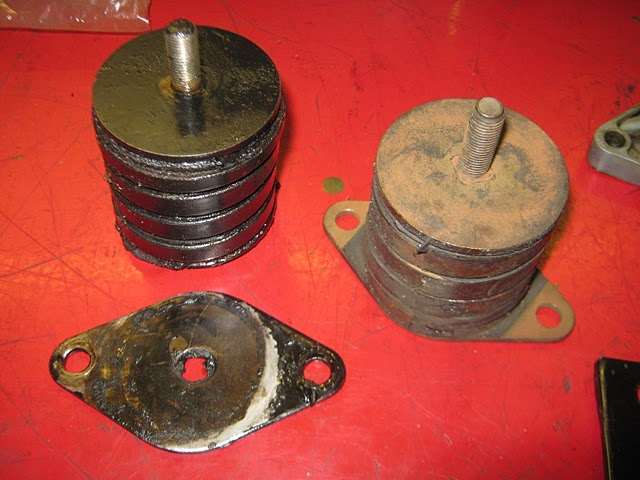 (42.81 KB) (42.81 KB) (31.51 KB) (31.51 KB)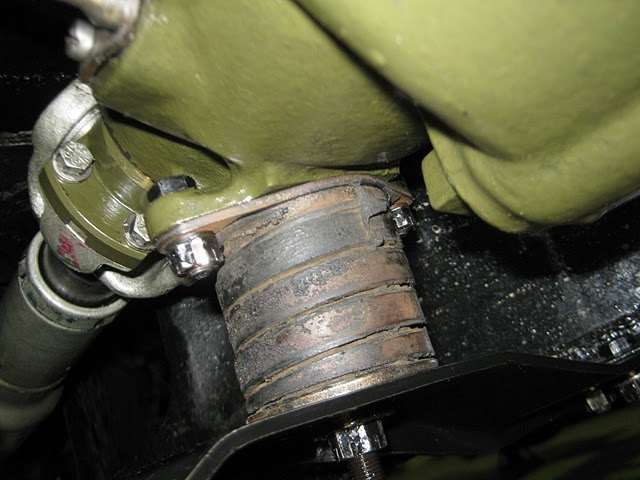 (26.22 KB) (26.22 KB) (32.73 KB) (32.73 KB) (26.93 KB) (26.93 KB)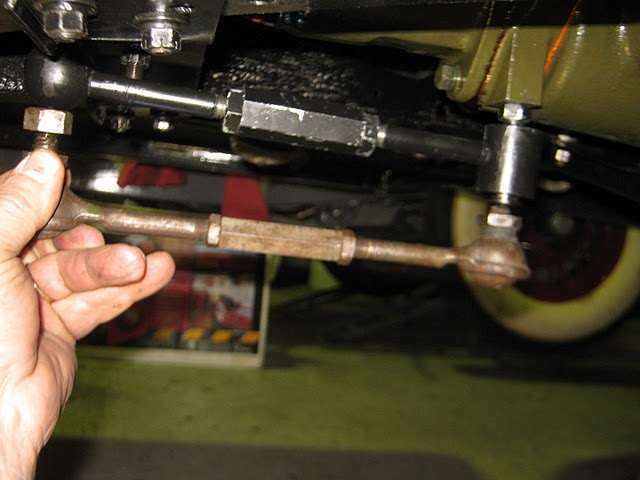 (26.37 KB) (26.37 KB) (25.23 KB) (25.23 KB)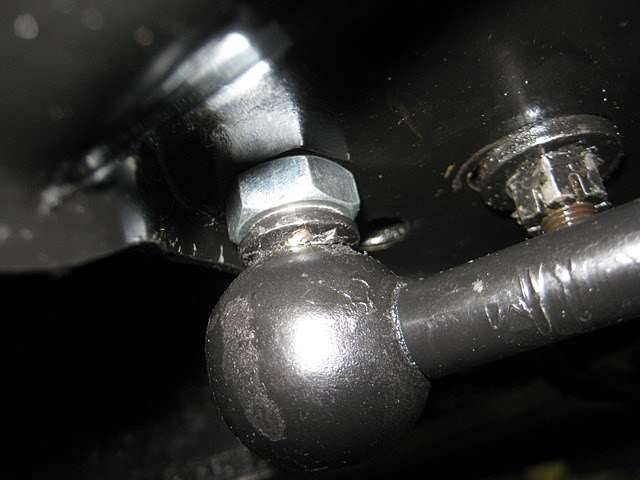 (34.29 KB) (34.29 KB) (35.12 KB) (35.12 KB)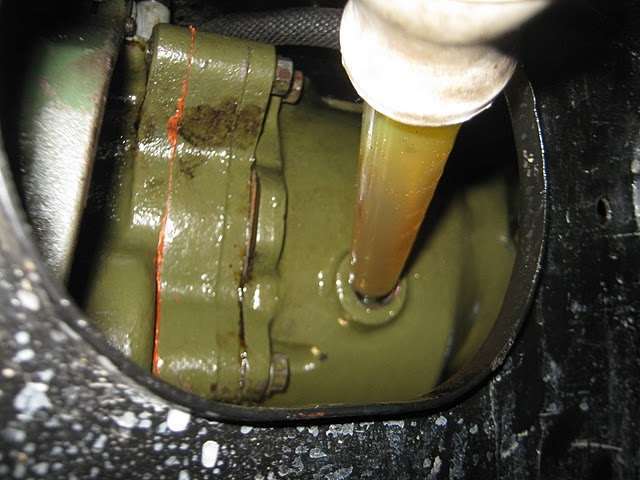 (35.70 KB) (35.70 KB)
Posted on: 2010/8/31 16:34
|
|||
|
Mal
/o[]o\ ==== Bowral, Southern Highlands of NSW, Australia "Out of chaos comes order" - Nietzsche. 1938 Eight Touring Sedan - SOLD 1941 One-Twenty Club Coupe - SOLD 1948 Super Eight Limo, chassis RHD - SOLD 1950 Eight Touring Sedan - SOLD What's this? Put your Packard in the Packard Vehicle Registry! Here's how! Any questions - PM or email me at ozstatman@gmail.com |
||||
|
||||
|
Re: Wade's Workshop
|
||||
|---|---|---|---|---|
|
Home away from home
|
Hi Mal and Wade, Sorry about the dust up with my OD cable at General Instruments. I have found many places with the same attitude, although if you pass the attitude test, ie, they like the cut of your jib, they usually will do the job. I point out to them that I have a similar business (Pest Management), where there are jobs such as termites, that I would rather not do. I do the difficult jobs because they keep the skill levels up and the grey matter working. I would have arced up as well. Are they still going to do those odd jobs for you? Best regards Peter
Posted on: 2010/8/31 22:19
|
|||
|
I like people, Packards and old motorbikes
|
||||
|
||||
|
Re: Wade's Workshop
|
||||
|---|---|---|---|---|
|
Forum Ambassador
|
Wednesday 1st September 2010
First day of Spring bringing with it the warmest Spring day in Sydney since 1865! Although it was still cool in the bowels of the workshop, a concrete cavern. First order of business was finishing filling the OD with oil and then onto the trans for the same. Using John's oil pump made the job a breeze compared with the turkey baster method. Wade then adjusted the clutch linkage. The '41 was then fired up, by Wade sitting on the base of the front seat and operating the throttle by pushing directly on the linkage rod poking through the firewall. And it worked! With the '41 up on jackstands the OD operation was checked and all appeared well. At this point Noel made an appearance, he was travelling to Castle Hill to talk with his chrome plater and dropped in to spend some Packard time with us. Once Noel left, the fore and aft jackstands were removed with the intention of going for a road test. But first the front carpet needed to be re-installed together with the seat squab. Allied with re-installing the carpet, which has seen better days but is the only '41 Packard front carpet I have, was making a new rubber piece to cover the tatty hole in the carpet where the throttle linkage rod comes through the firewall. That done, carpet, accelerator pedal and the front seat squab were installed and we were ready to roll. Didn't do the usual test route, where speeds are relatively low, but expanded our horizons by heading west. Started out with the OD knob pulled out, to lock out OD, but there was a problem after travelling a short distance with the knob sliding back in, engaging the OD! Apart from that, the test run went well except for the kick down test. Because it didn't! Back at the workshop it was determined the kick down cut out switch wasn't being activated by the throttle linkage. The rounded headed bolt which activates the switch wasn't long enough. While the OD lockout(or is it non-lockout?) problem appears to be too good an OD lockout cable, which moves very, very smoothly in operation. Not enough built in friction to hold it in place? Then while Wade was taking out the round headed kick down activating bolt, I was finishing off the interior by screwing in the aluminium carpet edge trims and installing the front quarter kick panels. Must pat myself on the back about this as it didn't take anywhere near as long to do as previous attempts have. Must be all that practice pulling these things in and out! But in installing the new longer bolt in the throttle linkage to activate the kickdown switch Wade dropped it, and wouldn't you know, we couldn't find it! Where could it be? It soon became glaringly obvious with the open mouth of the starter motor mounting hole at the front of the bellhousing directly below the kick down switch staring at us. Jack up the '41 again, jackstands in place, and the bottom of the bellbousing was removed. But no bolt! Ah, there it was, wedged lightly between the flywheel and pressure plate. Bolt out and installed without dropping it this time, although we left the bellhousing bottom plate off just in case. Kick down action now appears to be working well with full travel to switch. Allied with the kick down parts removal Wade had also removed the starter motor(as you no doubt surmised from the previous paragraph) because I'd expressed a wish to have the '41's starter turn over in a similar manner to that of Noel's '39. The difference after Noel's starter was cleaned up was remarkable. On the bench and apart the '41's starter didn't look anywhere near as oily and dirty as Noel's so my hopes and expectations at that point were lowered somewhat. However there was oil and dirt buildup on the commutator(is that the term?) which Wade carefully cleaned including scraping the built up dirt from the grooves. And a few years ago I'd bought some NOS starter brushes off eBay so I ducked home and picked them up. Back at the workshop learnt that only 3 of the 4 brushes from a set fitted(on the box they were marked to fit Mopar 1941, I now saw!) However, because I'd bought two sets, must have been cheap, was able to make a complete Packard fitting set from the two. Replaced the two brushes which screw to the body of the starter motor but the other two brushes posed a problem. They are soldered in and, in all likelihood, are also crimped in place and the big workshop soldering iron didn't have enough heating power to overcome the heat loss involved with all that metal. What to do? Why take the starter motor body and new brushes around to Tibby Rose, a local auto electrician. There I was advised that they could try and replace the two remaining brushes but wouldn't give any guarantees about it being successful. OR, because in their estimation the old brushes didn't show much wear, we could clean up the two remaining brushes by means of fire! Sounds drastic but, as they demonstrated, it just meant using a match to burn out and off any impregnated oil and grease on and around the two old brushes. Back at the workshop didn't use a match, but something much more high tech, a childproof disposable cigarette lighter. And this proved I'm not a smoker, besides being child proof the lighter was also Mal proof, because I couldn't get it to work! Fortunately Graham came to my rescue and demonstrated how easy it is to operate. Yes, easy, but only when you know how it works! Trial by fire completed, the starter was re-assembled, using only a thin smear of grease on the bushes, and re-installed. And although not a complicated task because of the starters weight, location and access limitations with the fixed bonnet(hood) side pieces on a '41 providing a wall between you and your job it's not an easy task. But perseverance pays off, and what comes out must go back in. Everything connected up climbed into the '41 and starting was a whirr! Seemed to literally spin over so easily at what seemed at least 5 times the revs of it doing so previously. I was very, very impressed. As O_D and others have stated often - if your electrical systems are in good condition 6V is plenty for your needs. I'm now a proponent of that philosophy. Attach file: (28.71 KB) (31.38 KB) (31.38 KB)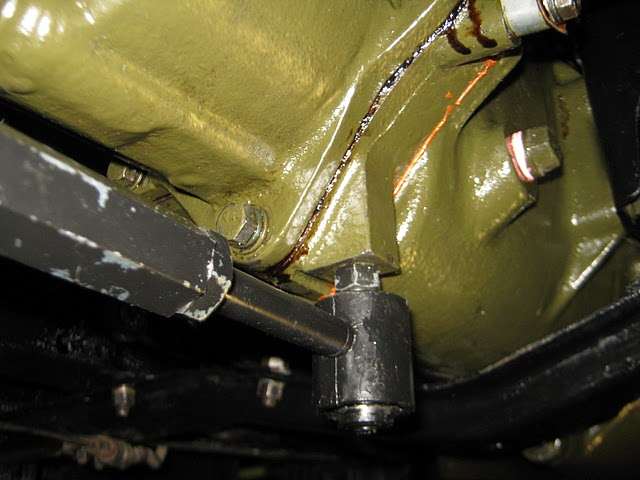 (27.51 KB) (27.51 KB) (40.95 KB) (40.95 KB)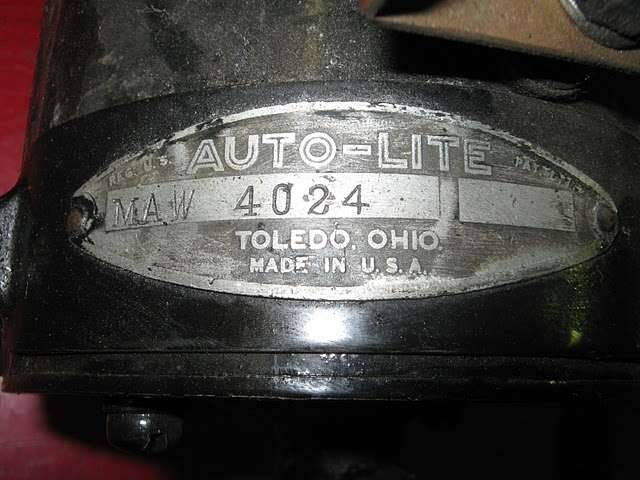 (28.97 KB) (28.97 KB) (23.69 KB) (23.69 KB)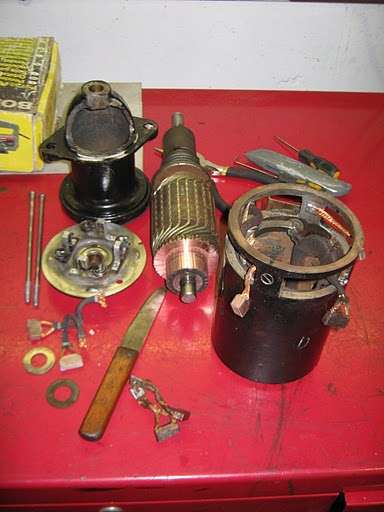 (29.84 KB) (29.84 KB) (35.34 KB) (35.34 KB) (31.47 KB) (31.47 KB) (30.37 KB) (30.37 KB)
Posted on: 2010/9/1 5:35
|
|||
|
Mal
/o[]o\ ==== Bowral, Southern Highlands of NSW, Australia "Out of chaos comes order" - Nietzsche. 1938 Eight Touring Sedan - SOLD 1941 One-Twenty Club Coupe - SOLD 1948 Super Eight Limo, chassis RHD - SOLD 1950 Eight Touring Sedan - SOLD What's this? Put your Packard in the Packard Vehicle Registry! Here's how! Any questions - PM or email me at ozstatman@gmail.com |
||||
|
||||
|
Re: Wade's Workshop
|
||||
|---|---|---|---|---|
|
Forum Ambassador
|
Thursday 2nd September 2010
Finished up the '41 this morning. After re-installing the lower bellhousing section and adjusting clutch free play we were ready for another test run. But first I made up an aluminium backing plate, for the rear number plate, which I intend to use for displaying rally and show badges(must be an ego thing!). Then off for the run, again heading west. Went well, but kick down operation was again an issue which will be looked at again at a later date. Reason being, when we arrived back at the workshop Wade was itching to install the new engine mounts, which arrived this morning, in Big Red. So Big Red was backed into the space the '41 had occupied less than half an hour earlier. The Packard turnover in the workshop has been quite high lately being measured in days or weeks instead of the months or years which were more the norm previously. Put Big Red up on jackstands fore and aft, for good undercar access, then into the job. To access the rear mounts the front floor and toe boards have to come out. A lot of work but to gain reasonable access it must be done. Then with Wade under the car tackling the left side mount and the "dogbone" because of limited topside access on that side, I tackled the right side mount and the right side stabilser. During the course of this excercise Harvey arrived to pick up a pair of upper front suspension rubbers for Vince's '39 120 Convertible Coupe that Wade had ordered in for him. After Harvey left I finished the right side dismantling, all accomplished through the right side front door. While Wade completed the left side mainly from below but had to come topside to access the upper mounting bolts. Jack under the trans to take weight off the mounts and the right side was taken out easily. Started installing the new right side mount and it was about half done when I had to leave Wade to it as babysitting duties again called. Attach file: (36.10 KB)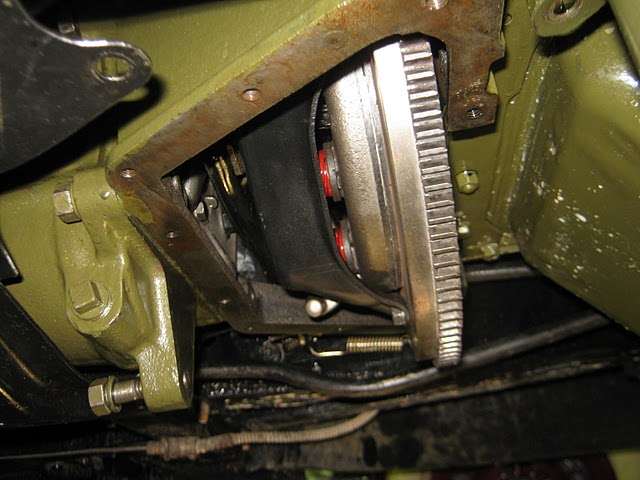 (37.07 KB) (37.07 KB) (33.15 KB) (33.15 KB) (35.37 KB) (35.37 KB) (35.40 KB) (35.40 KB) (36.47 KB) (36.47 KB) (32.53 KB) (32.53 KB) (40.69 KB) (40.69 KB) (32.58 KB) (32.58 KB) (39.09 KB) (39.09 KB)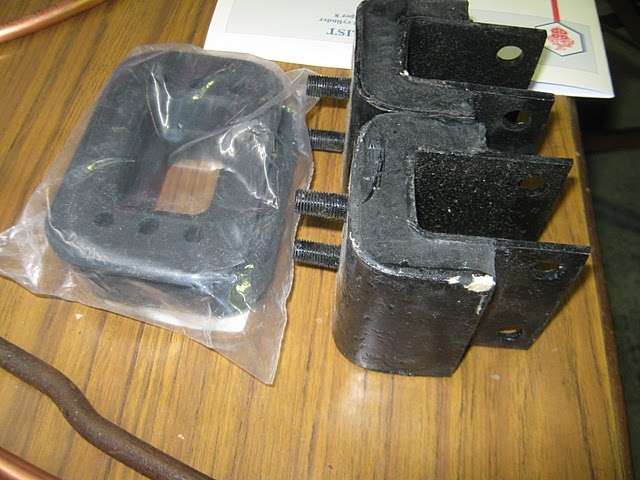 (45.03 KB) (45.03 KB) (38.29 KB) (38.29 KB)
Posted on: 2010/9/2 6:32
|
|||
|
Mal
/o[]o\ ==== Bowral, Southern Highlands of NSW, Australia "Out of chaos comes order" - Nietzsche. 1938 Eight Touring Sedan - SOLD 1941 One-Twenty Club Coupe - SOLD 1948 Super Eight Limo, chassis RHD - SOLD 1950 Eight Touring Sedan - SOLD What's this? Put your Packard in the Packard Vehicle Registry! Here's how! Any questions - PM or email me at ozstatman@gmail.com |
||||
|
||||
Register To PostTopic is Locked


