|
Re: Larry's 1951 Club Sedan Project
|
||||
|---|---|---|---|---|
|
Home away from home

|
Larry, I do not know the German label for the Pathfinder but congrats on the belt job. Modern cars I don't touch, a cobbler should stick to his last. As Paul (55clipperguy) said: a beautiful crew! Ben looks like a champion and btw be so kind to PM me the mobile phone number from Isabella (in twenty years). Forget all Packard blogs as long as your wonderful family surrounds you. Merry Christmas!
[unknown picture source]
Posted on: 2011/12/23 12:14
|
|||
|
The story of ZIS-110, ZIS-115, ZIL-111 & Chaika GAZ-13 on www.guscha.de
|
||||
|
||||
|
Re: Larry's 1951 Club Sedan Project
|
||||
|---|---|---|---|---|
|
Home away from home
|
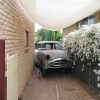
Thanks Paul and Guscha. As you can see, Mila is possibly the smallest and youngest Santa in captivity, with her little red Santa suit on!! Brought us more smiles than the super-sized Santa dude that we have stuck in our chimney!
Posted on: 2011/12/26 6:14
|
|||
|
1951 Packard Club Sedan | [url=ht
|
||||
|
||||
|
Re: Larry's 1951 Club Sedan Project
|
||||
|---|---|---|---|---|
|
Home away from home

|
Restoration of '51 Radio(s)
While the weather stopped other work on the car I decided to get the two '51 radios (Model 416387) I have out and see if I could get them working. I had the circuit diagram, handbook and one full set of original valves just in case, but I was soon to discover that I need not have ordered all the valves! Long ago I replaced all the capacitors in both units but didn't get any further, putting the radios back into storage for a couple of years, until now. I didn't have a power supply then or a decent 6V battery to use for testing. Both radios are in fair condition mechanically and electrically. They haven't been 'left out in the rain' or stored in poor conditions. Some caps are old micas with a strange colour code. These are Cornell-Dubilier caps and I managed to get a copy of the colour code which is available at Cornell-Dubilier Code It takes a bit of figuring out, as the code differs from the general colour codes for resistors and caps etc. Usually mica caps will be ok, they don't deteriorate like waxed paper caps. First step is to always replace any old wax/paper caps when doing up an old radio. I unplugged a vibrator can from one chassis and applied 6volts to it - no action. Decided to see if I could repair it. My brother (who was in the radio and TV repair business for many years) reckoned most could be repaired provided you took care opening the sealed can. I carefully ground the rim off the can and pulled the unit out. Both sets of contacts were shorted with metal filings and gunk. They cleaned up well when I dragged some fine emery paper between them. You should see an air gap between both sets of contacts. No adjustment was needed. The radios had not been used since at least 1975, and probably long before then, so I had little confidence that either would work straight up, but I was to get a surprise. At around 4 volts from the supply the vibrator started. I measured a few voltages but there was no HT. Turned the volts up to over 5V and I got static and finally a station. I had decent B+ voltage! The fidelity was really poor as the speaker was old and in poor condition. In fact it might have been original, around 60 years old. Tuning pulled in other stations but occasionally the OZ4 rectifier valve would just quit. There's an intermittent connection or a marginal valve elsewhere which I need to eventually find. Left the radio on for over an hour and it continued working well. Hooked up a new 6 x 9 speaker and the fidelity was much better - even OK to listen to. Next I powered up the second set, and the vibrator worked OK but there was no high tension (B+) voltage. Looks like there is an open circuit in the vibrator transformer winding, so I'll have to find a replacement. These are rare so it might take a while. I might not have time to work on the second radio for a while, with holiday visits etc happening. 775 &776: views of the vibtator can and innards. The unit can be opened by grinding off the retaining lip around the bottom.  776?: The vibrator after the contacts had been cleaned. Air gap is now visible between contacts.  782: Vibrator case showing lip ground away  779: The power supply. Very handy as you can bring voltage slowly up to reduce the chance of damage, while looking for 'smoke and fire'!  800: The Rectifier tube (OZ4) glowing nicely. It can be easily replaced with a solid state unit for extra reliability, but OZ 4 valves are only a few bucks each anyway and keep things 'original'.  762: One of the radios showing the replacement capacitors and the unusual Dubilier mica caps.  724: A 'ring-in' miniature valve has been substituted in the past . . . it works aok  757: Getting a replacement speaker is proving to be difficult. They are low profile and a tight fit in the chassis. 
Posted on: 2011/12/26 7:07
|
|||
|
1951 Packard Club Sedan | [url=ht
|
||||
|
||||
|
Re: Larry's 1951 Club Sedan Project
|
||||
|---|---|---|---|---|
|
Home away from home

|
There's a place here in the U.S. on the West Coast that does speaker rebuilding..
speakerrepair.com BTW Since it's Winter here I guess I'll have to get the radio out of my Clipper and see if it works....
Posted on: 2011/12/26 21:07
|
|||
|
||||
|
Re: Larry's 1951 Club Sedan Project
|
||||
|---|---|---|---|---|
|
Home away from home

|
Thanks for the link to the speaker resto site Paul. I've been trying to find a similar place here but no luck. Seems it's difficult to get these old style speakers, all the newer 6X9inch ovals are much bigger these days.
Let me know how you go with your radio - we can exchange helpful hints.
Posted on: 2012/1/10 6:03
|
|||
|
1951 Packard Club Sedan | [url=ht
|
||||
|
||||
|
Re: Larry's 1951 Club Sedan Project
|
||||
|---|---|---|---|---|
|
Home away from home

|
Well, first a bit of an update about the last / previous post. I never did find a 6" x 9" speaker anywhere that would fit into the original Packard radio from my '51. Looked extensively and made lots of enquiries, got nowhere. All 6 x 9's these days have larger magnets (for a start).
Even the idea of re-coning etc - no luck! Contacted a couple of likely places in the US and was told they just don't repair / recone that type of speaker. Bought a speaker that supposedly would fit (no guarantees) and had it shipped to Oz, but although it was close, it was too large and I would have needed to chop out a section of the radio chassis to even 'shoe-horn' it in. So what I'm doing is mounting that new 6 x 9 (double Voice Coil - DVC) speaker on the rear parcel shelf, and the original speaker (which still does work!) will remain in the radio body, with a cutover switch (probably) in case I want to switch to it for total authenticity. Benefit of a DVC is that if you eventually fit a stereo tuner / player / MP3 player somewhere (usually hidden) in your Packard the speaker accepts both channels OK. (Of course the better option is to mount two speakers but some might not want to do that so DVC is an alternative). If anyone ever does find a substitute speaker of the right size - please post details! I'm sure there'll be people who want to hear about it.
Posted on: 2012/4/6 7:56
|
|||
|
1951 Packard Club Sedan | [url=ht
|
||||
|
||||
|
Re: Larry's 1951 Club Sedan Project
|
||||
|---|---|---|---|---|
|
Home away from home

|
Three Sons, a Packard and a Wedding(One day it might become a movie).
A few weeks ago we had a wedding in our family - pretty special, because as well as being just a lovely event, there was a very nice Packard involved. Here are a couple of pics of our son Matt and his bride Renita on their wedding day. They loved the car, it added a shine to the whole event which went beautifully. I was told there were people all along the route snapping the car and walking out onto the road to get a better look. The Groomsmen are our other sons, Ben and Clayton - the three are great mates. Our daughter also attended so the whole family was there. Surely was a great day, and our capital city - Canberra - was a nice place to get married. My motto is - everyone should be married at least a few times . . . (just kidding).  My Three Sons . . . Matt in the middle, with the big smile 
Posted on: 2012/4/6 8:10
|
|||
|
1951 Packard Club Sedan | [url=ht
|
||||
|
||||
|
Re: Larry's 1951 Club Sedan Project
|
||||
|---|---|---|---|---|
|
Home away from home

|
Over the last few weeks I haven't done much on the car, just a few minor jobs. Lots of other matters to attend to, including our son's wedding.
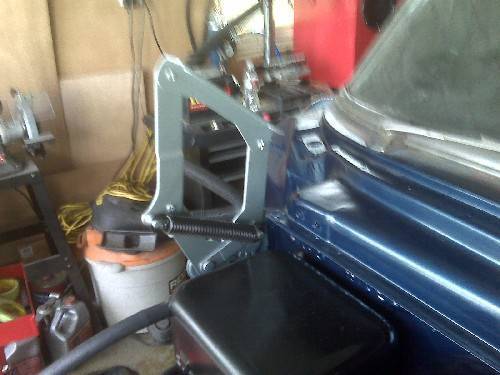
It was a real treat to spray my first lot of colour (Matador Red Metallic) even though it was only the firewall that got sprayed this session. I was keen to try out my new gun, an Iwata W400. They've been around for a long while and have a very good reputation although there are dozens of other guns that get good write-ups. But the Iwata doesn't have any detractors, so I got one. The regulations that govern solvents and the use of 'high volume, low pressure' guns (HVLP) that apply in the US are not applicable in Australia (yet) and that is helpful because HVLP usually means an upgrade to your compressor so that you have the larger volume of air available that these guns need. My old 2HP compressor is OK for a standard gun but not for a HVLP gun. Hadn't tried the gun before I sprayed the Packard firewall, but I discovered there wasn't any need to - it did a great job, and changes to pattern and paint / air volume were easily made during operation. Great gloss, not much overspray - unlike the other suction feed guns I have had for years, which can flutter and don't atomise well if you reduce pressure (to reduce overspray etc). The ability to change from vertical to horizontal pattern (or anywhere in between) while spraying (no loosening of the head) is a really helpful feature. Now I'm keen as mustard to be spraying the rest of the car, but that is a fair way off yet. Primed and ready  Matador Maroon metallic goes on  Camera doesn't render the Maroon accurately - it's darker than this   One of the other things I have been working on is applying schutz to the inners of some panels, like the doors and rear quarter panels. That stuff really is 'mobile' and despite a lot of masking the schutz drifts all over the place. Even though I masked really well, I still needed to wipe a lot of surfaces around the car to clean the mist that had settled. A good way of masking large areas with little work is to use the rolls of 'cling' film you can get that has one edge taped. It's around six feet wide. The next time I spray this stuff I will use it anywhere and everywhere nearby. Schutz drifts many yards so lots of care needed. Even if you mask widely be aware that drift will happen. Sound deadener on rear quarter inners  I decided to put it over primed and painted (2-pak) metal for maximum corrosion control . . .Originally it was over bare metal  Got onto stripping and cleaning the hood hinges as well, which took quite a while as there was loads of old black grease stuck in under the mechanism, meaning a lot of swabbing with petrol to clean it out before painting. After a final polish with a stripper disk and some ScotchBrite hand work I etched them with MetalReady and etch primed them, ready for painting. Original finish was apparently Cad plating although there was no sign of any remaining. I'm painting with a bright metallic silver that hopefully will be an acceptable substitute. Special fancy gasket to prevent water ingress . . .  The hinge is just about clean enough  Hinges get the metalready treatment before priming and paint 
Posted on: 2012/4/6 8:38
|
|||
|
1951 Packard Club Sedan | [url=ht
|
||||
|
||||
|
Re: Larry's 1951 Club Sedan Project
|
||||
|---|---|---|---|---|
|
Home away from home

|
Looking good! I have been leaning toward painting my car red as well. So far...I like it!
Posted on: 2012/4/6 9:28
|
|||
|
[url=h
|
||||
|
||||
|
Re: Larry's 1951 Club Sedan Project
|
||||
|---|---|---|---|---|
|
Webmaster
|
Looks really good Larry!
 One note on the hood hinges. While the mechanism of the hinge is cad plated, the springs are not. They are supposed to be black. I removed the springs from my hinges, painted the hinges with cadmium paint and waited for the paint to be fully cured, and then reattached to the firewall. Then I painted the springs semi-gloss black, and while they were still tacky wet, and reattached them to the hinges so they could partially expanded while they cured. No cracking so far.
Posted on: 2012/4/6 9:44
|
|||
|
-BigKev
1954 Packard Clipper Deluxe Touring Sedan -> Registry | Project Blog 1937 Packard 115-C Convertible Coupe -> Registry | Project Blog |
||||
|
||||

 (101.07 KB)