Hello and welcome to Packard Motor Car Information! If you're new here, please register for a free account.  
Login
Username:

Password:

Remember me


Lost Password?

Register now!
FAQ's
Main Menu
Recent Forum Topics
Who is Online
118 user(s) are online (112 user(s) are browsing Forums)

Members: 1
Guests: 117

Jimmyk, more...
Helping out...
PackardInfo is a free resource for Packard Owners that is completely supported by user donations. If you can help out, that would be great!

Donate via PayPal
Video Content
Visit PackardInfo.com YouTube Playlist

Donate via PayPal


1954 ultra selector shaft seal
#1
Just can't stay away

Warren J. Erickson
See User information
Hi guys

How do you remove the selector shaft seal. On a 1954 ultramatic

Thanks

Posted on: 2012/7/8 21:08
1954 Packard Pacific
1964 Studebaker GT Hawk
 Top  Print   


Re: 1954 ultra selector shaft seal
#2
Home away from home
Home away from home

Gary
See User information
Erik,
I just replaced the one in my '53 Clipper around the first of the year. The frame in your '54 may have about a 3/8" hole through it that alomost lines up directly with the selector shaft. After you remove the selector shaft lever, you can take a long sharp pointed punch and using the hole to access the seal, make a small hole in the face of the seal to insert a sheet metal screw. Make sure you center the hole in the face or you might scar the shaft if the screw threads contact the shaft itself. it's tight working quarters but you can use the same hole that you used for the punch for a screwdriver to install the screw. You dont need to screw it in too deep, the seal is only about a 1/4" deep and you dont want to bottom it out in the transmission case. After you get the screw in, use something like some needle nose vice grips to clamp on the screw, then wedge something like a thin piece of cardboard or wood shim under the vice grips and pry the seal out. The old seal comes out easy enough however to install the new seal is a bit more tricky as you will need to fabricate a tool that will fit over the selector shaft and contact the face of the new seal, then you will need to use something like a flat bar with a bend in it to pry against the frame of the car to "press" the new seal back in. you may need to cut a small block of wood or two to insert btween the frame and the bar to pry against. Any questions just ask, it's not a bad job to do, just a very confined space to work in, requires patience and a little fabricating ingenuity...just be safe and make sure to use jack stands and wheel chocks.

Posted on: 2012/7/9 5:39
 Top  Print   


Re: 1954 ultra selector shaft seal
#3
Just can't stay away

Warren J. Erickson
See User information
thanks gator! I never knew of that hole in the frame. I was going to lower the tail shaft. You saved me a lot of work.

Great tip thanks

Posted on: 2012/7/9 7:10
1954 Packard Pacific
1964 Studebaker GT Hawk
 Top  Print   


Re: 1954 ultra selector shaft seal
#4
Forum Ambassador
Forum Ambassador

HH56
See User information
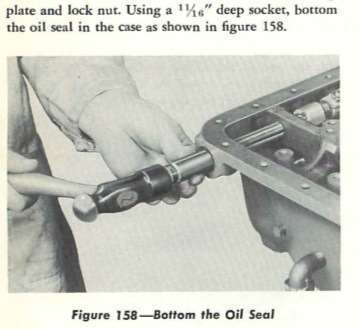
The old seal comes out easy enough however to install the new seal is a bit more tricky as you will need to fabricate a tool that will fit over the selector shaft and contact the face of the new seal, then you will need to use something like a flat bar with a bend in it to pry against the frame of the car to "press" the new seal back in.

If the hole is there and lines up, this is what was recommended on the twin Ultra. 55 seal was the same as earlier and I think shaft is close to same length so might work on yours. Use an extension to get extra length thru the hole.

Attach file:


jpg  (16.55 KB)
209_4ffadf4e2ecbd.jpg 360X329 px

Posted on: 2012/7/9 8:40
Howard
 Top  Print   


Re: 1954 ultra selector shaft seal
#5
Home away from home
Home away from home

Gary
See User information
Erik,
Lowering the tail shaft will not provide any additional clearance, it contacts the "X" crossing in the frame before it can drop down low enough to do any good.

HH,
Unfortunately the hole through the frame is slightly offset from being in direct alignment with the selector shaft thus making it difficult to insert a seal using a hammer and socket. I found that for the "in vehicle" replacement, the prybar method was quite effective and easier to control making it less likely to bugger up the seal. if the hole could be enlarged then hammering one in could be done more easily but still not a lot of room to swing a hammer.

Posted on: 2012/7/9 12:31
 Top  Print   


- The following Google Ad-Sense Advert helps fund the cost of providing this free resource -
- Logged in users will not see these. Please Join and Donate to help support the website -
Search
Photo of the Day
IMG_2605
Recent Photos
Bower Bearing Packa... (01/12/2025)
Bower Bearing Packa...
1934 Packard.jpg (01/06/2025)
1934 Packard.jpg
Rear Power Antenna ... (01/06/2025)
Rear Power Antenna ...
G186903, G162874, 4... (12/13/2024)
G186903, G162874, 4...
Recent Registry
Upcoming Events
Website Comments or Questions?? Click Here Copyright 2006-2025, PackardInfo.com All Rights Reserved