Hello and welcome to Packard Motor Car Information! If you're new here, please register for a free account.  
Login
Username:

Password:

Remember me


Lost Password?

Register now!
FAQ's
Main Menu
Recent Forum Topics
Who is Online
169 user(s) are online (124 user(s) are browsing Forums)

Members: 3
Guests: 166

DavidM, Ozstatman, BigKev, more...
Helping out...
PackardInfo is a free resource for Packard Owners that is completely supported by user donations. If you can help out, that would be great!

Donate via PayPal
Video Content
Visit PackardInfo.com YouTube Playlist

Donate via PayPal


(1) 2 »

Thermostat & retainer - can this REALLY be CORRECT??
#1
Just can't stay away

JimGnitecki
See User information
This posting is all about how a "simple" task can be anything BUT simple, and it ends with an important question which I hope the more experienced "men ( or women) who own one" can answer.

I knew there was something wrong with my old thermostat: My friend Randy had pointed out to me that IMMEDIATELY upon engine startup after we installed the new hi-performance radiator, he looked into the radiator (before the cap was put on) and saw coolant being CIRCULATED.

This of course should not have happened with a dead cold engine. The engine thermostat should have kept the coolant in the engine block until the coolant got hot enough to open the thermostat.

So, I order a new thermostat ("normal" temperature setting: 160 degrees) from Max Merrit, along with a new thermostat housing gasket, and a new "retainer". Packards require a retainer to hold the thermostat in position in the thermostat housing. Without the retainer, the thermostat will simply fdall right into the cylinder head.

I asked about how that retainer is properly installed, right here on the forum, and was told it would be"obvious".

Not so.

This "simple" thermostat replacement took me over 2 hours this morning, and it was comical I'm sure for the two donkeys who watched me do it.

The first step is to drain sufficient coolant from the system to get the level low enough to prevent a flood when you break the seal on the thermostat housing. There was a "surprise" right at this stage. I took off the radiator cap, and then unscrewed and removed the radiator drain cap. This produced a "pisser" of a stream of coolant that extended a full 20" past the front of the radiator! (I gazed at this for 1 or 2 seconds in pure envy :) ). Fortunately, I had a 24" long drain pan pre-positioned, and it took me only seconds to get the guyser flowing INTO rather than PAST the tray!

I noted with satisfaction that the coolant was still remarkably clean after a couple of hundered miles since the radiator swap, so maybe the interior of the engine is NOT all full of the dreaded "sludge" after 56 years.

After draining enough to be sure that the level of coolant was below the upper hose, I got only a few ounces up my arm closing the darn drain.

Next, I loosened the clamps on both ends of the upper radiator hose, and gently pried it off.

When I looked into the now exposed hole in the thermostat housing, I found two more surprises:

1. That hole is inexplicably internally THREADED

and

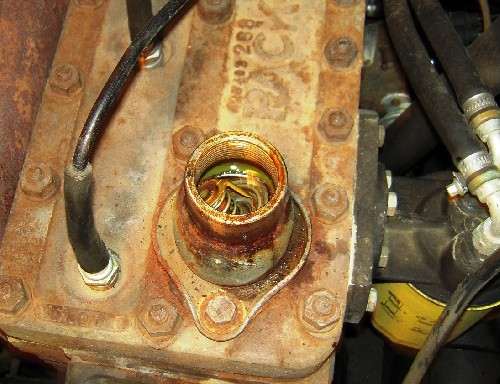
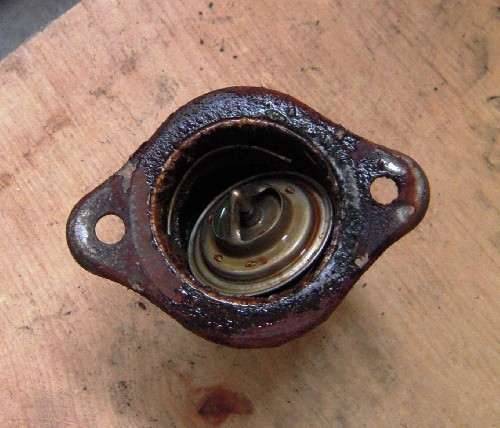
2. The old thermostat was actually there, but as you can see in the two photos of it below (taken from above when still installed, and then from below after the thermostst housing was removed), the thermostat was NOT properly secured, but was rather jammed in there at a cocked angle. With the position it was in, it would NEVER stop coolant flow through the radiator for engine warm-up, but on the other hand, it would also never allow "full flow", since it was blocking the passageway the coolant needed to take!

After I rmeoved the two thermostat housing bolts, and looked inside the thermostat, I could see yet three more surprises:

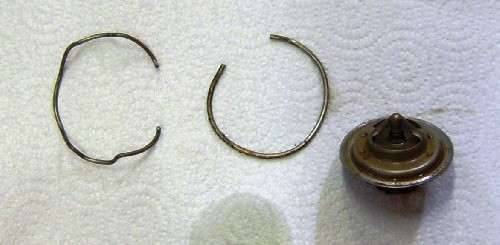
1. The retainer ring used was NOT the correct Packard retainer ring, but rather a simple circular wire ring

and

2. It had failed to hold the thermostat, and this is how the thermostat got cocked and jammed in that cocked position

and

3. The thermostat was a 190 degree thermostat, versus the 160 degree thermostat that JD at Max Merritt had told me was the correct standard one.

I cleaned the housing thoroughly, inside and out, and even repainted it bright silver using a real stove enamel spray. I figured I had now found all the surprises.

I was wrong.

When I tried putting the new thermostat in,it of course will fit from only the engine side of the housing (rad hose hole is much too small), so I KNOW I was putting it from the right end. I also know that the "ox yoke" shaped part goes on top, and the spring end faces the engine. There IS indeed a convenient ledge for the thermostat to "seat against" when placed into the housing this way.

However . . .

If you then turn the housing right side up, the thermostat of course just drops out.

This is where the magical retainer comes in. Or should.

HOW that complexly-shaped retainer is supposed to be mounted (which end up) is not at ALL "obvious", and it is also VERY far from obvious what keeps the retainer from simply sliding out of position itself over time. Take a look at the 3rd photo that shows this new funny shaped retainer on the left beside the incorrect circular one removed on the right. Would YOU know how to position it correctly??

Let's take these two problems one at a time.

For "which side up", I did the only sensible thing: I tried both ways. One way held the thermostat only very loosely, allowing it to move a bit, and I knew that couldn't be right, so I turned the ring upside down. That seemed to hold the thermostat, at least without any vibration or thermal expansion and contraction occurring.

But I have zippo confidence that the retainer would STAY in thew right position. Why? Because there is no groove or any other mechanism to seat the retainer!! Its security depends entirely upon a very SLIGHT spring pressure it exerts against that wet and slippery thermostat interior wall. I'm underimpressed with THAT.

I'm thinking now: this CAN'T really be correct can it?

CAN IT?

Or, is the silly complex retainer supposed to somehow mount in some way that holds the thermostat in some convoluted fashion, where the retainer somehow gets anchored PAST the thermostat into that ledge that the thermostat seats against. Of course, the only way to do that IF it can be done, would break "the seal" between the engine side of the thermostat and the radiator side, thus allowing leakage ALL the time. So, that does not sound right.

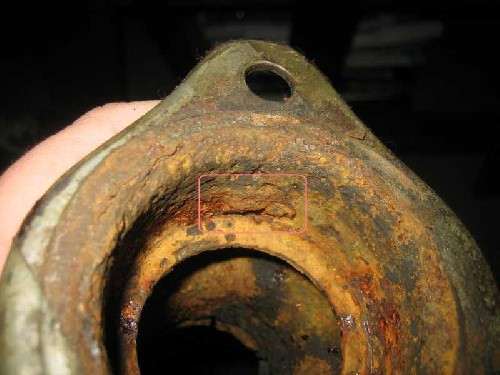
I looked hard for signs of any grooves or retaining slots. In the entire interior surface of that thermostat housing, there is only ONE recessed area, that is less than ?" x ?", and there is NO apparent way to get ANY portion or either end of the complex retaining ring into it.

So, I'm now throwing up my hands in frustration and simply asking any Packard man or woman who knows what he or she is doing:

1. "How the heck is this supposed to assemble?
And

2. If I did it wrong, do I now need to order yet again another new gasket to do the install again?

Damn it, I bought this car for its SIMPLICITY.

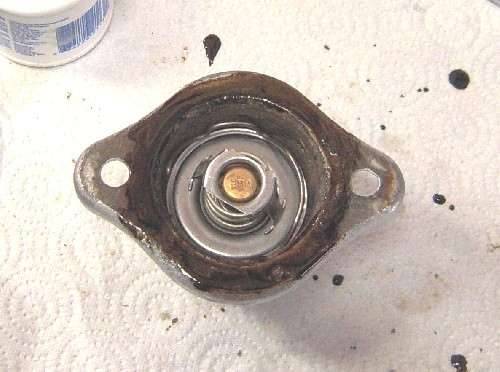
I've atatched a 4th photo that shows how I got it all to "fit", and it did road test apaprently ok, but I REALLY wonder if I have missed the proper assembly idea here.

Jim G

Attach file:


jpg  (39.10 KB)
777_48b893d939c4f.jpg 600X461 px

jpg  (31.93 KB)
777_48b893f319872.jpg 600X514 px

jpg  (65.66 KB)
777_48b89400c3866.jpg 1172X576 px

jpg  (31.38 KB)
777_48b894142107f.jpg 600X446 px

Posted on: 2008/8/29 19:26
 Top  Print   


Re: Thermostat & retainer - can this REALLY be CORRECT??
#2
Webmaster
Webmaster

BigKev
See User information
Jim,

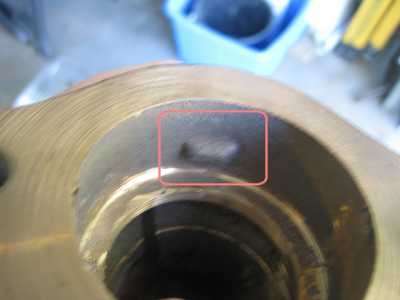
It's hard to see in your picture, but there should be little two "nubs" on inside of the thermo housing where are used to keep the retainer pressed against the thermostate.

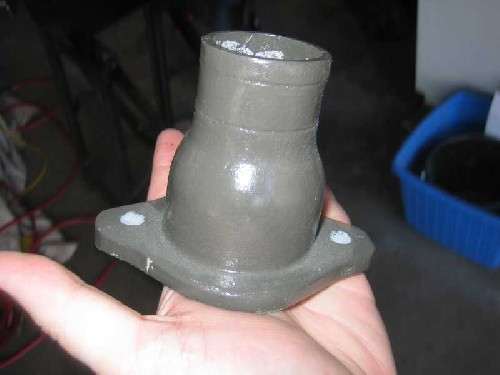
This is a picture of my thermostat housing. This is a reproduction housing made of solid brass, but here you can see the "nubs" I am talking about. The original should have something similar, but just pressed in indends in the original stamped metal housing. Hopefully they didnt rust off, or get pressed back out.

My original housing was paper thin from rust, so I had to replace it. Not sure if I still have the original laying around or not. But I will check.

Attach file:


jpg  (23.43 KB)
1_48b89a37aaa1d.jpg 800X600 px

jpg  (9.25 KB)
1_48b89a43a6e2e.jpg 400X300 px

Posted on: 2008/8/29 19:54
-BigKev


1954 Packard Clipper Deluxe Touring Sedan -> Registry | Project Blog

1937 Packard 115-C Convertible Coupe -> Registry | Project Blog
 Top  Print   


Re: Thermostat & retainer - can this REALLY be CORRECT??
#3
Just can't stay away

JimGnitecki
See User information
BigKev: My themrostat housing:

(a) has NO nubs

(b) is entirely different in shape than yours, AND the base on mine is formed stamped metal,no cast like on yours.

How can this be????

My Packard is a 1952 200 Deluxe with 288 cubic inch 135 hp engine.

Jim G

Posted on: 2008/8/29 20:15
 Top  Print   


Re: Thermostat & retainer - can this REALLY be CORRECT??
#4
Webmaster
Webmaster

BigKev
See User information
Jim,

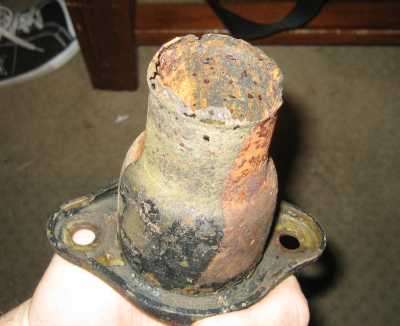
My housing is a reproduction one that is made of solid brass so it wont rust like the stamped sheet metal ones. It is made by one of the local PI chapters. But that aside, the nubs are the same. I went out to the garage and found my original one. You can still see the nubs on it. They are inline with the housing mounting ears. Any 288/327 from 1951-1954 will use this same housing. My 327 actually has a 288 head on it for a bump in compression.

Attach file:


jpg  (13.55 KB)
1_48b8a2529dda3.jpg 400X326 px

jpg  (41.81 KB)
1_48b8a25cb25b7.jpg 800X600 px

Posted on: 2008/8/29 20:29
-BigKev


1954 Packard Clipper Deluxe Touring Sedan -> Registry | Project Blog

1937 Packard 115-C Convertible Coupe -> Registry | Project Blog
 Top  Print   


Re: Thermostat & retainer - can this REALLY be CORRECT??
#5
Just can't stay away

JimGnitecki
See User information
My nubs must have worn or rusted off over the years, I guess.

1. Where do I get a new reproduction or NOS thermostat housing?

2. I assume I will again need a new gasket, even if I do the replacement of the housing within a few days of installing today's new gasket?

3. I suppose that now there is a good possiblity that the darn thermostat will again fall out of position in the meantime. Any chance that the retainer ring could actually fall into the engine, or is that impossible? Should I disassemble again, remove the thermostat and retainer entirely, and run no thermostat until the new housing and gasket can be obtained? Its 95 to 100 degrees here right now virtually every day, so the thermostst should be wide open anyway vritually all the time except on startups.


Jim G

Posted on: 2008/8/29 21:17
 Top  Print   


Re: Thermostat & retainer - can this REALLY be CORRECT??
#6
Webmaster
Webmaster

BigKev
See User information
I would remove the retainer and thermo and put it aside until you can get a replacement housing. You dont want the retainer getting lost down in the head somewhere. Kanter, Max Merrit, should have originals. Last time I looked in Kanters catalog, they also had bronze (I was mistaken about it being brass) reproduction housings. I think there's is $120, expensive but they will probably last longer than either of us. I think I paid $89 for mine from the local PI chapter. I belive it was the San Diego region, but it may have been the Southern Calif region. I cant remember which one it was.

Now, if the rest of the housing is in good shape, and the metal is not too thin, then perhaps you can wire brush the metal inside where the nubs are supposed to be until it's shinney and clean, and lay a couple small beads with a MIG welder to recreate the nubs. Just enough on each side to give the retainer somewhere to rest. You can see about what they need to look like from first set of pics. You got nothing to loose. If it doesnt work out, then you will need another housing anyway.

As far as the gasket goes, as long as you didnt glue it on, you should be able to reuse it. Remove the housing bolts and tap the housing sideways to break it loose, rather than pulling up on it. I just give those kind of paper gasket a super thin (paper thin) coating of gasket sealer. So you should be able to reuse it as long as you didnt use a gasket glue, or and didnt go crazy with the silicon or sealer.

Posted on: 2008/8/29 22:16
-BigKev


1954 Packard Clipper Deluxe Touring Sedan -> Registry | Project Blog

1937 Packard 115-C Convertible Coupe -> Registry | Project Blog
 Top  Print   


Re: Thermostat & retainer - can this REALLY be CORRECT??
#7
Forum Ambassador
Forum Ambassador

HH56
See User information
I believe this is one Kev refers to.


packards-today.com/catalog.php?CID=7&PID=39

Posted on: 2008/8/29 22:25
 Top  Print   


Re: Thermostat & retainer - can this REALLY be CORRECT??
#8
Webmaster
Webmaster

BigKev
See User information
Howard, thanks for that. Cheaper than I remember, and that is exactly where I bought it from. At the Packard swapmeet all those chapter booths start to look alike!


Posted on: 2008/8/29 22:41
-BigKev


1954 Packard Clipper Deluxe Touring Sedan -> Registry | Project Blog

1937 Packard 115-C Convertible Coupe -> Registry | Project Blog
 Top  Print   


Re: Thermostat & retainer - can this REALLY be CORRECT??
#9
Just can't stay away

JimGnitecki
See User information
Thank you both, BUT that $60 price was last refreshed, accoridng to the little note on website maintenance, in 2002! I suspect it costs more right now.

I have sent an email to the folks there, as there are no provisions for telephone contact at all. I've asked them how I can buy both the cast housing and the matching retainer (advertised on the same page, as I strongly suspect that retainer is DIFFERENT than the normal Packard one, as the part number is unique.

Jim G

Posted on: 2008/8/30 11:27
 Top  Print   


Re: Thermostat & retainer - can this REALLY be CORRECT??
#10
Just popping in
Just popping in

Steven3472
See User information
where did you get the reproduction thermostat housing as I can not salvage mine anymore and how much was it thanks.


SGT Steven deGroot
88M FLNG
407-757-6627

Posted on: 2018/5/21 21:23
 Top  Print   


(1) 2 »


- The following Google Ad-Sense Advert helps fund the cost of providing this free resource -
- Logged in users will not see these. Please Join and Donate to help support the website -
Search
Photo of the Day
1934 Packard touring car, nin…
Recent Photos
1934 Packard.jpg (01/06/2025)
1934 Packard.jpg
Rear Power Antenna ... (01/06/2025)
Rear Power Antenna ...
G186903, G162874, 4... (12/13/2024)
G186903, G162874, 4...
1937 Horn Assembly (12/13/2024)
1937 Horn Assembly
Recent Registry
Upcoming Events
Website Comments or Questions?? Click Here Copyright 2006-2024, PackardInfo.com All Rights Reserved