|
Re: Rebuilding the Carter WGD
|
||||
|---|---|---|---|---|
|
Just can't stay away
|
Thank you gentlemen. Retorqueing the head is indeed a good idea. A soon as the temperatures rise to a workable level I'm going to tackle all these jobs. I will surely be back and report on the results.
Posted on: 2013/2/24 4:58
|
|||
|
All the best from Holland!
Hans Clipper Deluxe Touring sedan 1954 |
||||
|
||||
|
Re: Rebuilding the Carter WGD
|
||||
|---|---|---|---|---|
|
Just can't stay away
|
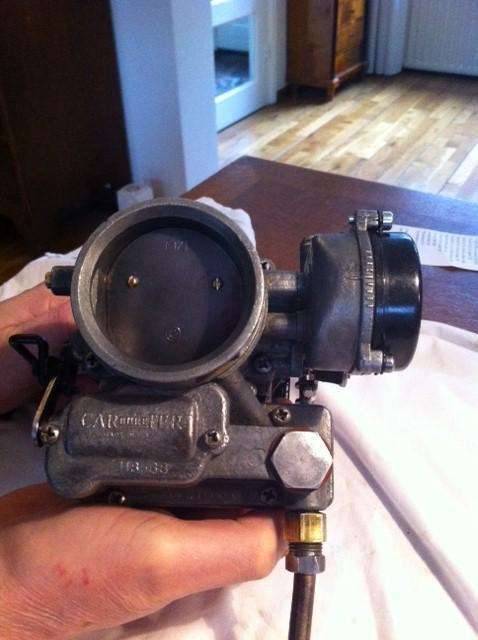
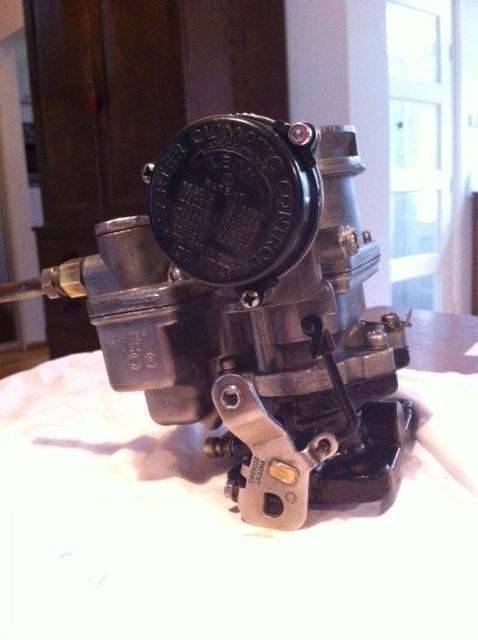
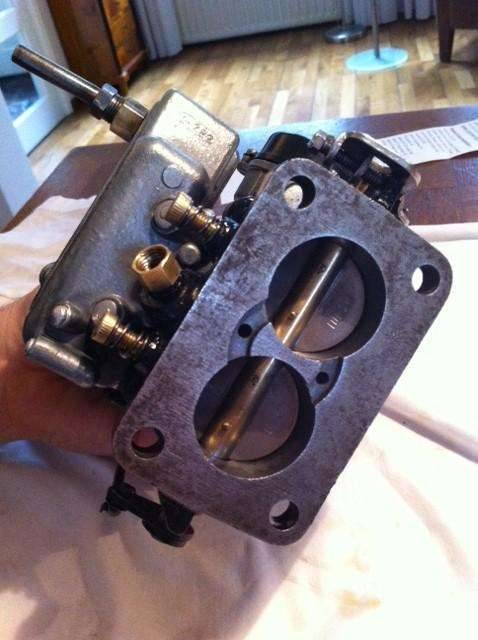
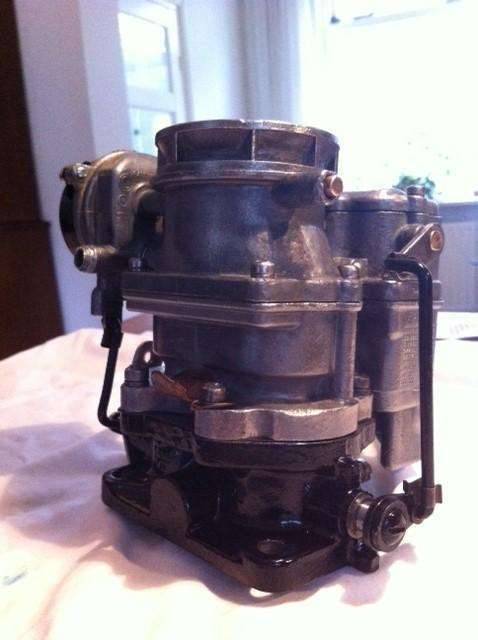
I promised you to take some pictures after the rebuild en the adjustments. Here they are. What do you think?
There is still one concern about the connection on the choke housing for the heat tube. It is rather damaged and maybe not air tight. A solution could be a pice of silicone tubing between the heat pipe and the flange on the choke housing. Attach file:  (33.55 KB) (33.55 KB)  (27.54 KB) (27.54 KB)  (38.46 KB) (38.46 KB)  (30.39 KB) (30.39 KB)
Posted on: 2013/3/2 13:19
|
|||
|
All the best from Holland!
Hans Clipper Deluxe Touring sedan 1954 |
||||
|
||||
|
Re: Rebuilding the Carter WGD
|
||||
|---|---|---|---|---|
|
Webmaster
|
Valve layout looking at the manifold side of the motor:
Posted on: 2013/3/2 15:27
|
|||
|
-BigKev
1954 Packard Clipper Deluxe Touring Sedan -> Registry | Project Blog 1937 Packard 115-C Convertible Coupe -> Registry | Project Blog |
||||
|
||||
|
Re: Rebuilding the Carter WGD
|
||||
|---|---|---|---|---|
|
Home away from home
|
If your talking about the pipe coming from the manifold to the choke body. I don't think it needs to be air tight, it just directs heated air up into the choke body to heat the spring to control the opening and closing of the choke.
Wes
Posted on: 2013/3/2 16:03
|
|||
|
||||
|
Re: Rebuilding the Carter WGD
|
||||
|---|---|---|---|---|
|
Just can't stay away
|
Kev, thanks for the neat diagram with the valve layout. I will make a note of it and keep it with the manual.
It will definitely come in handy when adjusting the tappets, together with the one-rev tip.
Posted on: 2013/3/3 6:09
|
|||
|
All the best from Holland!
Hans Clipper Deluxe Touring sedan 1954 |
||||
|
||||
|
Re: Rebuilding the Carter WGD
|
||||
|---|---|---|---|---|
|
Just can't stay away
|
Wesley, thanks for the advice. On installing I will make sure that the line from the manifold is not blocked.
My plan is to reinstall the carburetor, start up the engine and study the reactions of the choke when warming up, to make sure everything works properly. I sure hope to see the choke valve opening...
Posted on: 2013/3/3 6:13
|
|||
|
All the best from Holland!
Hans Clipper Deluxe Touring sedan 1954 |
||||
|
||||
|
Re: Rebuilding the Carter WGD
|
||||
|---|---|---|---|---|
|
Just can't stay away
|
Hi guys,
The Clipper is back on the road, finally. Because I also had some issues with the ignition I described what I did to fix them in an separate thread 'Starting problems'. The main points are that I found out that the starter was in bad need of service and drew too much current. This upset the electronic ignition and resulted in no spark when starting, basically only one when letting the key go. The ignition generally proved to be an unreliable player, so I decided to reverse to points. All in all I installed points, copper core spark plug cables (no resistance) and serviced the starter myself (cleaning, undercutting and lubricating). This did the trick and was very budget friendly with a fine result: just brushing the ignition key is now enough for the car to fire up: exactly what I wanted. Now back to the WGD, which I rebuilt including new throttle shaft bearing bushes. Since my last report here I found out that the the carburator was leaking from one of the lead plugs just above the mixture screws. Nothing dramatic but too much for my taste and of course directly above the manifold. When I went over the parts that came with the car I found another carburator body, castingwise definitely in better shape than the one on the car. So what I did was swap bodies. No more leaks and better looks! I have to humbly admit (especially to owen and Ross) that my doubts about the automatic choke were completely out of order, it works like a dream. Responses are exactly as they should be. The choke valve works fine and it is a joy to see it opening up and closing again when the engine cools down. The heat from the manifold stove reaches the choke housing with no problem at all. Rpm's at idle rise when starting from cold and return to normal when gradualyy warming up. Runnning at idle is very steady, thanks to the new shaft bushings no more air leaks which spoil the mixture. Maybe it is wishful thinking but I think the engine feels and sounds better and there is more and smooth power under accelaration. At he moment I am not considering adjusting the valves as it seems totally unnecessary. So this is the good news form the Netherlands: a very happy Clipper owner! Once again thanks for all your advice and comments.
Posted on: 2013/7/13 3:48
|
|||
|
All the best from Holland!
Hans Clipper Deluxe Touring sedan 1954 |
||||
|
||||
|
Re: Rebuilding the Carter WGD
|
||||
|---|---|---|---|---|
|
Just can't stay away
|
Well, maybe just one small last question which suddenly popped to my mind.
The heat control (hot spot) valve in the manifold seems to miss the thermostatic coil spring. In the past the valve has been fixed to open position. IMO this does not affect starting or warming up in a way that I can detect it. Should I still replace the missing spring and if so are they available? My friend's Willys MB jeep (1942) has a similar heat control valve layout with a similar thermostatic spring. Are these springs generic, in other words would I be able to use the Willy's coil spring?.
Posted on: 2013/7/13 3:59
|
|||
|
All the best from Holland!
Hans Clipper Deluxe Touring sedan 1954 |
||||
|
||||
|
Re: Rebuilding the Carter WGD
|
||||
|---|---|---|---|---|
|
Forum Ambassador

|
If I had occasion to use the car frequently during cold weather I'd be inclined to restore the function of the heat manifold riser valve though other than the engine being a bit balky during the first few minutes of cold weather warm-ups, there really isn't anything that is sacrificed if you just keep the valve fully open. I have no knowledge if the springs are generic but I rather doubt it - but it's simple enough to evaluate another spring; if the valve is closed when cold and fully opens when warm it should be fine. Obviously the condition you want to avoid is having the valve any less than fully open with a warm engine.
Posted on: 2013/7/13 8:57
|
|||
|
||||


