|
Re: 1947 clipper electric tricks
|
||||
|---|---|---|---|---|
|
Home away from home

|
Are you referring to the directional arrows?-if equipped with the turn signals you should have the directional arrows which I think work through the flasher circuit
Posted on: 2014/7/30 8:40
|
|||
|
||||
|
Re: 1947 clipper electric tricks
|
||||
|---|---|---|---|---|
|
Forum Ambassador
|
I'm thinking the separate pointer light was eliminated for post war cars and the schematic was just a relabeled prewar item or perhaps it was an early planned feature that showed up on schematics but never made it into production.
My 2106 only has space for 5 bulbs so no place for a pointer light. There is what appears to be a kilometer speedo on ebay labeled as being from a 46 and from what I can see looks like it only has 5 holes as well.
Posted on: 2014/7/30 9:03
|
|||
|
Howard
|
||||
|
||||
|
Re: 1947 clipper electric tricks
|
||||
|---|---|---|---|---|
|
Just can't stay away

|
Thank you for your replies.
Howard, your reply set me on the right track: According to the parts book, there is no pointer lamp (and no light bulb) on a 2106. Another mystery unravelled.  Unriddled Regards, Clemens
Posted on: 2014/8/5 15:29
|
|||
|
Ok, well for starters I'll have
Who, What, When and Where, and then Whither, Whether, Whence and Wherefore to follow and one big sideorder of Why. ... and the parts list please 
|
||||
|
||||
|
Re: 1947 clipper electric tricks
|
||||
|---|---|---|---|---|
|
Just can't stay away

|
Next gremlin is showing up:
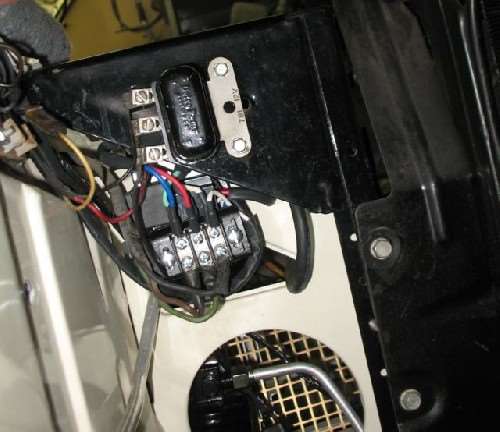
I had to change the headlights, indicators and parking lights to European standards, and since the front harness was not genuine anyway and aggravated me with grounding problems I rebuild it and installed everything (I do have to apologize for the modern sleeving though):   While checking lights, indicators and everything the headlights started to come off and on again in a slow pattern. I think it might be the bimetal spring of the light switch. I had the light switch out a few days ago to fix a loose contact and know there is a bimetal spring (presumably against overload) and an adjusting screw.  Are there any hints in the manual (couldn't find any) how to fix that? Another option would be a fused bypass with a 20amps fuse. Blinking Regards, Clemens
Posted on: 2014/8/10 4:52
|
|||
|
Ok, well for starters I'll have
Who, What, When and Where, and then Whither, Whether, Whence and Wherefore to follow and one big sideorder of Why. ... and the parts list please 
|
||||
|
||||
|
Re: 1947 clipper electric tricks
|
||||
|---|---|---|---|---|
|
Forum Ambassador
|
There is no adjustment procedure I can remember seeing. I didn't find specs for the 47 but 48-54 6v cars all list 30 amp protection for the head, tail, and parking lights. Since the light systems are almost identical having the same load and the added dash lights feeding off that breaker strip, that should be a good number for the 47.
Usually the cycling is caused by a shorted wire somewhere in the circuit so If you have verified no problems with the rewire, it is possible the breaker has lost capacity or is just too low for the added load in changing to your standards. If there was a known 30 amp load you might be able to adjust the screw to something approaching correct but that would be one of those "maybe it could be done and work reliably" things. If you go with an external protection, I would use a 30 amp type I automatic reset circuit breaker rather than a fuse. That is what later cars with the breaker mounted on the switch used. I don't know your total load but one other thing to consider is the age of the switches. If the load is higher than the old system you might want to consider adding a couple of relays to work the headlights. Several of us have done that even when using the original bulbs. The lowered stress taking the high current out of the switch plus the larger wire and shortened path supplying the voltage directly to relays gives a bit brighter lights.
Posted on: 2014/8/10 8:51
|
|||
|
Howard
|
||||
|
||||
|
Re: 1947 clipper electric tricks
|
||||
|---|---|---|---|---|
|
Home away from home
|
That's a big electrical load for those old switches, like Howard says you should probably install a headlight relay to handle the current and save your switch. Here is a good article on that:madelectrical.com/electricaltech/brighter-headlights.shtml
I don't think you should feel bad about modernizing wiring when it's a safety issue, Packard would have surely fixed it had they lasted.
Posted on: 2014/8/10 11:24
|
|||
|
1952 Model 200 Deluxe Touring Sedan
HA's 52 Grey Ghost "The problem with quotes on the internet is you never know if they're true" - Abraham Lincoln |
||||
|
||||
|
Re: 1947 clipper electric tricks
|
||||
|---|---|---|---|---|
|
Forum Ambassador
|
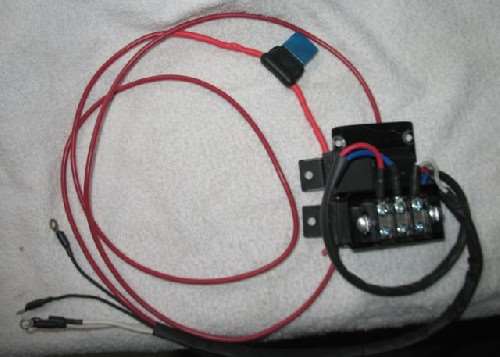
As mentioned, several of us have done the relays on the V8s. Randy hid his under the radiator splasher. I placed mine on a removable module and mounted them near the battery tray. I wanted a place that could reach original headlight wiring with new terminal strip and relay signals could be obtained from original terminal strip. That space chosen was close to both yet not really visible. I could have taken the power from horn relay but decided to go all the way back to battery solenoid connection for a separate protected feed.
Am thinking the same approach for the 47. Haven't decided whether to place the module high and visible near the terminal strip or hide it under the battery tray next to where I installed a cable operated main battery disconnect switch. Will probably be near strip because the new wires to the headlight buckets were the original length. Those are probably not long enough to neatly go down under the tray. Best solution might be the module under and a separate strip just for the headlights on top. That way the original strip still does the parking lights and relay signals with the new strip for the light feeds.
Posted on: 2014/8/10 13:09
|
|||
|
Howard
|
||||
|
||||
|
Re: 1947 clipper electric tricks
|
||||
|---|---|---|---|---|
|
Just can't stay away

|
Hello and thanks again for the wealth of information.
Load is not bigger than it was before. I avoided the common 6V Halogen bulbs with 60/55 Watts and opted for bilux bulbs with 45/40Watts (headlight lenses have a nicer pattern too). Parking lights have to be illuminated all the time, they add 6 Watts, that is 1 amp. First step will be to measure how many amps the light circuit needs. (If there is still a shorted wire I will continue to replace wires ...)  Second step will be to test the breaker. With both sealed beams still working I can set up a nice testing station up to 30 amps and find out when the breaker cuts off. I think I managed to let the breaker cut off with only parking lights working but I couldn't repeat it. If everything is clear and checked through, then I will install some relays. No need to cover up faulty wiring with relays.  I can put them just behind the terminal strip, this way I don't have to change the original wiring setup, just add some wires for power. If I mount the relays really high I can hide them almost completely under the beading of the wing. Circuited Regards, Clemens
Posted on: 2014/8/10 15:27
|
|||
|
Ok, well for starters I'll have
Who, What, When and Where, and then Whither, Whether, Whence and Wherefore to follow and one big sideorder of Why. ... and the parts list please 
|
||||
|
||||
|
Re: 1947 clipper electric tricks
|
||||
|---|---|---|---|---|
|
Just can't stay away

|
Some news on contact breaker adjustment.
First I measured the amps between light switch and feed to the beam control switch. Not more than I expected. I took the switch out again and connected it to one of the headlights. After approximately 60 seconds, the light went out and the breaker point started to throw out tiny sparks. Battery delivered 6.2 Volts, amperage at high beam was 6.5A. To screw in the adjustment screw I had to heat up the soldering. One turn and I checked again: Now the contact breaker took the load of one headlight. Then I connected the second headlight and after some 30 seconds the contact breaker started to interrupt the connection again.  After several attempts and turning in the adjustment screw roughly 4 turns I reached a level where the contact breakers could bear a load of over 18 A (two high beams and one low beam) over a long time. While testing the different set ups, I measured temperature of the breaker with a pyrometer: Highest temperatures I could measure were at the breaker next to the points: With 6.5 A the breaker reached 120?F with 13 A the breaker reached 185?F with 18.3 A the breaker reached 240?F Taking of the load (i.e. reducing form 18.3 to 13 A) the breaker slowly cooled down to the temperature measured before with the lesser load and stayed there. I put the light switch back in and: Lights are working fine. Now I will put in the relays to get rid of that load and temperatures on that switch and contact breaker and another electric trouble should be solved ... Note: All my equipment does not meet any scientific standard, it is just what I accumulated over the years. My equipment is working fine and is very helpful with my car projects.  Adjusted Regards, Clemens
Posted on: 2014/8/18 2:05
|
|||
|
Ok, well for starters I'll have
Who, What, When and Where, and then Whither, Whether, Whence and Wherefore to follow and one big sideorder of Why. ... and the parts list please 
|
||||
|
||||

 (29.74 KB)


