|
Re: 21-23 series rubber sill plates.
|
||||
|---|---|---|---|---|
|
Forum Ambassador
|
Quote:
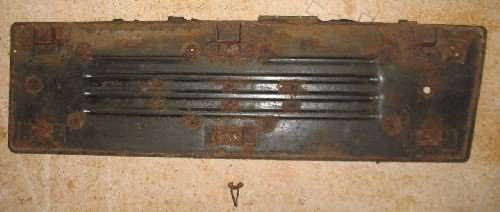
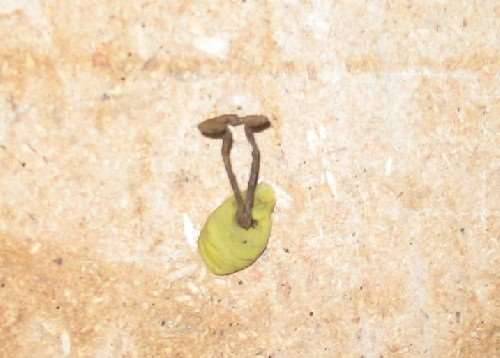
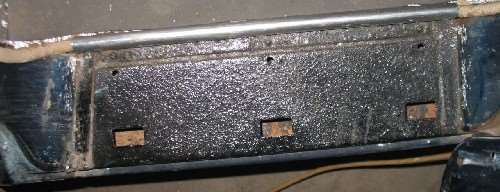
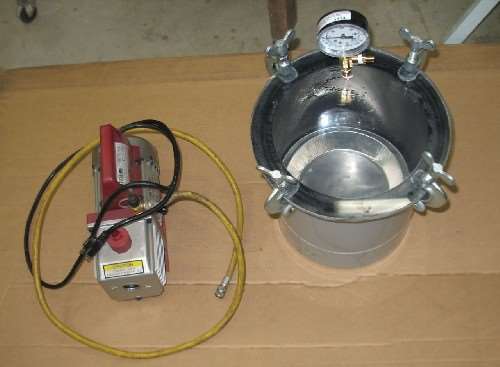
I am interested in the size of the metal plate and look of the clips. I guess posting the information would be of help even though my 1949 Packard is a Standard 4 door. Here is one of the rear plates and one of the removable clips for the hole or inside sill side for a 21st series. Should be the same for all Clipper based bodies 20-22 and probably 23rd series. The rubber is molded to the stamped plate which is under almost the entire rubber mat. Only a small amount of thin rubber material extends past the plate on the sides and inside edges. The outside edge is just a thin lip. The plate mounts in slots and holes on the body. To remove the assy, start at the stainless molding and pry the inner edge up to remove the clips from the holes. Once the clips are out and clear, the entire plate is slid toward the outside about half an inch to remove the tongued pieces on the metal plate from the slots. I am using products from Smooth-On.smooth-on.com To make the mold I used the OOMOO 30 silicon rubber. It is easy to mix and has a decent open pot time. The first sill was made with Vytaflex 40 urethane rubber. It also has a good mix ratio, decent pot time and cured with no bubbles but only comes in a max hardness of shoreA 60. The consensus is that the sill rubber was originally something around a shoreA 80 so that is what I am trying to do now. The first product tried was Econ 80. Good mix ratio and decent pot time of 13 minutes but cured full of bubbles. That is where the project is for now. Waiting for the items to convert my pressure pot to a vacuum operation to arrive and will try the Econ 80 again before moving on with a different material. At the moment am leaning toward casting a depression in the rubber to mount the plate using adhesive or velcro rather than trying to mold it in.
Posted on: 2014/12/9 11:15
|
|||
|
Howard
|
||||
|
||||
|
Re: 21-23 series rubber sill plates.
|
||||
|---|---|---|---|---|
|
Home away from home
|
outer clips. Go into depressed slots in backing steel and ears are bent down flat. These "wedge" in the rectangular holes and the inner clips snap into the round holes.
ps: HH is more correct, I should've said "compound".
Posted on: 2014/12/9 19:22
|
|||
|
||||
|
Re: 21-23 series rubber sill plates.
|
||||
|---|---|---|---|---|
|
Forum Ambassador
|
Made the new lid for the pressure pot and used my AC vacuum pump as the source. It quickly pulled a nice 29" vacuum in the pot and had plenty of working time on the material.
Am pleased to report the vacuum degassing of the Econ 80 urethane rubber was a success and reasonably happy with how the piece turned out. Not a bubble in sight. Also not sure if it was the degassing or not using any release agent in the silicone mold was the reason but this time the rubber cured to a dull finish and not the typical urethane shiny finish the other test pieces had. I think it looks very much like a vulcanized rubber part. Now on to the other pieces. I learned on this one to get all the glue off the plaster model where I joined the 47 name to the 48 body or it casts thru as shiny -- even under the shellac sealer. You can see it just above the name and not sure if there is a fix or if it will wear or dull down.. Have the plaster casting for the other rear piece sealed and ready for pouring the silicone mold today. Once all the other pieces are done and if they look better in that area I will probably go back and do this one over.
Posted on: 2014/12/15 11:40
|
|||
|
Howard
|
||||
|
||||
|
Re: 21-23 series rubber sill plates.
|
||||
|---|---|---|---|---|
|
Home away from home
|
Well done - looks very good.
Posted on: 2014/12/15 15:47
|
|||
|
||||
|
Re: 21-23 series rubber sill plates.
|
||||
|---|---|---|---|---|
|
Home away from home
|
Howard sure is impressive. Gets my vote.
Posted on: 2014/12/15 16:55
|
|||
|
||||
|
Re: 21-23 series rubber sill plates.
|
||||
|---|---|---|---|---|
|
Home away from home

|
Wow...that's really cool!
Posted on: 2014/12/15 19:11
|
|||
|
[url=h
|
||||
|
||||
|
Re: 21-23 series rubber sill plates.
|
||||
|---|---|---|---|---|
|
Forum Ambassador
|
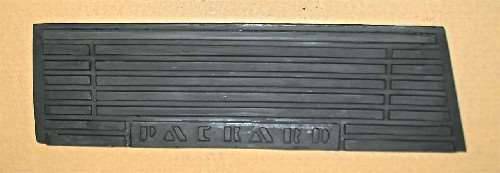
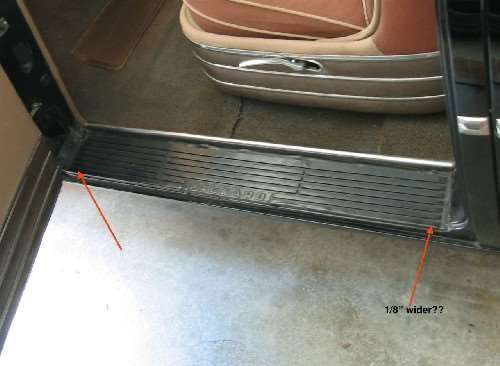
When working on the front door piece and setting up to narrow the wide 22nd series rib in the plaster cast and add the extra rib the 47 needs at the inside edge I was having trouble because it kept requiring an offset. The reason is it appears on this old 22nd series set I'm using for a pattern that the outermost rib on the front doors is 1/8" wider at the center pillar end than it is at the hinge end causing the ribs to be a tiny bit out of parallel. Could someone confirm that is the case or am I seeing a difference because my old pieces have just deteriorated that much.
I think I can see a difference on this 23rd piece posted earlier in the thread but looking at the 47 photos also posted it is hard to see if there is a difference. Unfortunately my 47 pieces are broken and missing the outermost rib on both sides so can't tell what the width is supposed to be. Would appreciate if someone would also look at their 47 and see if it changes width. I am committed to what I have made so far and if 47 is the same instead of tapering I won't change it now. Question is with a width difference is it so apparent as to need another mold or is it subtle enough that it won't be noticed if I use one mold for both sides. The test piece I made fits nicely in the opening on either side and if I didn't now believe there is a taper would never have noticed it being different. If there is a width change then to do it right requires another mold.
Posted on: 2015/1/2 20:07
|
|||
|
Howard
|
||||
|
||||
|
Re: 21-23 series rubber sill plates.
|
||||
|---|---|---|---|---|
|
Home away from home
|
Measure the ends of the rocker panel/door jam from the SS trim to the outer edge and see if steel is parallel or tapered. The mat edge should follow the panel edge and fit tight to the trim piece. There's some float in the clips which you won't have with velcro but can adjust fit to even out reveal.
On my 23rd series 2 dr drawing ribs are parallel but the rubber edge is tapered as is the steel and is 1/4" wider on one end. One end is cut on taper, other is straight. These mats are a lot longer, ~45", so 1/8" might be about right for 4 dr.
Posted on: 2015/1/4 20:55
|
|||
|
||||
|
Re: 21-23 series rubber sill plates.
|
||||
|---|---|---|---|---|
|
Just can't stay away

|
Hello Howard,
I just took measurements on my 1947 (2106) sill plates and the outermost rib is 9 -10 mm (0.375'') straight through from front to aft on both sides. All the inner ribs are of same width. Can't see the rib widening as a sensible design by packard since the human eye discovers such an irregularity pretty easily. I'll try to make a picture of it tomorrow (way to dark in the barn right now). Silly  Regards, Regards,Clemens
Posted on: 2015/1/17 16:28
|
|||
|
Ok, well for starters I'll have
Who, What, When and Where, and then Whither, Whether, Whence and Wherefore to follow and one big sideorder of Why. ... and the parts list please 
|
||||
|
||||

 (62.27 KB)