|
Re: Howard's 47 Custom project
|
||||
|---|---|---|---|---|
|
Forum Ambassador

|
that is a major improvement. who cares what it looks like with the flash. People will see it in real light and it'll look great!
Posted on: 2016/9/12 16:09
|
|||
|
1937 Packard 138-CD Deluxe Touring Limousine
Maroon/Black 1090-1021 [url=https://packardinfo.com/xoops/html/modules/registry/View.php?ID=232]1955 Packard |
||||
|
||||
|
Re: Howard's 47 Custom project
|
||||
|---|---|---|---|---|
|
Home away from home

|
Looks great to me!
Posted on: 2016/9/12 18:44
|
|||
|
[url=h
|
||||
|
||||
|
Re: Howard's 47 Custom project
|
||||
|---|---|---|---|---|
|
Forum Ambassador
|
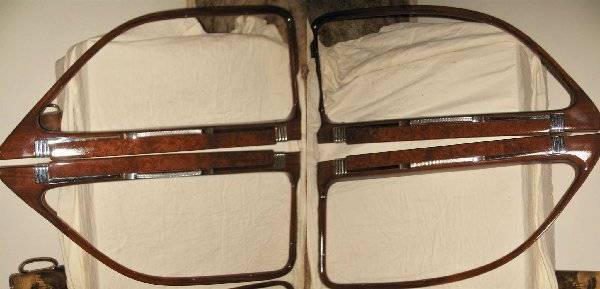
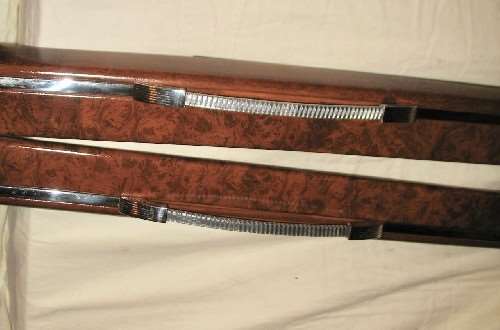
The garnish moldings had too much a curve for the vinyl material Cli55er used on his dash so I had to do them with the GrainIt method. Didn't turn out horrible although it does help that I can't see past the end of my nose. I will give anyone else that looks at them a blindfold first.
A lack of talent and experience made the inner curves at the corners a challenge for the size rollers I had. Screwed up the first one a few times before getting wise -- or maybe it was frustrated. Cast smaller rollers that would fit and move around the corners better using a modified mini paint roller for the handle and PVC pipe for the molds. Shore 00-10 and 00-20 super soft silicone was the material. The door pulls were redone using 3/32 ID-5/32 OD clear Tygon tubing. Wrapping tightly, that tubing flattened out to be virtually identical to the size of the original solid plastic stuff. Made sure to reverse the winding direction so the wrap leans toward the front on each side. Not sure I like the clear and think amber would look better against the wood tones. Since clear was what the consensus says it was originally guess I will learn to like it.
Posted on: 2016/12/28 18:01
|
|||
|
Howard
|
||||
|
||||
|
Re: Howard's 47 Custom project
|
||||
|---|---|---|---|---|
|
Home away from home
|
Looks awesome, Howard. I wish I hadn't been in such a toot to get my windows in. I would have waited and sanded the urethane and given it another coat. I may still do it to the pieces I can remove, but not to the dash.
And yes, I wish I'd invested in a small silicone applicator to get around the windshield moulding and parts of the dash. Cool way to make your own.
Posted on: 2016/12/28 18:46
|
|||
|
||||
|
Re: Howard's 47 Custom project
|
||||
|---|---|---|---|---|
|
Forum Ambassador

|
doing these moldings in that vinyl would have been a real challenge. getting it to where there was no seam would have been the big problem.
what you did looks awesome! sorry the vinyl didn't work out.
Posted on: 2016/12/28 19:51
|
|||
|
1937 Packard 138-CD Deluxe Touring Limousine
Maroon/Black 1090-1021 [url=https://packardinfo.com/xoops/html/modules/registry/View.php?ID=232]1955 Packard |
||||
|
||||
|
Re: Howard's 47 Custom project
|
||||
|---|---|---|---|---|
|
Home away from home

|
Looks very nice to me.
Posted on: 2016/12/29 9:34
|
|||
|
||||
|
Re: Howard's 47 Custom project
|
||||
|---|---|---|---|---|
|
Home away from home
|
Great job Howard looks good. Too bad I didng see this sooner I am just getting to wrap a 49. I have three 49 complete interiors I'm wrapping. I'll share the success or the disaster as it unfolds
Posted on: 2016/12/29 11:11
|
|||
|
[url=https://packardinfo.com/xoops/html/modules/
|
||||
|
||||
|
Re: Howard's 47 Custom project
|
||||
|---|---|---|---|---|
|
Home away from home

|
Great job! Looks fantastic!
Posted on: 2016/12/29 19:25
|
|||
|
[url=h
|
||||
|
||||
|
Re: Howard's 47 Custom project
|
||||
|---|---|---|---|---|
|
Forum Ambassador
|
Not much to report. Haven't been in the mood for doing physical labor so have been rethinking the controls for the AC.
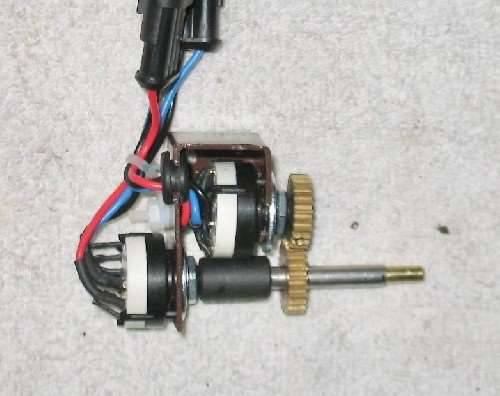
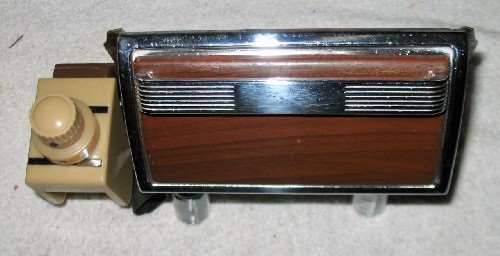
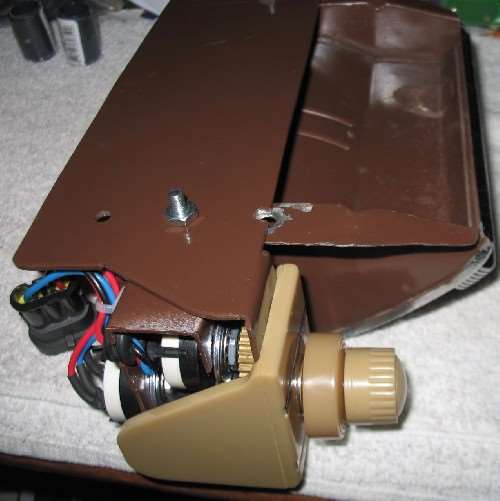
Had originally made new Clipper style pull knobs to put AC on/off and the vent control in the dash. Temp control was under. Due to the limited spaces in the Clipper dash, that required a new shared heater/defroster control in the one remaining space. Have decided that may not have been one of my better ideas. Since the vent and temp controls will in all probability not be moved or accessed much decided they could both go under the dash along with all the other switches and knobs that are present. The dash spaces could revert back to factory original layout with separate heater and defroster switches and just the COOLING knob for AC on/off staying in the dash. Rather than having two separate switch locations, decided to make a dual switch arrangement and place it to the drivers side of the ashtray. Visible and sort of factory looking but still somewhat out of the way. This is what I came up with for now --. Current knobs and housing are a combo of repro prewar items and what I had on hand. Not crazy about the large knob sizes so they may not be permanent if I find something smaller that better matches the style of the other knobs. Unless I try my hand at making them myself, finding something in the Packard beige will be the hard part unless the people that bought out Yesterday's Radio get into production. With the revised switch arrangement have almost decided to use a small 4 amp 6 to 12v motor rated voltage converter placed behind the ashtray to provide the 12v for the solenoid valves controlling temp and vent functions. If I go that way will think about reverting the rest of the AC back to 6v and getting rid of the dual battery setup. Here is the latest revision and like always, subject to change on a whim as the mood strikes. There will be a cover for the side once I mount it permanently.
Posted on: 2017/1/10 19:20
|
|||
|
Howard
|
||||
|
||||

 (124.74 KB)