|
Re: A Tale of Two Patricians
|
||||
|---|---|---|---|---|
|
Home away from home
|
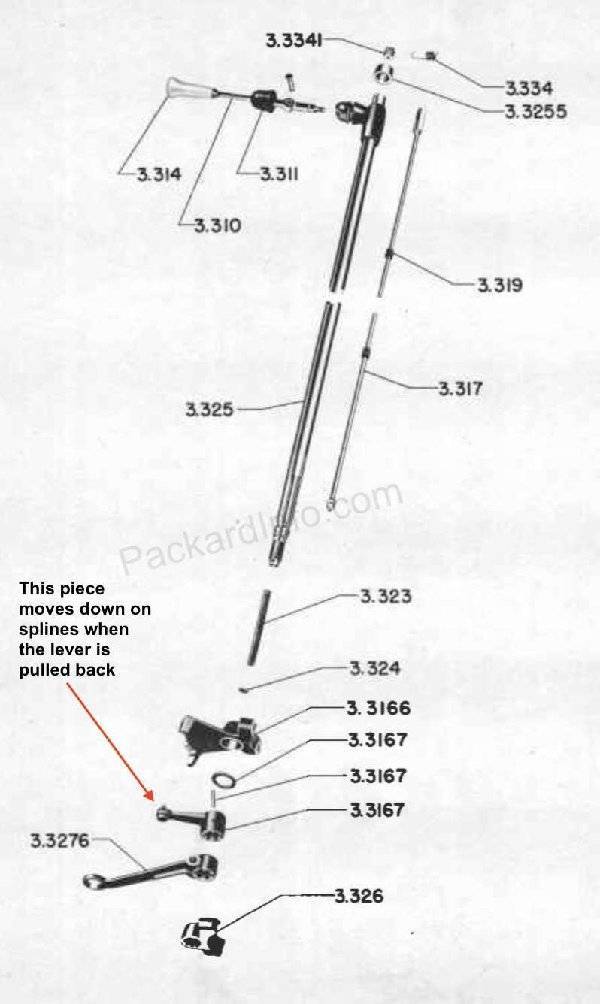
Thank you again, Howard! That sounds like a valid possibility as I seemed to recall now that you've reminded me that there was movement other than up and down in the lever. The pieces on the splines appear to be clamped firmly to them, unlike a manual where a piece has to slide to engage one or the other of the levers but I had forgotten about the detent rod and that's the only bit I can't see with it together so it will have to come apart tomorrow. The parts car's is stuck too but no surprise there as it had been parked outdoors for who knows how many years when I bought it.
Posted on: 2018/3/1 0:32
|
|||
|
All generalities are false.
Once I thought I was wrong but I was mistaken. Don Pierson Packard / IMPERIAL page CA DMV Licensed Vehicle VIN Verification 1951 Henney-Packard 3-Door Long Wheelbase Air Force Ambulance The 1951 Henney-Packard is For Sale! 1954 Packard Patrician 1954 Packard Patrician Parts Car 1956 Clipper Custom Sedan |
||||
|
||||
|
Re: A Tale of Two Patricians
|
||||
|---|---|---|---|---|
|
Home away from home
|
The gasket I used was nice and thick and fit like it was made for a Packard but was actually for a GMC truck. It was made by Mahle with part number C24125. The holes were very slightly off but not enough to cause fitment issues and it needed no trimming.
Can't get the photo attach even though it's small enough so will try again later. . . . Tried again with it half the size of others I've uploaded and it still will not Attach!
Posted on: 2018/3/1 11:39
|
|||
|
All generalities are false.
Once I thought I was wrong but I was mistaken. Don Pierson Packard / IMPERIAL page CA DMV Licensed Vehicle VIN Verification 1951 Henney-Packard 3-Door Long Wheelbase Air Force Ambulance The 1951 Henney-Packard is For Sale! 1954 Packard Patrician 1954 Packard Patrician Parts Car 1956 Clipper Custom Sedan |
||||
|
||||
|
Re: A Tale of Two Patricians
|
||||
|---|---|---|---|---|
|
Home away from home
|
Can hardly stand up (sore lower back) or walk (agitated an existing condition) today so didn't get much done, especially as it's a walk of about a block just to get to the shop and another to get back. However, I did start up the Patrician and ran it to operating temperature, or at least until the choke fully opened. Idled just a little raggedly but smooths out with a tiny amount of throttle and only the odd click or two of a lifter but nothing steady. The main sound comes from a 5-blade flex-fan that has got to go. Too noisy!
On the shifter, I took off the shift lever and sprayed some PB Blaster into the upper and lower areas of the shifter in the hopes that it might free it up but not yet. Started to pull the steering wheel but didn't have the proper bolts for my puller, which is actually made for harmonic balancers although I was surprised to find that the screws holding in the horn ring were very loose. Had already made a trip to town in the morning to ship some 1937 parts and didn't want another drive just for that so called it a day but will do so tomorrow if the toe is better. However, while doing the work inside the car I was surprised to find a pair of NOS 1956 Clipper door sills on the back seat that I have no memory of ever having bought. In the last few years, I keep coming across Clipper parts and, as with the sills, have no memory of buying anything whatsoever for it!
Posted on: 2018/3/1 18:48
|
|||
|
All generalities are false.
Once I thought I was wrong but I was mistaken. Don Pierson Packard / IMPERIAL page CA DMV Licensed Vehicle VIN Verification 1951 Henney-Packard 3-Door Long Wheelbase Air Force Ambulance The 1951 Henney-Packard is For Sale! 1954 Packard Patrician 1954 Packard Patrician Parts Car 1956 Clipper Custom Sedan |
||||
|
||||
|
Re: A Tale of Two Patricians
|
||||
|---|---|---|---|---|
|
Home away from home
|
Asked earlier, how can I better attach the oil filler tube? It's always been wobbly and the paint on the block around it is black with fumes coming out from the base so should it have sealer on it and, if so, what type? It appears to attach to the block by a slight taper but seems to not hold it well enough as it is even when tapping it down into place.
Posted on: 2018/3/2 12:03
|
|||
|
All generalities are false.
Once I thought I was wrong but I was mistaken. Don Pierson Packard / IMPERIAL page CA DMV Licensed Vehicle VIN Verification 1951 Henney-Packard 3-Door Long Wheelbase Air Force Ambulance The 1951 Henney-Packard is For Sale! 1954 Packard Patrician 1954 Packard Patrician Parts Car 1956 Clipper Custom Sedan |
||||
|
||||
|
Re: A Tale of Two Patricians
|
||||
|---|---|---|---|---|
|
Forum Ambassador

|
I'd guess it's been removed too often in the past, wiggling side-to-side deforms the base pretty quickly. If you can find one, best way is to use a 3-roll expander inserted into the bottom and reshape and enlarge the base of the tube.
Posted on: 2018/3/2 13:07
|
|||
|
||||
|
Re: A Tale of Two Patricians
|
||||
|---|---|---|---|---|
|
Forum Ambassador
|
I believe it is just a press fit. You might be able to tighten it by using a small center punch and working from the inside of tube, place a few very shallow "pimples" to expand the metal a tiny bit so it can get a tighter fit. You do not want to get carried away and it shouldn't take more than 3 or 4 spaced around the tube. Once the metal is expanded use a block of wood at the top and hammer against the wood to drive tube into the block.
As to fumes leaking around the base, I would not use much sealant because you may want to get the tube out again. Perhaps a very thin bead of silicone or even a thin O ring pushed up right to the seating ring crimped in the tube and then the tube inserted so the sealant or O ring is compressed between block and seating ring would stop it.
Posted on: 2018/3/2 13:10
|
|||
|
Howard
|
||||
|
||||
|
Re: A Tale of Two Patricians
|
||||
|---|---|---|---|---|
|
Home away from home
|
Great idea and I never thought of that! I have a pipe expander for exhaust pipes that probably does not go small enough so I'll look for one that does. The oil deflector on the end might pose some problems but perhaps it can be removed and tack-welded back on. This pipe was removed only once during the rebuild but apparently that was enough to cause problems.
Howard, thank you too with more excellent ideas!
Posted on: 2018/3/2 13:14
|
|||
|
All generalities are false.
Once I thought I was wrong but I was mistaken. Don Pierson Packard / IMPERIAL page CA DMV Licensed Vehicle VIN Verification 1951 Henney-Packard 3-Door Long Wheelbase Air Force Ambulance The 1951 Henney-Packard is For Sale! 1954 Packard Patrician 1954 Packard Patrician Parts Car 1956 Clipper Custom Sedan |
||||
|
||||
|
Re: A Tale of Two Patricians
|
||||
|---|---|---|---|---|
|
Forum Ambassador

|
I don't think Howard's suggestion, just 3 or 4 little dimples from a center punch would make a particularly long-lasting repair. But maybe a little modification of it might work better. Rather than a center punch, use a larger blunt punch with a slightly rounded nose. Then lay the tube on a solid support but one with a large hole beneath where you intend to use the punch so you actually can displace a larger "blister" of metal, thus enlarging more of the surface area. Again as HH suggested, 3 (or more) spots around the circumference.
Posted on: 2018/3/2 13:52
|
|||
|
||||
|
Re: A Tale of Two Patricians
|
||||
|---|---|---|---|---|
|
Home away from home
|
Howard, on the blow-up view of the steering column assembly where you marked that the piece slides up and down the splines, I can't see how that's possible because the arm appears to be pinned to the splined shaft. Can you please elaborate? I have the wheel off and the indicator disconnected but see nothing obvious causing the stickage.
Posted on: 2018/3/2 16:54
|
|||
|
All generalities are false.
Once I thought I was wrong but I was mistaken. Don Pierson Packard / IMPERIAL page CA DMV Licensed Vehicle VIN Verification 1951 Henney-Packard 3-Door Long Wheelbase Air Force Ambulance The 1951 Henney-Packard is For Sale! 1954 Packard Patrician 1954 Packard Patrician Parts Car 1956 Clipper Custom Sedan |
||||
|
||||

 (57.55 KB)


