|
Re: 1924 Sport 136
|
||||
|---|---|---|---|---|
|
Home away from home

|
As with everything you’ve done, the engine is a work of art! Just beautiful.
Posted on: 2024/10/9 17:51
|
|||
|
All generalities are false.
Once I thought I was wrong but I was mistaken. Don Pierson Packard / IMPERIAL page CA DMV Licensed Vehicle VIN Verification 1951 Henney-Packard 3-Door Long Wheelbase Air Force Ambulance The 1951 Henney-Packard is For Sale! 1954 Packard Patrician 1954 Packard Patrician Parts Car 1956 Clipper Custom Sedan |
||||
|
||||

|
Re: 1924 Sport 136
|
||||
|---|---|---|---|---|
|
Home away from home
|
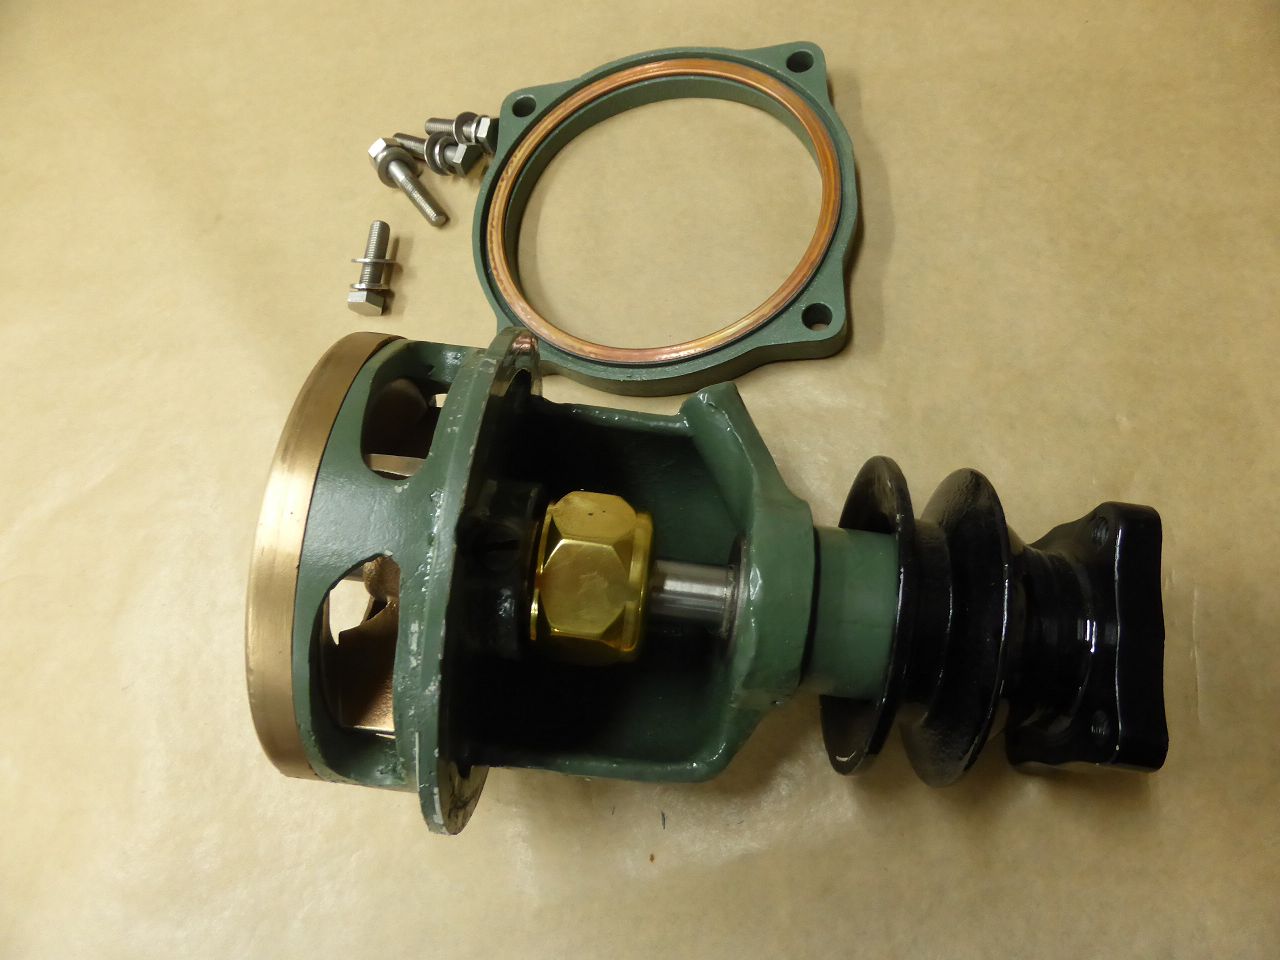
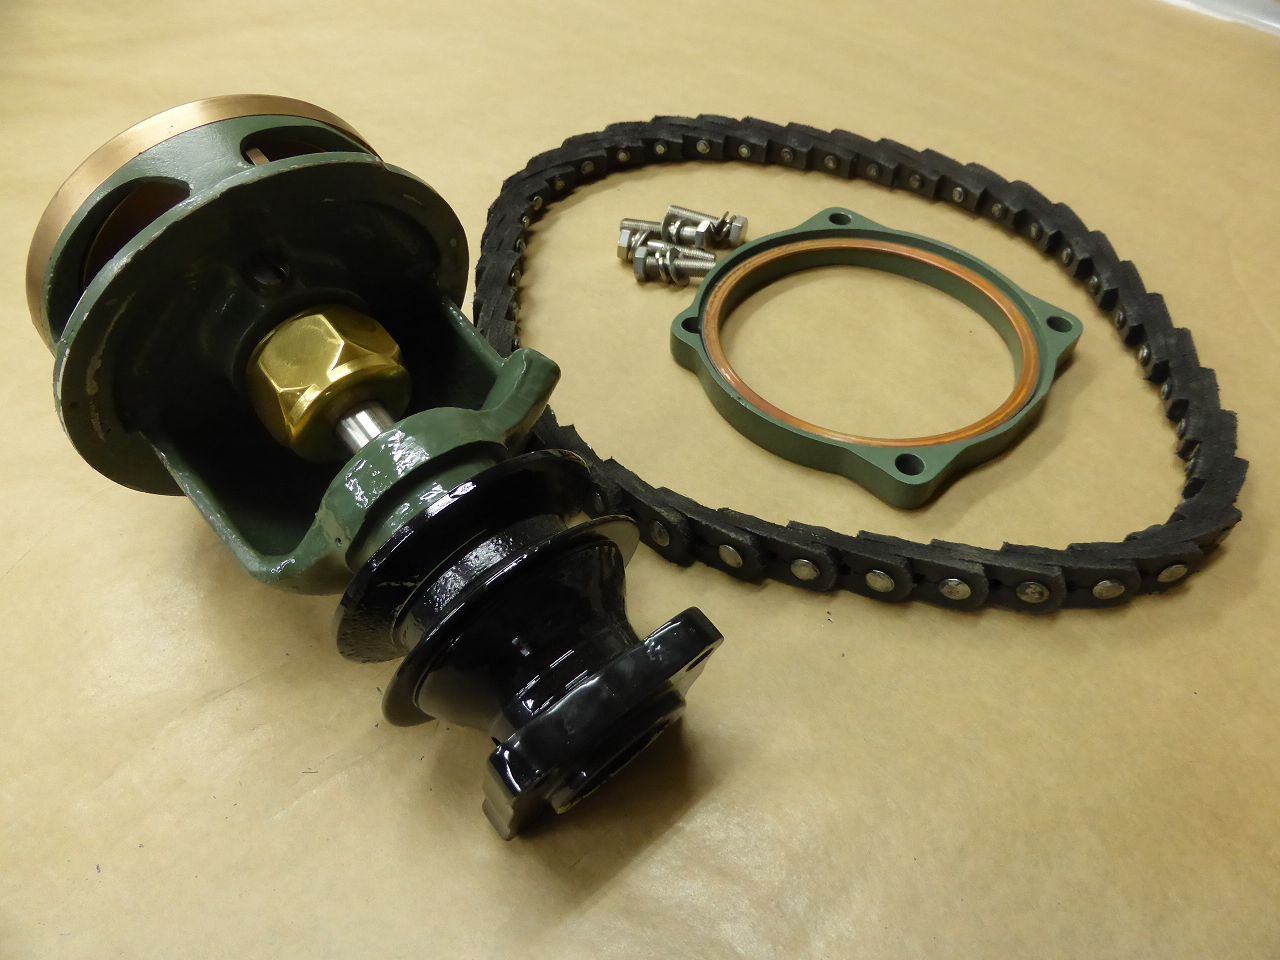
The Engine Timing Parts
The timing chain gears were in good condition. However, the timing chain itself had reached the end of its life. The chain was so long that it could no longer be tensioned. It was replaced with a post-production version. The camshaft appeared to be worn, but a measurement by a company that specializes exclusively in camshaft reconditioning showed that the camshaft was in good, workable condition. This was surprising given the condition of the rocker arms. These were in a pitiful condition. The engine or these rocker arms must have been without sufficient oil supply for a long period of time. My search for rocker arm replacement parts revealed that only one supplier in the United States could offer a "good used" set for the Series 1 engine for $50 each. But I didn’t just want to install “good used” engines into my rebuilt engine. And then have them overtaken. So for 16x50$ = $800 plus shipping and duty/tax I would have paid about $1200. That makes absolutely no sense if I only had to pay around 800 euros to refurbish my own rocker arms, which would then have to be paid in addition to the used ones delivered from the USA. I showed my rocker arms to a company that I have known for 40 years and that had already molded the crankshaft bearing journals and rear axle quick-release axles back to their original dimensions for me. This company has specialized, among other things, in re-spraying all types of storage surfaces with the appropriate metal using plasma spraying and thus returning them to their original dimensions. For example, the original ball bearing sizes could be reinstalled or worn surfaces could be resealed with new shaft seals The company also worked for the German Federal Railroad and used this process to repair the axles of older transport wagons that were uneconomical to manufacture new. At that time, Deutsche Bahn had the strictest material testing procedures and rules here in Germany in almost all areas. There is therefore no doubt about the suitability of this company for this work. The company looked at my rocker arms, checked the material/metal and assured me that the treads could be refinished. When I first described this restoration process here at PI, the question was whether the sprayed overlay would adhere tightly enough to the existing metal and possibly not come loose. Specifically to this question, the company explained to me that the sprayed layer cannot come off in all stress situations applicable to this component and beyond. After sandblasting the application surfaces, the rocker arms were flame sprayed with chrome-molybdenum metal at a sufficient height. A chrome-molybdenum wire is liquefied in a pointed gun and sprayed onto the work surface under high pressure at a speed of around 800 meters per second. The result can be seen in the photos. The machine shop that worked on the engine then ground and polished the side surfaces and rocker arm races on an existing machine to the original ½-inch radius. Karl Attach file:  k-P1030267.JPG (178.12 KB) k-P1030267.JPG (178.12 KB)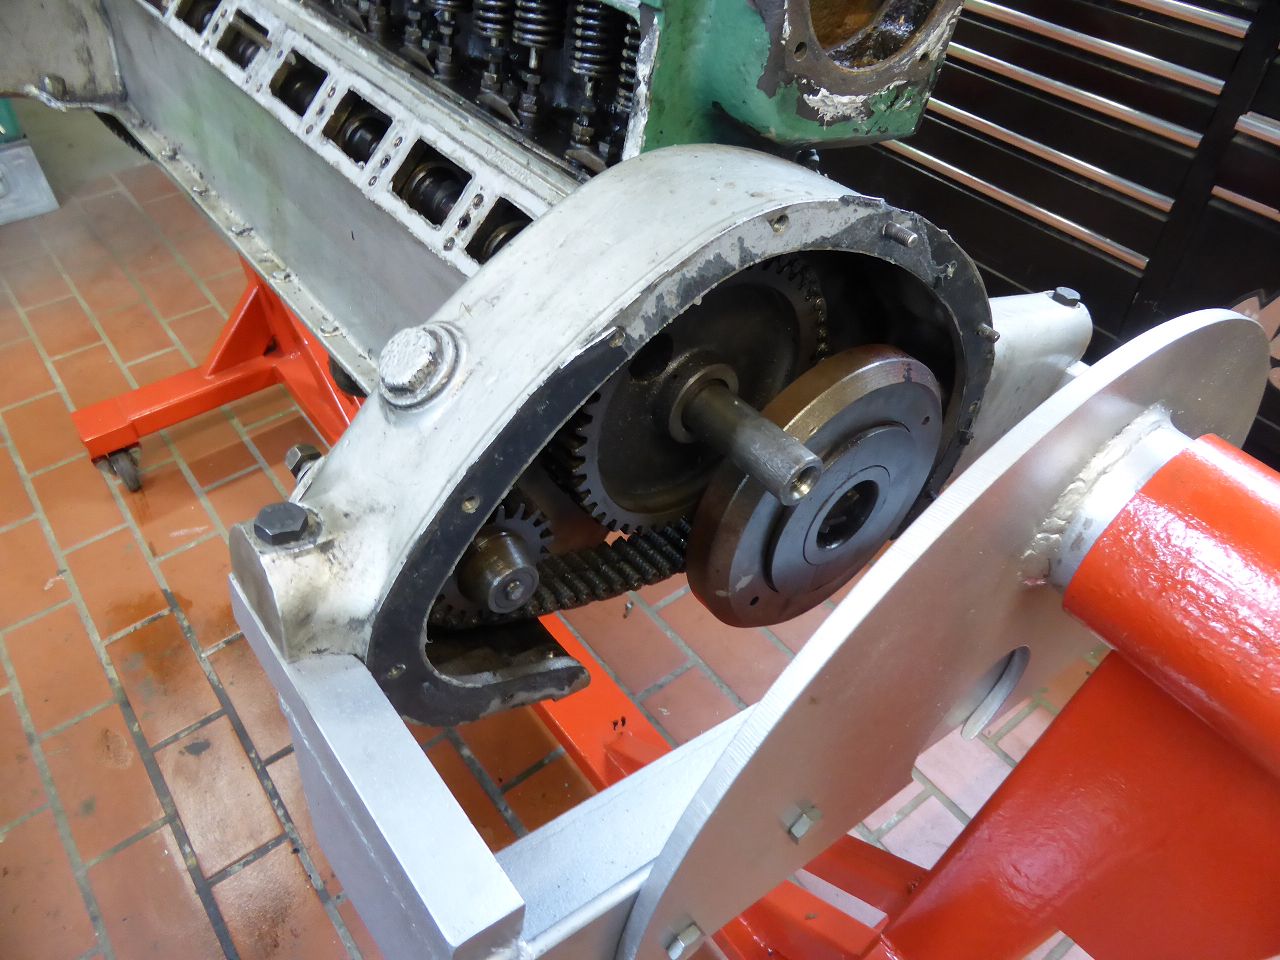 k-P1030332.JPG (184.37 KB) k-P1030332.JPG (184.37 KB)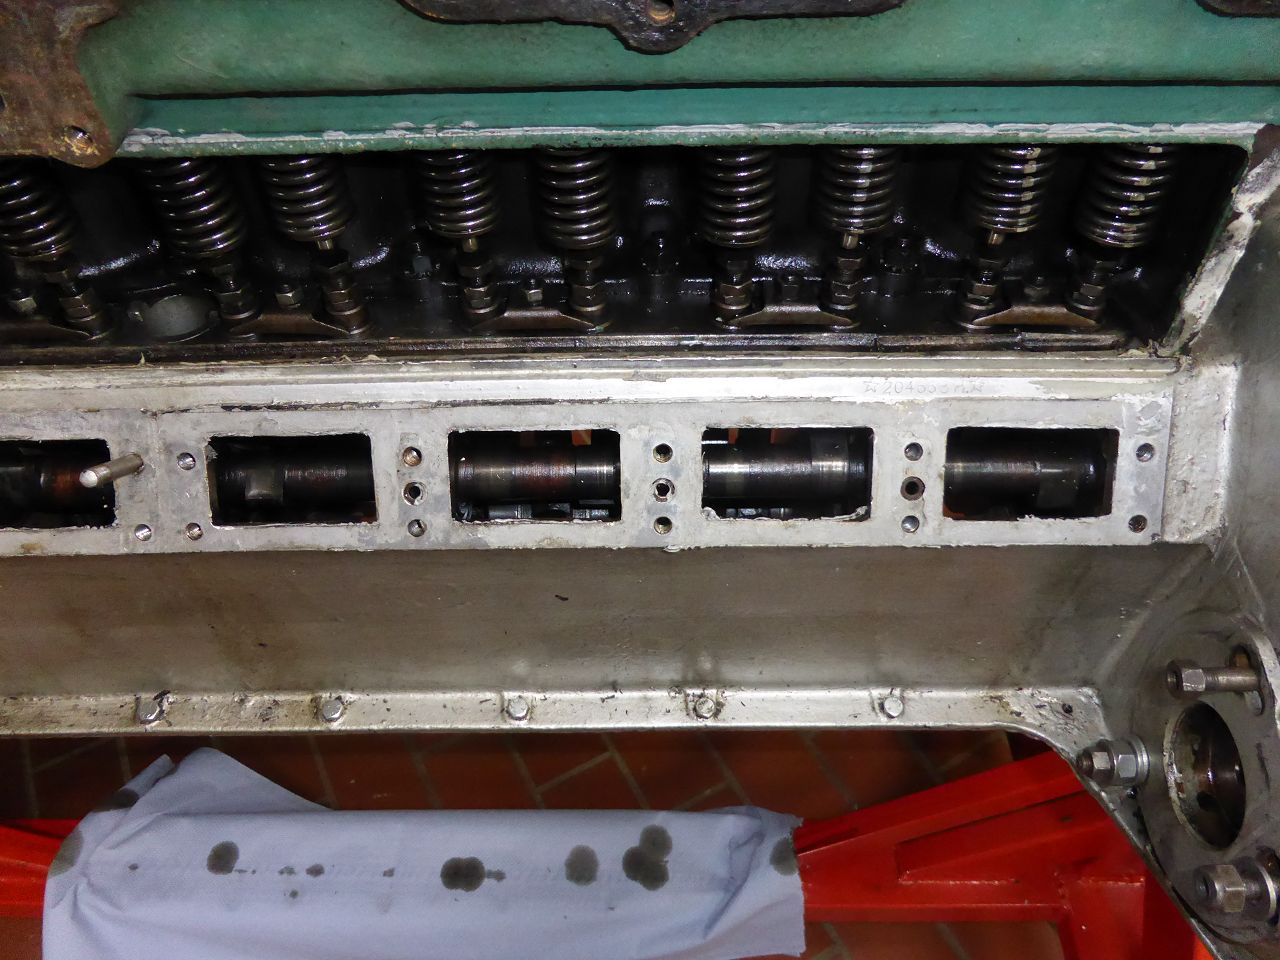 k-P1030333.JPG (194.06 KB) k-P1030333.JPG (194.06 KB)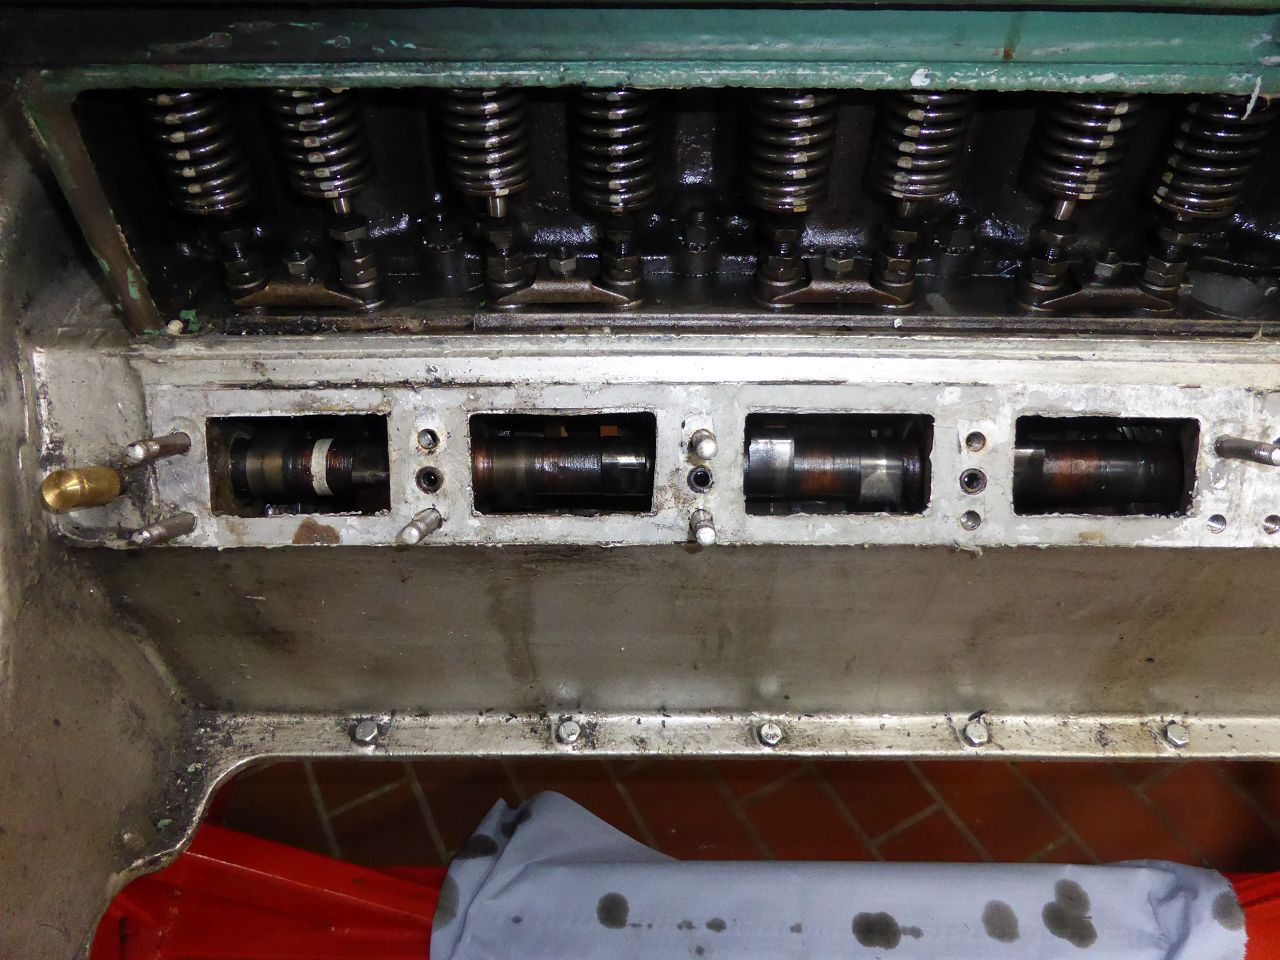 k-P1030246.JPG (200.19 KB) k-P1030246.JPG (200.19 KB)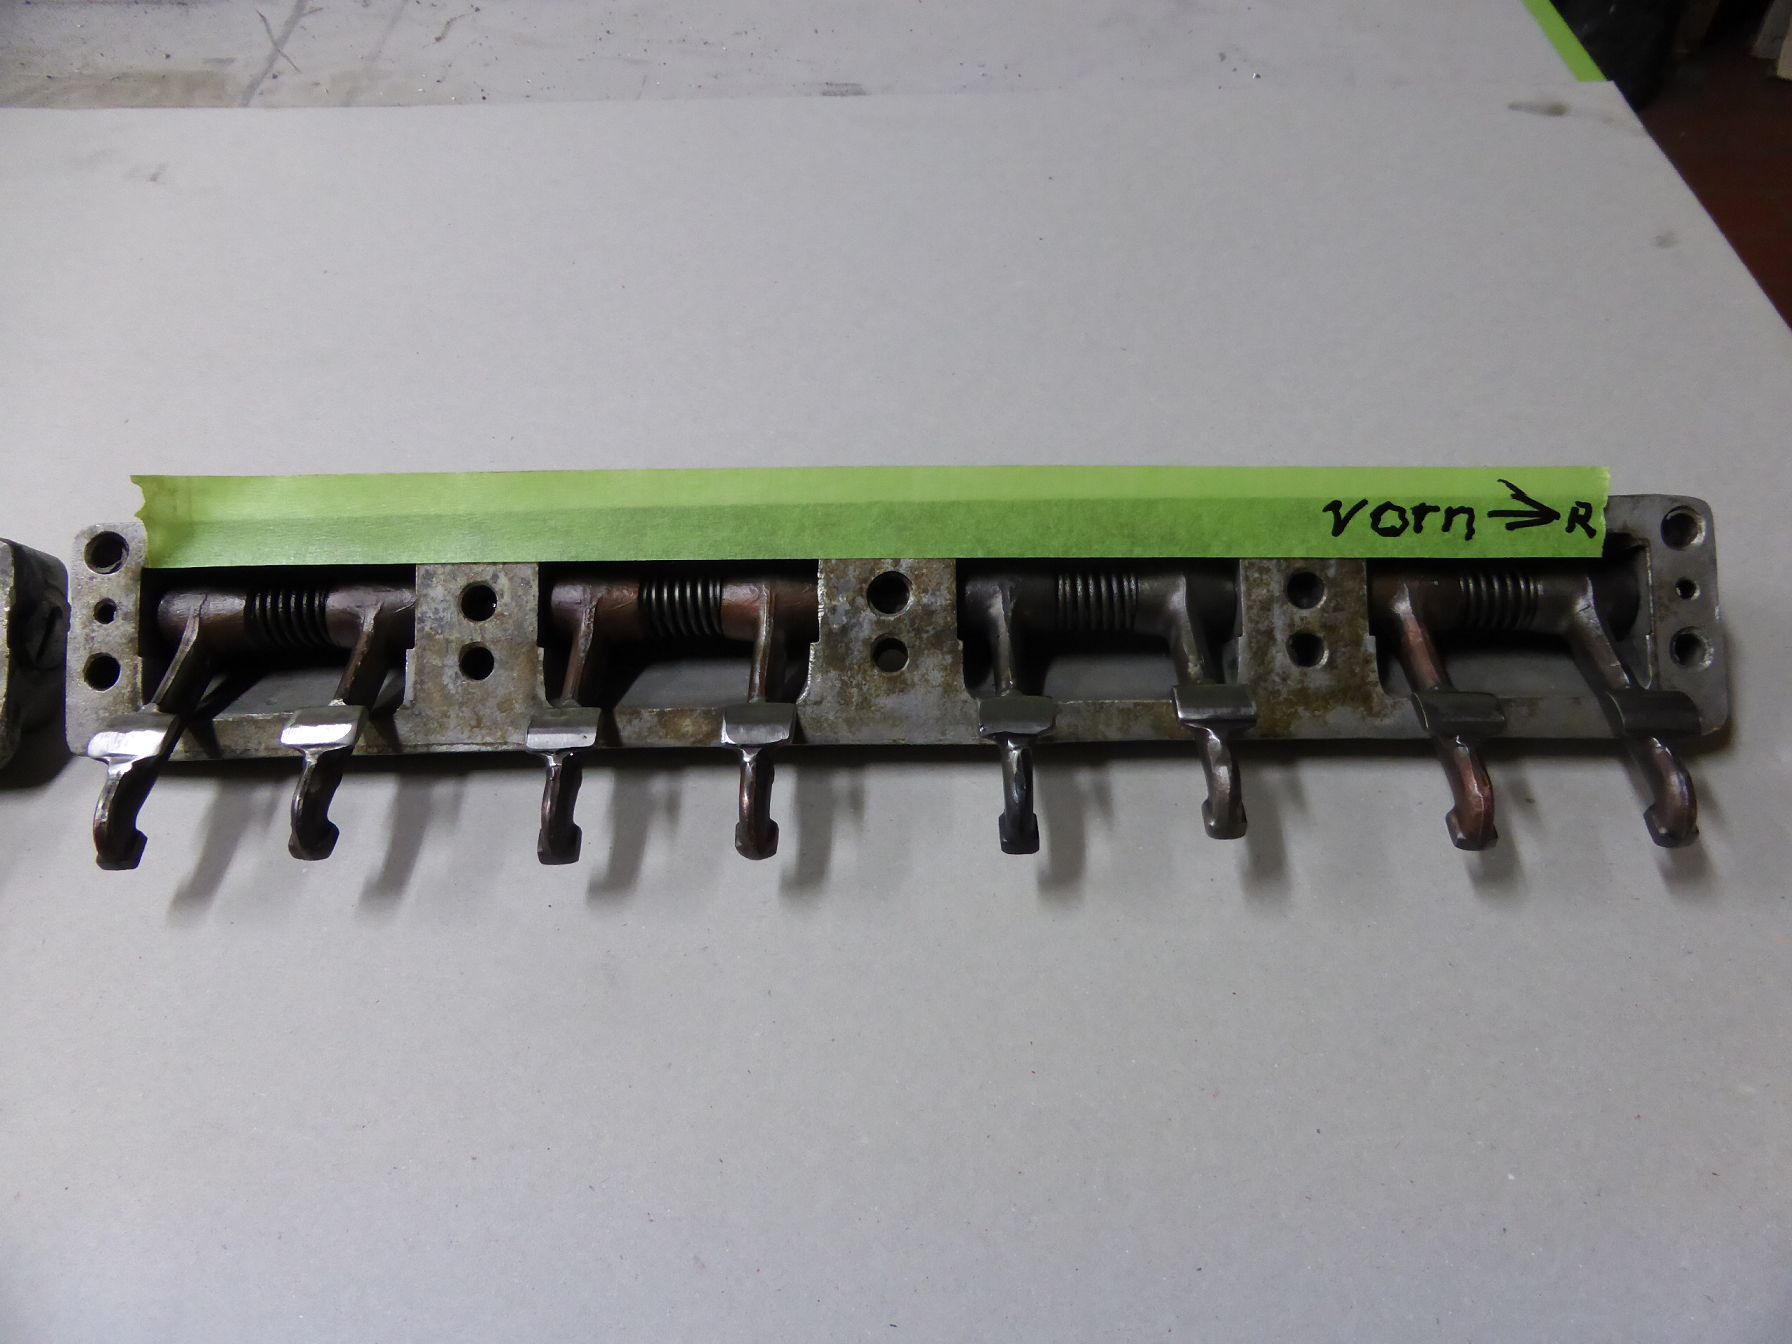 k-P1030249.JPG (308.41 KB) k-P1030249.JPG (308.41 KB)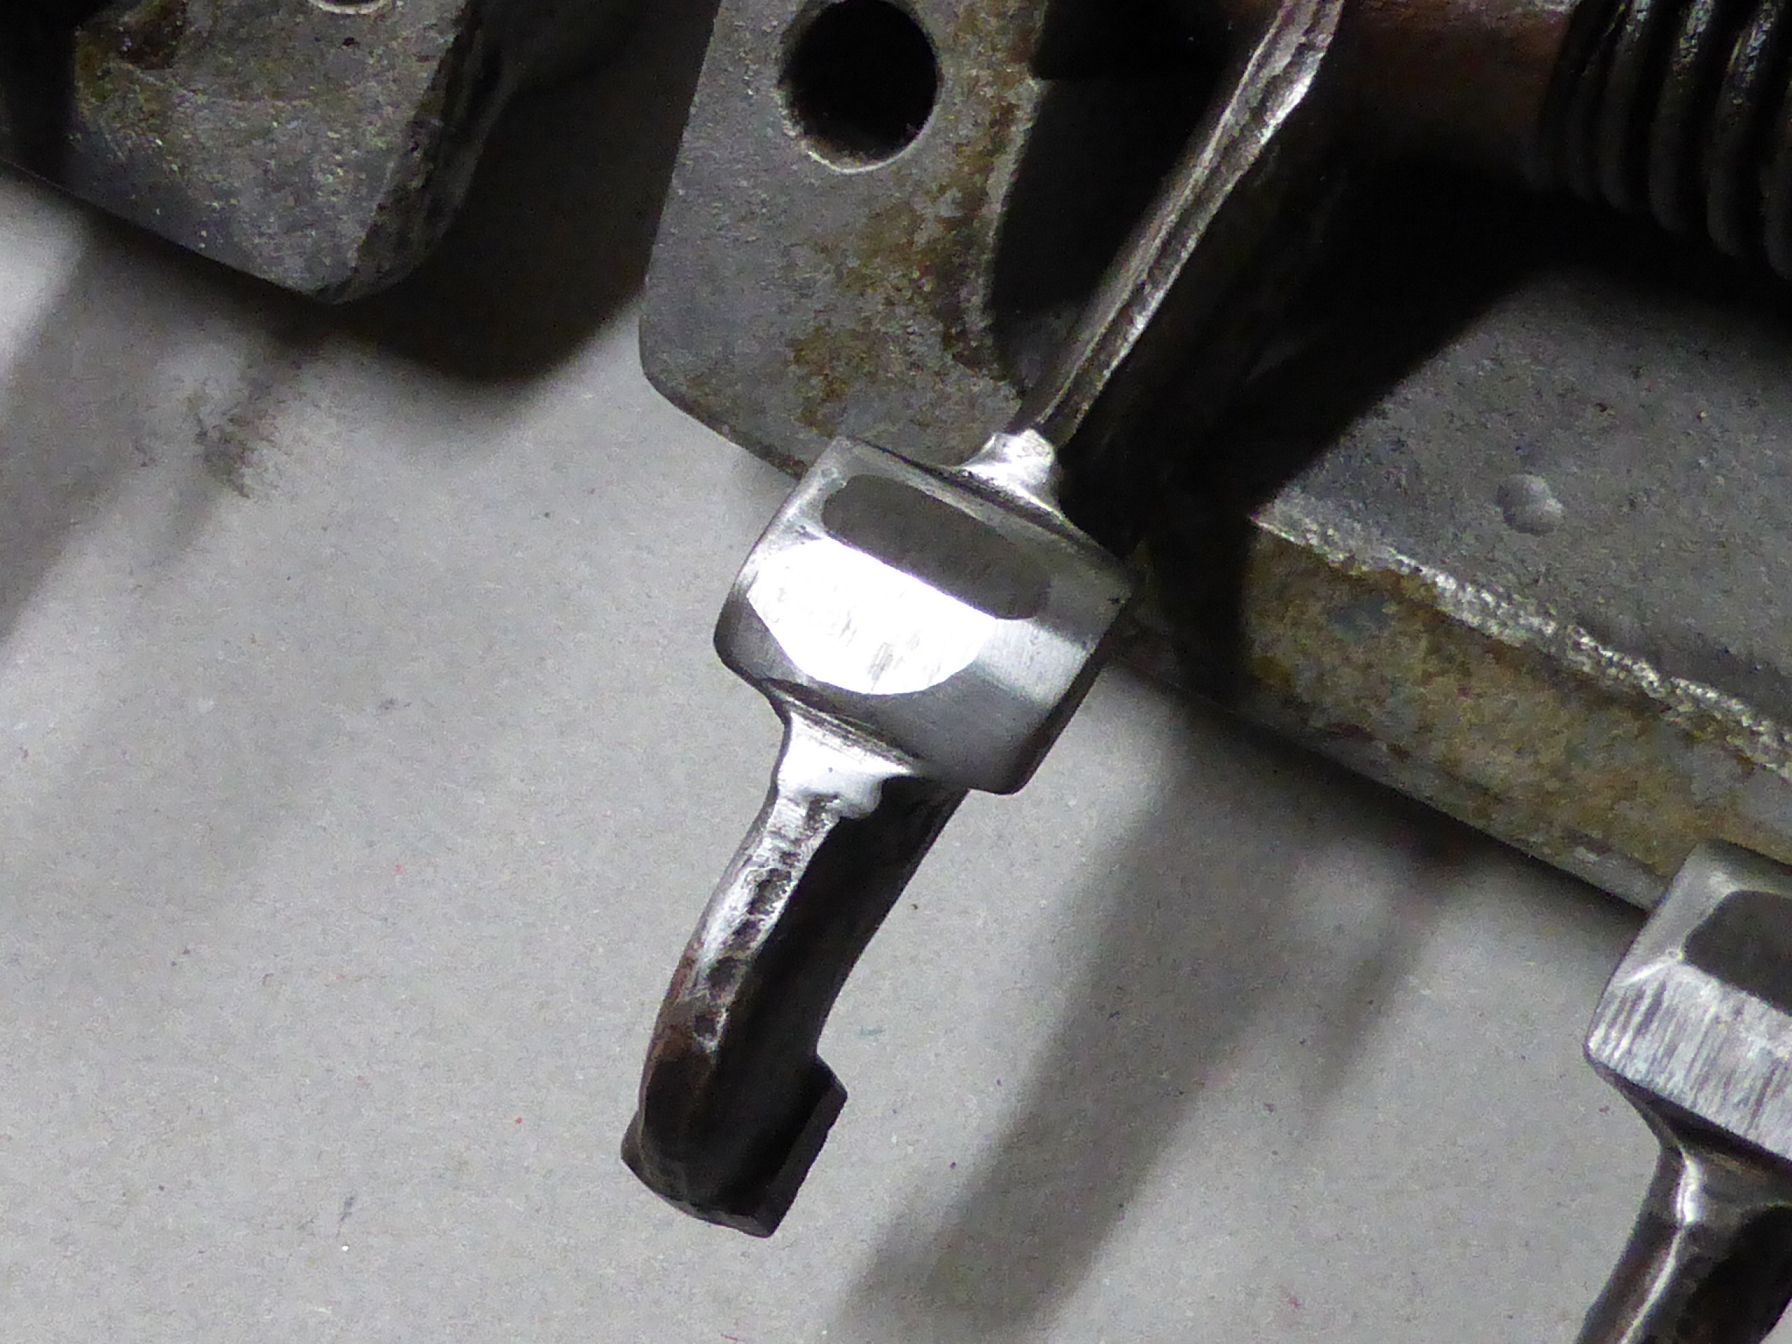 k-P1030250.JPG (295.04 KB) k-P1030250.JPG (295.04 KB)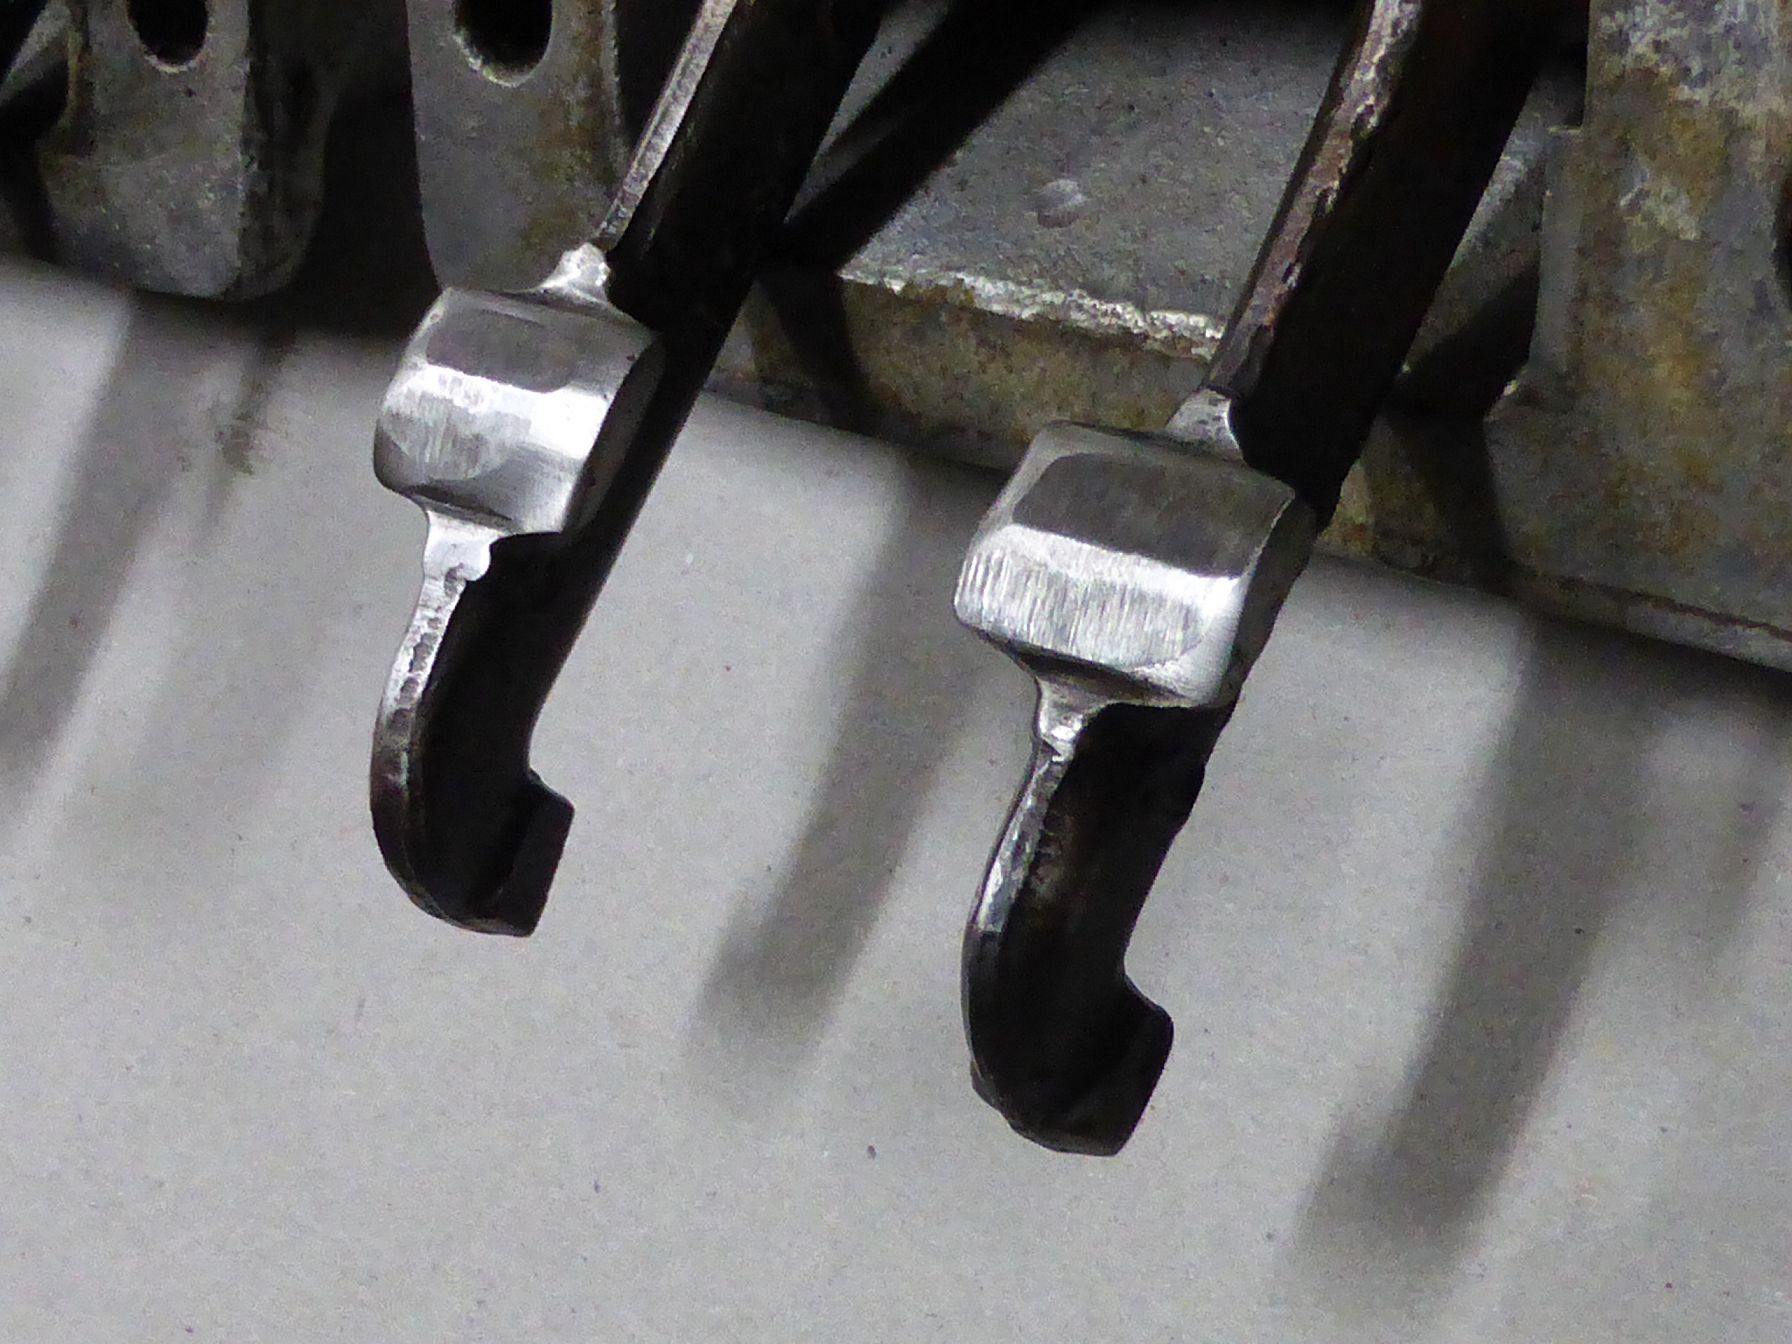 k-P1030253.JPG (234.73 KB) k-P1030253.JPG (234.73 KB)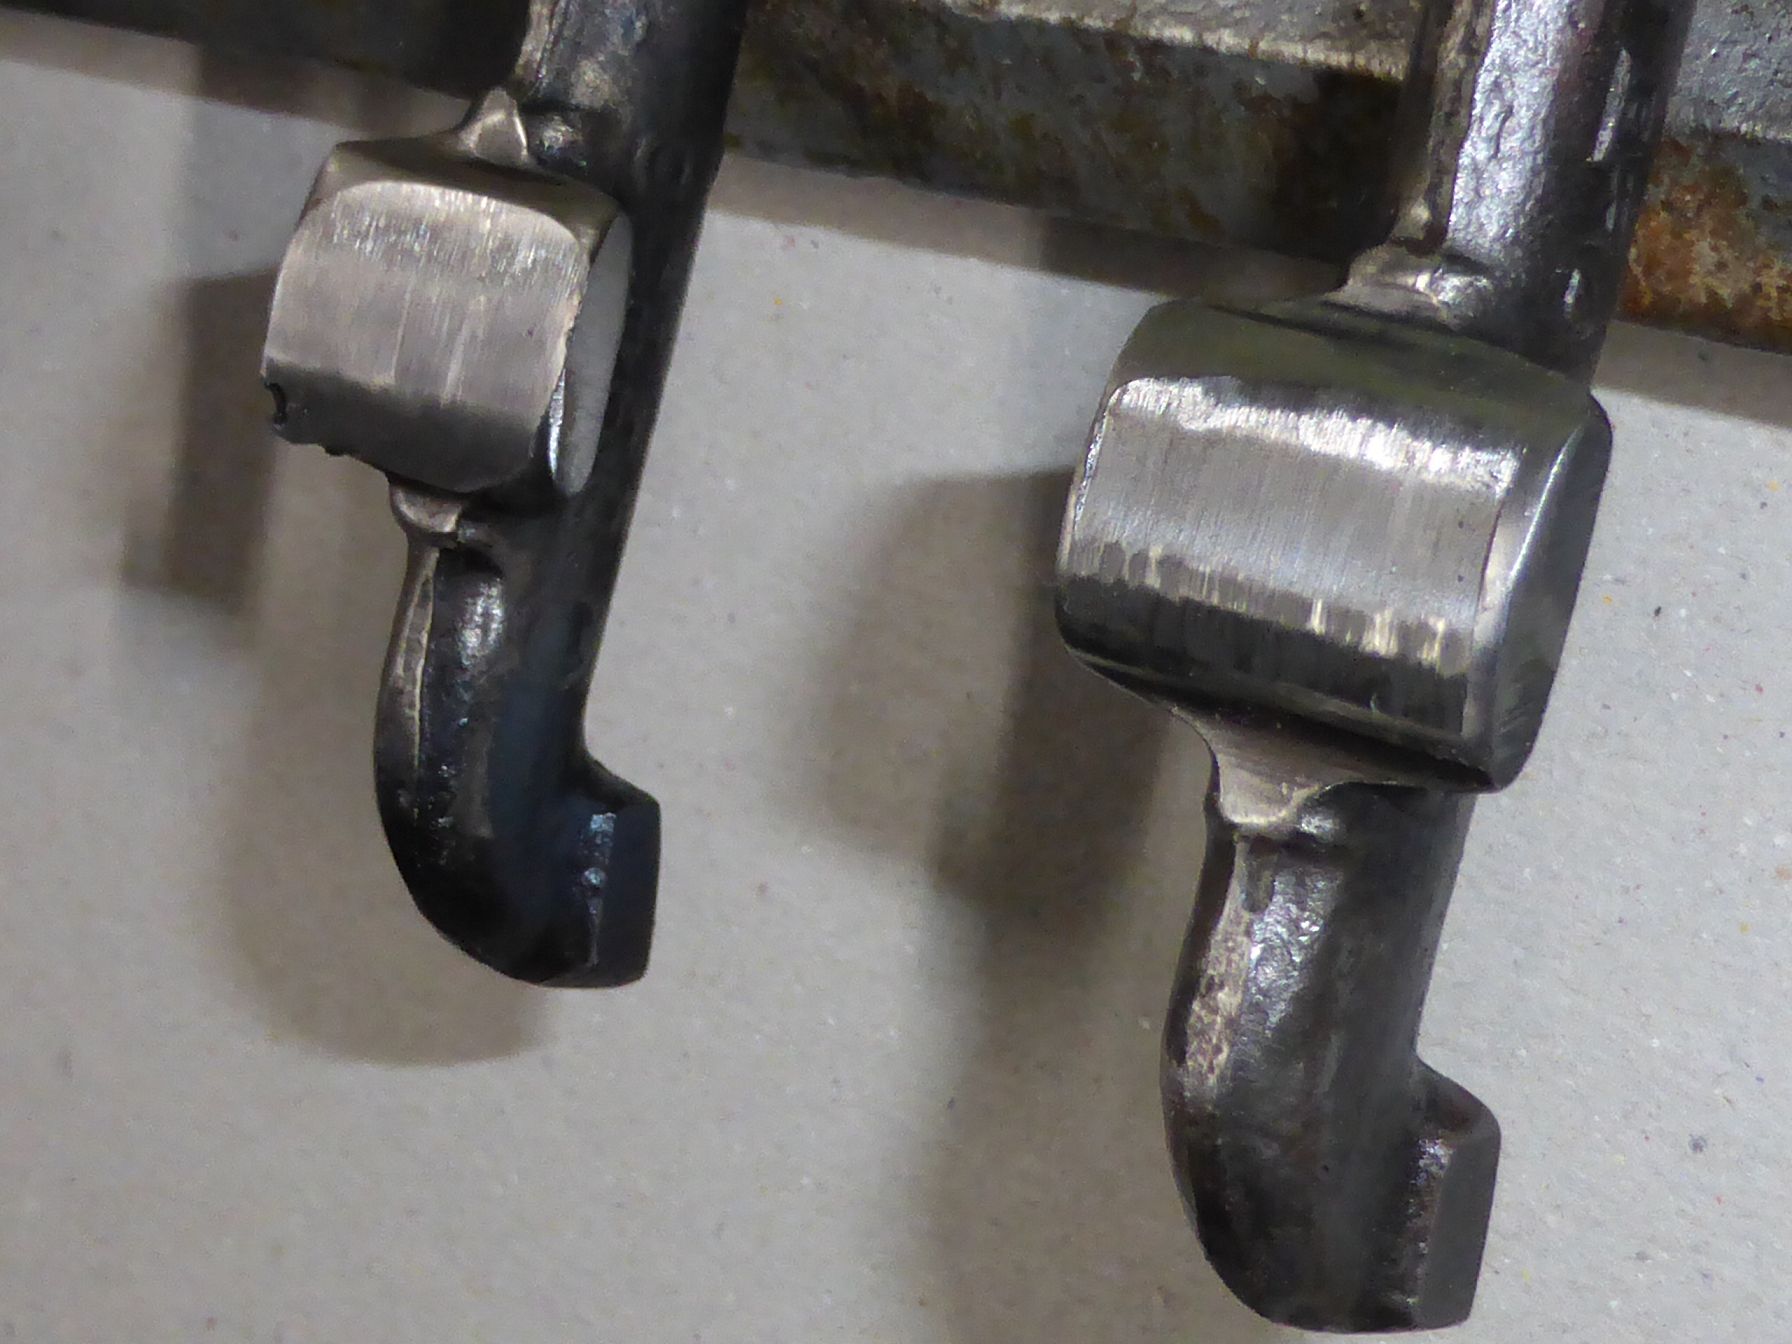 k-P1030255.JPG (265.38 KB) k-P1030255.JPG (265.38 KB)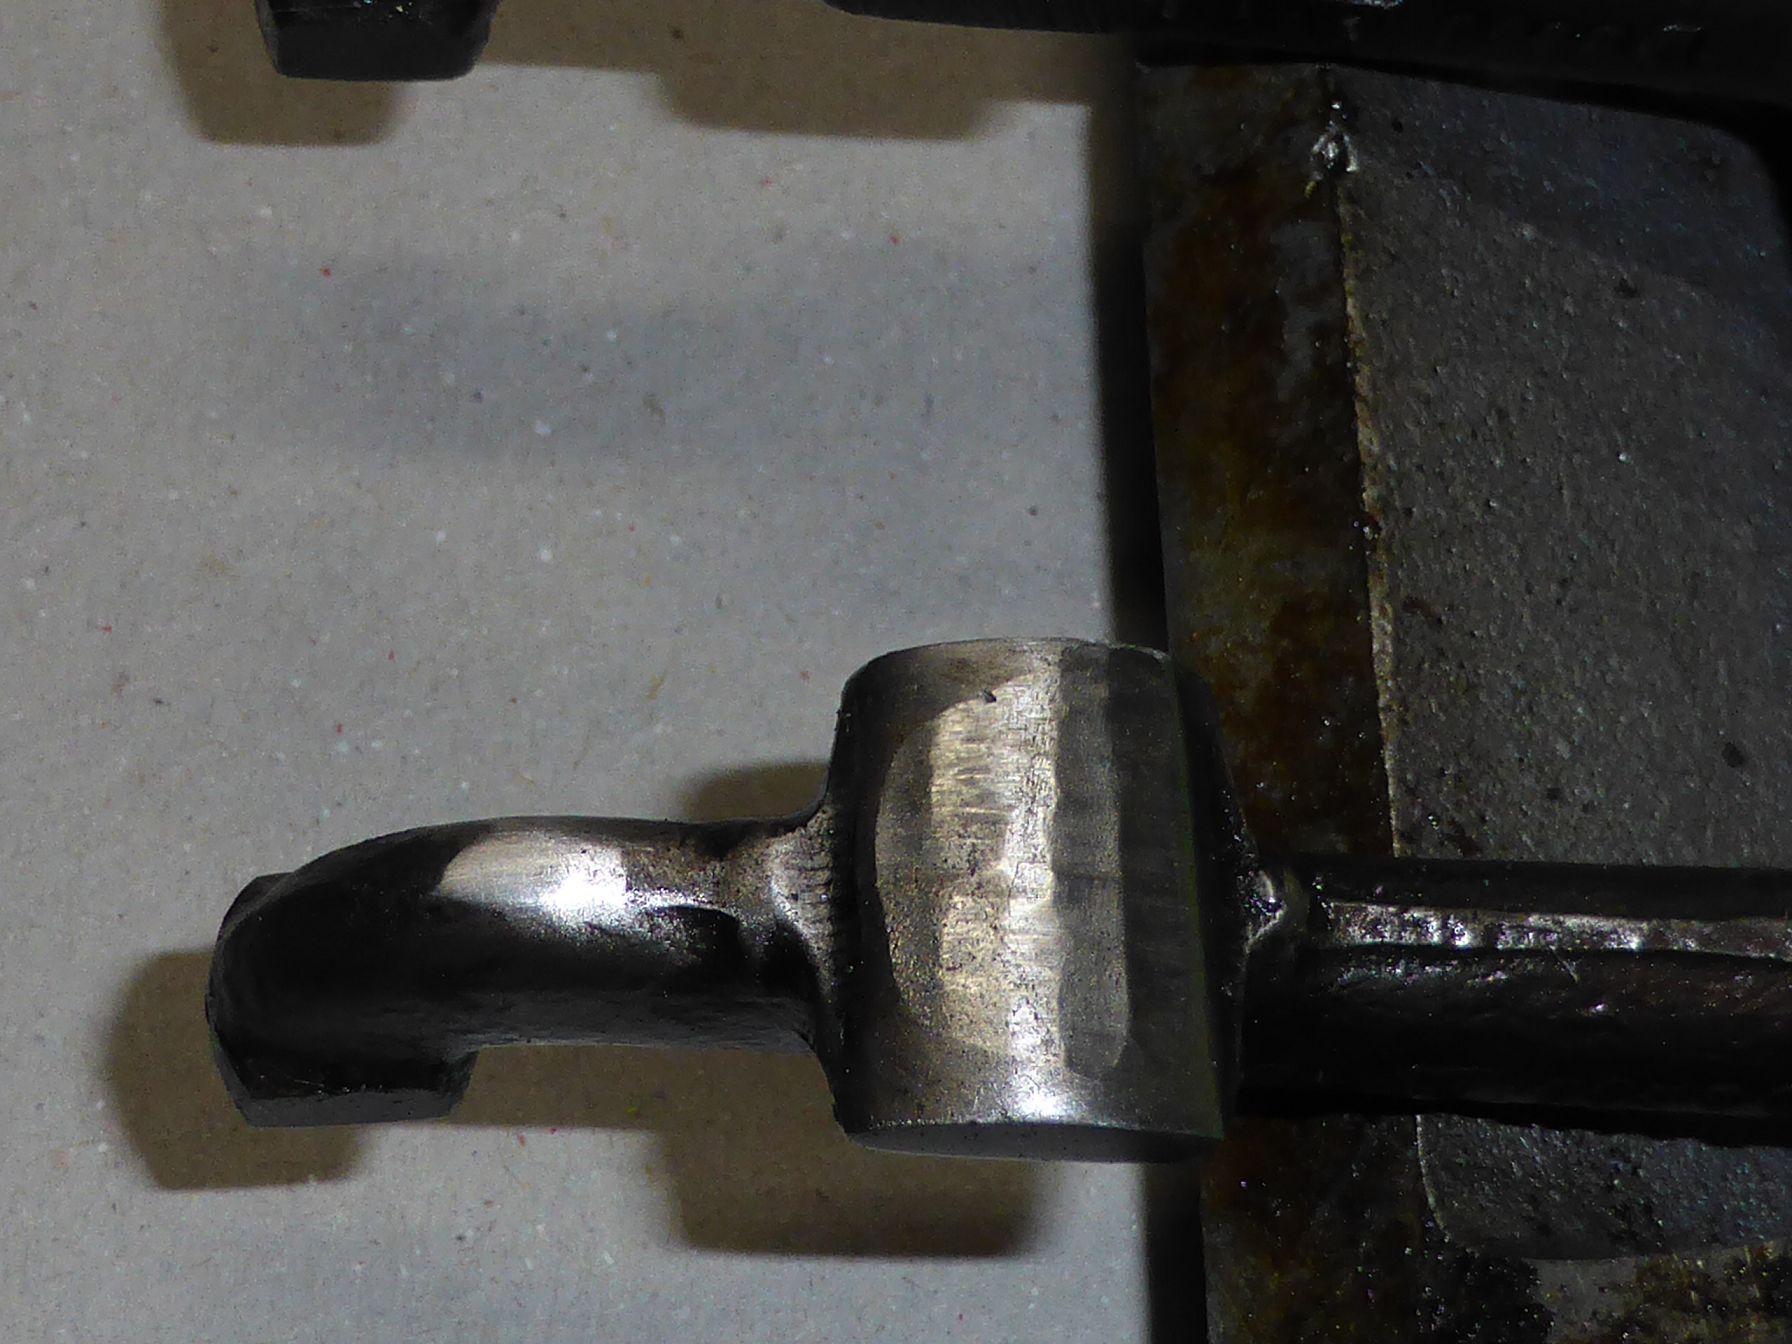 k-P1030259.JPG (288.71 KB) k-P1030259.JPG (288.71 KB)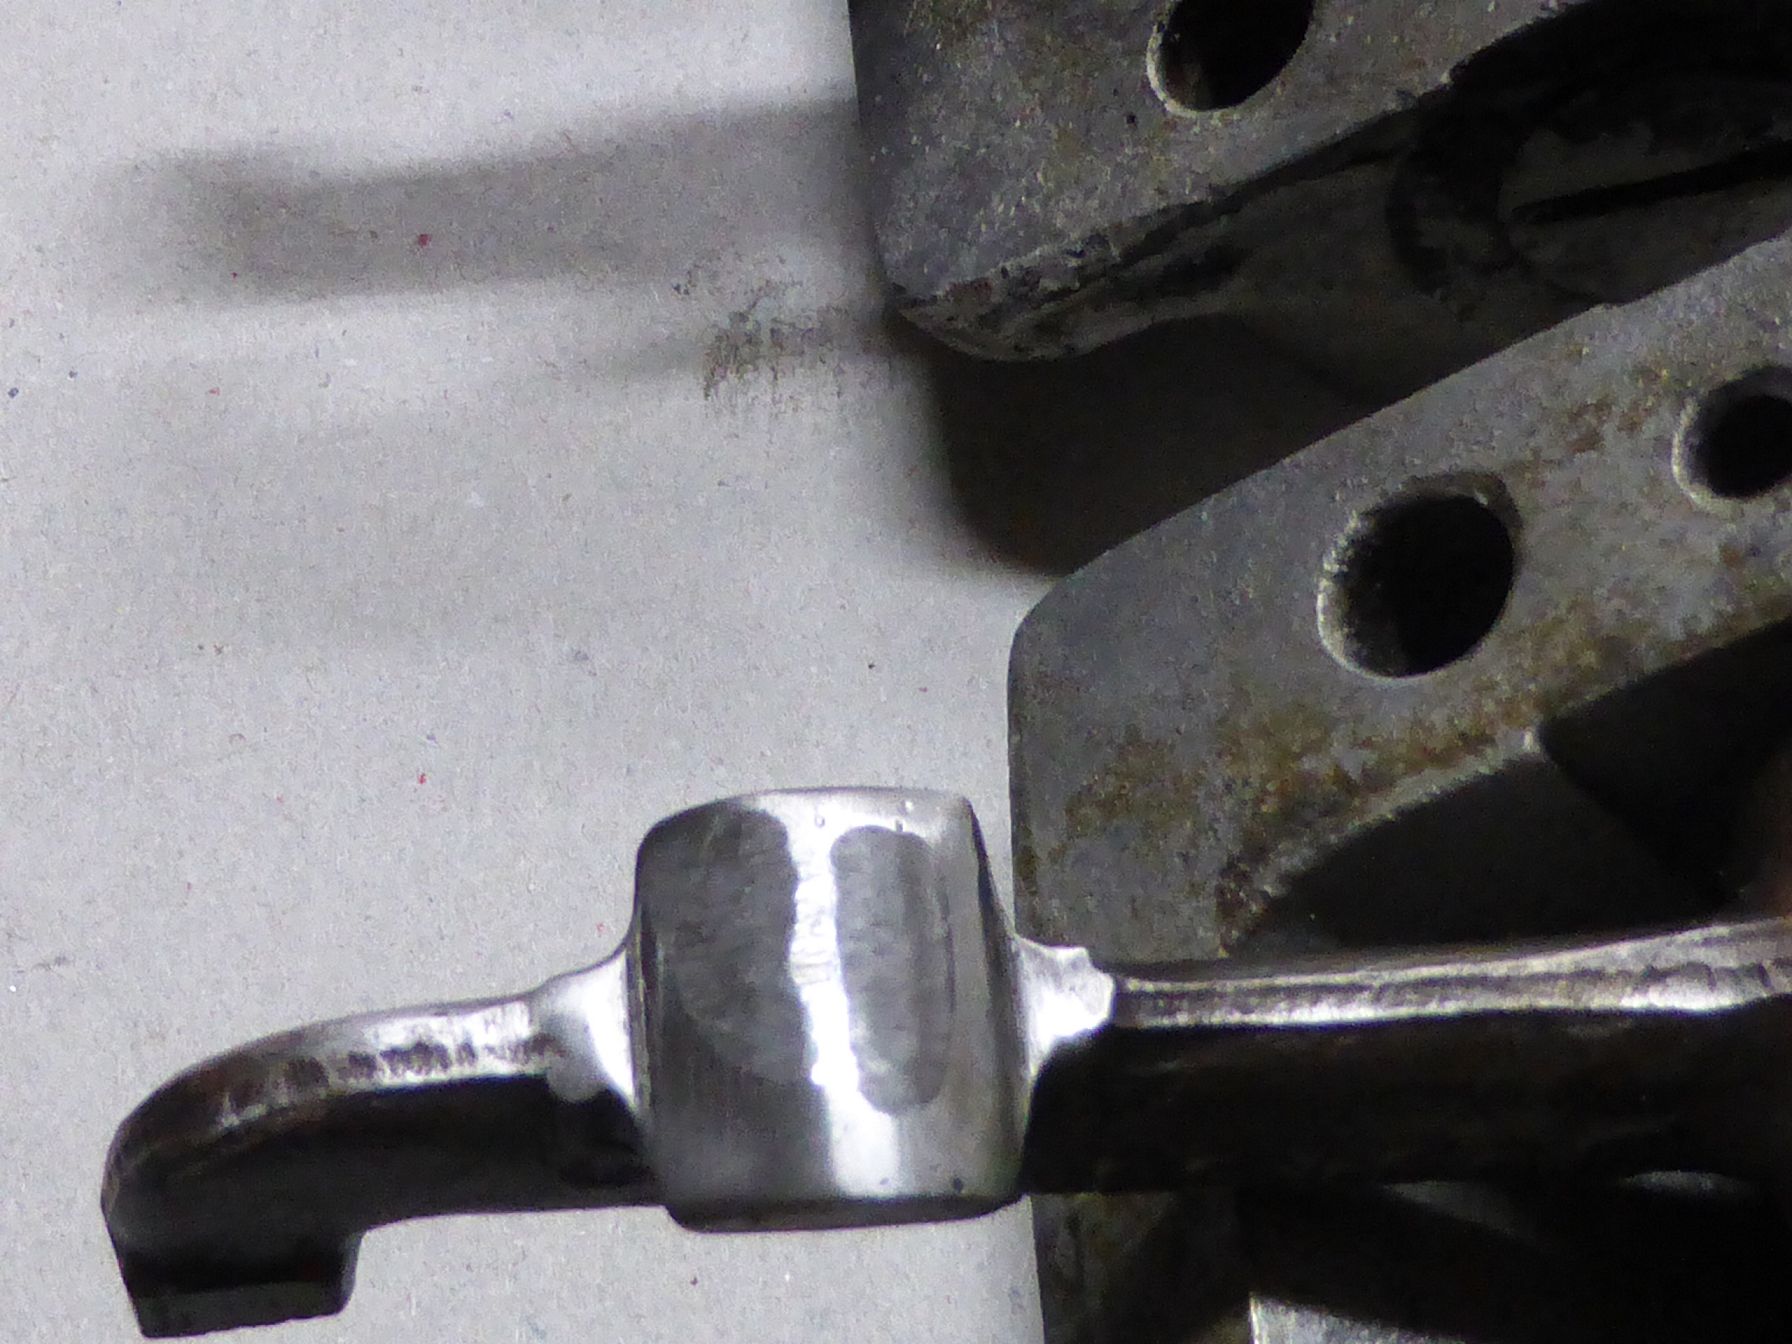 k-P1030460.JPG (279.54 KB) k-P1030460.JPG (279.54 KB)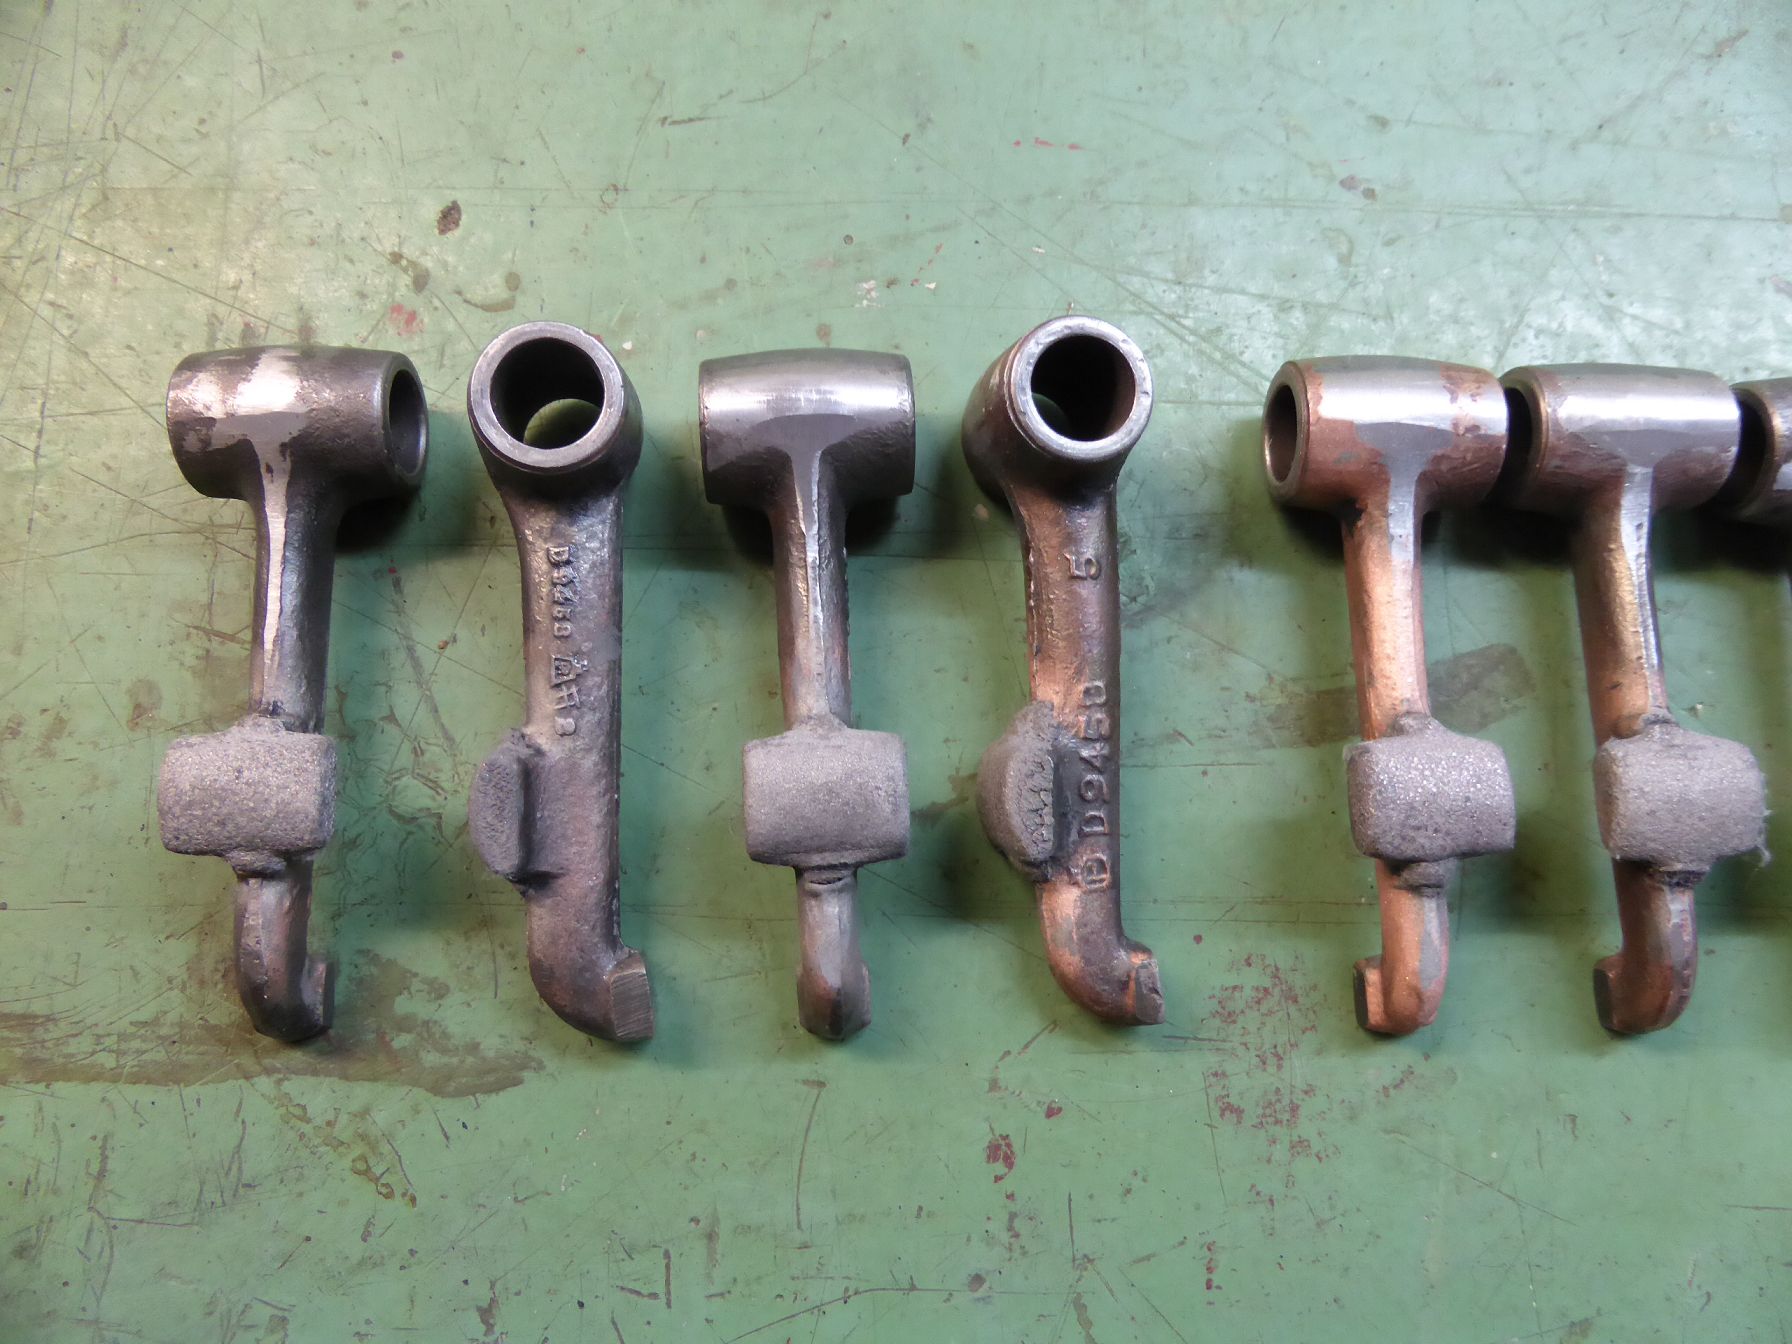 k-P1040013.JPG (226.60 KB) k-P1040013.JPG (226.60 KB)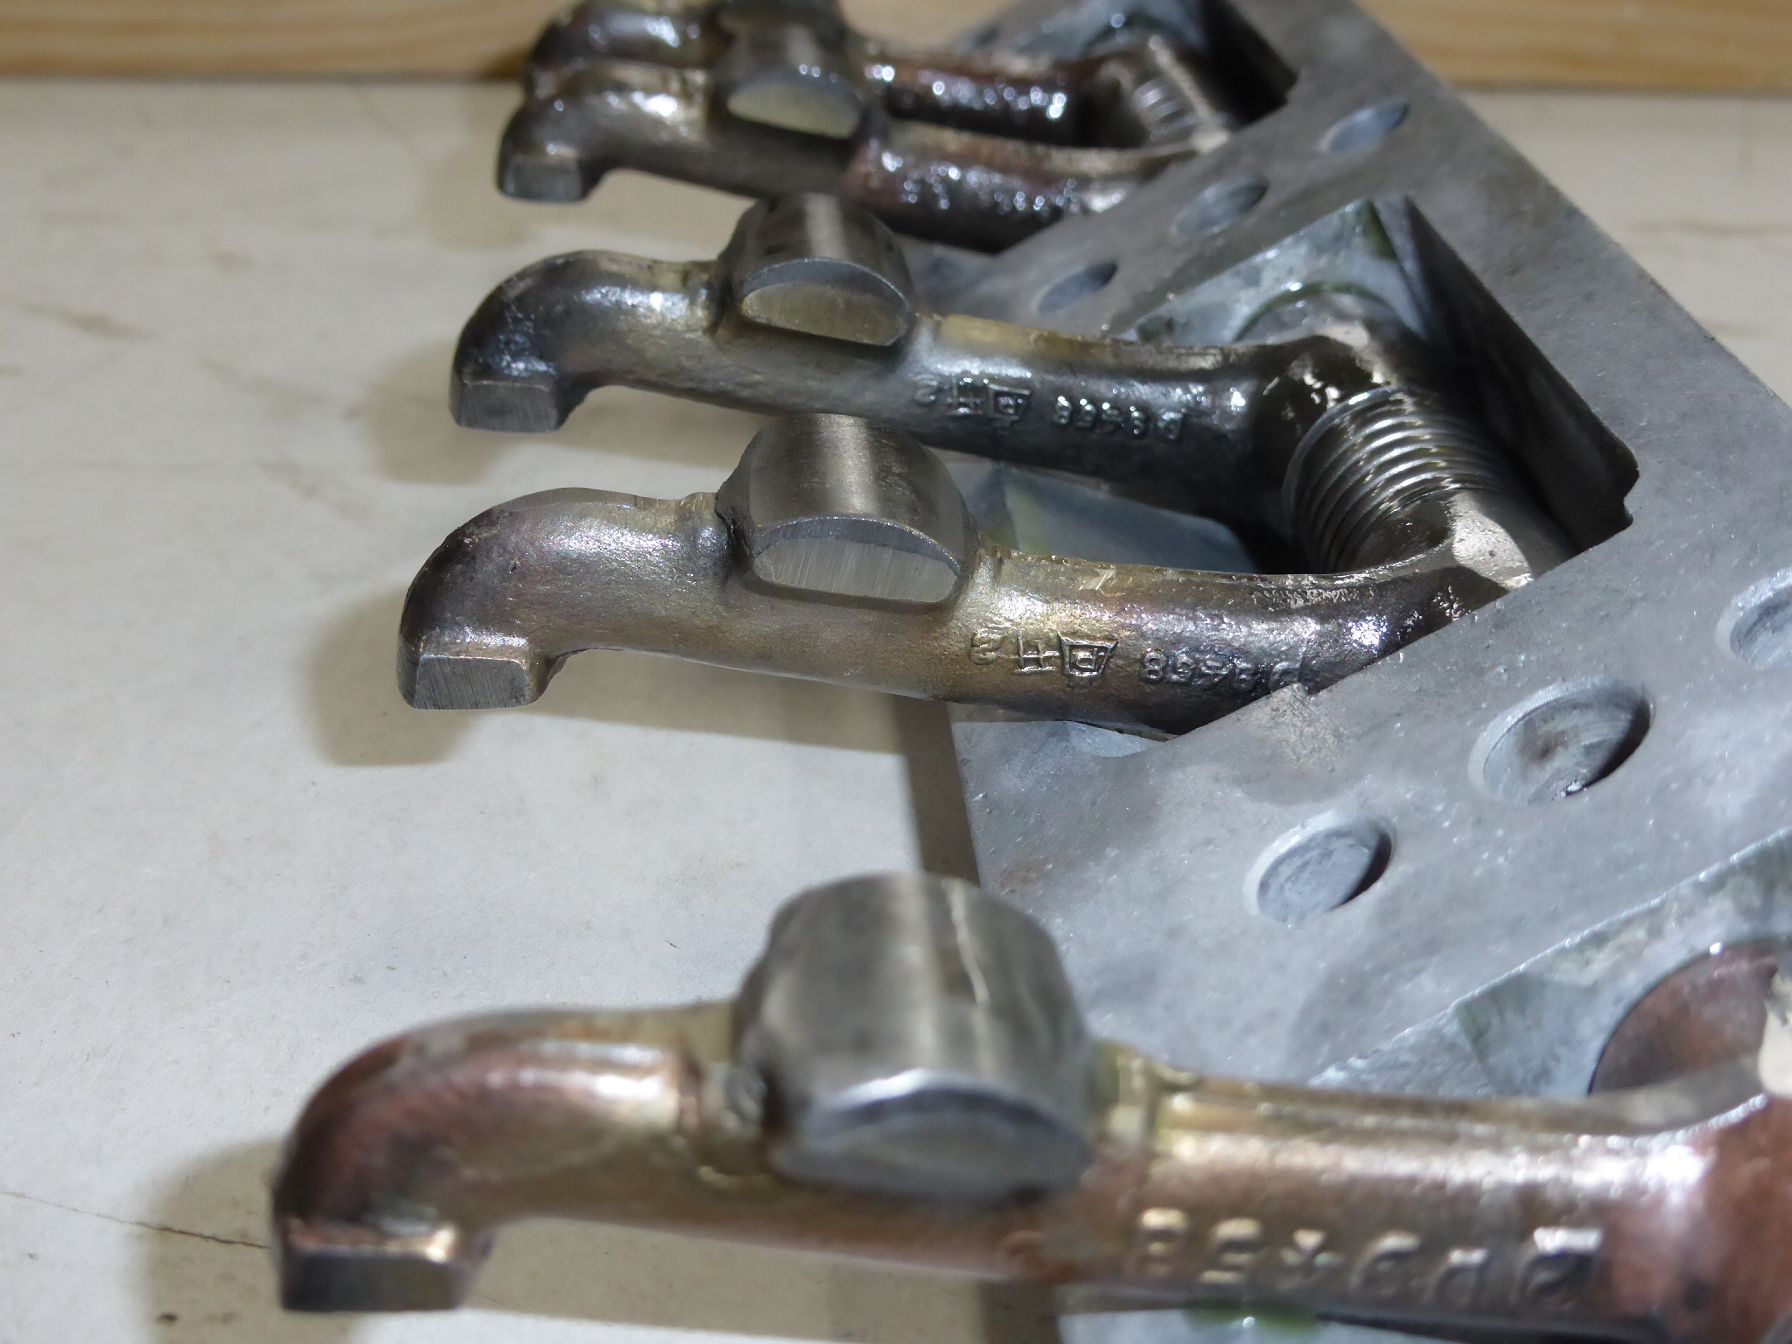
Posted on: 2024/10/18 10:39
|
|||
|
||||
|
Re: 1924 Sport 136
|
||||
|---|---|---|---|---|
|
Home away from home
|
I once had a crankshaft rod journal metal sprayed on a 1940 Packard 110 engine and it still looks like new today. Good job on recovering the original rockers!
Posted on: 2024/10/18 12:50
|
|||
|
All generalities are false.
Once I thought I was wrong but I was mistaken. Don Pierson Packard / IMPERIAL page CA DMV Licensed Vehicle VIN Verification 1951 Henney-Packard 3-Door Long Wheelbase Air Force Ambulance The 1951 Henney-Packard is For Sale! 1954 Packard Patrician 1954 Packard Patrician Parts Car 1956 Clipper Custom Sedan |
||||
|
||||
|
Re: 1924 Sport 136
|
||||
|---|---|---|---|---|
|
Home away from home
|
Hello Packard Friends,
I hope everyone had a nice Christmas. In the last 2 months, urgent other work and a long-term eye infection have not allowed me to continue working on "Sport" or write another post. In addition, the repaired electric motor for my defective lathe finally came back from Poland at the end of November. Why “Poland”??? ...well, this motor is a three-phase motor with 2 windings. Purchasing a new machine for my lathe was way beyond my budget. It was also beyond my budget to have this repair work (.. new windings...) carried out here in Germany, as the costs were close to the new price. A friend of mine who works here in Germany but lives in Poland took it to Poland for me and had it repackaged there. This saved me about $750. Unfortunately, the money didn't stay in my cash register for long because my electroplater called after 3 months of waiting and said that the last parts to be nickel-plated were now ready. The price for it had risen outrageously again since the last work. At least the result was acceptable. Now the work on the exhaust pipes will continue in the new year, provided the temperatures in my workshop allow it. Alternatively, I will continue the upholstery work on the front seat. Happy New Year to all Packard Freaks and Friends here in PI. Karl Attach file: k-P1040666.JPG (145.18 KB) k-P1040667.JPG (156.34 KB) k-P1040667.JPG (156.34 KB) k-P1040669.JPG (107.49 KB) k-P1040669.JPG (107.49 KB) k-P1040670.JPG (178.72 KB) k-P1040670.JPG (178.72 KB) k-P1040675.JPG (131.43 KB) k-P1040675.JPG (131.43 KB) k-P1040677.JPG (178.25 KB) k-P1040677.JPG (178.25 KB)
Posted on: 12/30 9:04
|
|||
|
||||
|
Re: 1924 Sport 136
|
||||
|---|---|---|---|---|
|
Webmaster

|
Very nice looking!
Posted on: 12/30 9:15
|
|||
|
-BigKev
1954 Packard Clipper Deluxe Touring Sedan -> Registry | Project Blog 1937 Packard 115-C Convertible Coupe -> Registry | Project Blog |
||||
|
||||
|
Re: 1924 Sport 136
|
||||
|---|---|---|---|---|
|
Home away from home
|
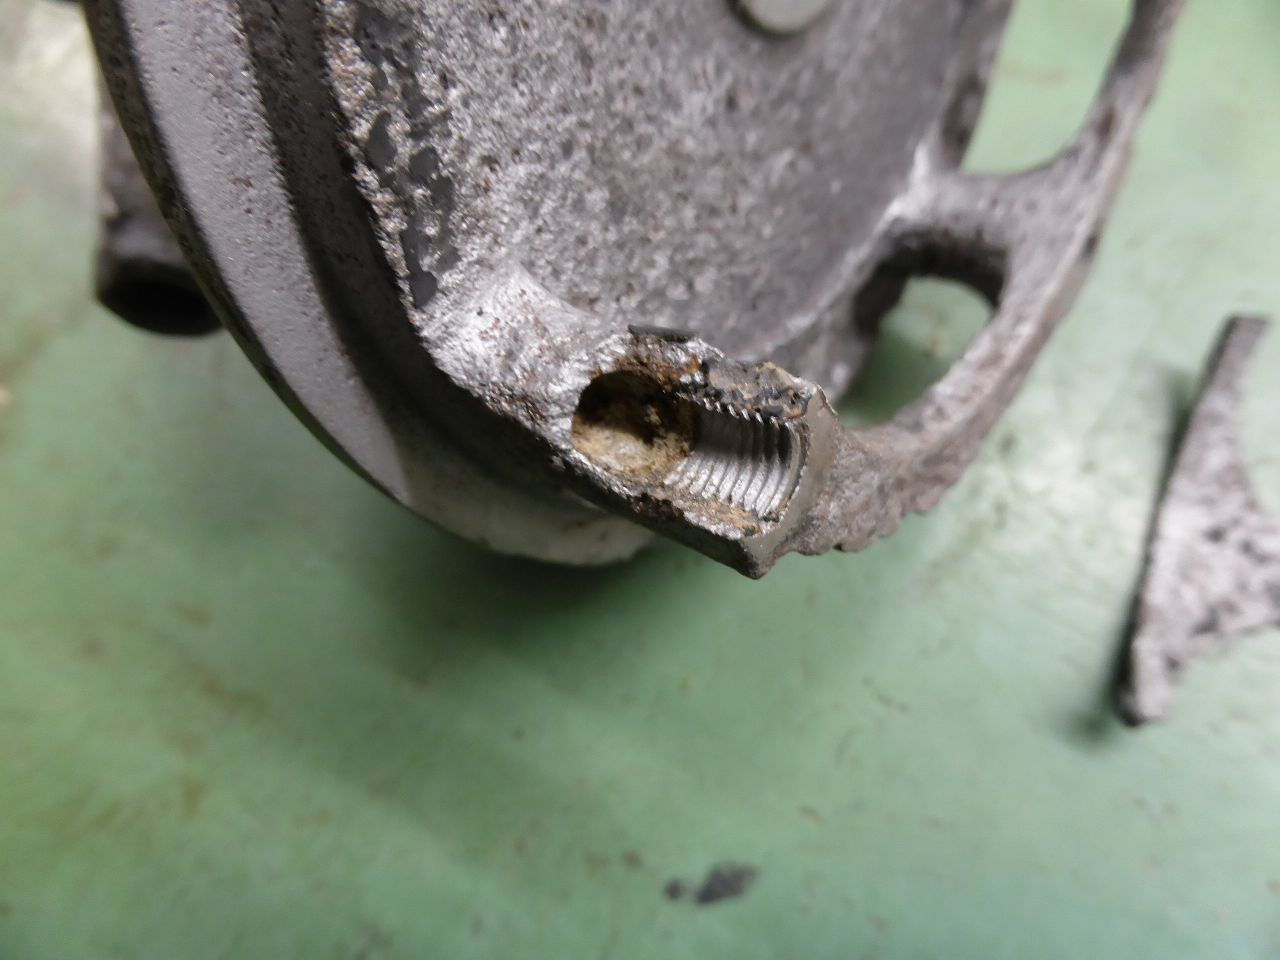
The Wheel Bolts
The old wheel bolts were in poor condition. That's why I wanted to exchange them for a new set. However, I had a problem with the replica screws because, like the original screws, they have 6 prongs at the ends of the hex head. These tips of the hexagonal head of the wheel bolts, which press directly onto the fastening rings of the rims, had already damaged the old, chrome-plated contact surfaces. The bolt would also damage the new, (softer) nickel-plated rings. That's why I didn't choose the screws that were offered as replicas. Instead, I made a set of screws myself. I chose commercially available screws (“Dorman 9/16 – 18 Wheel Bolt Hex / strength class 10.9”), which I machined on my lathe so that the hexagonal head and the conical collar end in a ring, which is now a fixed part of the head and thus exerts the pressure on the rim retaining ring across the board and not at 6 points. I cut off the cone collar so far that the remaining part forms a ring, which is now part of the screw head without being visually noticeable. After machining the “Dorman bolts”, I recut the threads on the lathe so that they correspond to the original. I then polished the heads of the bolts on the polishing machine so that they could be nickel-plated directly. I simply brushed the threaded part with a rotation special brush. Karl Attach file: Wheel Bolt.jpg (63.95 KB) k-P1040687.JPG (94.09 KB) k-P1040687.JPG (94.09 KB) k-P1040685.JPG (144.22 KB) k-P1040685.JPG (144.22 KB) k-P1040681.JPG (93.85 KB) k-P1040681.JPG (93.85 KB)
Posted on: 2/25 12:00
|
|||
|
||||
|
Re: 1924 Sport 136
|
||||
|---|---|---|---|---|
|
Home away from home
|
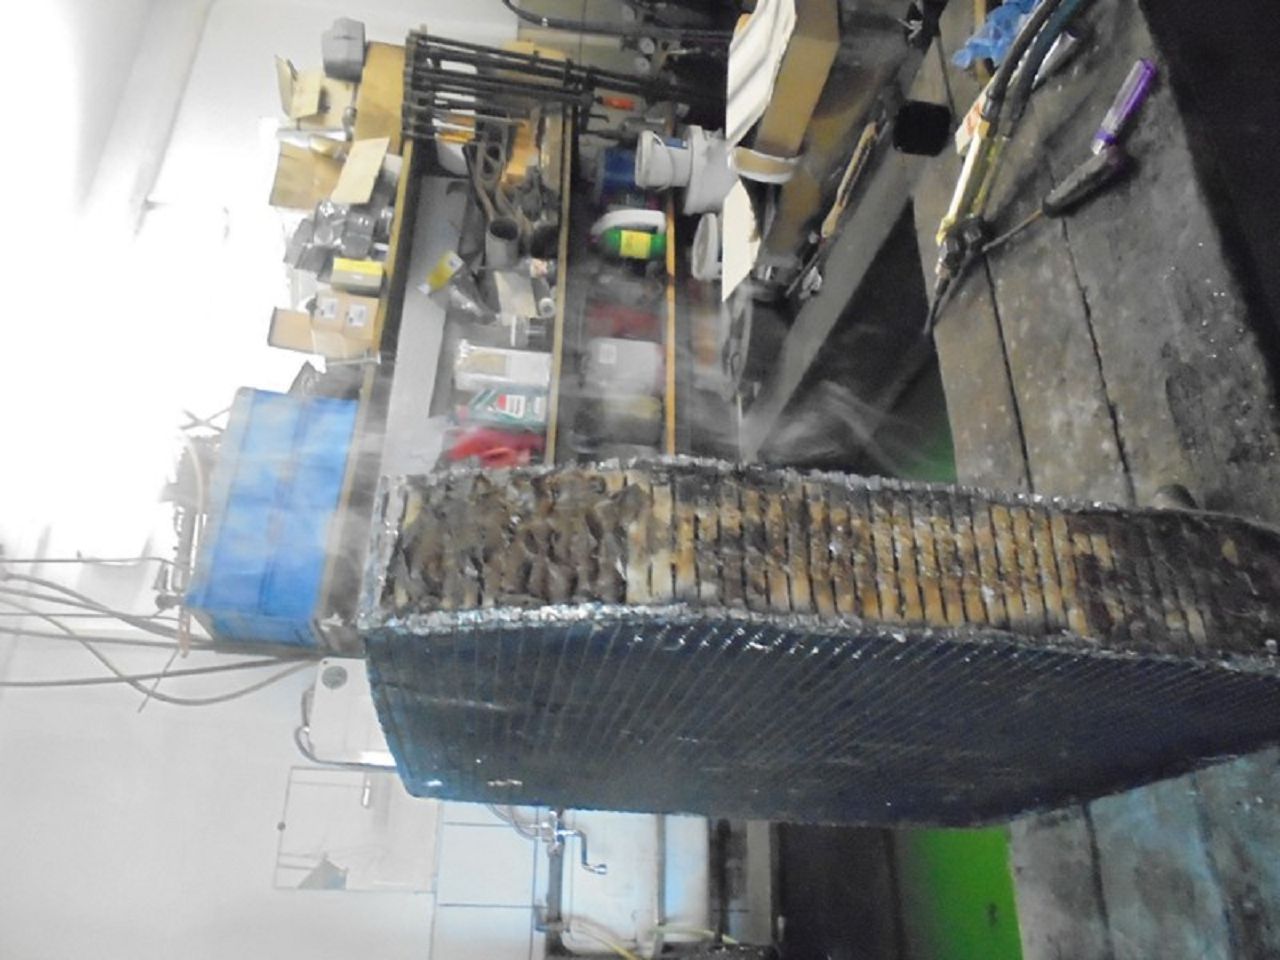
Now that daytime temperatures in my workshop are back between +6° and +10°C, I've started and completed work on the components I need to complete and commission the engine. First, I had to fabricate the remaining parts of the exhaust system. With the exception of the rear silencer, I made the entire system and its mounting hardware from stainless steel. Except for the material selection and thickness, the entire system's construction is identical to the original in every component. The pipe following the manifold will later be wrapped with heat protection tape. All components are then coated with a special black protective varnish.
Karl Attach file: k-P1040689.JPG (132.16 KB) k-P1040697.JPG (123.09 KB) k-P1040697.JPG (123.09 KB) k-P1040696.JPG (186.10 KB) k-P1040696.JPG (186.10 KB) k-P1040692.JPG (183.18 KB) k-P1040692.JPG (183.18 KB) k-P1040693.JPG (213.22 KB) k-P1040693.JPG (213.22 KB) k-P1040690.JPG (171.67 KB) k-P1040690.JPG (171.67 KB)
Posted on: 4/7 13:13
|
|||
|
||||
|
Re: 1924 Sport 136
|
||||
|---|---|---|---|---|
|
Home away from home
|
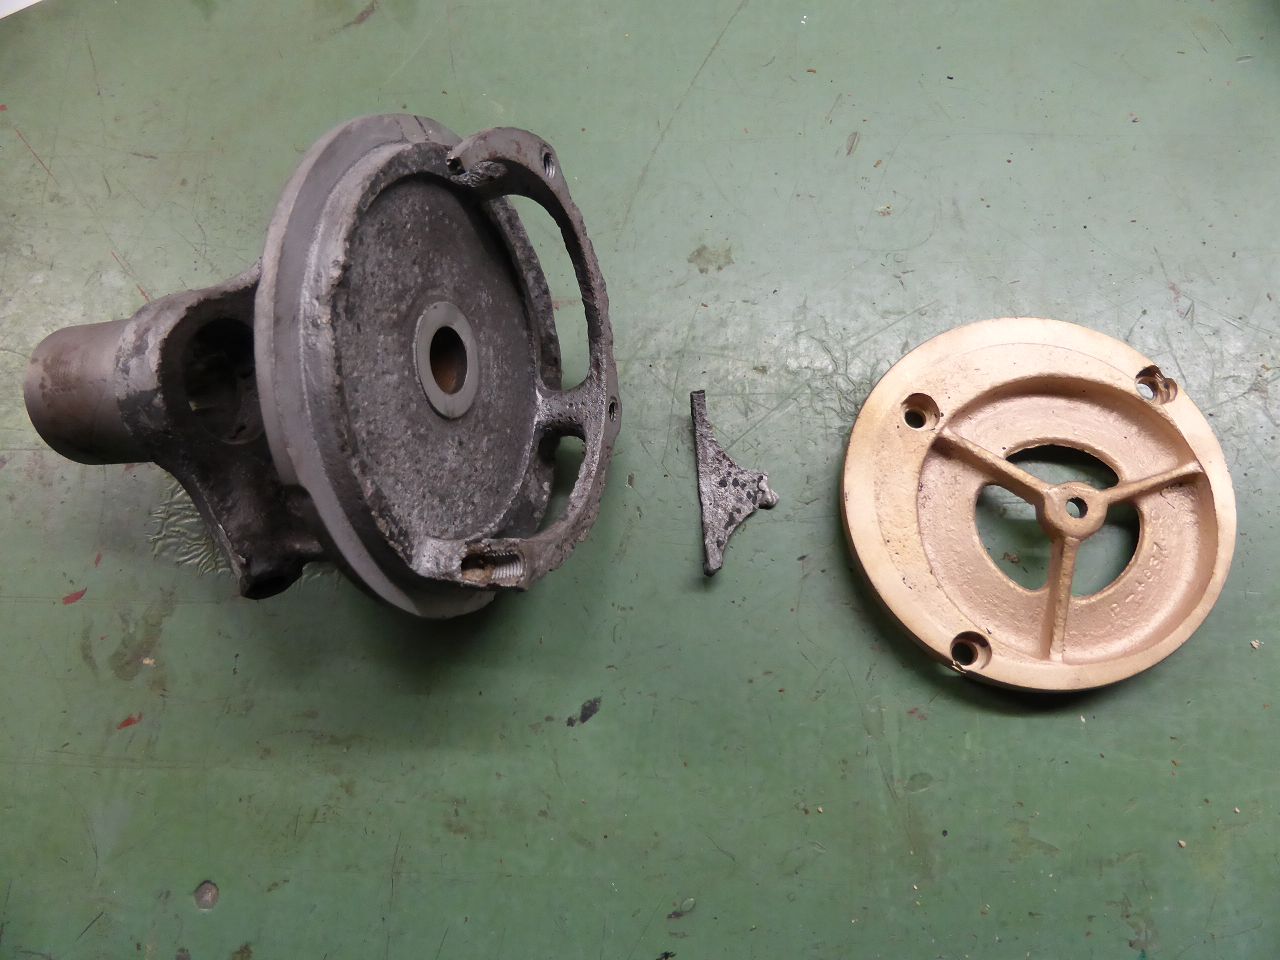
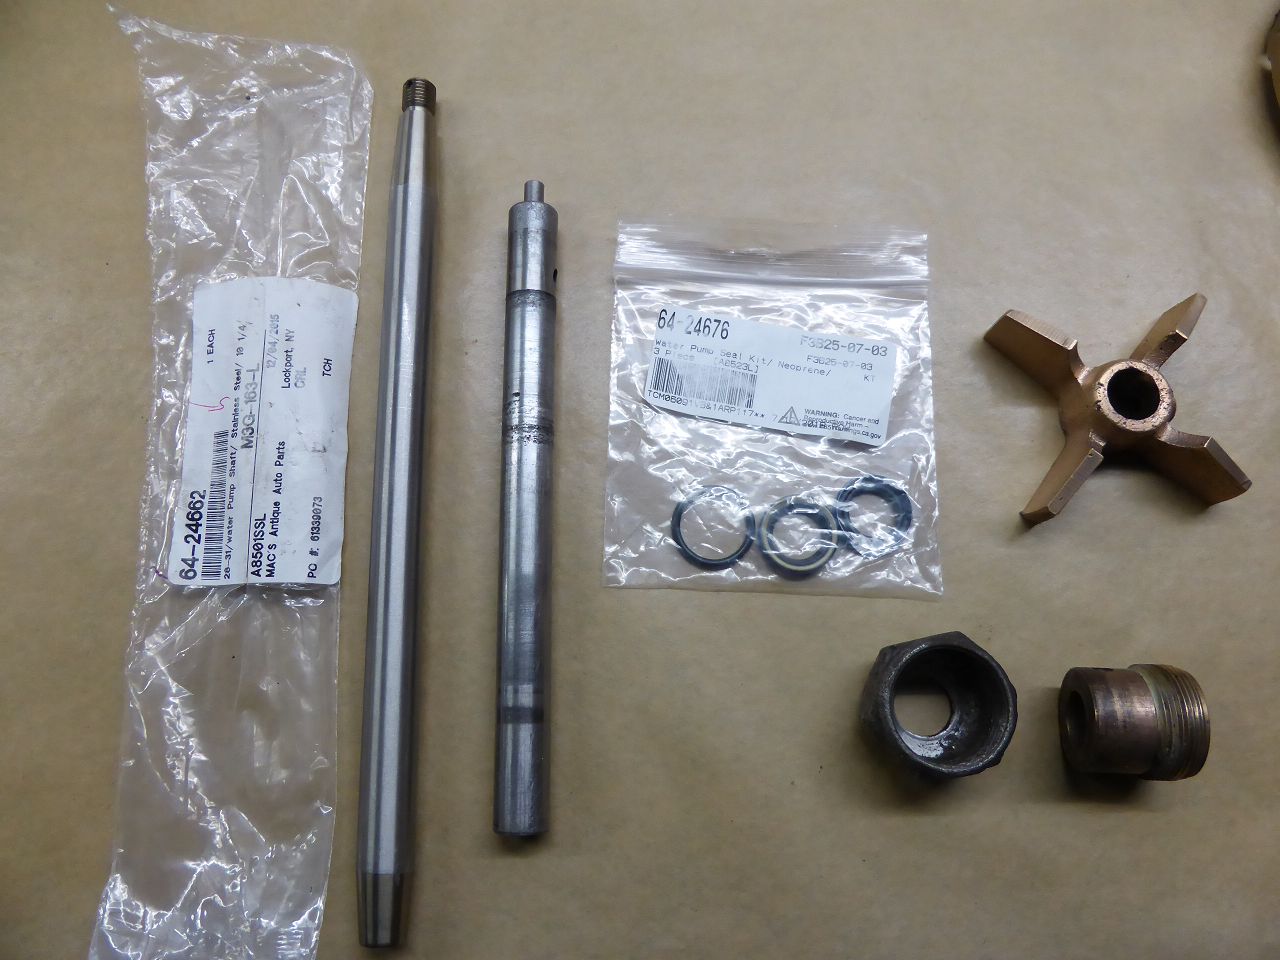
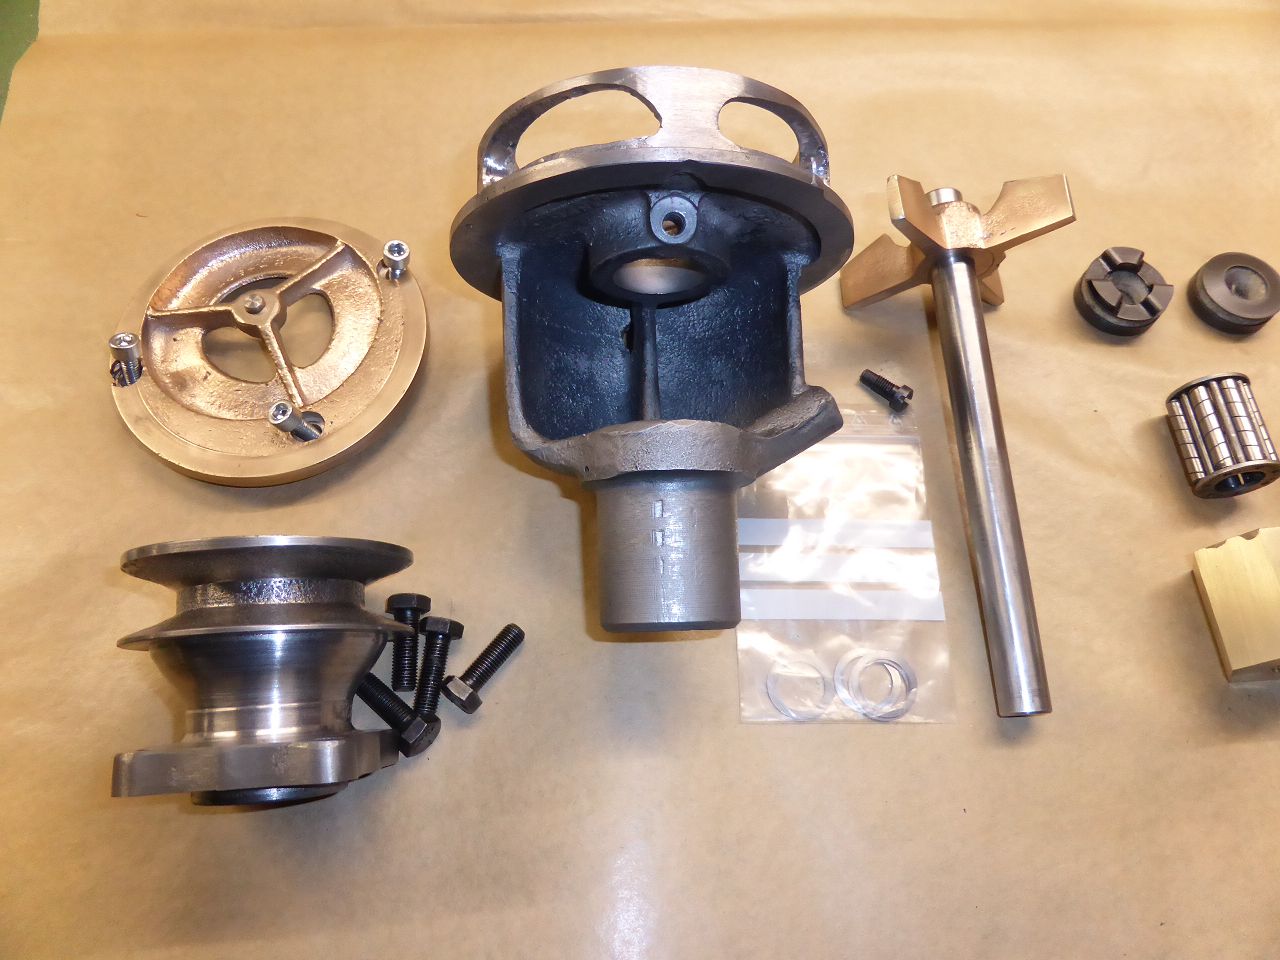
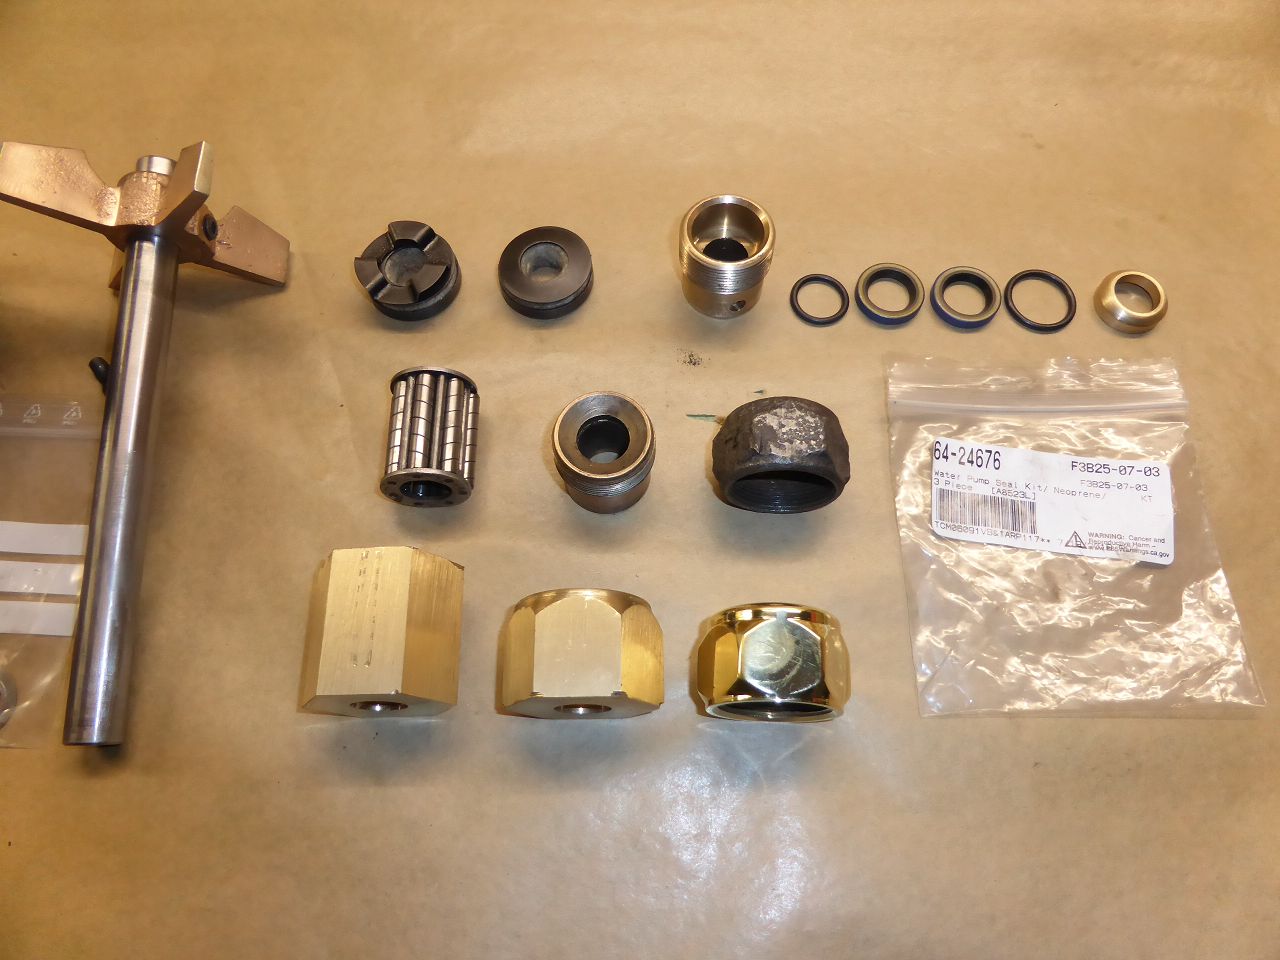
The pictures show the restored components I'm currently using to complete the engine and prepare it for testing. I re-bearing the distributor (ball bearing on top and bushing on the bottom of the axle). I overhauled and replaced the worn centrifugal bearing pins on my lathe. I replaced the distributor cap and rotor fingers with those from the later model. I replaced the condenser cast into the original distributor with a new one that fits into the old housing, thus preserving the original appearance. The carburetor received a repair kit and was brushed to a satin finish with a special brush. The carburetor linkage was replaced with a stainless steel linkage, mounted in new bushings, and painted black. The petcocks were blasted with glass dust and polished. The old fan blades were deformed and had several coats of paint on them. I made new ones. The new blades will then be painted with a clear varnish specifically designed for non-ferrous metals.
The starter and alternator will be featured in the next blog post. Karl Attach file: k-P1030880.JPG (101.61 KB) k-P1030882.JPG (98.65 KB) k-P1030882.JPG (98.65 KB) k-P1040270.JPG (127.79 KB) k-P1040270.JPG (127.79 KB) k-P1040271.JPG (96.50 KB) k-P1040271.JPG (96.50 KB) k-P1040272.JPG (100.73 KB) k-P1040272.JPG (100.73 KB) k-P1020995.JPG (229.18 KB) k-P1020995.JPG (229.18 KB) k-P1020649.JPG (233.37 KB) k-P1020649.JPG (233.37 KB) k-P1020674.JPG (226.75 KB) k-P1020674.JPG (226.75 KB) k-P1040698.JPG (205.34 KB) k-P1040698.JPG (205.34 KB) k-P1040699.JPG (163.85 KB) k-P1040699.JPG (163.85 KB) k-P1040708.JPG (142.30 KB) k-P1040708.JPG (142.30 KB) k-P1040709.JPG (149.75 KB) k-P1040709.JPG (149.75 KB) k-P1040710.JPG (147.72 KB) k-P1040710.JPG (147.72 KB) k-P1040701.JPG (100.78 KB) k-P1040701.JPG (100.78 KB) k-P1040703.JPG (105.99 KB) k-P1040703.JPG (105.99 KB) k-P1040704.JPG (188.55 KB) k-P1040704.JPG (188.55 KB) k-P1040705.JPG (170.36 KB) k-P1040705.JPG (170.36 KB)
Posted on: 5/10 5:33
|
|||
|
||||
|
Re: 1924 Sport 136
|
||||
|---|---|---|---|---|
|
Home away from home
|
.... fan blades mounted on blade support with 4mm stainless steel semi-circular hollow rivets.
Karl Attach file: k-P1040713.JPG (86.79 KB) k-P1040711.JPG (167.73 KB) k-P1040711.JPG (167.73 KB) k-P1040712.JPG (154.20 KB) k-P1040712.JPG (154.20 KB)
Posted on: 5/18 4:57
|
|||
|
||||


