|
Re: Larry's 1951 Club Sedan Project
|
||||
|---|---|---|---|---|
|
Home away from home
|
It's a pleasure Jim. Quite reassuring to know there's a good likeness with the Maroon on your car, appreciate you checking that aspect. Happy polishing!
Posted on: 2012/5/26 23:42
|
|||
|
1951 Packard Club Sedan | [url=ht
|
||||
|
||||
|
Re: Larry's 1951 Club Sedan Project
|
||||
|---|---|---|---|---|
|
Home away from home

|
Painting the Bonnet
A few months back I cleaned up the bonnet and primed it, ready for finishing and painting. Recently I got it out of 'storage' and began prepping it for painting.Always look forward to shooting a bit of colour onto the car. When I bought the car the bonnet had been stripped and primed, and because that was over 30 years ago, I found some light metal oxidation had formed under that old primer. There was no rust apart from a small patch of surface rust on the rear underside. Ground that off with a die grinder and 80-grit flapper then treated the whole bonnet with phosphoric acid before re-priming with etch primer. Have worn out one angle grinder already . . . here is the new one getting a workout. Using stripper discs I cleaned a small area at a time so as there is no chance of warping the metal.  Some of the very old pitting (although very minor) needed a few passes with the stripper disc to get the area really clean   Only one small area with surface rust    Treated with MetalReady  There were some very minor dents leading to highs and rather than shrink these and risk any warping due to the heat I used a slapper to minimize them. After etch-priming both top and underside of the bonnet, and filling one small nick with stop putty, 4 coats of 2-pak primer-filler were applied. Then the bonnet was wet sanded with 320 followed by 600 and finally 800.  Blocking was a lengthy job, taking around 4 hours . . .  I set up outside and sprayed the underside first, as a test of whether I would end up having too many inclusions (- dust and bugs) to achieve a good finish. Sure enough, it must have been a 'Bug's day out', and several small ones landed on my paint job during the spraying of the underside. It was a still, cool but sunny day and being the middle of winter I had thought there would be very few bugs around. So it was going to be necessary to spray the upper surface inside the workshop to eliminate bugs. The bonnet was moved inside, lights set up, doors closed and thankfully a very good result was achieved, with no bugs and minimal dust. A few views of the Packard Maroon Metallic. Yet to be buffed but gloss is good    At a later stage the job will be lightly hand-sanded with 2000 grit and re-coated with several additional coats of clear, to give additional depth and smoothness to the final finish. It has already had four coats of clear over the colour.
Posted on: 2012/7/1 4:13
|
|||
|
1951 Packard Club Sedan | [url=ht
|
||||
|
||||
|
Re: Larry's 1951 Club Sedan Project
|
||||
|---|---|---|---|---|
|
Home away from home

|
Beautiful work Larry! All the hard work is paying off! Congrats!
Posted on: 2012/7/1 8:15
|
|||
|
||||
|
Re: Larry's 1951 Club Sedan Project
|
||||
|---|---|---|---|---|
|
Home away from home

|
Larry, fantastic job! Goes to show that hard work and patience does indeed pay off! I'm looking forward to seeing some photos of the bonnet installed on the car.
Posted on: 2012/7/1 8:27
|
|||
|
PA Patrician (Tim Wile)
[size=x-small][color=000099][font=Georgia][url=https://packardinfo.c |
||||
|
||||
|
Re: Larry's 1951 Club Sedan Project
|
||||
|---|---|---|---|---|
|
Home away from home

|
Sweet!
Posted on: 2012/7/1 12:40
|
|||
|
1954 black Patrician, unrestored, mostly original, minty!!
|
||||
|
||||
|
Re: Larry's 1951 Club Sedan Project
|
||||
|---|---|---|---|---|
|
Home away from home

|
Looks gorgeous!
Posted on: 2012/7/1 20:43
|
|||
|
[url=h
|
||||
|
||||
|
Re: Larry's 1951 Club Sedan Project
|
||||
|---|---|---|---|---|
|
Forum Ambassador

|
It's good to see you take the time to do a thorough job. I am impressed. Keep the pics coming.

Posted on: 2012/7/2 12:12
|
|||
|
||||
|
Re: Larry's 1951 Club Sedan Project
|
||||
|---|---|---|---|---|
|
Home away from home
|
Looks wonderful, Larry! Keep up the great work and the play by play descriptions. I have a non-Packard paint job ahead of me and this really helps!
Posted on: 2012/7/2 18:36
|
|||
|
1951 200 Deluxe Touring Sedan
1951 200 Deluxe Touring Sedan (parts ?) 1951 Patrician Touring Sedan 1955 Patrician Touring Sedan |
||||
|
||||
|
Re: Larry's 1951 Club Sedan Project
|
||||
|---|---|---|---|---|
|
Home away from home

|
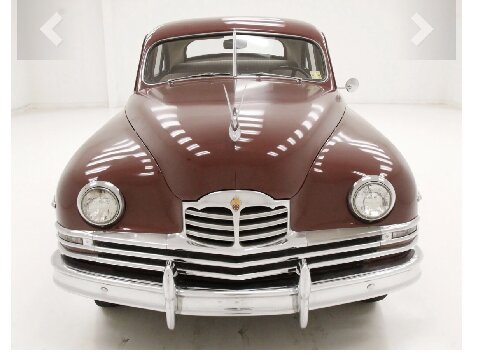
Just as an FYI, see those neat scallops there along the sides of the hood? They were quite unique in '51, John Reinhart (stylist) called the whole thing the 'Contour look', and it's best seen in that there hood: The center part of the hood is a smooth, flat surface, the same height as the fender tops, giving the whole front end a more graceful, streamlined look..and far more modern than the competition...GM still had that center bulge in the middle of the hood towering over the fender tops.
Just one of the things that made Packard special, and sometimes one of the things we take for granted today b/c the 'Contour look' is widely accepted today.
Posted on: 2012/7/2 22:32
|
|||
|
1954 black Patrician, unrestored, mostly original, minty!!
|
||||
|
||||

