
|
Re: Henry's 37 Limousine
|
||||
|---|---|---|---|---|
|
Forum Ambassador

|
I never said Packard was stupid, And I guess we will see how long it lasts. The goop was actually the backup. The 45 from the bulge shoved up on the manifold and held up tight inside was the primary.
Progressive and innovative....
Posted on: 2017/2/11 19:59
|
|||
|
1937 Packard 138-CD Deluxe Touring Limousine
Maroon/Black 1090-1021 [url=https://packardinfo.com/xoops/html/modules/registry/View.php?ID=232]1955 Packard |
||||
|
||||
|
Re: Henry's 37 Limousine
|
||||
|---|---|---|---|---|
|
Forum Ambassador
|
took the exhaust and intake manifold off so i could weld the choke tube to the manifold. my previous attempts to keep it in were unsuccessful and i didn't like the leak there nor it coming loose. so i just welded it in, this way only the tube will need to be replaced over time if it breaks or fails.
i cleaned, degreased, and heated the manifold in waves while welding. its not super pretty, but it isn't going anywhere now. sorry if you dont like it, but i do. i also welded the valve in the down position. i welded the shaft all the way around on both sides to stop the exhuast leak. i didn't want to spend the money for a rebuild kit when i'm not gonna use the dumb thing. (no i'm not calling Packard dumb) the car warms up fine without it, so i just welded it so the flap routes the exhaust gases out the muffler. it looks like it is sill there from the outside, but it just doesn't move. if i ever change my mind, unlikely... a new manifold can be sourced as this one was already abused to begin with. all i have left are fiber gaskets for the exhaust manifold, i used the good metal impregnated ones already. i hope the fiber ones hold up as well. with the manifolds off, i will beable to look at the lifters easier. i also applied for the Concours d'Elegance of Texas and Keels and Wheels. shall see what happens. Attach file:  (37.74 KB) (37.74 KB)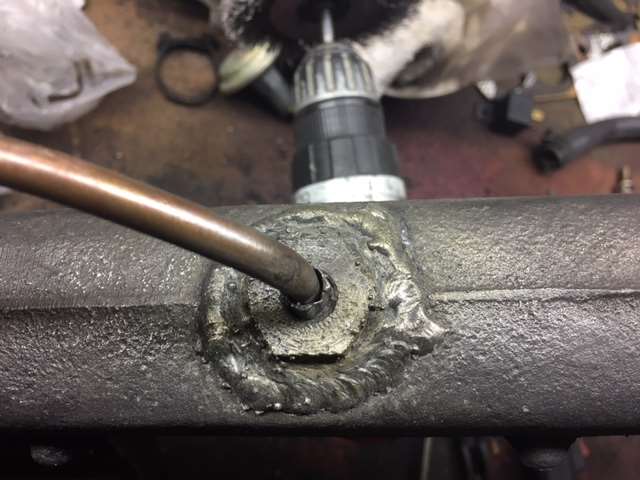
Posted on: 2017/2/14 14:04
|
|||
|
1937 Packard 138-CD Deluxe Touring Limousine
Maroon/Black 1090-1021 [url=https://packardinfo.com/xoops/html/modules/registry/View.php?ID=232]1955 Packard |
||||
|
||||
|
Re: Henry's 37 Limousine
|
||||
|---|---|---|---|---|
|
Forum Ambassador
|
I had both inner fenders off, so I repainted them.
I finished up the Deutsch connector for the headlights. this will accommodate removal of the front clip again in the future if I ever find the need and I wont have to cut the wiring harness again. it works great and all lights and turn signals, etc, work fine. getting alittle nervous about the submissions I put in for the two concours. Attach file: (33.56 KB)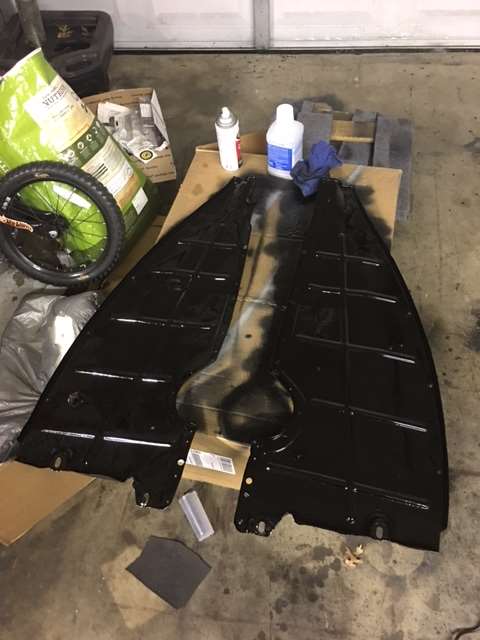 (26.19 KB) (26.19 KB)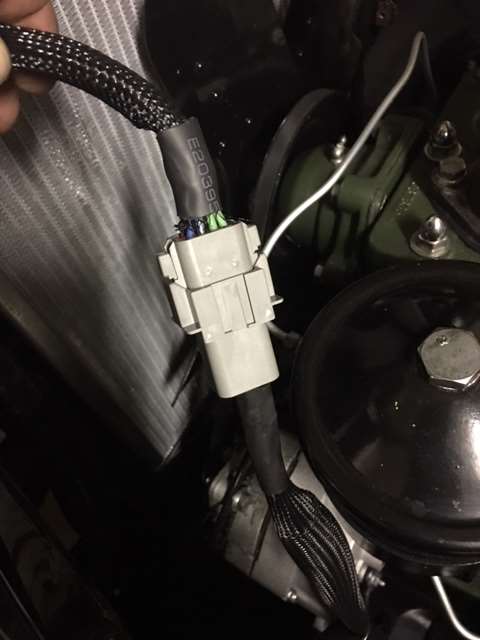
Posted on: 2017/2/16 23:31
|
|||
|
1937 Packard 138-CD Deluxe Touring Limousine
Maroon/Black 1090-1021 [url=https://packardinfo.com/xoops/html/modules/registry/View.php?ID=232]1955 Packard |
||||
|
||||
|
Re: Henry's 37 Limousine
|
||||
|---|---|---|---|---|
|
Forum Ambassador
|
got some supplies at the auto store to do the "fog" lights today. while browsing saw some nice rubber tips to put on the heater inlet/outlet pipes. makes them look a lot better I think.
I adjusted the lifters again, went with .08 on the intake and .011 on the exhaust. I did .009 and .013 before and they were noisy. today was warmer out and I closed the gap a bit, so hopefully they will not be noisy this time around. figured I should give them a go since the manifolds were off. thanks to the Packard parts department at the dealer in Dallas, I have new metal exhaust gaskets. Thanks Parts dept, couldn't do half this stuff without you! national carbs called and they received the carb. they will start working on it Monday. still nothing yet on the concours. I probably shouldn't give my hopes up. Attach file: (33.68 KB)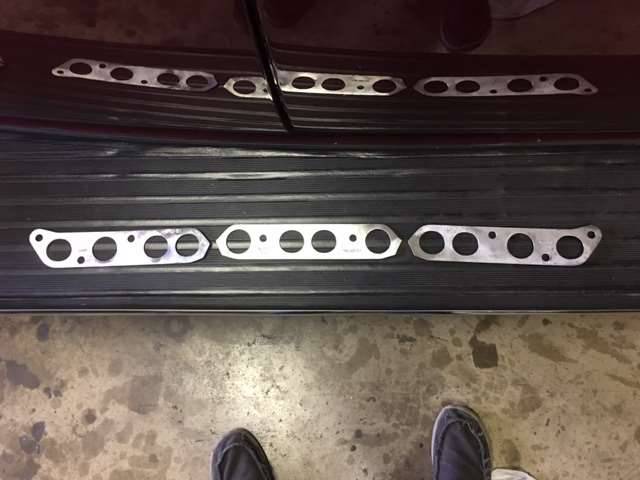 (34.21 KB) (34.21 KB)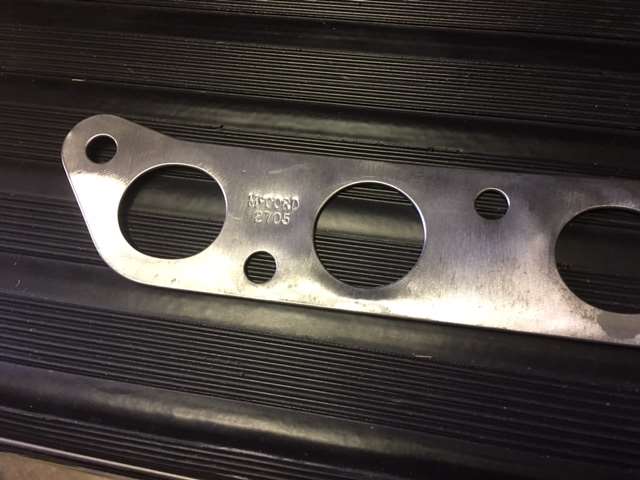 (26.42 KB) (26.42 KB)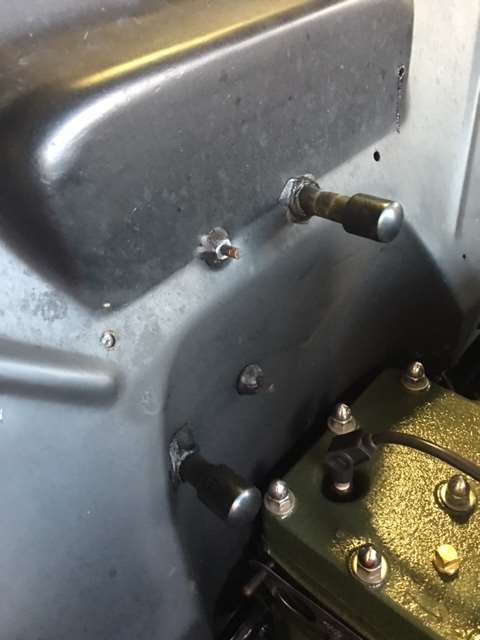
Posted on: 2017/2/18 19:27
|
|||
|
1937 Packard 138-CD Deluxe Touring Limousine
Maroon/Black 1090-1021 [url=https://packardinfo.com/xoops/html/modules/registry/View.php?ID=232]1955 Packard |
||||
|
||||
|
Re: Henry's 37 Limousine
|
||||
|---|---|---|---|---|
|
Home away from home

|
If my memory serves me correctly from working on my 37 120 body 1092 the headlight harness unplugs from the main harness to facilitate removal of the front clip. Don't understand why it is necessary to install those modern connectors??
Posted on: 2017/2/18 20:07
|
|||
|
||||
|
Re: Henry's 37 Limousine
|
||||
|---|---|---|---|---|
|
Forum Ambassador
|
I do not have a factory harness. Nor do I have 6 volt. I have 12 volt. I have an alternator, not a generator. I have a universal wiring harness that I custom modified to look discrete. When I routed the harness I did not make a disconnect to facilitate the removal of the front clip. That meant I had to cut it. Now that it is back together I used a modern connector to put it back together. In the future I can take the clip off and not cut the harness again. When I wire the fog lights, which my alternator will handle, I will have disconnects for them as well. Does that makes sense??
Posted on: 2017/2/18 21:35
|
|||
|
1937 Packard 138-CD Deluxe Touring Limousine
Maroon/Black 1090-1021 [url=https://packardinfo.com/xoops/html/modules/registry/View.php?ID=232]1955 Packard |
||||
|
||||
|
Re: Henry's 37 Limousine
|
||||
|---|---|---|---|---|
|
Forum Ambassador
|
began working on the wiring for the fog lights. found out the headlights do not come on in the 3rd switch position, only the 4th. if the 3rd is still energized when it is in the 4th position, i will use it to signal the switch for the fog lights. this way i can run them with or without the headlights. you can see where i mounted the dual relays near the battery. they are sealed. battery positive and negative wires to battery and the others will be left/right fog lights and the wires to the switch on the dash to signal the relays which beam i want.
now on to the rear shock links. rubber was complete gone from the top end. i bought a generic shock rubber kit from the auto store. it has two of the round bushings and two of the ones that sandwich the metal...not sure what shape you want to call those. i used the round one to fix the upper part and the others will be for the lower. first, there was no way the rubber was going to fit into that small hole in the eye at the top. so i had to grind off one side of the eye so i could get the rubber in. i had to shave some of the rubber off the round bushing as well. lots of lubricant and it was in. then i drilled the center hold in the rubber bushing to 1/2" size in steps. Once that was done i used more lubricant and pressed it on the bolt by hand at first and then socket and hammer to get it to go the rest of the way. the taper in the end that goes into the shock arm helps to spread the 1/2" hole in the rubber to fit tightly and press the rubber so it will not just rotate. since i ground off that one side to fit in the rubber, i blocked it back up with 2 washers. the washers will be sandwiched when the bolt is tightened and when it rotates a bit the washers will rotate on each other. cheap fix, but not for those looking for a correct restoration. i did not take pictures during the process as i wasn't sure it would work and my hands were coverd in crud. i will try with the next one. the shocks are pretty tired, i can move the lever by hand very easily back and forth. the rebuild does not look that easy to do, but i have spares at the shop that maybe i can give it a go on first. Attach file: (33.92 KB)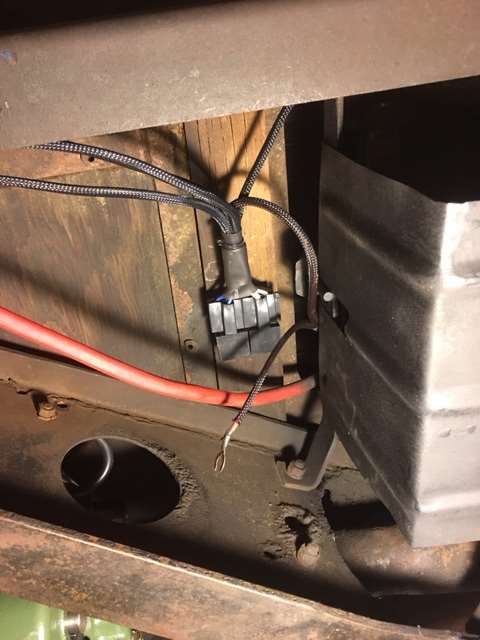 (50.56 KB) (50.56 KB)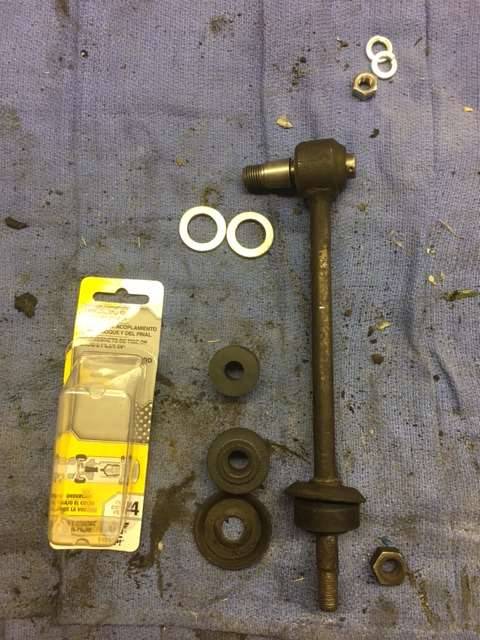 (25.69 KB) (25.69 KB)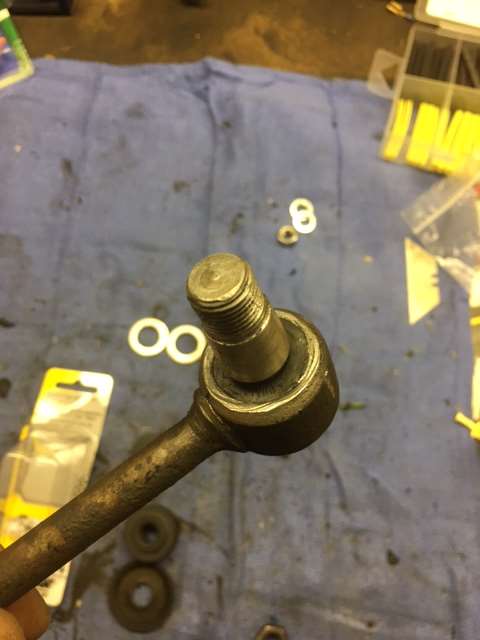 (31.68 KB) (31.68 KB)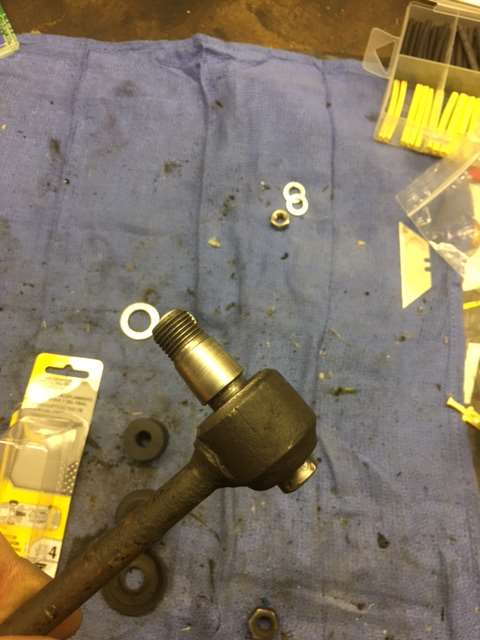 (29.19 KB) (29.19 KB)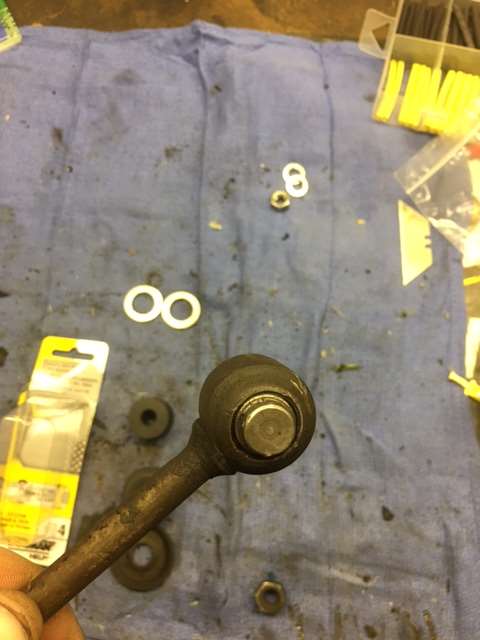 (22.78 KB) (22.78 KB)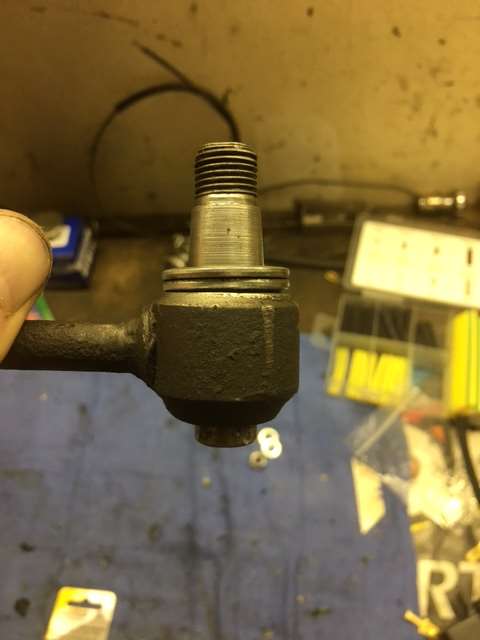
Posted on: 2017/2/24 11:17
|
|||
|
1937 Packard 138-CD Deluxe Touring Limousine
Maroon/Black 1090-1021 [url=https://packardinfo.com/xoops/html/modules/registry/View.php?ID=232]1955 Packard |
||||
|
||||
|
Re: Henry's 37 Limousine
|
||||
|---|---|---|---|---|
|
Forum Ambassador

|
The correct shock link rubber grommets are all listed as available in the Steele Rubber catalog. I used their shock link grommets for my '34 perhaps 40 years ago and unlike some other Steele suspension parts I've bought, they have held up extremely well to this day.
Posted on: 2017/2/24 12:59
|
|||
|
||||
|
Re: Henry's 37 Limousine
|
||||
|---|---|---|---|---|
|
Forum Ambassador
|
I see them on Steele's website, but looking over the prices, i'm glad i went with the $4.50 option from oreilly autoparts and some elbow grease. the lower bushing are a bit smaller in diameter, but they will work fine and they are available over the counter.
i'm also not sure how you would get those bushings in the top of the link arm, unless they fold easily and the rubber is plyable enough. probably is since the hole is 5/8 and i started with a much smaller hole and drilled out to 1/2" after it was inserted. maybe if the hole was drilled to 1/2" first, maybe i could squeeze it in without having to grind one side of the upper arm off. idk...either way its fixed and will work. i used some of their rubber on the rear link on the 55....all of it has gone to crap, but other parts i have used are fine. the rear window seal wasn't the best either, had to send back the first one. over all i'm glad they are there to help in this hobby, so no offense to them meant. 100 point restoration...Steele driving and using.....Hank the bat  Attach file: (34.08 KB)
Posted on: 2017/2/24 13:45
|
|||
|
1937 Packard 138-CD Deluxe Touring Limousine
Maroon/Black 1090-1021 [url=https://packardinfo.com/xoops/html/modules/registry/View.php?ID=232]1955 Packard |
||||
|
||||


