|
Re: BigKev's 1954 Packard Clipper Deluxe Sedan
|
||||
|---|---|---|---|---|
|
Webmaster

|
Thanks for all the info guys. I am going to let the tank "air-out" till next weekend before I figure out how to tackle what lives inside it. I already gave it a few rounds of vigorous flushing with the garden hose, and a round with thinner.
I will also replace the vent hose with new rubber after the refinishing process. Interesting thing about my tank is there is not a trace of paint on it at all. So were the 51-56 tanks left natural as opposed to painted?
Posted on: 2010/2/16 2:26
|
|||
|
-BigKev
1954 Packard Clipper Deluxe Touring Sedan -> Registry | Project Blog 1937 Packard 115-C Convertible Coupe -> Registry | Project Blog |
||||
|
||||

|
Re: BigKev's 1954 Packard Clipper Deluxe Sedan
|
||||
|---|---|---|---|---|
|
Webmaster
|
Thanks Dave, that was the confirmation I was looking for before I order Eastwoods "Tank Tone" paint.
Posted on: 2010/2/16 12:04
|
|||
|
-BigKev
1954 Packard Clipper Deluxe Touring Sedan -> Registry | Project Blog 1937 Packard 115-C Convertible Coupe -> Registry | Project Blog |
||||
|
||||
|
Re: BigKev's 1954 Packard Clipper Deluxe Sedan
|
||||
|---|---|---|---|---|
|
Webmaster
|
Since I needed to order a couple of cans of "Tank Tone" paint from Eastwood as well as a couple more cans of Silver Cadmium Paint, I just went ahead and ordered their fuel tank sealer kit as well. You still use muriatic acid and acetone which you can buy at a hardware store to clean the tank, and then the kit comes with a rust remover, an etch, and then finally the sealer. People have reported that the sealer has lasted for over 10 years in their cars with no rust or peeling visible. I will also install a filter back by the tank as anything that happens in the future I want captured there are opposed to the screen in the bottom of the fuel pump.
Anyway, once it all arrives I will go through the process and take pictures along the way. Also since I ordered today they threw in a free pair of panel dimpling pliers. Not sure if I will ever use then, but hey, free tools is free tools! 
Posted on: 2010/2/16 17:16
|
|||
|
-BigKev
1954 Packard Clipper Deluxe Touring Sedan -> Registry | Project Blog 1937 Packard 115-C Convertible Coupe -> Registry | Project Blog |
||||
|
||||
|
Re: BigKev's 1954 Packard Clipper Deluxe Sedan
|
||||
|---|---|---|---|---|
|
Webmaster
|
A few updates. I got most of the tank cleaned with Eastwoods kit, but there still exists some hardened rust/vanish that just wont come off (mostly on the underside of the top). I used stronger and stronger doses of Muriatic acid, and really not much more came out. I ever put several large bolts in the tank and gave it repetitive rounds of shaking with acid, and still the patches of rust persist. Only thing that accomplished was flash-rusting the bolts. The tank is about 90% clean. So I got to a point where it was getting close to midnight and I had to call it a night. So poured in the Fast Etch which leaves a rust resistant coating on the tank, follow by a few rounds of acetone to drive out the remaining moisture. Then I left a air-hose running in the tank for about a 1/2 hour until the tank was bone dry. I did this as I didnt want the tank rusting back over from the muriatic acid.
Checked it this morning and no new rust has formed. The pickup tube and sump area are clear, and there is no loose scale or anything else in the tank. So know I have to figure out what to do next. Either I run the tank like it is know (without the Sealer), 90% clean with hardened patches of rust remaining. OR I dump in the Eastwood sealer as is and worry about it pealing later because of the rust patches. OR I get the tank boiled out at a radiator shop (budget allowing), and then do the sealer.  No pictures on the tank cleaning episode last night as I figured strong acids, lots of water, and various chemicals wouldn't play well with the digital camera. On a positive note, the driveway was never cleaner! On another topic.... I got a replacement Rear Speaker switch from David Moe that is correct for my '54. Thanks David for tracking that down for me. Also I received the electric fuel pump and see-through filter from Summit Racing.
Posted on: 2010/3/4 23:42
|
|||
|
-BigKev
1954 Packard Clipper Deluxe Touring Sedan -> Registry | Project Blog 1937 Packard 115-C Convertible Coupe -> Registry | Project Blog |
||||
|
||||
|
Re: BigKev's 1954 Packard Clipper Deluxe Sedan
|
||||
|---|---|---|---|---|
|
Forum Ambassador

|
You know Kev, if the tank does not leak, I think I would avoid sealing. I have seen very mixed results with fuel tank sealants. I am also not sure sealing over rust / contaminants would be a very good idea. Tough call for sure.
Posted on: 2010/3/5 1:44
|
|||
|
||||
|
Re: BigKev's 1954 Packard Clipper Deluxe Sedan
|
||||
|---|---|---|---|---|
|
Webmaster
|
Agreed.
I'm kinda leaning towards running as is and putting the sealer away for another day. I figure with the see through reusable filter back at the tank outlet I can catch any rust that might may break loose before it affects anything forward. The tank itself is in very good shape, no holes or anything. The tank itself was still was holding fuel when I removed it. I figure if it becomes a problem later, the tank itself is pretty easy to drop, and I then can get it boiled out and sealed at that time. So unless anyone else has a better thought on the matter, I will cleanup the outside of the tank, repaint it, and get it back on the car so I can finish running the new fuel line. BTW here is the filter I am going to use. The end unscrews so you can remove the inner filter and replace or clean it. The body is thick glass. I will make a cover for it to protect it from rocks. I will also use metal hose barbs instead of the plastic ones it comes with. Attach file:  (37.92 KB) (37.92 KB)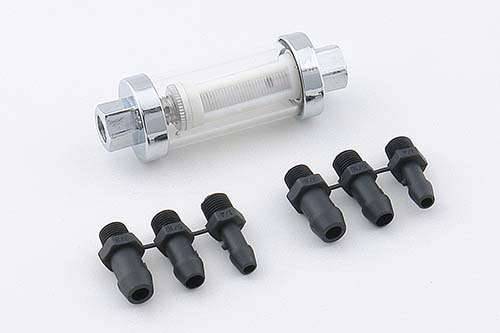
Posted on: 2010/3/5 2:06
|
|||
|
-BigKev
1954 Packard Clipper Deluxe Touring Sedan -> Registry | Project Blog 1937 Packard 115-C Convertible Coupe -> Registry | Project Blog |
||||
|
||||
|
Re: BigKev's 1954 Packard Clipper Deluxe Sedan
|
||||
|---|---|---|---|---|
|
Webmaster
|
Gerd,
The Fast Etch I put in the tank after flushing the Muriatic Acid out was phosphoric acid based, and it left the nice uniform gray coating on the clean metal. I think the purpose of the Acetone was to neutralize any remaining acid, and to help remove any residual moisture. It amazing how fast metal will flash rust after using Muriatic Acid if you don't treat it with something else. Literally minutes!
Posted on: 2010/3/5 2:34
|
|||
|
-BigKev
1954 Packard Clipper Deluxe Touring Sedan -> Registry | Project Blog 1937 Packard 115-C Convertible Coupe -> Registry | Project Blog |
||||
|
||||
|
Re: BigKev's 1954 Packard Clipper Deluxe Sedan
|
||||
|---|---|---|---|---|
|
Webmaster
|
Well finally some forward progress on the car this today.
I first decided to mount the correct rear speaker switch on the dash board. So now I have just about every accessory switch on the dash board expect for A/C controls. I also replaced the plain clipper style switch bezel, to the senior style "named" bezel. This better matches all the other style bezels on the dashboard. Then it was onto the fuel tank. First I went over the tank with stripper wheel to knock down all the road grime, and heavy rust. With both sides cleaned up I then when over the entire tank with a green scrub pad and phosphoric acid (wearing gloves of course). This gives the tank a layer of protection and helps make some of the rust inert. After going over the tank a few times, I wiped the tank dry. The tank should now have a dull gray appearance, and any rust areas should have turned black. Then I went over the tank with a clean rag with thinner on it. I did this several time using a clean rag each time until the last rag showed no more dirt. The I replaced the sender O-Ring, installed the sender, and installed the lock ring. I am doing this at this stage as I want to insure good metal to metal contact between the sender and the tank for grounding purposes before I paint it. Next I paint two coats of Eastwood "Tank Tone" paint on the top of the tank. I will let this cure overnight, and then flip the tank over and do the bottom side. I also painted the period correct cap with it. Attach file: (27.43 KB)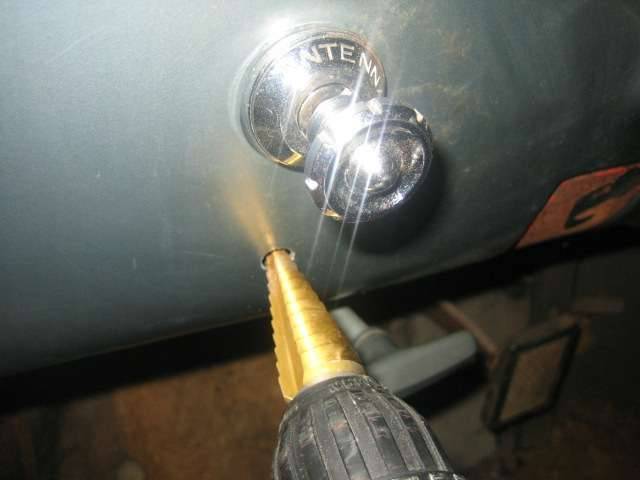 (24.31 KB) (24.31 KB)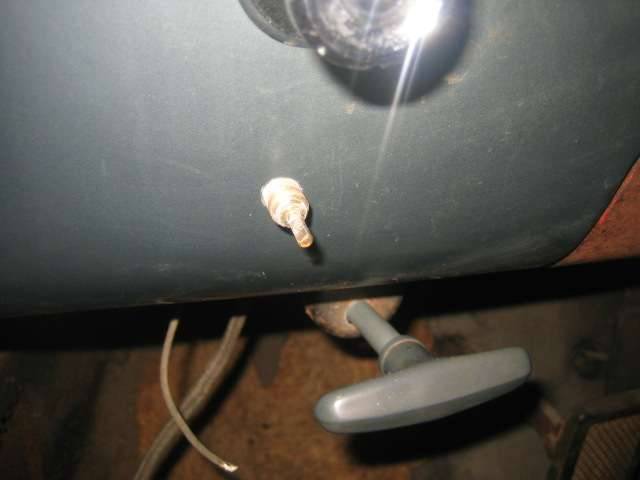 (18.80 KB) (18.80 KB) (19.97 KB) (19.97 KB)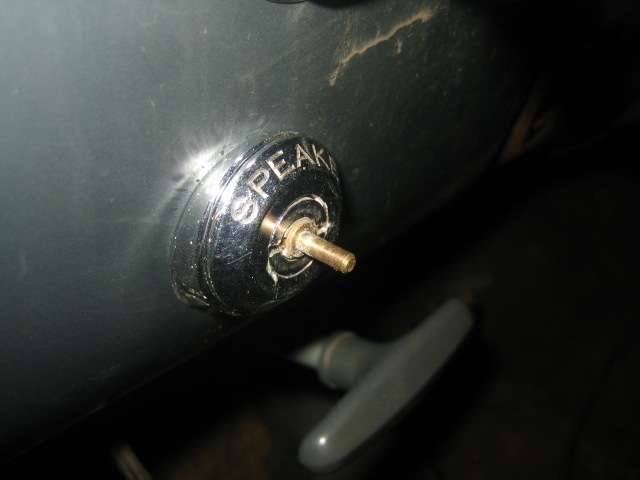 (22.93 KB) (22.93 KB) (23.93 KB) (23.93 KB)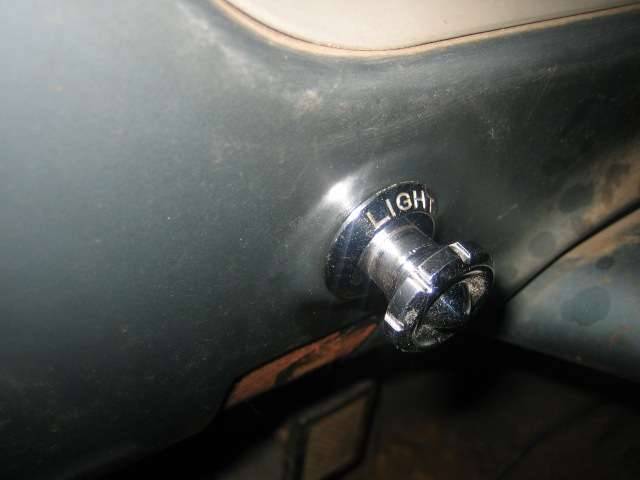 (35.42 KB) (35.42 KB) (27.06 KB) (27.06 KB)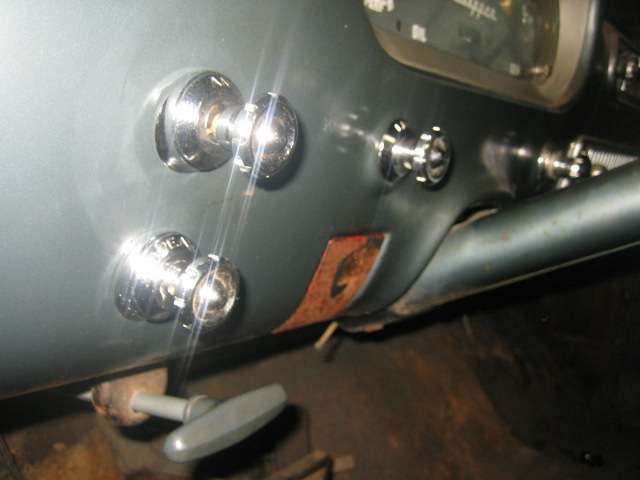 (32.70 KB) (32.70 KB)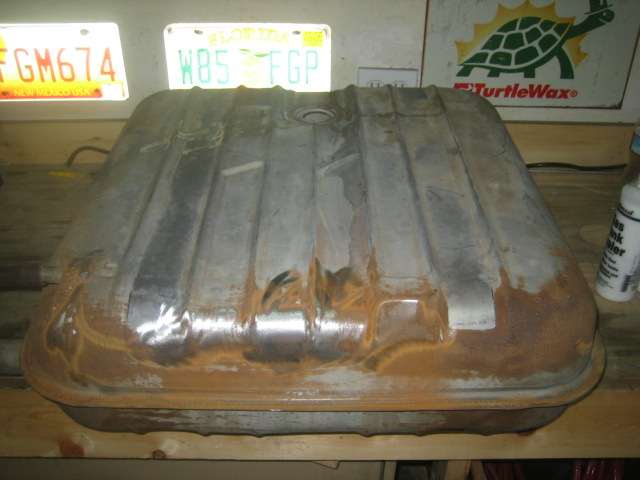 (32.78 KB) (32.78 KB)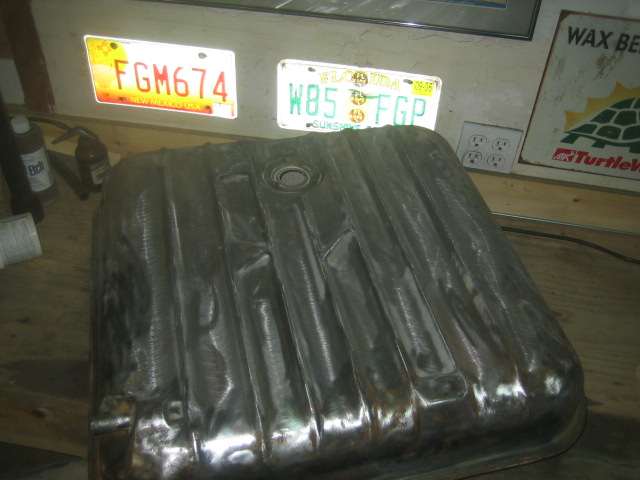 (35.44 KB) (35.44 KB)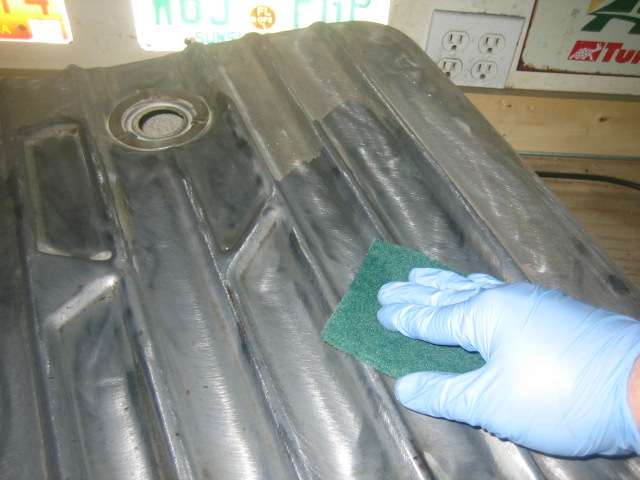 (35.50 KB) (35.50 KB)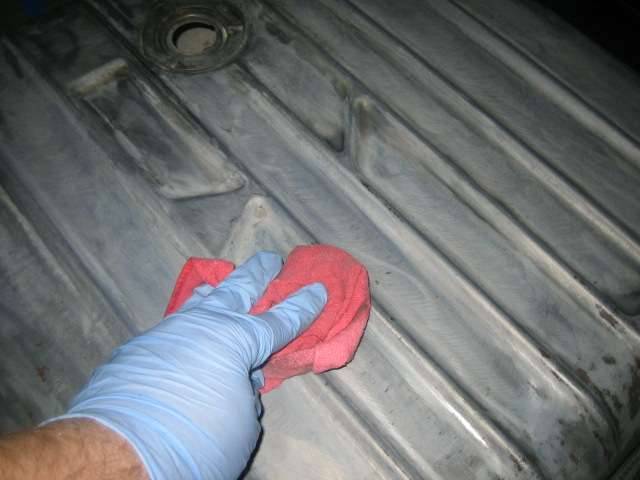 (36.57 KB) (36.57 KB) (33.87 KB) (33.87 KB)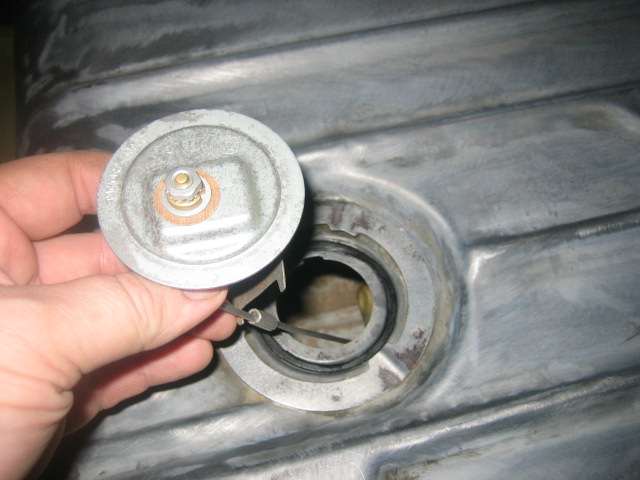 (33.11 KB) (33.11 KB) (32.96 KB) (32.96 KB)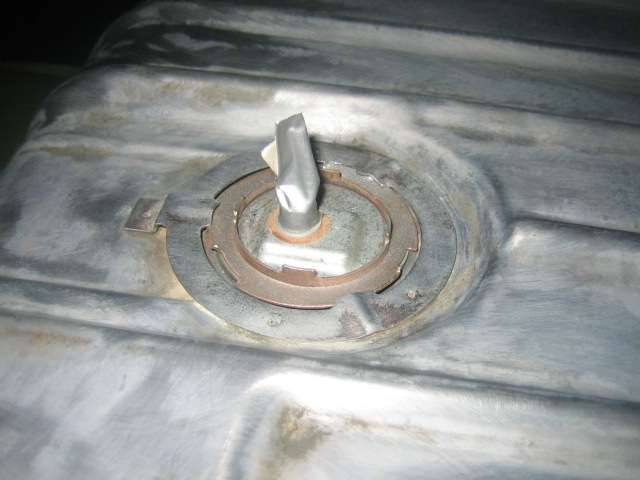 (26.40 KB) (26.40 KB)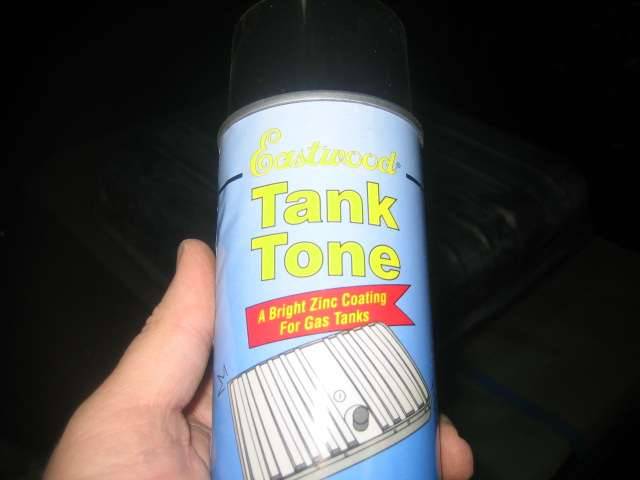 (24.60 KB) (24.60 KB) (31.41 KB) (31.41 KB)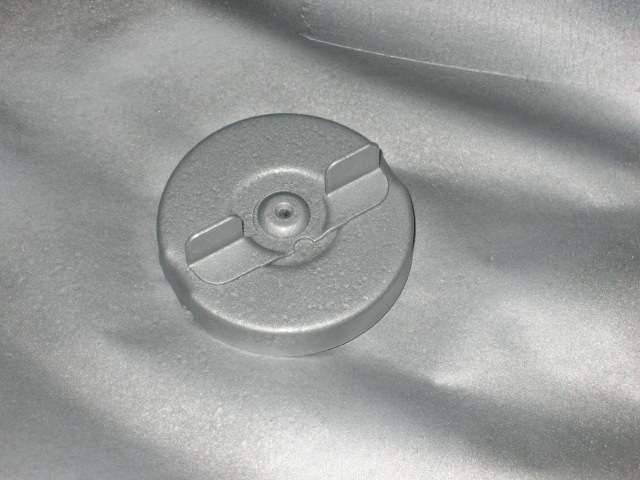
Posted on: 2010/3/6 21:37
|
|||
|
-BigKev
1954 Packard Clipper Deluxe Touring Sedan -> Registry | Project Blog 1937 Packard 115-C Convertible Coupe -> Registry | Project Blog |
||||
|
||||
|
Re: BigKev's 1954 Packard Clipper Deluxe Sedan
|
||||
|---|---|---|---|---|
|
Webmaster
|
One thing I noticed is that the two halves of the tank are the exact same stamping. So you will actually see that same cut-out and bung locations on both halves for the vent tube, filler tube, sump, and pickup tube.
Posted on: 2010/3/6 21:43
|
|||
|
-BigKev
1954 Packard Clipper Deluxe Touring Sedan -> Registry | Project Blog 1937 Packard 115-C Convertible Coupe -> Registry | Project Blog |
||||
|
||||


