|
Re: painting the 51 200
|
||||
|---|---|---|---|---|
|
Home away from home

|
I really like the shape of the '51's David, lovely bonnet scallops and curvaceous trunk lid etc. No doubt You're getting plenty of exercise doing the colour sanding! I've just finished my coupe and it was a long process. I kept finding traces of orange peel and had to go back over spots again. I used the one foam pad and some fine 3M buffing compound, it took quite a few passes to get the 2000 scratches out so maybe I should have gone three pads like you did . . .
Certainly it is a good feeling to finally get the painting done.
Posted on: 2013/1/31 8:37
|
|||
|
1951 Packard Club Sedan | [url=ht
|
||||
|
||||
|
Re: painting the 51 200
|
||||
|---|---|---|---|---|
|
Home away from home
|
Still sanding and buffing after having some touchup work done by the painter. The areas under the fenders weren't sprayed enough and we had some minor chips on the edges of the hood and trunk. Those are now taken care of. The bad news last night is I picked up the trunk ornament with the NOS plastic insert I found a few years ago. You guessed it, it fell out and cracked it, creating a small chip in the red paint and two cracks in the plastic.
I'm thinking about going to Hobby Lobby to see if they have some liquid plastic I can use to fill the chip. Anyone have any suggestions, or better yet another NOS insert?
Posted on: 2013/4/5 21:15
|
|||
|
||||
|
Re: painting the 51 200
|
||||
|---|---|---|---|---|
|
Home away from home
|
I have straightened out the stainless steel trim and was ready to put it back on when I remembered that the old fasteners were mostly toast. i tried the local hardware and nut/bolt stores in town, but none had the clips I needed. So I took some stiff metal flashing and cut it into rectangles about 1-1/4" by 3/4". I drilled a hole thru each piece, threaded a 10 x24 bolt into it and soldered it in place. I then bent the metal into a gentle curve so that it would fit into the metal trim. I had found at Ace Hardware some plain rubber washers and some domed metal washers with rubber backing. It was then very easy to reinstall the trim and fasten everything down with some 10 thread nuts. The plain rubber washers are on the outside of the fenders and the domed ones on the inside. It all worked very nicely, and only took about 45 minutes to fabricate all the fasteners I needed.
Posted on: 2013/4/6 17:59
|
|||
|
||||
|
Re: painting the 51 200
|
||||
|---|---|---|---|---|
|
Home away from home
|
Here are some photos of the homemade fasteners. They work like a champ, and I didn't have to wait for the UPS truck!
Attach file:  (56.64 KB) (56.64 KB)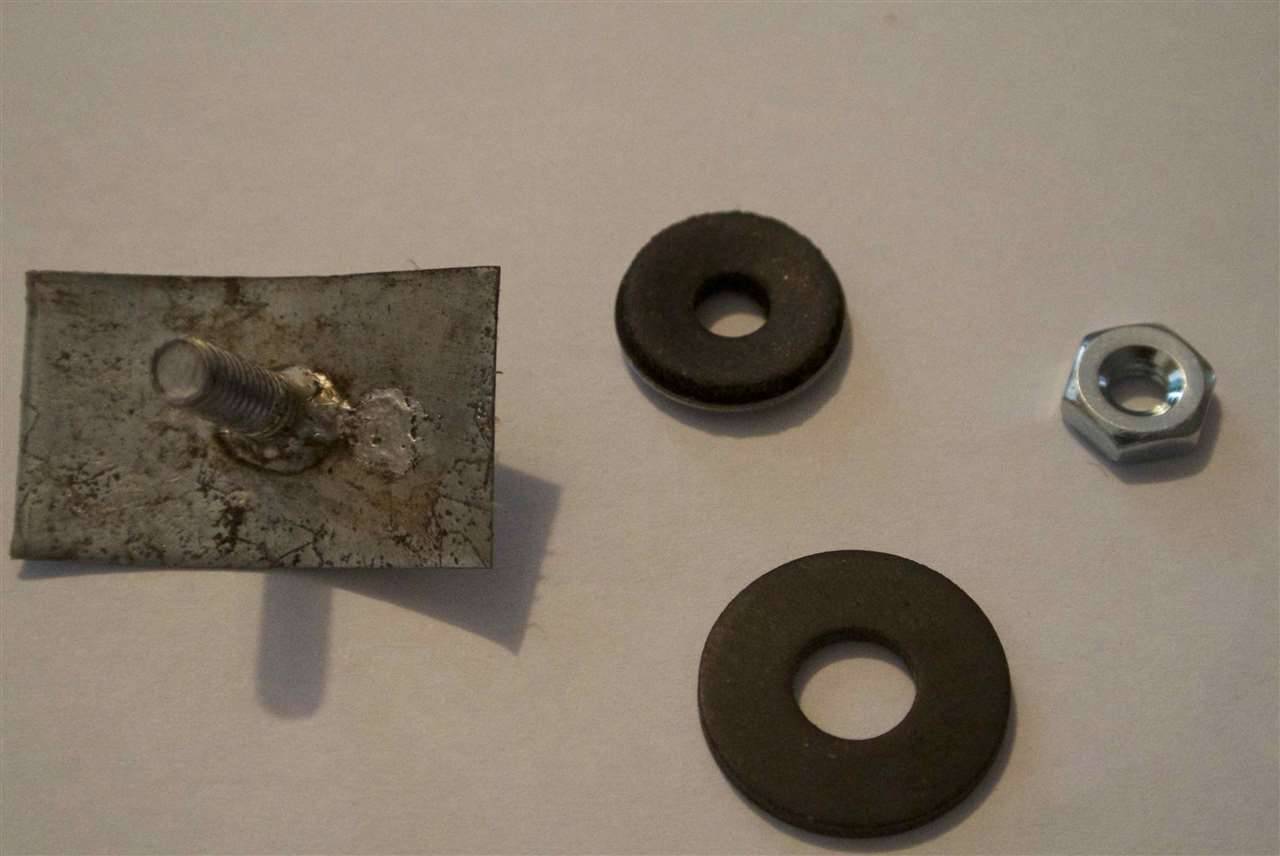 (58.32 KB) (58.32 KB)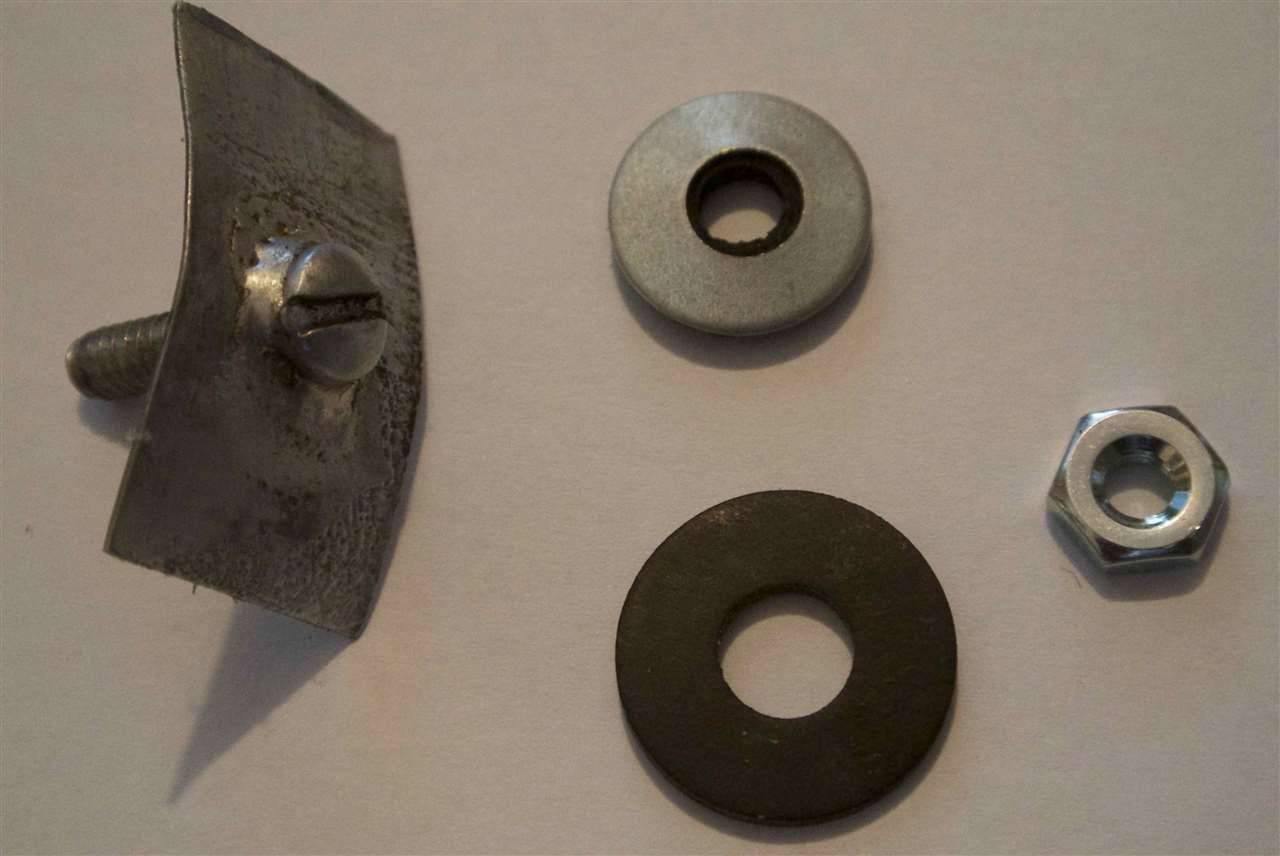
Posted on: 2013/4/6 20:10
|
|||
|
||||
|
Re: painting the 51 200
|
||||
|---|---|---|---|---|
|
Forum Ambassador

|
Very nice. Save $$ along with no UPS truck.
Posted on: 2013/4/6 20:16
|
|||
|
Howard
|
||||
|
||||
|
Re: painting the 51 200
|
||||
|---|---|---|---|---|
|
Forum Ambassador
|
Very good David. I appreciate your ingenuity.

Posted on: 2013/4/6 22:00
|
|||
|
||||
|
Re: painting the 51 200
|
||||
|---|---|---|---|---|
|
Home away from home

|

Posted on: 2013/4/6 23:09
|
|||
|
[url=h
|
||||
|
||||
|
Re: painting the 51 200
|
||||
|---|---|---|---|---|
|
Home away from home

|
Thank you David! That is a really neat tip.
Bernardi
Posted on: 2013/4/16 0:08
|
|||
|
||||
|
Re: painting the 51 200
|
||||
|---|---|---|---|---|
|
Home away from home
|
Glad the tip was a hit. It certainly worked well on reinstalling the trim.
I installed the rear bumper and the splash shield yesterday. The splash shield originally came with a rubber trim stapled on it. I haven't had much luck finding a reproduction one, so I bought some vacuum line hose and spilt it longways with a razor. It was easy to install the rubber along the ins and outs of the splash guard edge. It probably won't seal as well as the original, but then I don't drive much on dirt roads anymore. But it does keep the guard from touching the bumper. Today, I hope to get the the rear seat and the interior door panels back in, It is still snowing here, but we have a two hour drive and picnic scheduled for Sunday when the weather is supposed to cooperate.
Posted on: 2013/4/16 8:22
|
|||
|
||||


