|
Re: Sticking shift linkage
|
||||
|---|---|---|---|---|
|
Forum Ambassador

|
Only levers I can think of with C clips are the ones at bottom of steering column.
If those are the ones you mean, not sure how far you have the car disassembled but don't think it can be done in position. At the least I think the column will have to slide up a few inches to give room between the shift tube and the steering box for the levers to slide out but probably needs to come all the way out so you can have a solid surface to drive the pin holding the selector tongue to the inner rod out. That has to come apart so the tongue can remove and upper lever slide down past that point.. Anyway, once you have working room the bottom cotter key comes off. Behind it is a long heavy spring so watch for that wanting to fly out. Once the cotter key is out, the bottom bracket unscrews off tube. After removing the bottom C clip, washer and any shims, the bottom R-1 lever will slide off. Don't remember for sure but you may need to remove the upper C clip so the upper 2-3 lever can slide up slightly for good access to the tongue and pin for the next step. Drive the pin out of the rod and once pin is free from rod, the tongue will slide off the splines. Rod will probably also want to come out at that point. Once the tongue is out of the way, the upper lever will slide down and off. If different levers have C clips, please ignore the post and refresh the failing memory.
Posted on: 2014/6/29 13:10
|
|||
|
Howard
|
||||
|
||||
|
Re: Sticking shift linkage
|
||||
|---|---|---|---|---|
|
Home away from home
|
Thanks Howard,
I'm understanding more about how that assembly works. Front clip is still off, accessibility no problem. Everything in the linkage from the transmission levers forward is out and in the process of re-assembly. I'm thinking it would be a good idea to start linkage re-assembly from the transmission forward to the idler assembly and then do the column levers last. My thinking here is to assemble things with the transmission in neutral so that ultimately the column levers end up in the right place.
Posted on: 2014/6/29 13:42
|
|||
|
||||
|
Re: Sticking shift linkage
|
||||
|---|---|---|---|---|
|
Forum Ambassador
|
With the work you have done with the bushings etc, the turnbuckles will probably need to readjust anyway so having all the linkage to trans in place is a must.
Once you change the column levers (or decide to keep the originals) insert the drill bit or pin in the lock holes to hold them together. Then move the operator lever to its midpoint or neutral position. With the trans in neutral and the operator lever at its midpoint, you would adjust the turnbuckles on the rods so the ends can easily insert in the column levers. There is another post just recently where Ross suggests giving a bit of bias to one of the turnbuckles so that gear moves a bit faster and has mostly completed movement before the next gear moves. Bad thing is I forget which one but maybe you or someone else remembers the post.
Posted on: 2014/6/29 13:57
|
|||
|
Howard
|
||||
|
||||
|
Re: Sticking shift linkage
|
||||
|---|---|---|---|---|
|
Home away from home

|
Quote:
This one?
Posted on: 2014/6/29 14:40
|
|||
|
||||
|
Re: Sticking shift linkage
|
||||
|---|---|---|---|---|
|
Home away from home
|
Could someone walk through the steps to remove the shift column? Or, direct me to a previous discussion.
Thanks.
Posted on: 2014/6/30 19:58
|
|||
|
||||
|
Re: Sticking shift linkage
|
||||
|---|---|---|---|---|
|
Forum Ambassador
|
You will have to remove the steering wheel first so you will need a wheel puller. You might want to note where the wheel is on the shaft or else make sure wheels are straight so it goes back on the way it came off.
Disconnect the horn wire at base of steering box and horn ring (3 screws on back of wheel hub) Watch out for any associated horn ring parts that might be loose once the screws are out. With horn ring gone, you should be able to see the horn contact and wire in the center of shaft. Pull contact and wire assy out from the top. If the wire has been repaired or taped at the bottom it may be reluctant to fit thru the hole at steering box end so you might have to work some there to remove the wire. Once the horn contact plate is out, loosen the nut several turns but don't remove it. Use the puller against the nut to break the wheel free so as not to damage or mushroom the threads on the shaft. Once the wheel is free you can remove the nut, ground plate, wheel and spring under the wheel. You will see a bearing around the shaft down inside the top shroud. Look very carefully and inside the bearing around the shaft is a concave split ring, It will probably be recessed into the bearing. That ring has to be pulled up and off so the bearing can slide up the shaft when you pull the column. Once the ring is off remove the floor plate and also slide any plate or cardboard around the column covering the hole in firewall up the column a few inches, It may be cardboard with insulation on it or maybe the metal and rubber plate or maybe both. The Custom also has the carpet which you may have to fight with. Once you have a clear opening remove the clamp at base of dash, and disconnect the turn signal wires. The only remaining clamp is around the base of column at steering box. Remove the nuts, set the U portion and bracket with reverse switch aside. If the levers are disconnected you should now be able to slide the entire assy up. It will probably require some wrangling to get things lined up so the levers fit thru the opening. My pedal tops were already off when I did mine but not sure if they have to be. Be careful with the shift and turn signal levers. You may run into the headliner with the top of column so it might be wise to cover that end with a towel so as not to get anything dirty. If the column won't clear the top you may also have to loosen and remove a bolt or two at the steering box so the shaft can drop down slightly. Hopefully I haven't forgotten anything or if so, it won't be major. To reassemble just do everything in reverse. The only thing you may fight with is getting the horn wire back down. Use a stiff wire like baling wire and push it up the shaft from below. Attach the horn wire with the least amount of bulk possible to pull back down. There is a lip inside the tube that sometimes gives a bit of grief. Attach file:  (79.75 KB) (79.75 KB)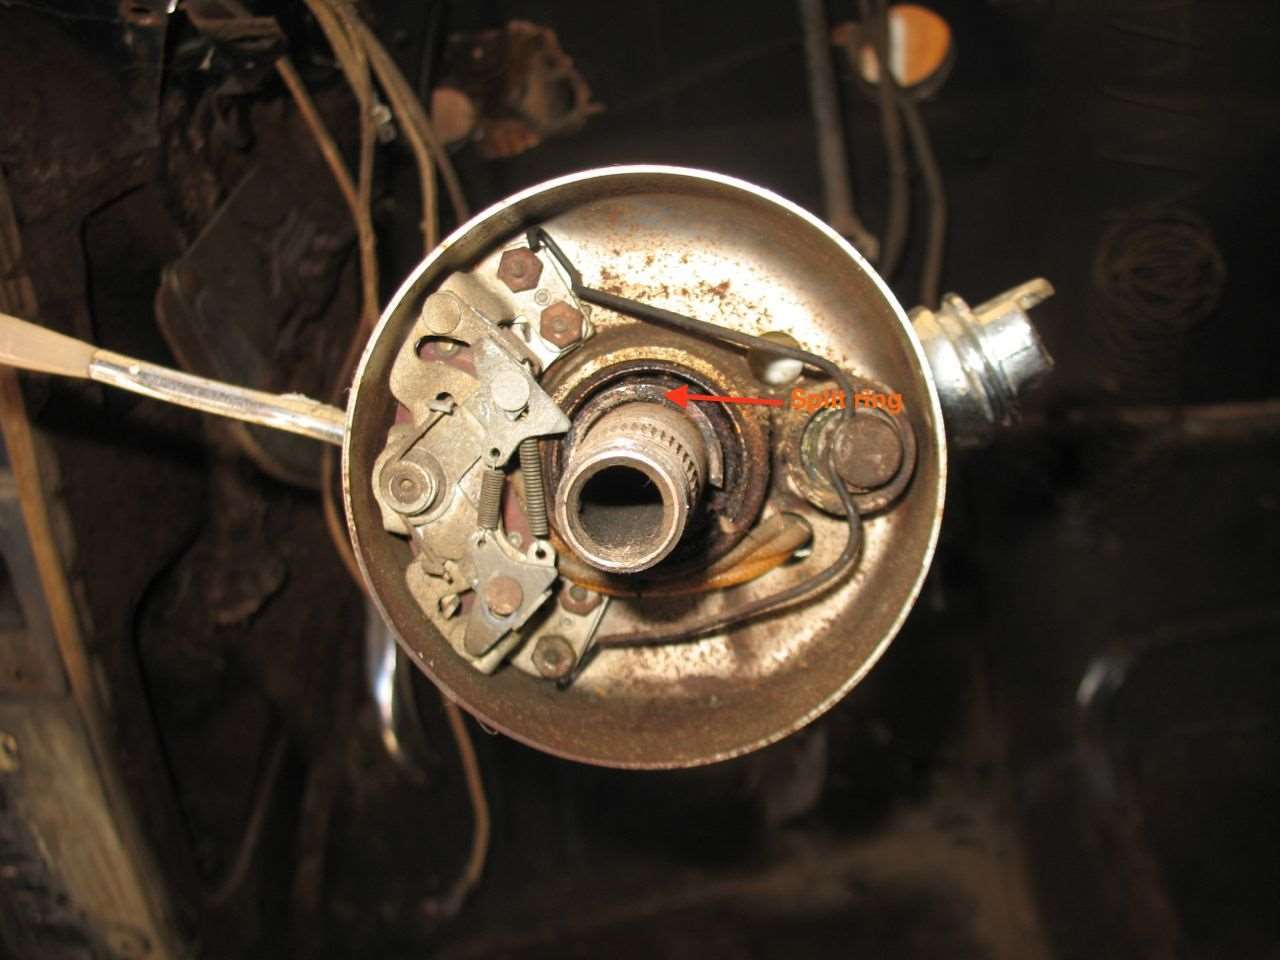
Posted on: 2014/6/30 21:33
|
|||
|
Howard
|
||||
|
||||
|
Re: Sticking shift linkage
|
||||
|---|---|---|---|---|
|
Home away from home
|
Howard, thanks for taking the time for all the detail. After some study, I kinda thought the shroud and all had to come up through the top. Much of this was done when I rebuilt the steering box, so I should be on my way. Thanks again..
Posted on: 2014/6/30 22:22
|
|||
|
||||
|
Re: Sticking shift linkage
|
||||
|---|---|---|---|---|
|
Home away from home
|
OK, the column came out and back in without too much trouble and so did the replacement of the shift levers. I'm now trying to get the levers re-assembled. Question: should there be some clearance between the levers and their bearings such that the bearings can rotate sideways within the lever? Seems like they should in order to move with the arc of the idler arms. And, the bearings are rounded off, also making me think they rotate. Right now both the levers and bearings are new with a very tight fit and no movement between them at all.
Thanks.
Posted on: 2014/7/8 17:05
|
|||
|
||||
|
Re: Sticking shift linkage
|
||||
|---|---|---|---|---|
|
Forum Ambassador
|
I don't think the rotation is necessary -- think any rotation is more in the center to the rod and believe it is more of a very slight side to side twisting or rocking motion at the actual lever. That would be indicated by the slight curve on the bushing. The thin spring washer allowed just a tiny bit of motion with the thicker flat washers keeping the bushing in the hole. If it is so tight neither can happen perhaps it could stand a quick touch up with some crocus cloth or fine emery paper coated with oil to remove any burrs.
Posted on: 2014/7/8 17:18
|
|||
|
Howard
|
||||
|
||||


