|
Re: 1941 Gear Selector Arms Swop
|
||||
|---|---|---|---|---|
|
Forum Ambassador

|
Howard Surfaces !!! how are you buddy?
I know I've seen it discussed for the '47 cars, basically the same...either do a search or HH56, Howard , will hopefully elucidate...
Posted on: 2018/7/9 18:08
|
|||
|
||||
|
Re: 1941 Gear Selector Arms Swop
|
||||
|---|---|---|---|---|
|
Not too shy to talk
|
Hi David,
Hope this finds you well sir ! Apologies for the 'silence' since I first ran the restored car for my sons wedding. After the marathon getting it ready for that event I needed a rest, and in the meantime got tied up renovating four houses and completing my PhD..... -so, almost two years later, I'm now back tinkering where I left off -and starting to address the various mechanical issues that 'running' the car for the first time revealed. I will of course be posting again on the blog, but thanks for your response -it does me good to know you're still there 
Posted on: 2018/7/9 18:35
|
|||
|
||||
|
Re: 1941 Gear Selector Arms Swop
|
||||
|---|---|---|---|---|
|
Forum Ambassador

|
I believe the Packard Handishift mechanism was mechanically about the same from introduction thru 54 with the differences being mostly cosmetic. Shape of the lower levers and how they did interior styling being the primary differences.
There is a good writeup in section 7 -- Clutch, Electromatic, and Transmission -- of the 46-50 service manual starting on page 44 explaining how the shift mechanism works along with an exploded drawing of the layout.https://www.packardinfo.com/xoops/html/downloads/servicemanual4650/Section7.pdf I can't speak directly to the 41 conventional body removal but I strongly suspect it will be almost the same as the Clipper and the postwar models. On those the steering column removes as an assembly. Once the column is out the shift tube and parts can be removed without much difficulty. To remove the postwar column the steering wheel is removed along with the heavy spring and inner race of the upper bearing which is located just below the steering wheel. The horn wire is disconnected at the plug just outside the end of steering box and pulled out from the top. It might help to tie a piece of string or dental floss to the wire and pull that up thru the steering shaft as the wire is pulled out. Cut the string off the wire and use some adhesive or grease just inside the end of the shaft to keep the string from falling back while you do the rest of the work. Disconnect the shift linkage at the two levers at the bottom of column. If the car has factory turn signals disconnect the wires coming from the switch. There is a clamp under the dash and another at the very bottom of the column at the neck of the steering box. Loosen or remove the screws holding the toe plate around the brake and clutch pedals so it can shift to let the levers pass the opening in the firewall. On some you may need to remove the accelerator pedal and also the pedal pads so the toe plate and carpet can be pulled up and off rather than moved aside. Loosen or remove the column clamps and pull the entire column up over the steering shaft and out. You may need to pry the column off the neck of the steering box before it will move. The end of column may hit the headliner so place a towel or rag over it so it doesn't stain the headliner. If there is not quite enough clearance at the headliner the steering box bolts may need to be loosened and one or two removed so the box and shaft can pivot on the remaining bolt to tilt slightly. Here is a picture of the Clipper column showing the inner race which needs to remove. The large compression spring between the wheel and race keeps it tightly in position and once the spring is removed the race has a split on one side and can be slid up and off. Attach file:  (120.66 KB) (120.66 KB)
Posted on: 2018/7/9 18:36
|
|||
|
Howard
|
||||
|
||||
|
Re: 1941 Gear Selector Arms Swop
|
||||
|---|---|---|---|---|
|
Not too shy to talk
|
Many Thanks for this Howard -I'll try what you suggest and report back on success or otherwise !
Best Regards Howard.
Posted on: 2018/7/10 4:47
|
|||
|
||||
|
Re: 1941 Gear Selector Arms Swop
|
||||
|---|---|---|---|---|
|
Forum Ambassador
|
I believe the biggest issue in removal will be turning and manipulating the column to get the lower levers to pass thru the opening in the firewall. There was a bit of difficulty reported on a 40 so maybe the conventional body opening is not as large as the later models.
Once you have the column out lay it on a workbench to disassemble. As you remove the lower retainer and cotter key that holds the spring and rod be aware the spring is strong and can shoot across the room if you are not careful. There is apparently a small round disc which forms a kind of seat sitting between the cotter key and spring so if yours is present watch for it. On my 47 it must have disappeared over the years but something is shown per the manual and when Wes took his shift assy apart it was there. Apparently very little factory lubrication was provided for the levers. On later models there is a small hole in the shift tube about an inch above the levers where a few drops of oil will lube the inner rod and run out the slot in the shift tube to catch the R-1 lower lever. Not sure if the hole is present on yours but look for it. If it is there a few drops of oil periodically is a good idea. Nothing is provided for the top 2-3 lever other than what spills when doing the hole so watch out for corrosion and rust that might want to bind the 2-3 lever to the shift tube. When placing drops in the hole it is a good idea to place a few drops at the top of the lever to let oil run down in the space between the lever and shift tube. Both levers must be free to rotate on the shift tube so that when one is selected to move, as the shift tube rotates to move the selected lever the other can stay absolutely stationary. If both try to move at once the interlock in the transmission will come into play and cause issues when selecting any gear. Be sure the shift tube surface where the levers sit is clean and polished when you put things back together. As to the trans interlock mechanism, there was an issue with a bolt holding the interlock and detent assy loosening on the 40-41 trans. It would be a good idea to disconnect the rods at the trans and grab one of the levers at a time to see if there is any play. Other than a minimal amount of movement the detent should be solid and levers not able to move more than a tiny bit at the ends when in a gear position. There was also an issue with the bushings that are in the holes in the levers where the ends of the rods fit. Look at their condition and make sure no excess play or wear on the rods is evident. If any of the old rubber and steel bushings are in use pay particular attention to their condition. All of the above contribute to hard shifting or the gearshift locking up. Here are photos of the 47 shift tube showing where the corrosion on the shift tube is prevalent. The upper 2-3 lever area is the one of most concern. I believe the 41 assy will be essentially the same but with different shaped levers. Attach file: (45.14 KB)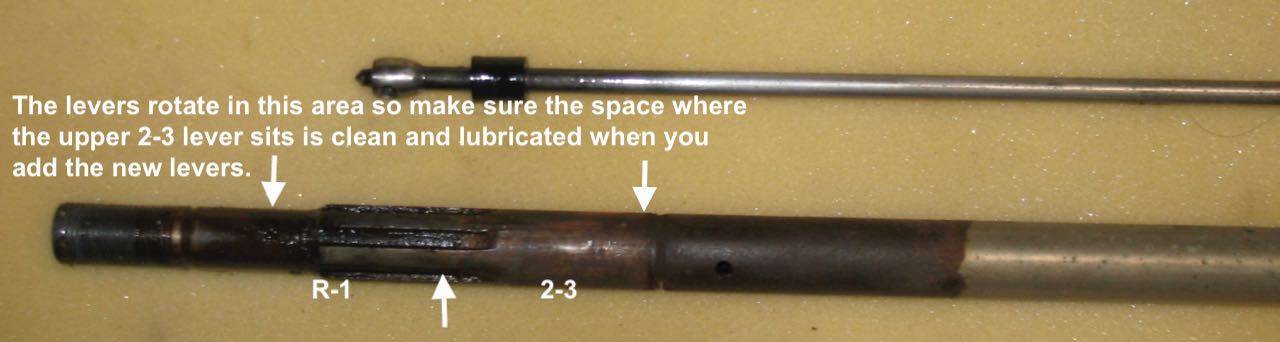 (76.91 KB) (76.91 KB)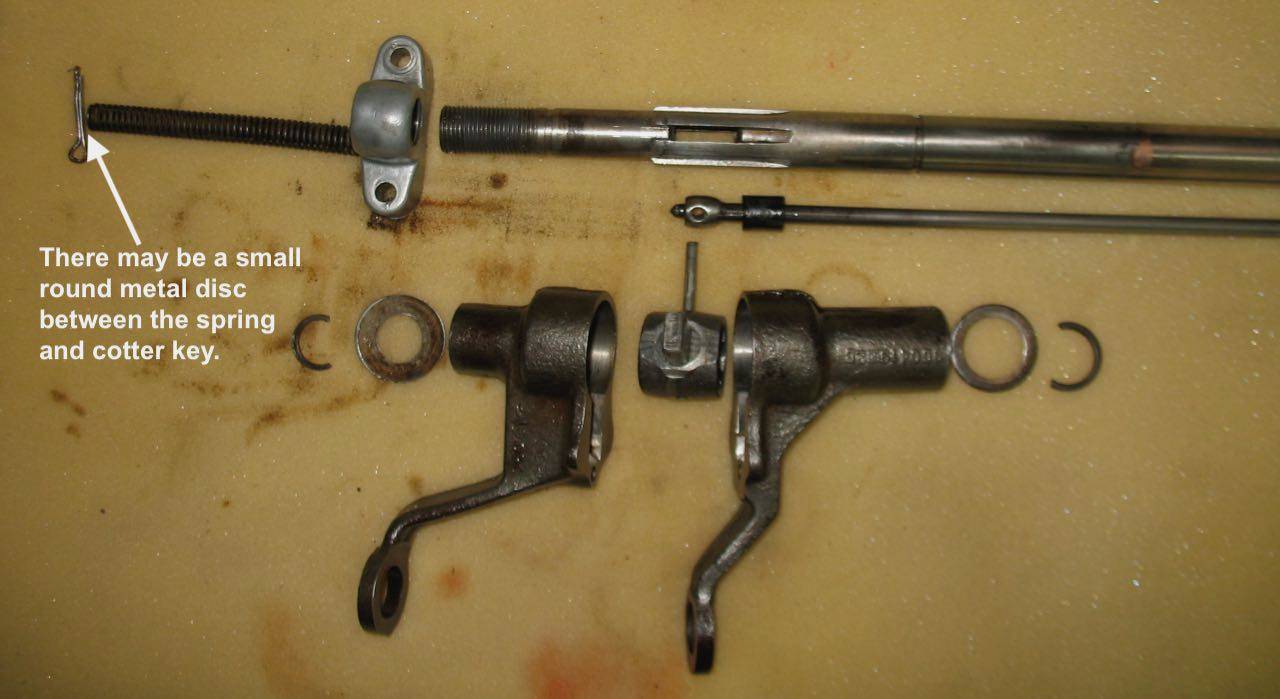
Posted on: 2018/7/10 10:13
|
|||
|
Howard
|
||||
|
||||
|
Re: 1941 Gear Selector Arms Swop
|
||||
|---|---|---|---|---|
|
Forum Ambassador
|
Yeah, that's the picture I was thinking of...Big thanks to Howard for his patience posting this every time someone asks....
Posted on: 2018/7/10 10:27
|
|||
|
||||
|
Re: 1941 Gear Selector Arms Swop
|
||||
|---|---|---|---|---|
|
Not too shy to talk
|
Many thanks Howard - as always your encyclopaedic knowledge is matched only by your willingness to help - IOU. I'll follow your guide see what I find, and report back.
Posted on: 2018/8/11 4:09
|
|||
|
||||
|
Re: 1941 Gear Selector Arms Swop -UPDATE
|
||||
|---|---|---|---|---|
|
Not too shy to talk
|
Today I took the plunge and made a start on stripping my steering column to swop the selector forks. Using Howard's excellent advice as a guide, I took off the steering wheel and bulkhead blanking plate, and stripped out the column fasteners. I had two issues in getting the column out; first the levers caught on the bracket that bolts to the bulkhead and carries cable clamps etc. : unbolting this (3 bolts) allowed me to push the bracket out of the way to clear the forks no problem. The second issue I found was the upper column bracket that bolts up under the dash. When unbolted, this was still behind the dash outer metal plate (with my carefully regained finish..). By carefully pushing the outs column towards the bulkhead I was able to finagle the column clear and then the column sleeve and gear selectors came out easily.
Both on the car and on the bench, it was clear that the lower selector arm was bent, and that the brass bushes at the end of both arms were unevenly worn, clearly two separate issues that cant have been good for my gear changing. On the bench, whilst the upper arm was pretty tight to the column, the lower arm was able to move off the axis of the shaft quite a bit (see pic), which if nothing else suggests its inner brass bush may be well worn. In stripping the selector Forks, Howard was right - removing the split pin frees the inner spring to fly off if you're not careful -mine didn't have a 'spacer' between the pin and spring either, I guess the victim of poor maintenance in the past. I marked the column to not where the 'U' clamp fit on the column, and noted the number of turns (20) to unscrew the bracket from the shaft, just in case I needed to return it to its exact position on reassembly. The bracket came off followed by a spring with a washer at either end; the spring is narrower at the end facing 'up' the selector shaft. The lower fork then came off in good order. At that point I was hit a snag as the detent wouldn't come off - it has a spring-loaded pin that moved freely a few mm but no amount of my fiddling could get it to come off the shaft, so I couldn't get the upper selector arm off -so; anyone know how to free the detent arm ? I also then unpacked for the first time my 'NOS' selector arms, a cue for 'enter snag number two' .....-.Both were bagged and numbered (360425 & 360426) but apart from the bore of their shaft 'hole', seem exactly the same. Also, they appear to be cast from different (rough) metal to the nice aluminium originals, don't have any brass bushes, and the arm ends are too small to take bushes; their bases are also a different shape to my original (see pics). So whatever these are they are not original NOS.... which begs the question has anyone else come across these type of arms and do they fit/work on the '41 19 series Packard. I should have checked by opening the package when I bought them 93 years ago...) -my bad, but if these are no good then I'll have to either find some replacements or re-bush my original arms (and bend the lower one back into shape). Attach file: (210.28 KB) (370.09 KB) (370.09 KB)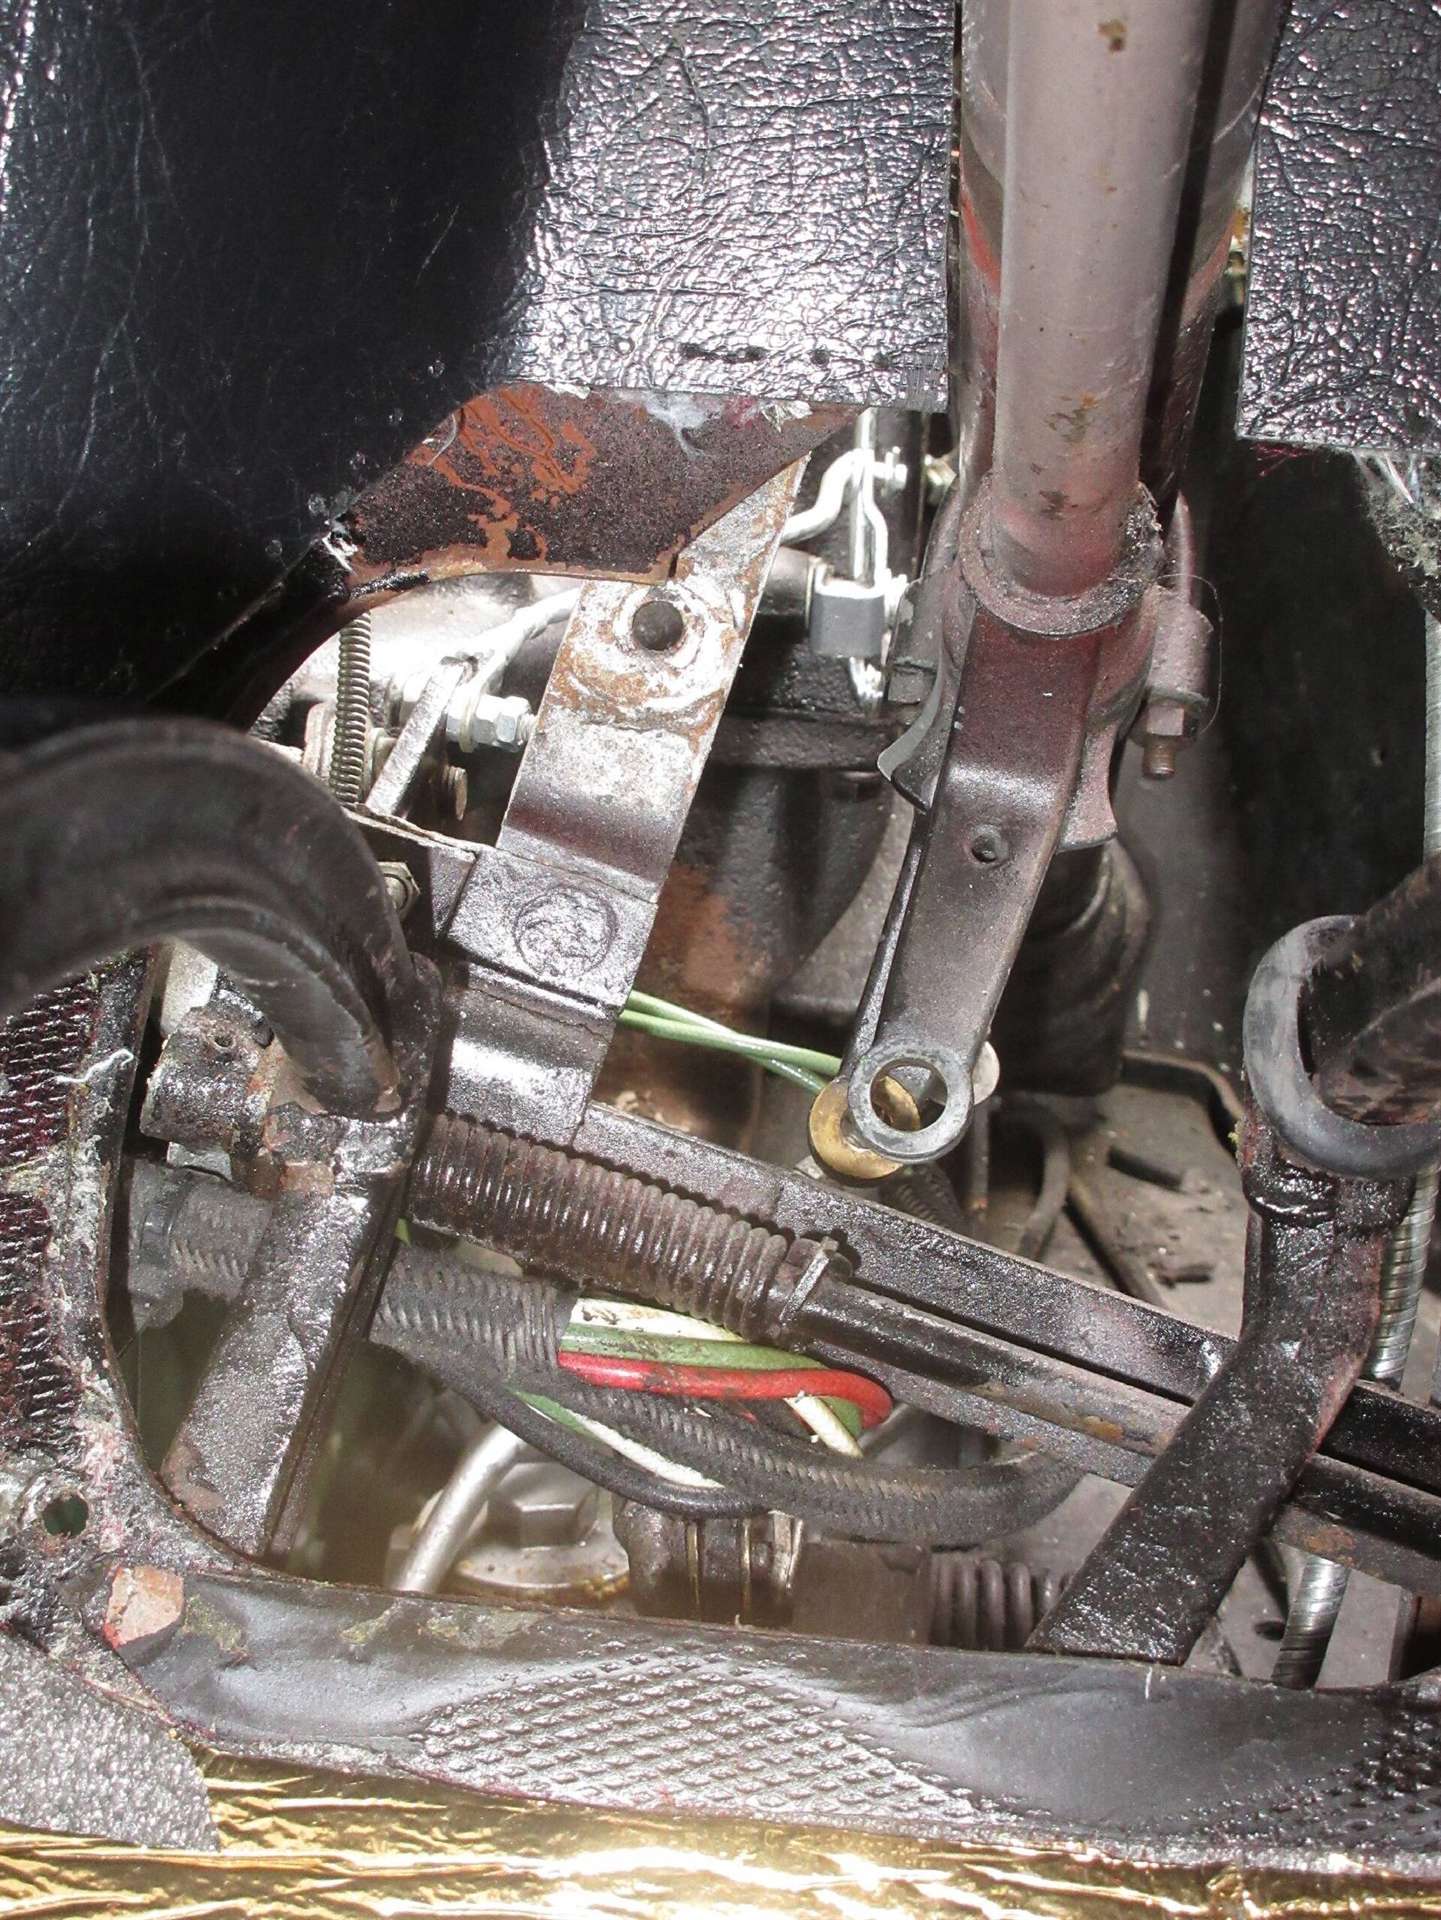 (166.60 KB) (166.60 KB) (284.21 KB) (284.21 KB)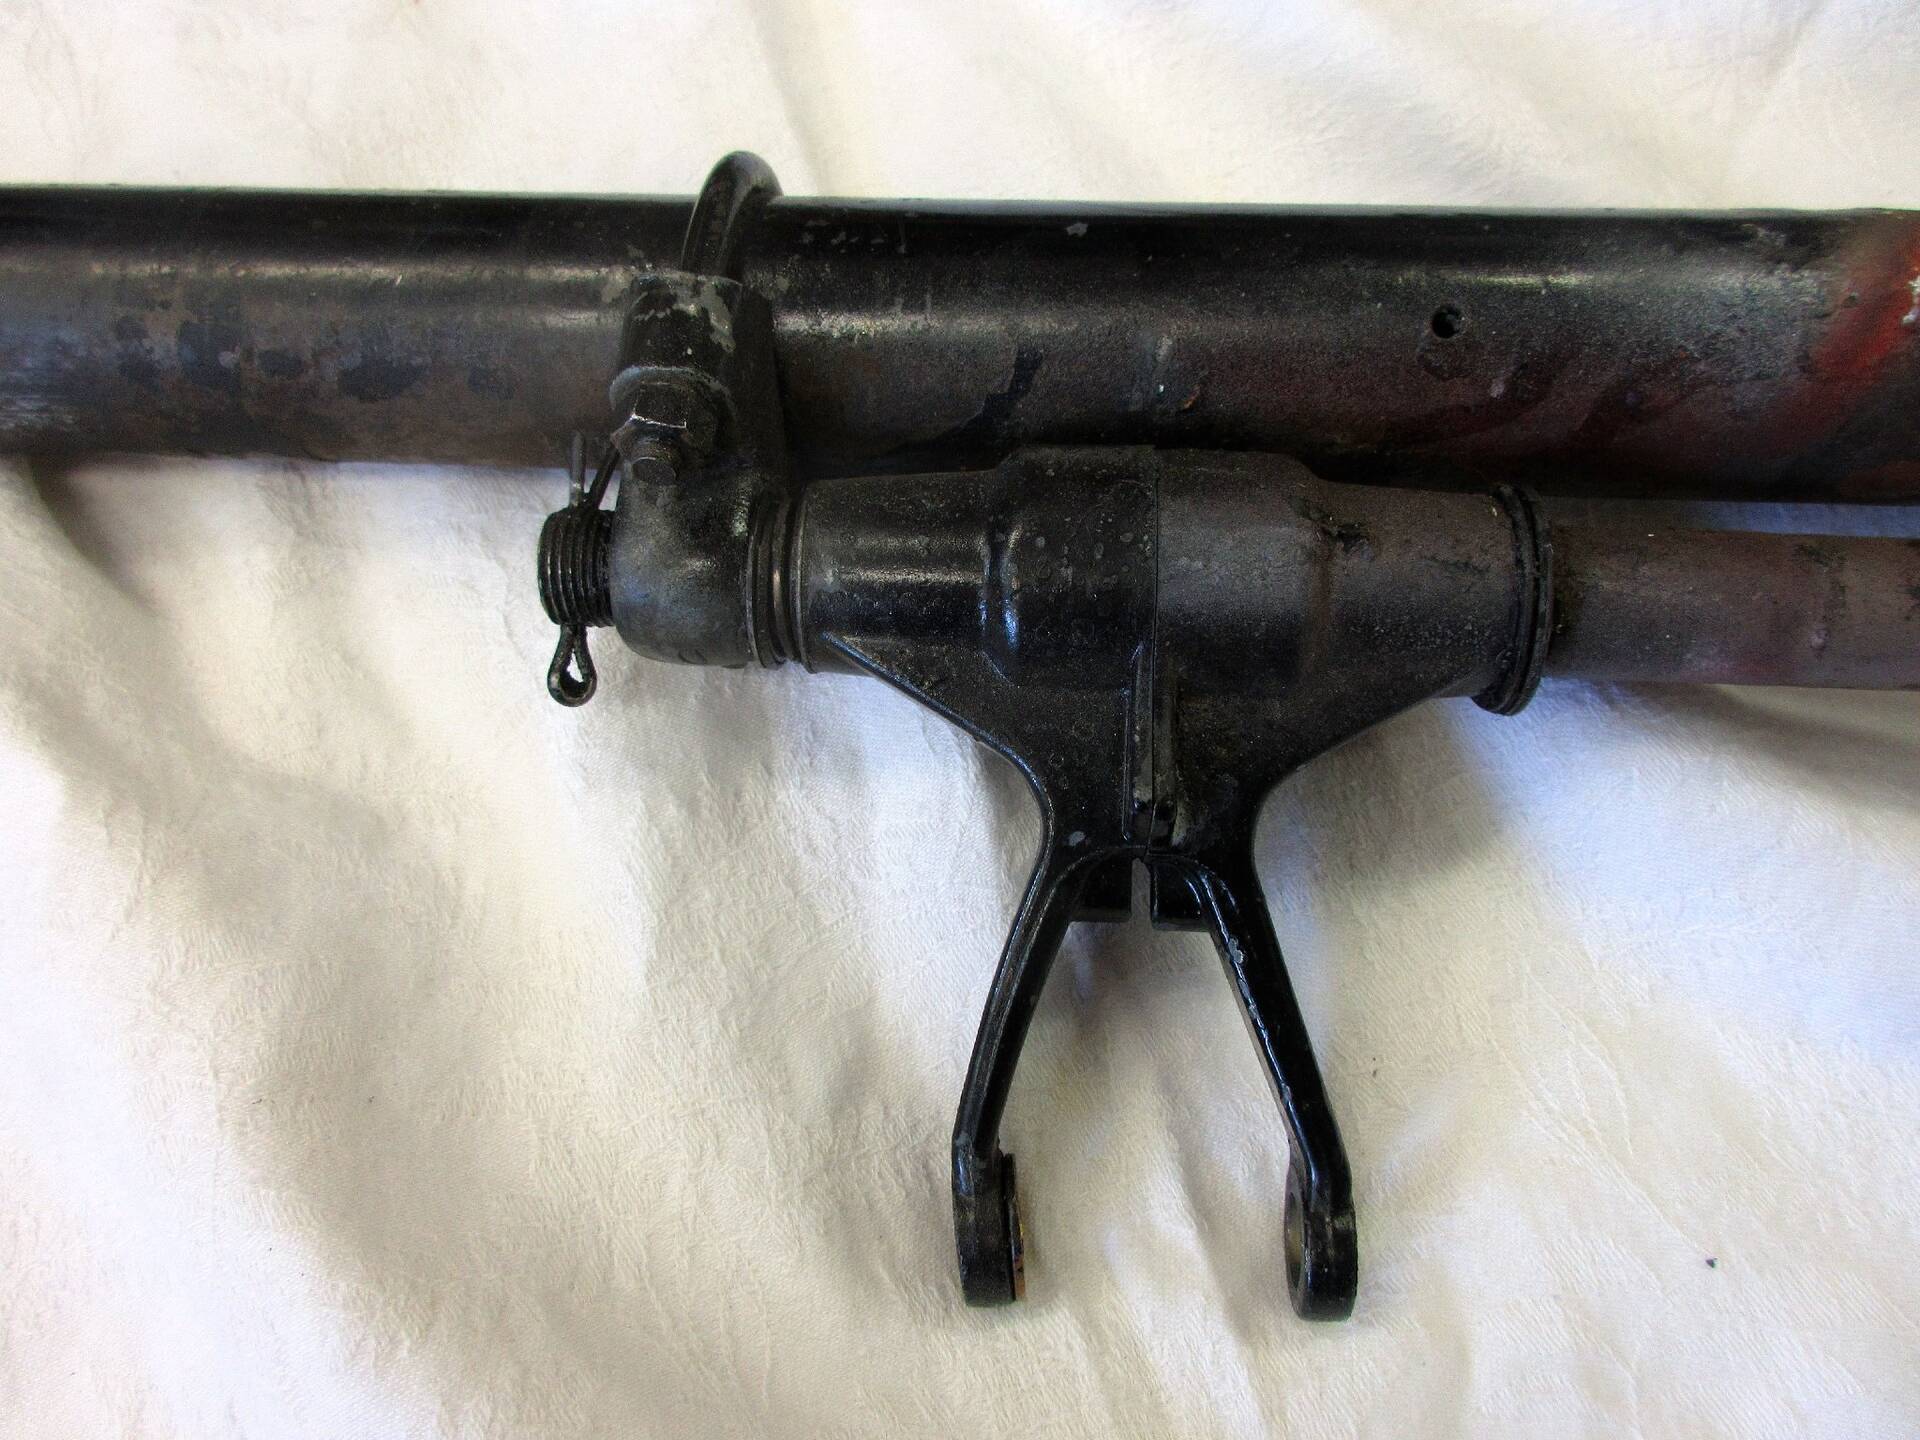 (198.08 KB) (198.08 KB) (261.23 KB) (261.23 KB)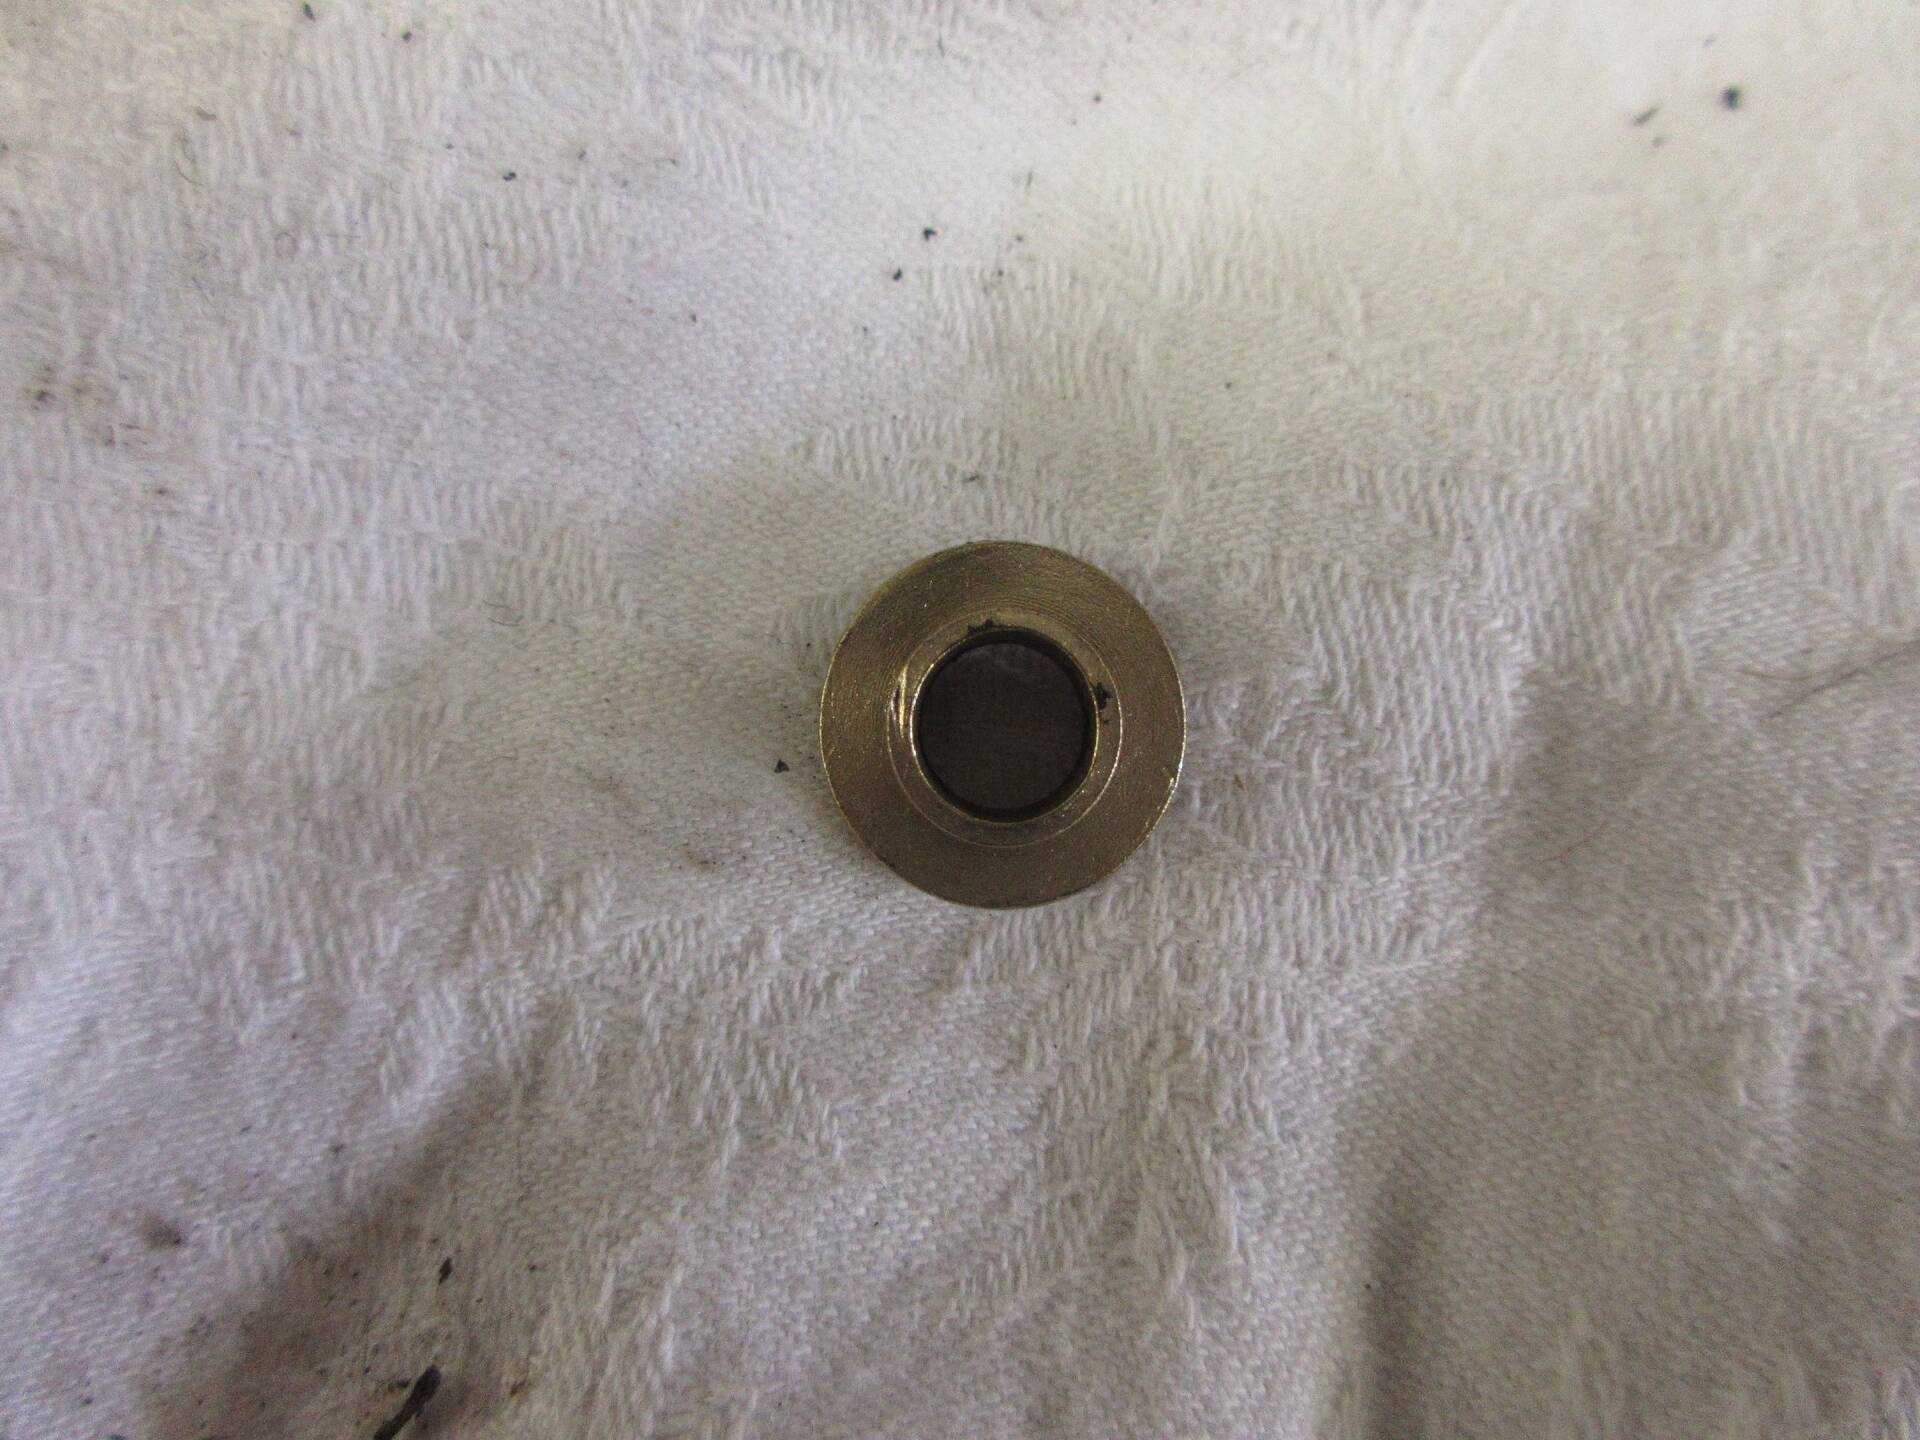 (278.33 KB) (278.33 KB)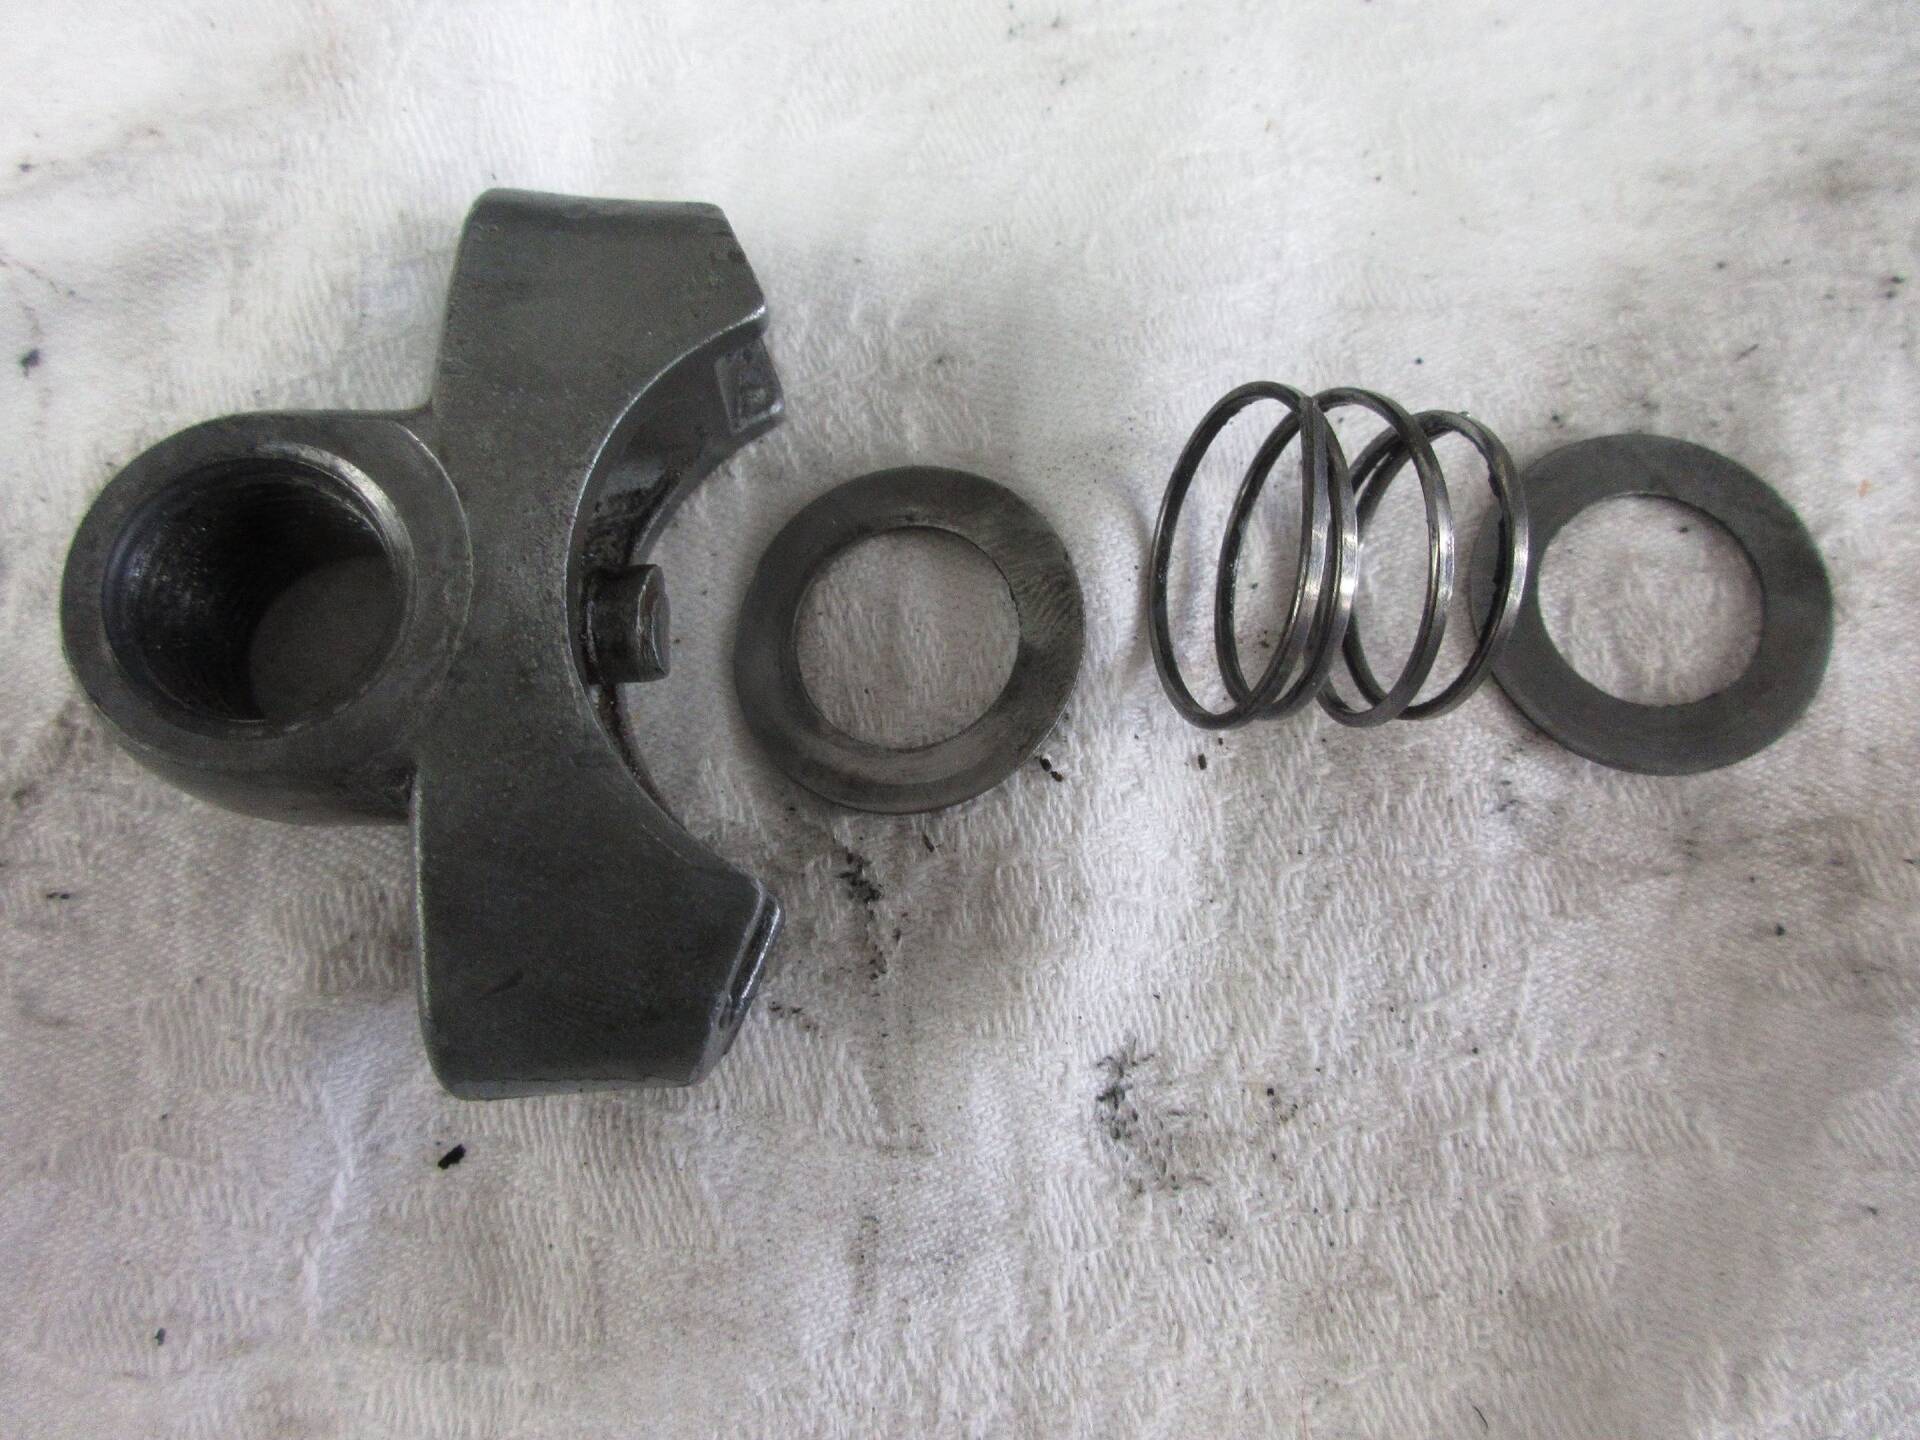 (217.94 KB) (217.94 KB)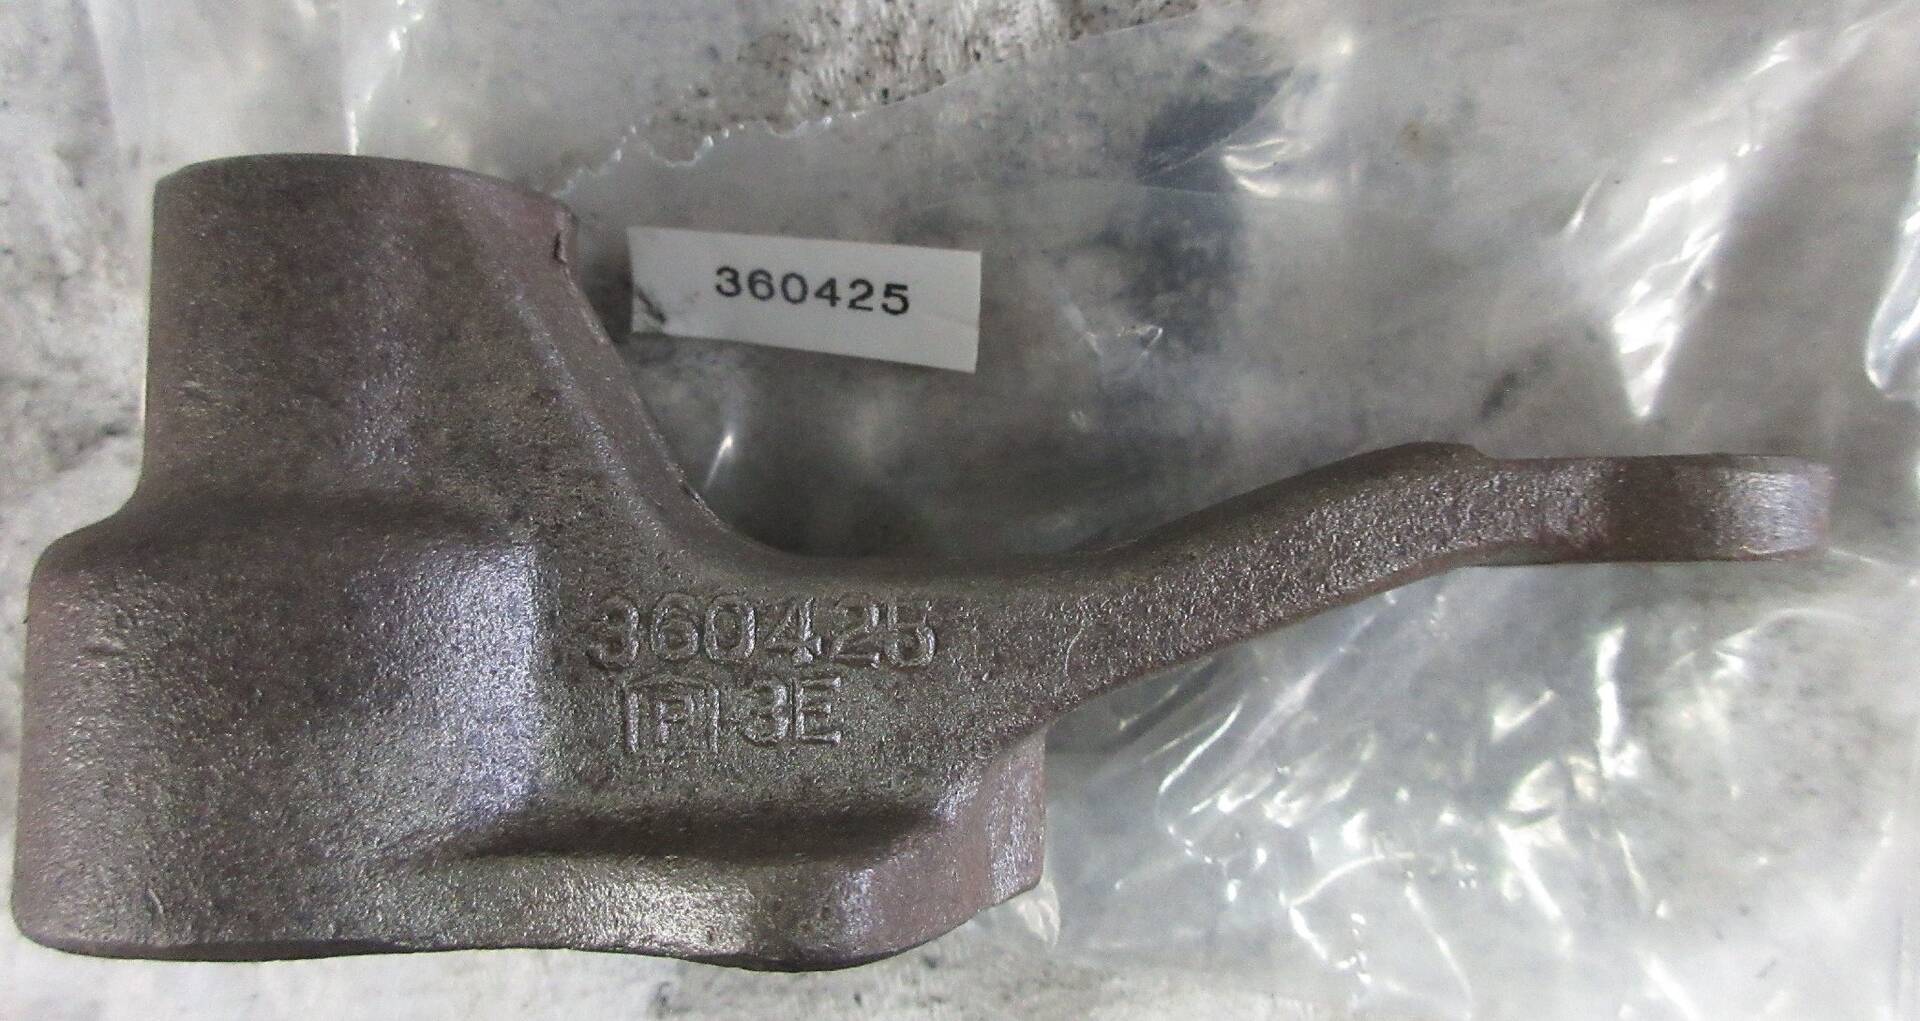 (195.44 KB) (195.44 KB)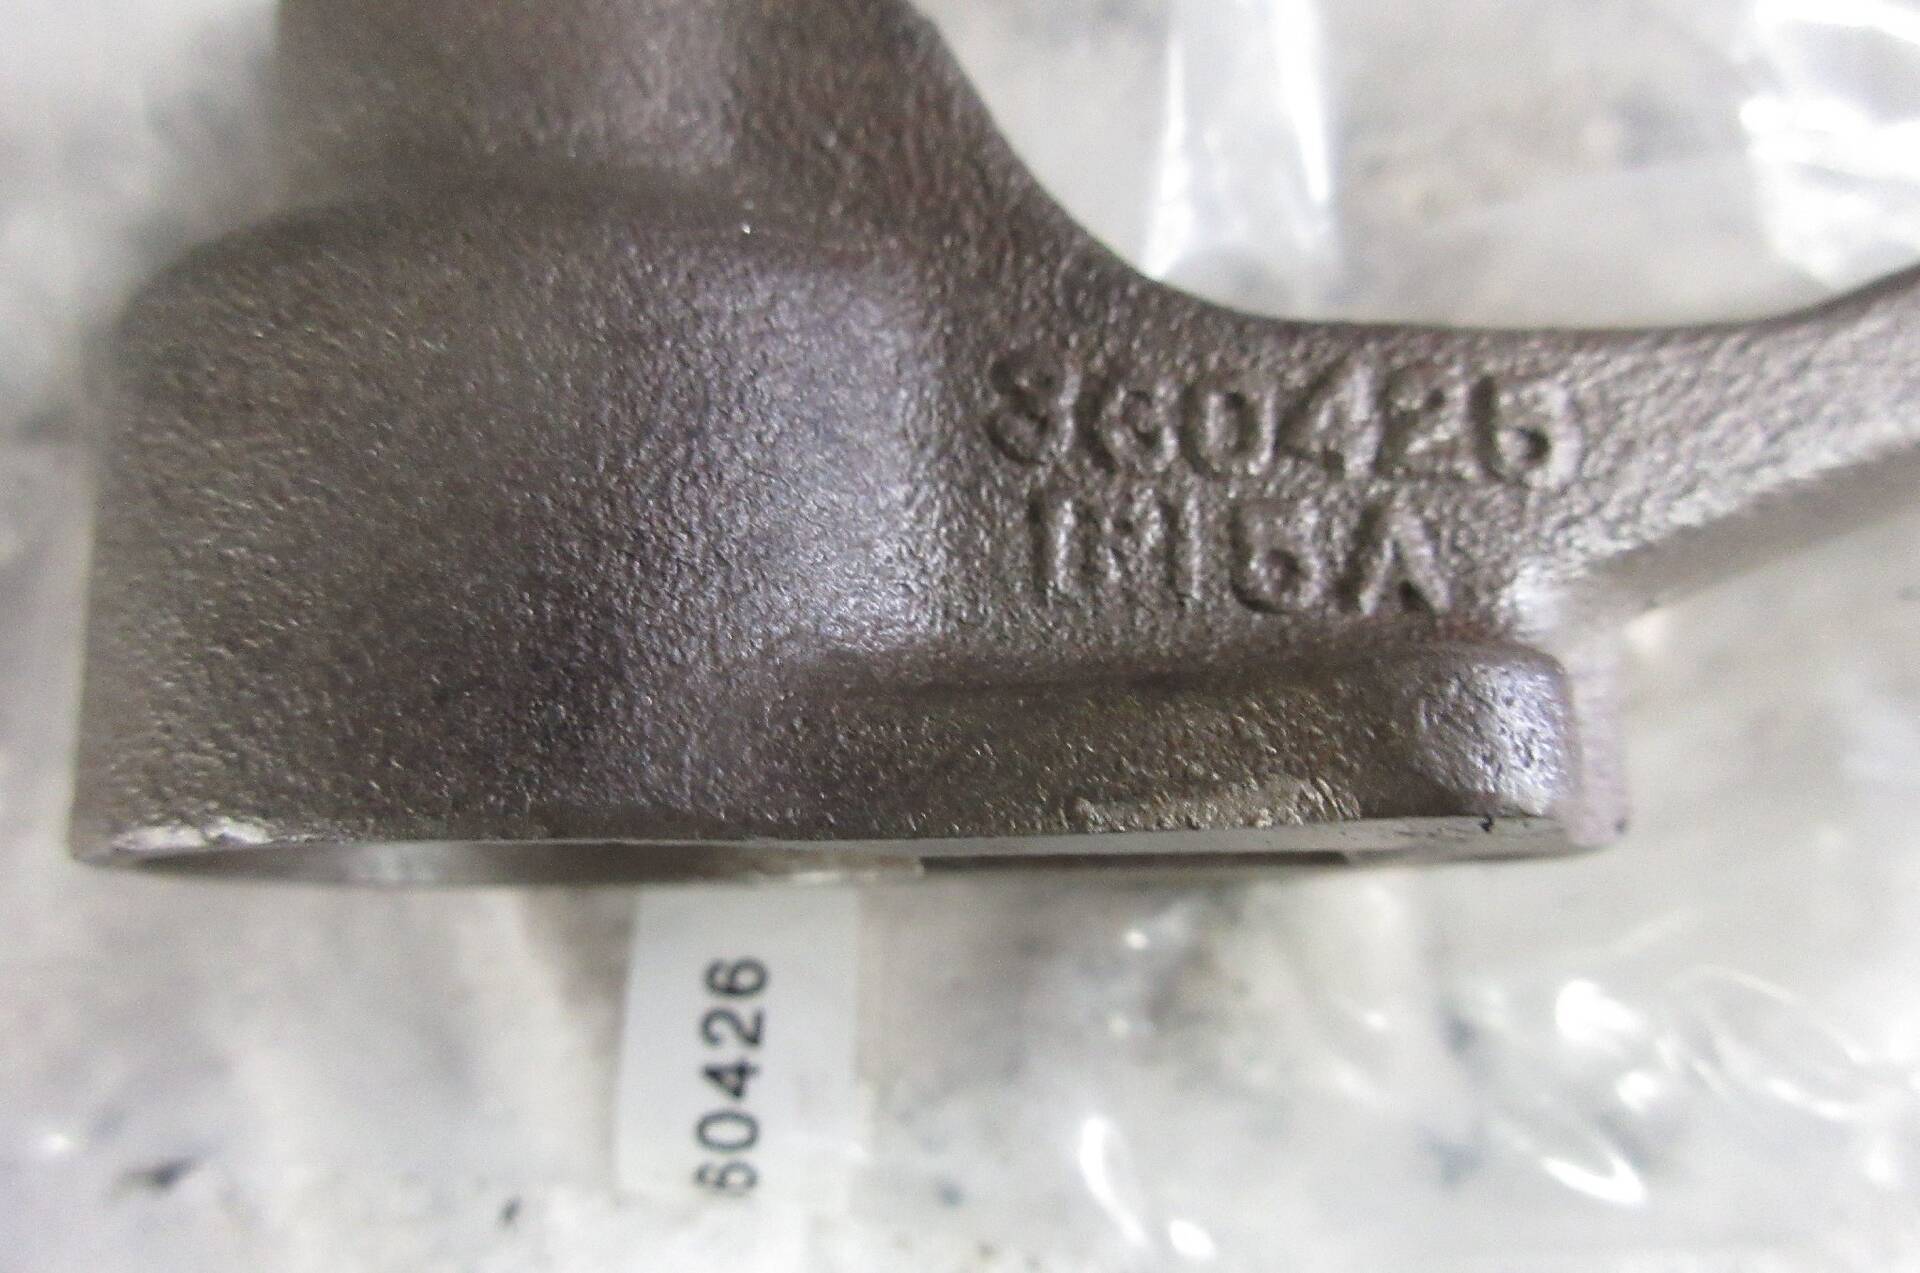 (288.84 KB) (288.84 KB)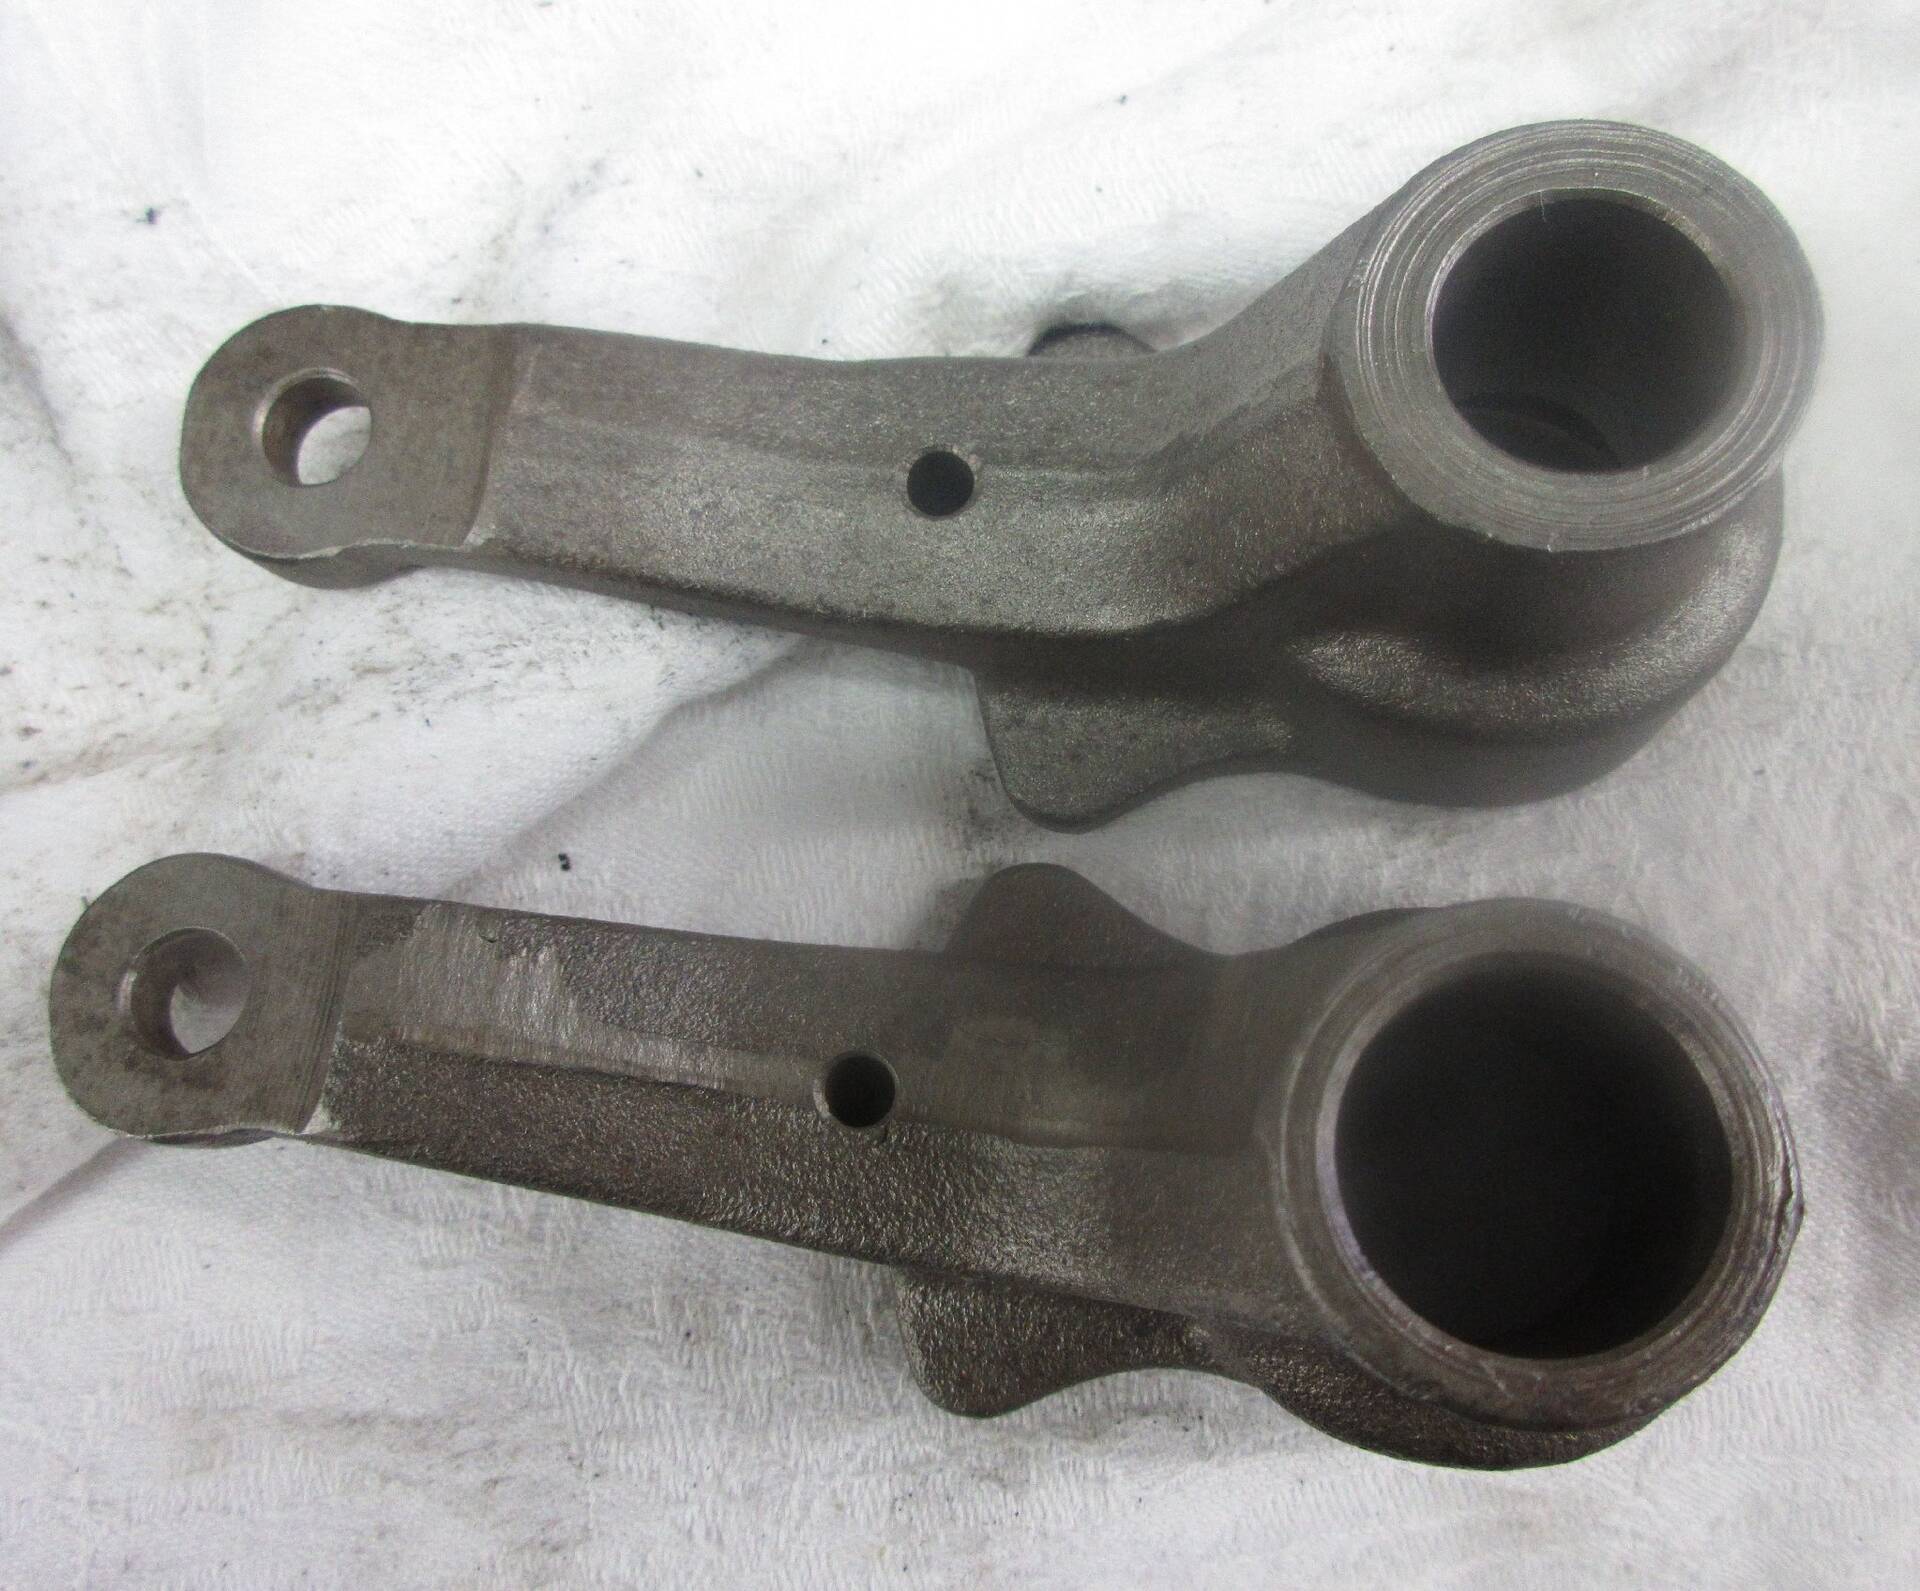 (185.26 KB) (185.26 KB)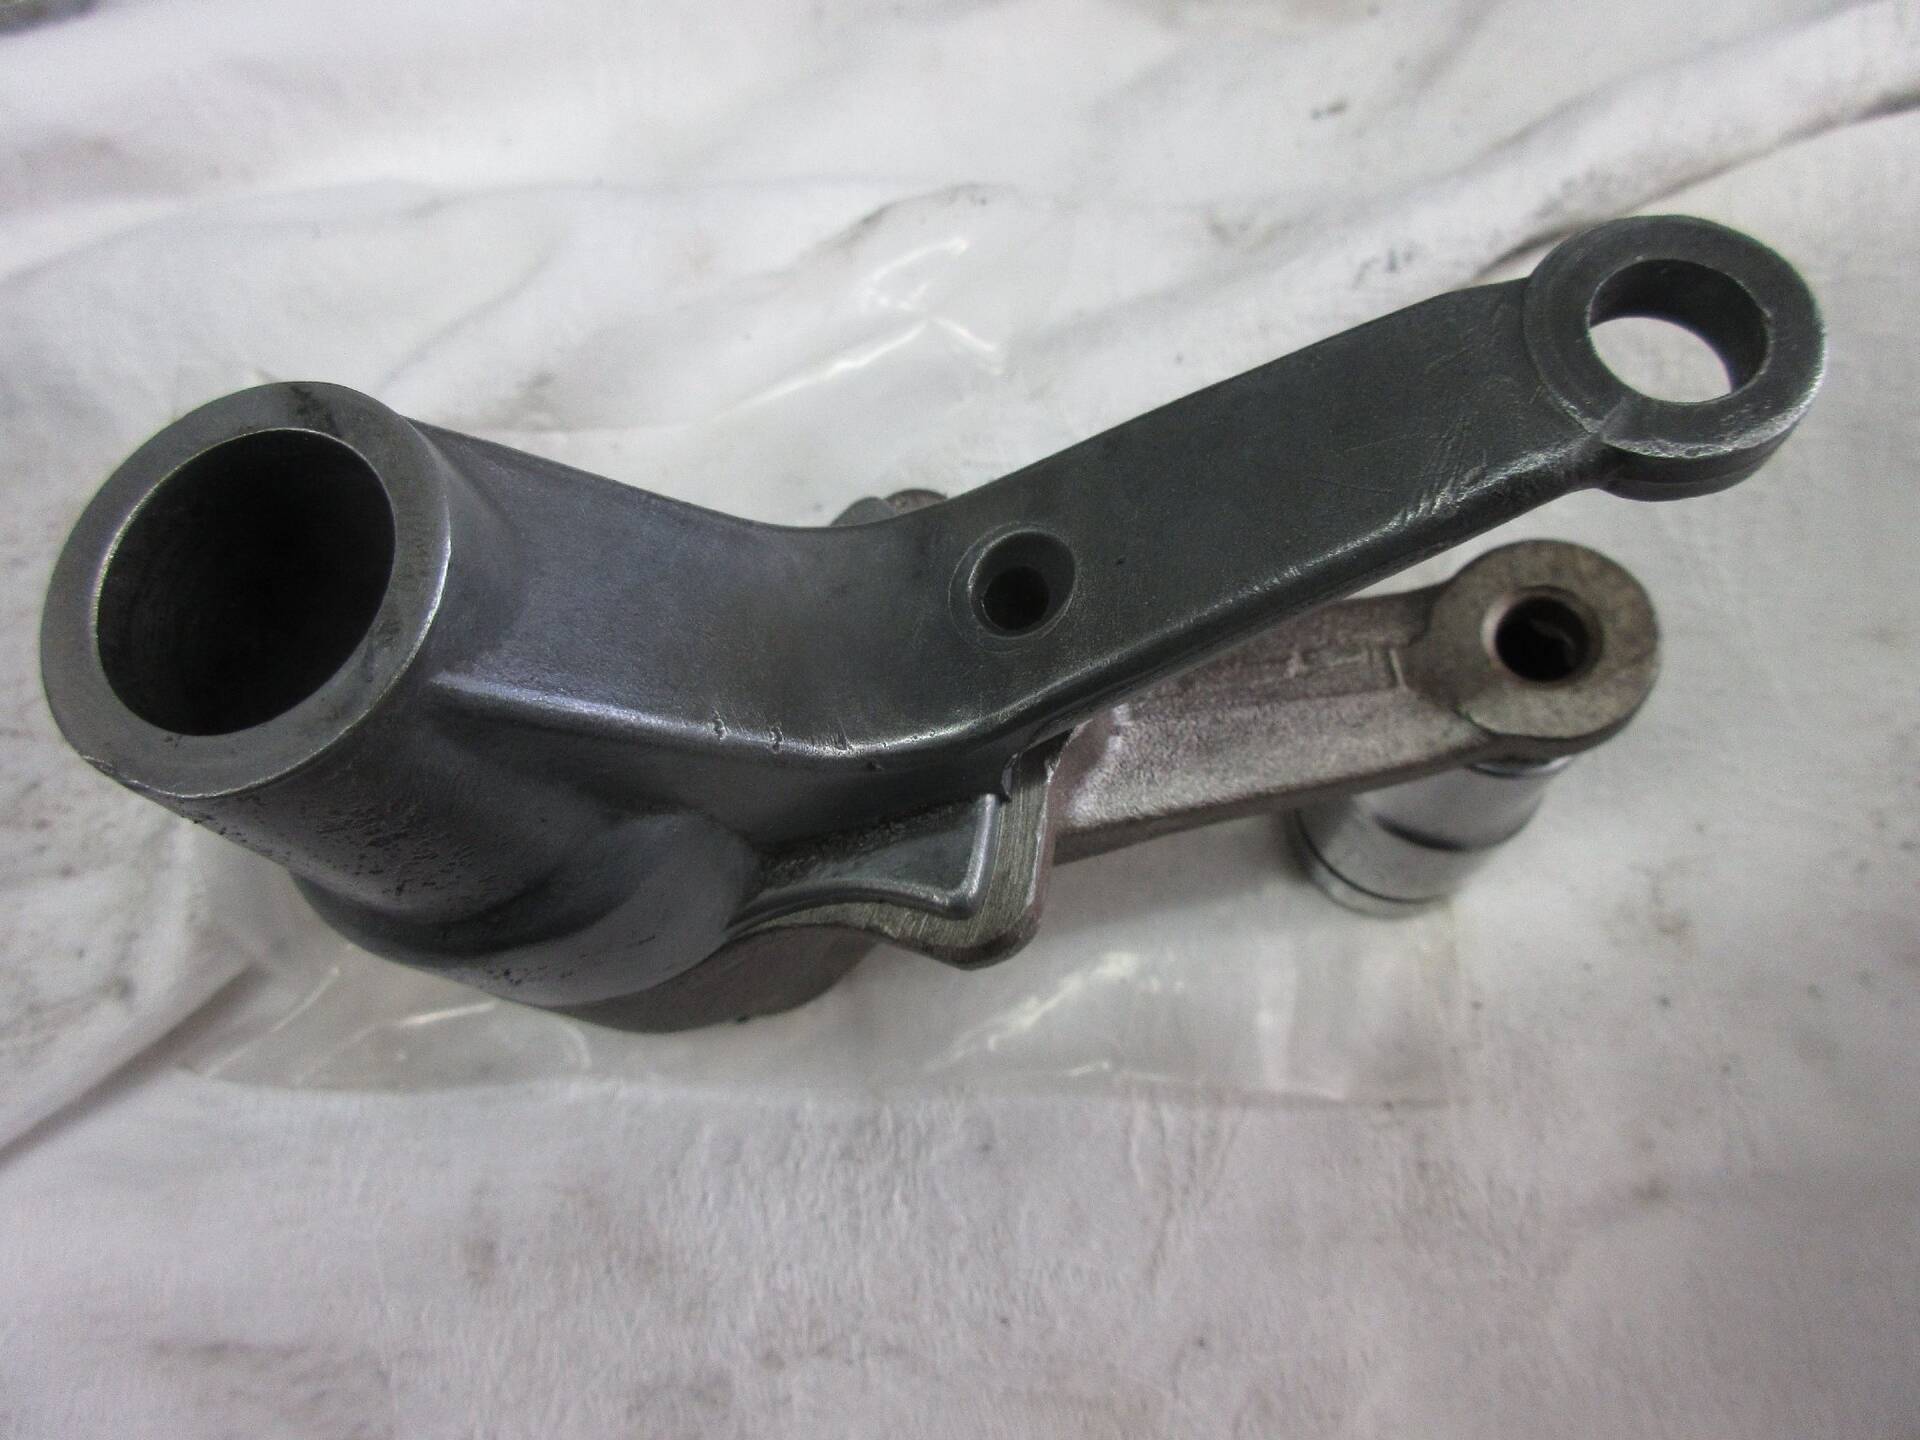 (311.98 KB) (311.98 KB)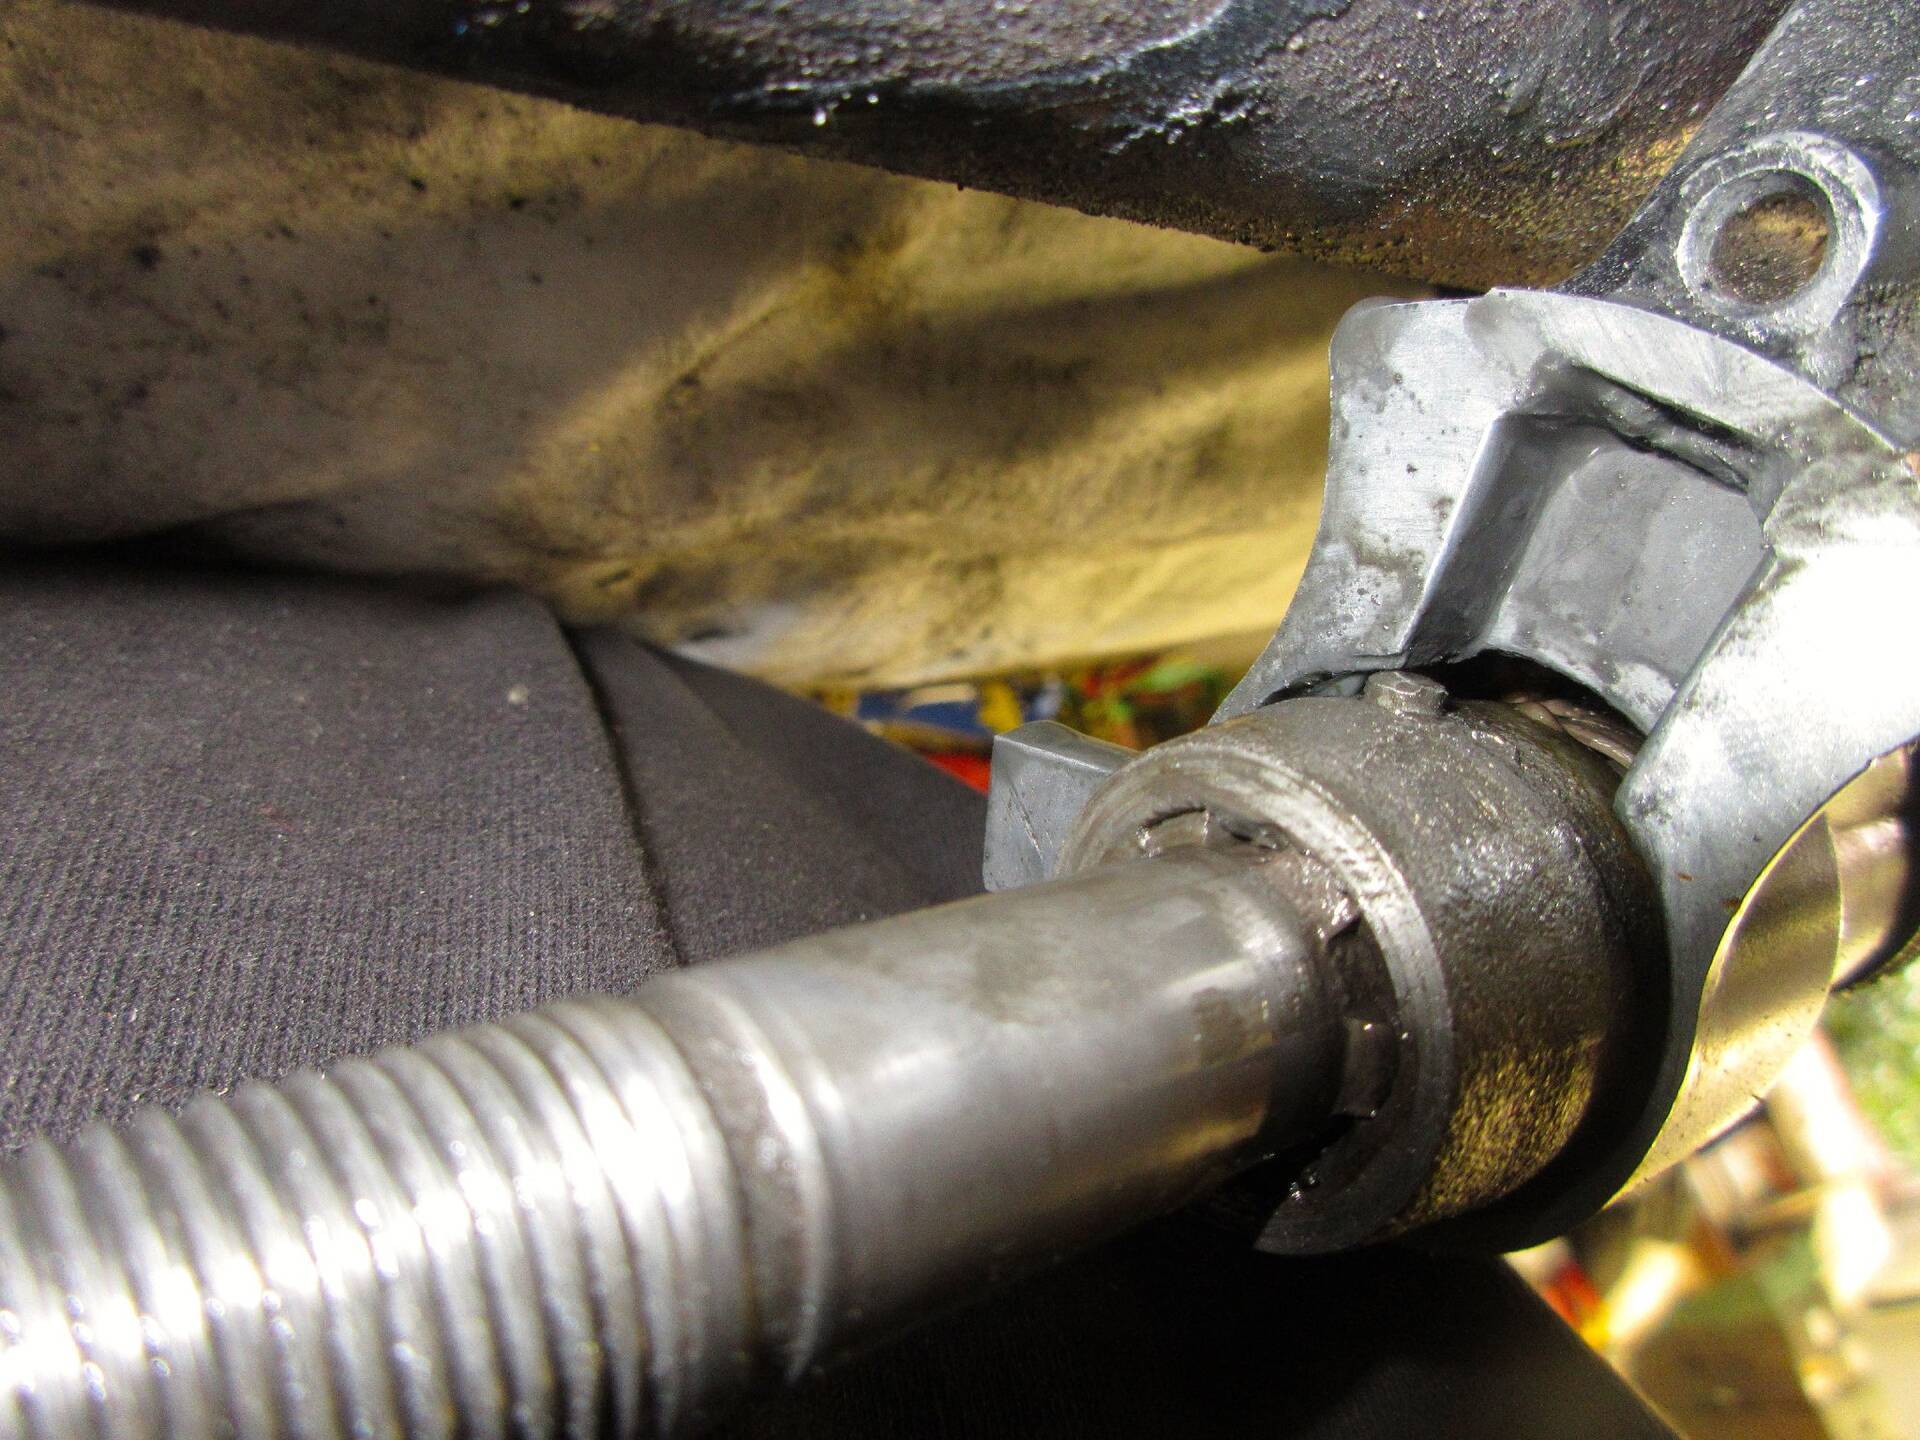
Posted on: 2018/8/11 10:42
|
|||
|
||||


