
|
Re: Lighting circuit wiring 48 288
|
||||
|---|---|---|---|---|
|
Forum Ambassador

|
The headlight switch on indicator shows at least that you have power to the switch. I would run the switch thru the various stages and use a meter to trace voltage at some of the easier to get to wire connections.
Depending on how many times the headlight switch is pushed various lights come on in stages. The first push activates the tail and park lights. The on indicator is fed from the tail light terminal and that same terminal also feeds the tail lights and instrument light switch. If the tail lights are not coming on look at the black wire which goes to an inline connector and connects to the body loom and then to the rear where another inline connector feeds the small filament on each tail light bulb. The parking lights are fed from the park light terminal via a blue wire which goes directly to the terminal strip on the left front fender where it ties to the small filament on the Left parking light bulb and to a cable which goes across to the right headlight and small filament on that park light bulb. Park light housing grounds can be an issue on almost all Packard models For the dash lights, the tail light terminal feeds the instrument light switch and depending on number of times the switch is pushed, it is off or on low or on high then back to off. All dash lights run thru that switch. A second push of the headlight switch keeps the indicator light, tail lights, and instrument lights on and energizes the headlight terminal but turns the park light terminal off. The headlights are fed from the headlight terminal via a white wire with green tracers. That wire goes directly to the dimmer switch common terminal. One push of the dimmer sw provides the connection for low beams that also goes to the terminal strip on the left fender via a brown wire where it goes on to both headlights. Pushing the dimmer switch again transfers power to a green wire also going to the fender terminal strip for high beams. A second wire on that same dimmer switch terminal goes back to the dash for the hi beam indicator light. Since you have the indicator light, I would look to the terminal strip connections and also headlight grounds. The headlights are grounded via a wire in the cable going to each bucket and bulb using a mounting screw to sheetmetal on the left fender terminal strip. The brake light switch gets power from a red wire connected to the always powered circuit breaker on the back of the instrument cluster. Out of the switch on a green wire to another inline connector and body loom, to the rear and then another inline connector feeding a second filament on both tail light bulbs. Turn signals in 48 are basic. In the front the bulb is shared with park lights. The large filament in the bulbs are the one used for turn signals. There are 3 way inline connectors under the dash which connects the turn signal switch to the main and rear body looms. In front inline connectors near the fender terminal strip connects the park light bulbs to the turn signal wiring in the main loom. In the rear there are separate bulbs which only light for turn signals. There are two individual wires in the rear body loom and associated inline connectors feeding those bulbs. Prior to 49 the brake light wire does not go thru the turn signal switch so turn signals do not share the same bulb filament with brake lights. Here is a photo of the headlight sw showing the terminal locations and an extraction showing the 22nd series turn signal circuit. If you have a 23rd series model, the circuit is quite different. Attach file:  headlight sw.jpg (36.15 KB) headlight sw.jpg (36.15 KB)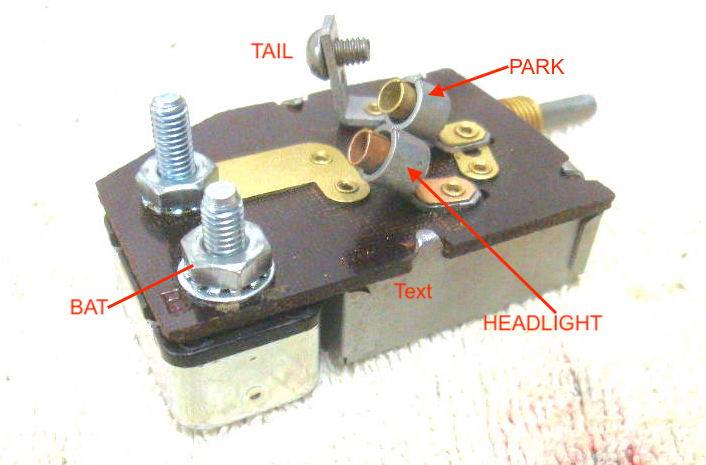 48 22nd series turn signal extraction.jpg (63.63 KB) 48 22nd series turn signal extraction.jpg (63.63 KB)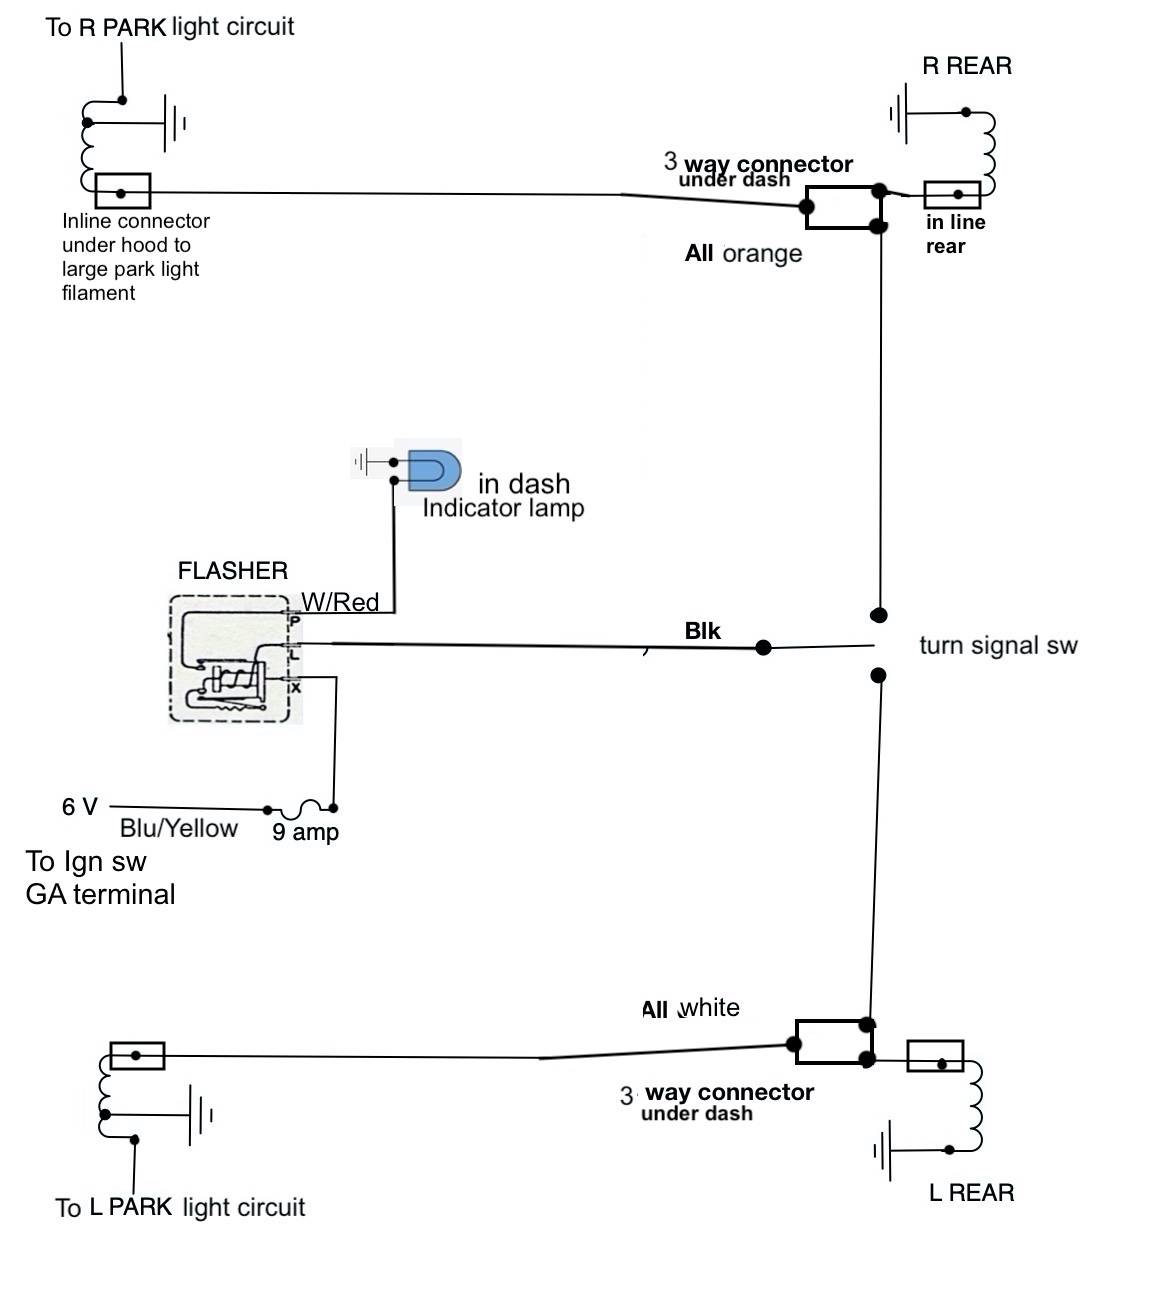
Posted on: 2023/8/7 11:27
|
|||
|
Howard
|
||||
|
||||
|
Re: Lighting circuit wiring 48 288
|
||||
|---|---|---|---|---|
|
Home away from home

|
Wiring can be very frustrating. Howard's info is perfect. Although I have a 1949 23rd series, my headlight switch is identical to the picture Howard gave you. What I find curious is the instrument lights switch gets its power from the from the Headlight switch. The instrument light switch can only turn on if the headlight or Parking light switch is on. So, if you believe the headlights are on, just not receiving power, you should still have dash lights. Very perplexing; After checking the wiring for the Headlight switch. I am wondering if the dimmer switch is wired right. Just a thought.
Dave O
Posted on: 2023/8/7 16:45
|
|||
|
||||
|
Re: Lighting circuit wiring 48 288
|
||||
|---|---|---|---|---|
|
Forum Ambassador
|
I believe one of the reasons they took the instrument light feed from the headlight switch as they did is so the dash lights can also be energized in conjunction with optional fog lights without needing to work a second switch.
I suspect most never touch the instrument switch so it is always on. If the standard Packard issued fog light switch is used a wire is jumpered over to the tail light terminal on the headlight switch. When the fog light sw turns on the fog lights it also powers the tail light terminal so the tail lights come on at the same time as would the dash and light switch is on indicator. You do have a good point in regards to the dash lights not working. If the hi beam indicator light is coming on, unless the switch is damaged or wired incorrectly at least part of the headlight circuit which would include the tail light terminal should be getting power.
Posted on: 2023/8/7 16:58
|
|||
|
Howard
|
||||
|
||||
|
Re: Lighting circuit wiring 48 288
|
||||
|---|---|---|---|---|
|
Home away from home

|
Since you are stuck, start by doing the homework: read all of the service and operating manual electrical sections and service indexes/bulletins for clues and study the electrical diagrams in detail til you throughly understand your vehicles electrical system. Site Tabs on the left if you don't have. Sometimes changes appear mid model and yours may or may not have been upgraded or known solutions. Helps to make work copies of drawings and outline circuits with a colored marker that you're working on at the car/garage.
+ grd 6 VDC is typically more challenging to troubleshoot because most are familiar with 12 VDC neg grd way of thinking - hot wire to grd. You kind of have to think backward so to speak where power is derived. Takes twice the current to make the same power. Plus this technology is over 70 years old, so things that were common then are foreign today. Less branch circuits typically means more connections but usually much simpler function. You won't answer the why questions so avoid that time waster. When turn signals are involved, the old flasher is often a source of headache. The old flashers are thermal and the circuit won't operate unless that proper flasher is installed and functioning. May take several new ones to get one to work due to poor quality repro. Fuses are another place of grief these days, corrosion or age, and they get finicky about passing current. I usually replace them all, clean the connections/dab of conductive/dielectric grease, if not tight, and test the new fuses, to be sure, before they go in. New bulbs/sockets get same treatment. After it's installed, ring it out for continuity before energizing*. Factory harnesses would be checked that way prior to ship out. Packard also ran an auto electric entity that was shed to GM, but they kept the same Warren factories, etc.close to where I grew up. Helps to look under the fuse block too, to see the condition of the solder connections. Wiring is often in tough shape too. So even if it looks OK, what's under the insulation can be very different and require a full blown re-wire. I sometime recommend engaging an auto electrician in cases where one is stumped, but these are "old school", so unless you have the right person close by, not likely to help. They'll be learning as they go too. But may have more diagnostic tools like ground tester. The main thing in troubleshooting is to be methodical. Checking and verifying, vs trying to "figure it out" and jump around. Make sure the cure fits the symptoms. If it's intermittent, then look for intermittent causes, loose, pulsing, etc. If it's dead, what makes 'em dead; check power, switches, connections, and function. Use the DVM continuity setting and ring out any wires and devices in the circuit, keep records, before you question something. Seek/Know what you know first, not what you don't. When we would commission a large instrument job, the documentation was massive. These old cars don't have very good documentation and it's not going to get any better with a Packard than it was 65 years ago. * - apply check it, double check it, and check it again to reduce errors. That's 99.99+%.
Posted on: 2023/8/7 20:45
|
|||
|
||||


