|
Re: Body Mounts
|
||||
|---|---|---|---|---|
|
Home away from home

|
You have to unbolt and raise the body off the frame a tad to change the cushions. ie, take the weight off and space to replace with new ones. If the bolts are rusty, it can be a chore if they don't want to separate. And maybe a two man job, one holding wrench inside, one under. Get them all on with bolt in, lower, and then tighten it back up.
Surprised the outriggers are bad, but the body isn't corroded through as well? Thicker GA steel on the brace. Maybe another surprise waiting for you. And didn't you just have the carpet out? I just replaced all them on my P/U truck and could not use impact they way they were arranged, inaccessible floating cage nuts. I didn't know they had an issue with the urethane and the "baja" construction zone ate them alive and other suspension parts - long story. So you'll need some sort of lift or jack and way to reinforce the body/distribute the load. Usually, you can get them one by one on the outriggers, but since you're changing braces, it's a bit more complex. Times like these one wishes they have a lift or body twirler and take the whole thing up. I couldn't get my twirler under the truck without a major mod to it. Time you get done fixing all the gremlins, you'll have a complete resto.
Posted on: 2/26 17:23
|
|||
|
||||
|
Re: Body Mounts
|
||||
|---|---|---|---|---|
|
Home away from home
|
Thanks Fish'n Jim. The part I'm confused about, which is because I can't crawl under my car at the moment, is how the bolts to the frame are configured because they do not come trough the floor like the bolts on the out riggers do. I'm clearly missing something, but I'm not sure what. I may have to make a trip to go see my car just so I can see what's going on.

Posted on: 2/26 17:45
|
|||
|
||||
|
Re: Body Mounts
|
||||
|---|---|---|---|---|
|
Home away from home
|
David Grubbs posted in the parts cross reference that Napa 602-1045 body mounts could be cut down and used for early 50's cars. Does anyone know what the correct thickness is for the upper and lower rubbers??
Posted on: 3/2 1:00
|
|||
|
||||
|
Re: Body Mounts
|
||||
|---|---|---|---|---|
|
Home away from home

|
Bad Chad, suggests going to Princess auto & buy some boat rollers. cut them with a chop saw. I might try that for my car. I believe the thicknesses are 1/2" for the thin ones & 3/4" for the thick ones. I did some research on this a long time ago. The wiser more experienced fellows may correct me.
Posted on: 3/2 12:24
|
|||
|
1956 Packard Executive 2 door hard top (5677A)
1956 Clipper Deluxe Touring Sedan (5622)(parts car) |
||||
|
||||
|
Re: Body Mounts
|
||||
|---|---|---|---|---|
|
Forum Ambassador

|
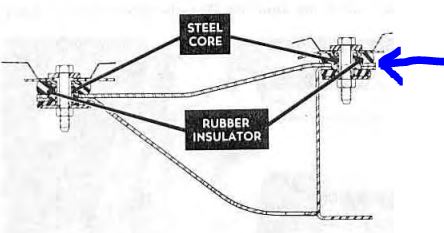
Check out Steele's offerings for body mount pads. Some years used actual molded rubber and other years only used a rubber and fabric impregnated substance similar to conveyer belting. Steele gives dimensions for his rubber cushion offerings if you are going to try and make your own. At one time Kanter sold pieces of the belting like material where you cut your own 2" or 3" squares out of the piece. If they no longer carry that material McMaster-Carr sells conveyer belting by the foot in a few different widths and thicknesses.
51-4 seems to have only used a couple of different thickness and shapes but 55-6 had some additional shapes and thicknesses along with some having steel cores to keep any body bolts with excessive tightening from compressing the rubber too much. All of the locations could also have needed shims to accommodate differences in body mfg as the pieces were welded together. Ths was found evident if you read thru Stewarts 55 blog on his mismatched door fit adventure which I believe was solved by changing or rearranging a few shims. If you check the Steele website and click on an item he often provides a dimensional drawing.. Here are the two cushions used in 51-4. 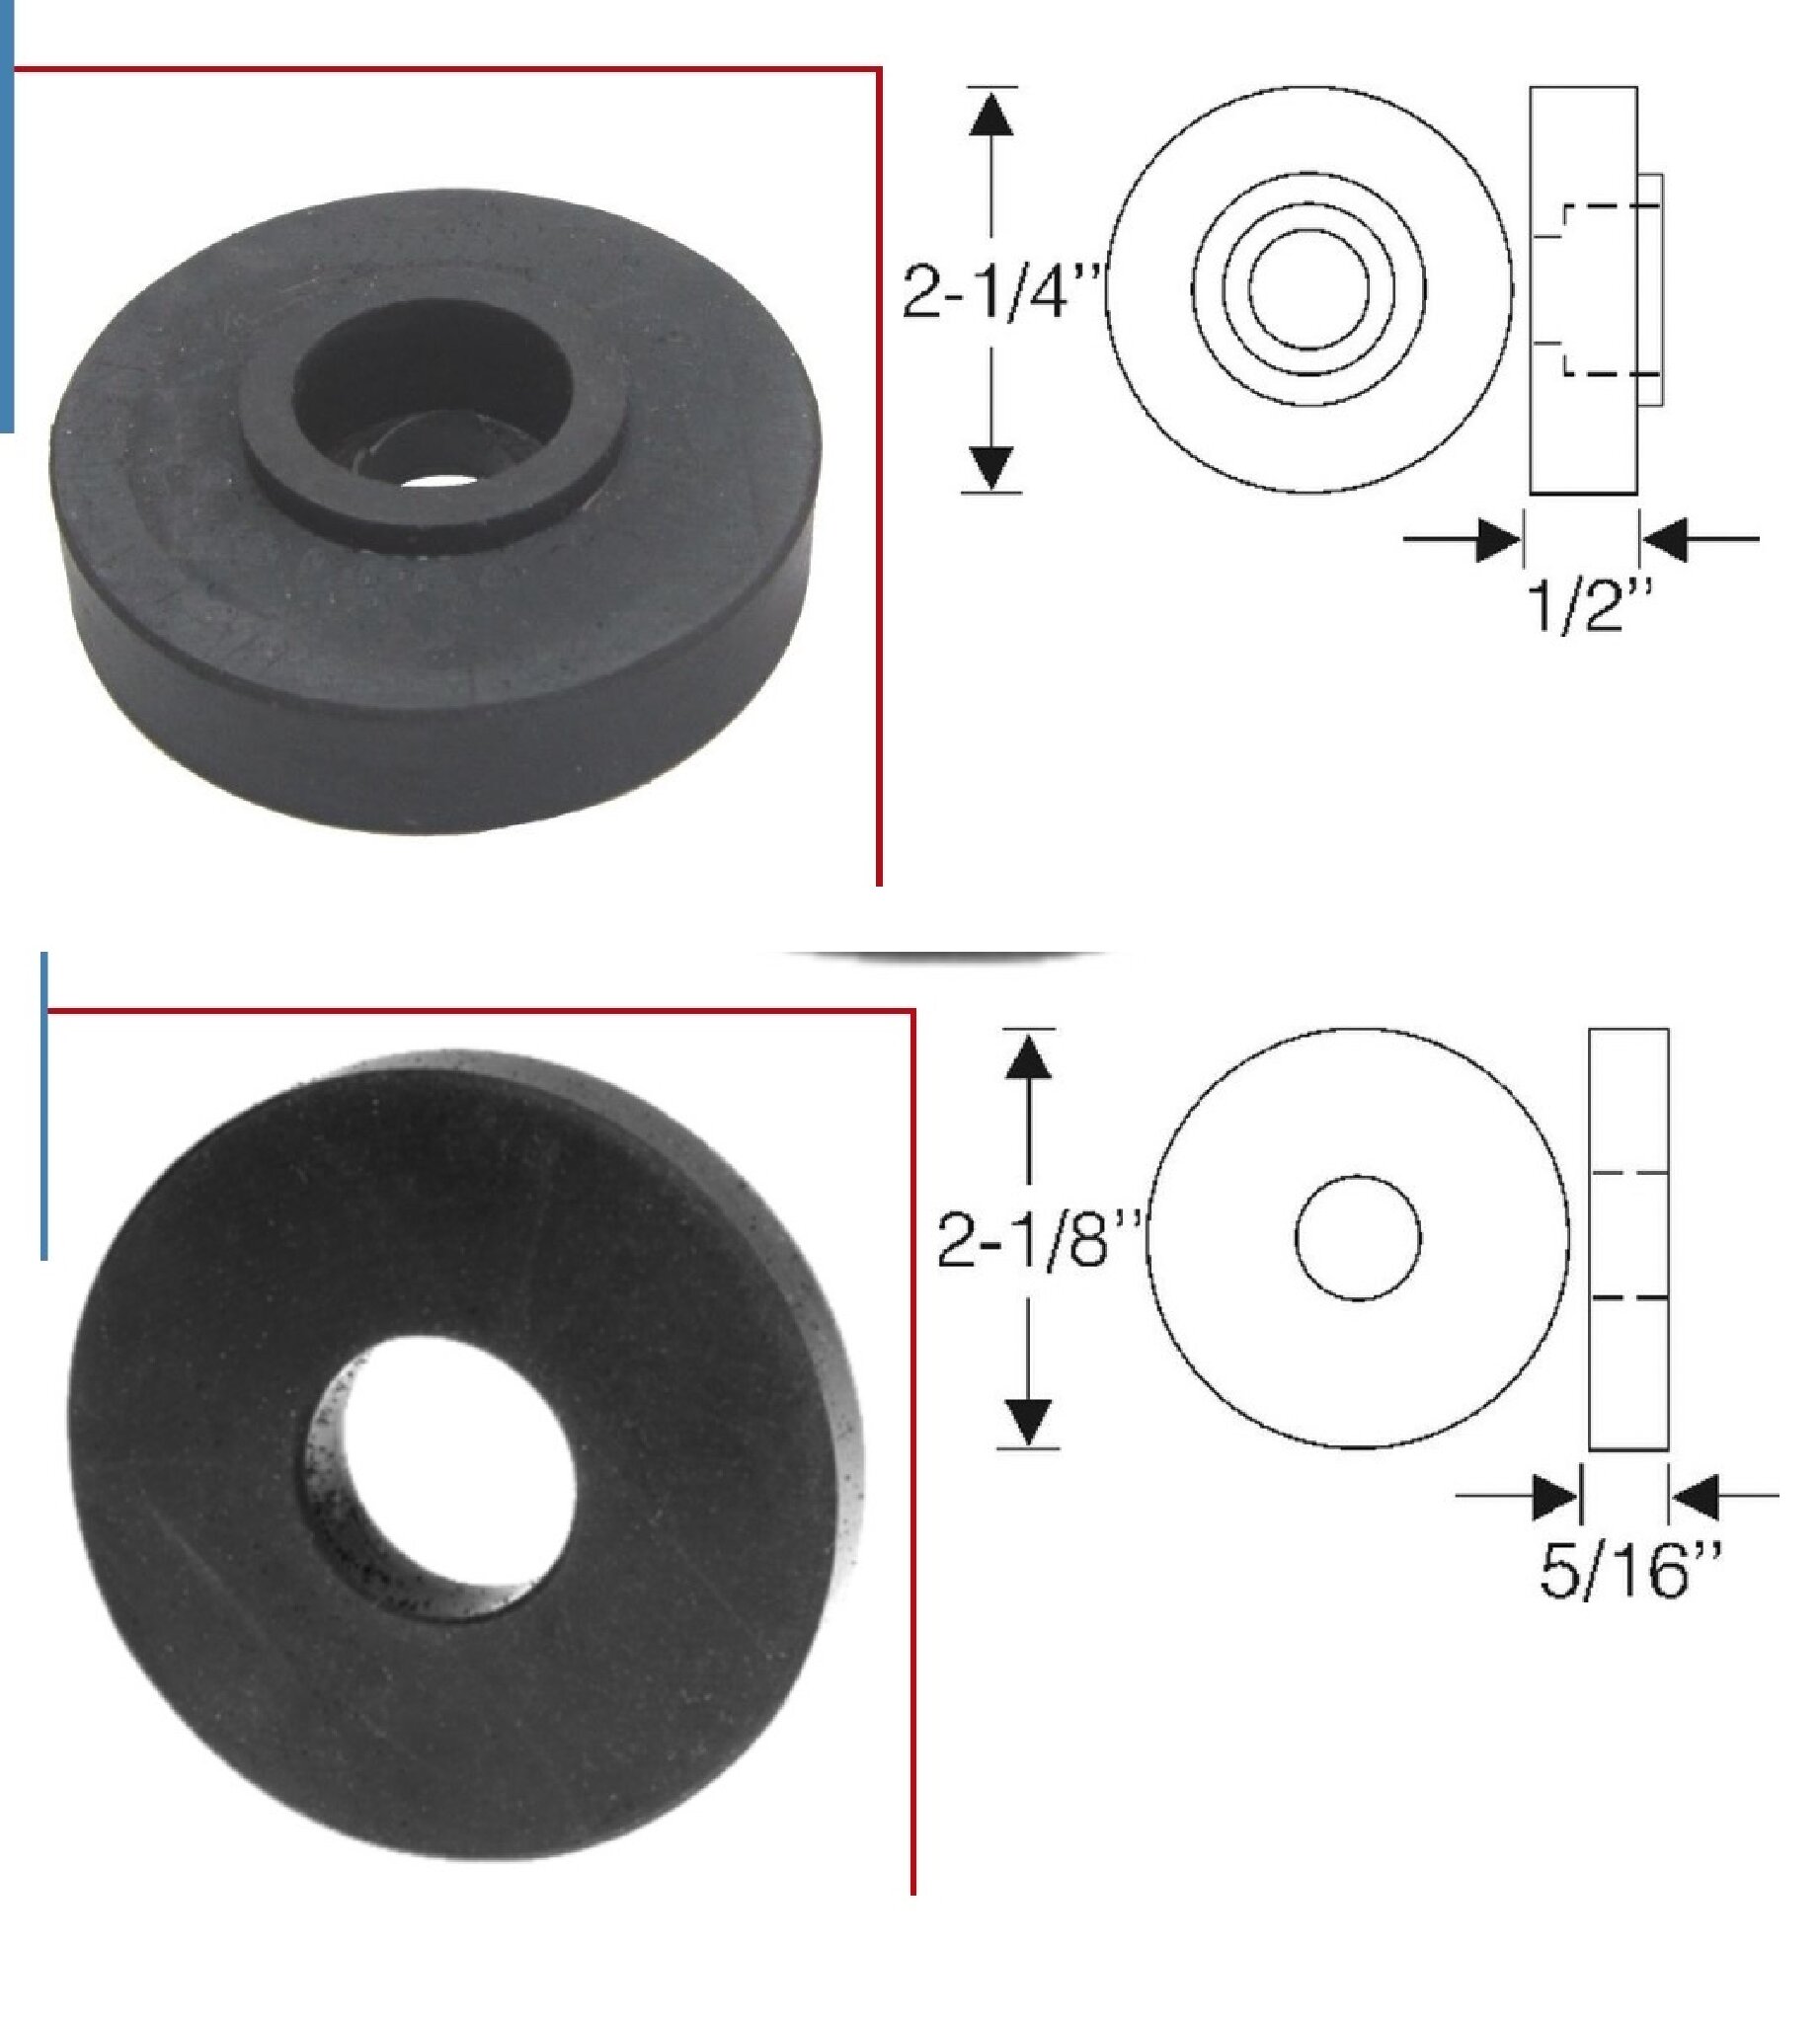
Posted on: 3/2 12:50
|
|||
|
Howard
|
||||
|
||||
|
Re: Body Mounts
|
||||
|---|---|---|---|---|
|
Home away from home
|
Thanks Howard!
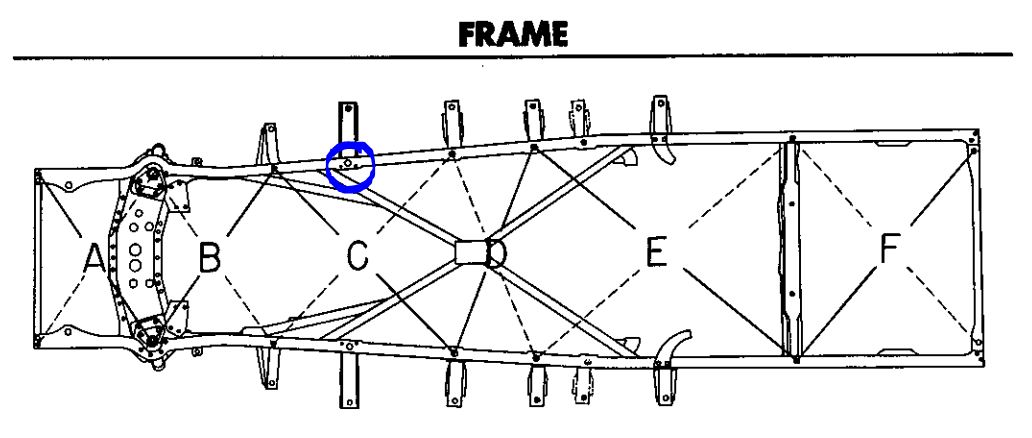
I have been going through the parts books and going cross eyed trying to figure out what size rubbers, bolts, etc. I need for my car. I'm afraid I'm not a very good parts guy! When I go to the illustrations to find the part numbers I can't find the body mounts, but I can find EVERYTHING else. Mine do have steel cores and I believe a thick and thin one. I'm doing some floor pan repairs and while I'm under there I want to replace the rubbers and bolts to ensure they are all secure and to ensure the body is sitting correct on the frame so as I do floor pan repairs and any other body work I'm starting from a good foundation. On page 331 of the parts manual I can find the "body to frame bolt rubber" there are inners and outers, which makes sense, thin and thick but can't find dimensions like they give for some other models. There there are ones for "No. 2,3,4,5", for example, which I assume are positions, but can't find something that indicates which point is which number. Working on my Cavalier 2672 I'm sure this is all clear, when you know what you're looking for and where to look. Any help you can provide would be appreciated. Attach file:  body to frame bolt rubber.jpg (163.48 KB) body to frame bolt rubber.jpg (163.48 KB)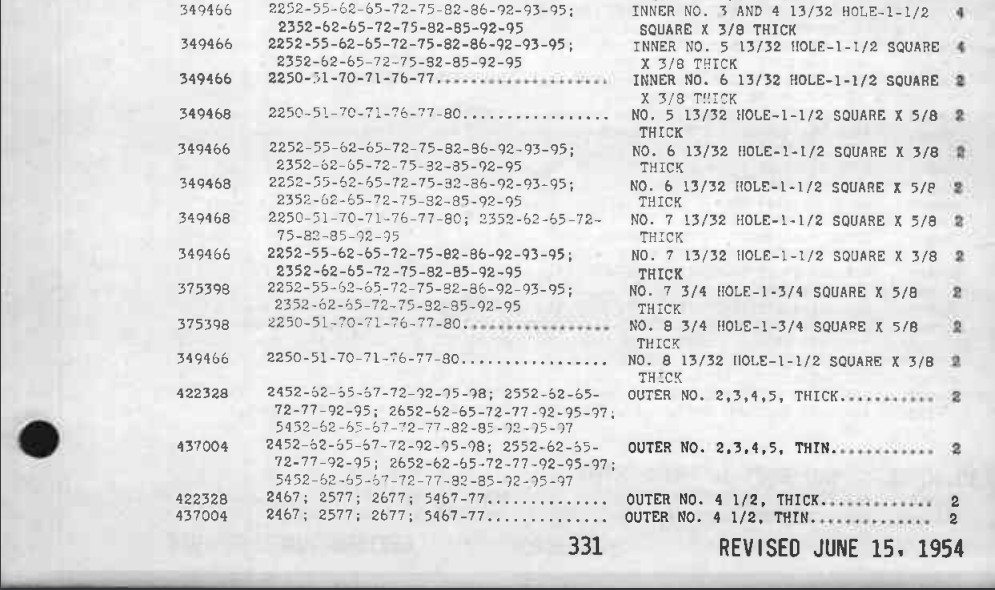
Posted on: 3/2 13:17
|
|||
|
||||
|
Re: Body Mounts
|
||||
|---|---|---|---|---|
|
Forum Ambassador
|
Regarding your frame drawing in post #1 above, number 1 is at the left between the B and C indications. It is the one exposed at the bottom of the cowl when the fenders are removed. The mounts follow toward the rear with 2 being opposite the C and go all the way back with 6 and 7 at the rear in the trunk with the F centered between them. Hardtop styles usually have one extra outrigger so 4 1/2 would be on a hardtop and convertible. Longer wheel base models are not covered in the drawing.
Inner would be the holes above the frame and outer is at the end of the outriggers. On the parts list page you posted above you are only interested in the 2672 models which is the 300 sedan or Cavalier model. The 4 outer listings you need are at the bottom of that page and the 4 inner listings are on the following page in the manual.. The 11 listings toward the top of the page starting 22xx are for the hard rubber composition belting like material which was used in most models prior to 51. Instead of rubber, convertibles usually had mostly solid steel blocks needed to provide the body rigidity. It looks like only the two rubber numbers, 422328 and 437004 are used but the combinations are different depending on location. Shims and steel items are listed starting on page 333. Some of the steel spacer lengths are listed and if shims are needed they only have an X for quantity undetermined since it depended on body fit. Those came in a couple of thicknesses. In the Steele photo in post #6 422328 is the thicker 1/2 cushion shown as the upper item, 437004 is the thinner 5/16 cushion..
Posted on: 3/2 13:45
|
|||
|
Howard
|
||||
|
||||
|
Re: Body Mounts
|
||||
|---|---|---|---|---|
|
Home away from home
|
Thanks again Howard, that makes sense and is very helpful. I started making an Excel doc of what I needed, but that wasn't working out. I'm just going to pull out the old mounts, bolts & spacers in order to figure out what I need, at least one side.
I wanted to be proactive and have everything ready because I'm going to be doing some sandblasting and want to clean up and paint the mounting points, but looks like I'll be adding an extra step to the process.
Posted on: 3/2 15:41
|
|||
|
||||
|
Re: Body Mounts
|
||||
|---|---|---|---|---|
|
Home away from home
|
Back working on my body mounts today and hoping someone can provide a little clarity. I thought I could make sense of everything by looking at what parts are listed in the parts book, but not getting there.
First picture shows outrigger #2, or outer. Pretty clear here, I'll just remove and replace with the same combination of washers, cushions, etc. Second picture shows the cushion between the frame and body, #2 inner. Am I correct to assume that these cushions have a shoulder that fits into the hole in the frame and the floor pan brace to keep them from sliding sideways, and then are held in place by the weight of the body? Third pictures show the lack of cushions between the frame and body at #3 and #4 inner. Am I correct to assume that these deteriorated and have fallen out? Attach file: 20240310_123113.jpg (3,704.14 KB)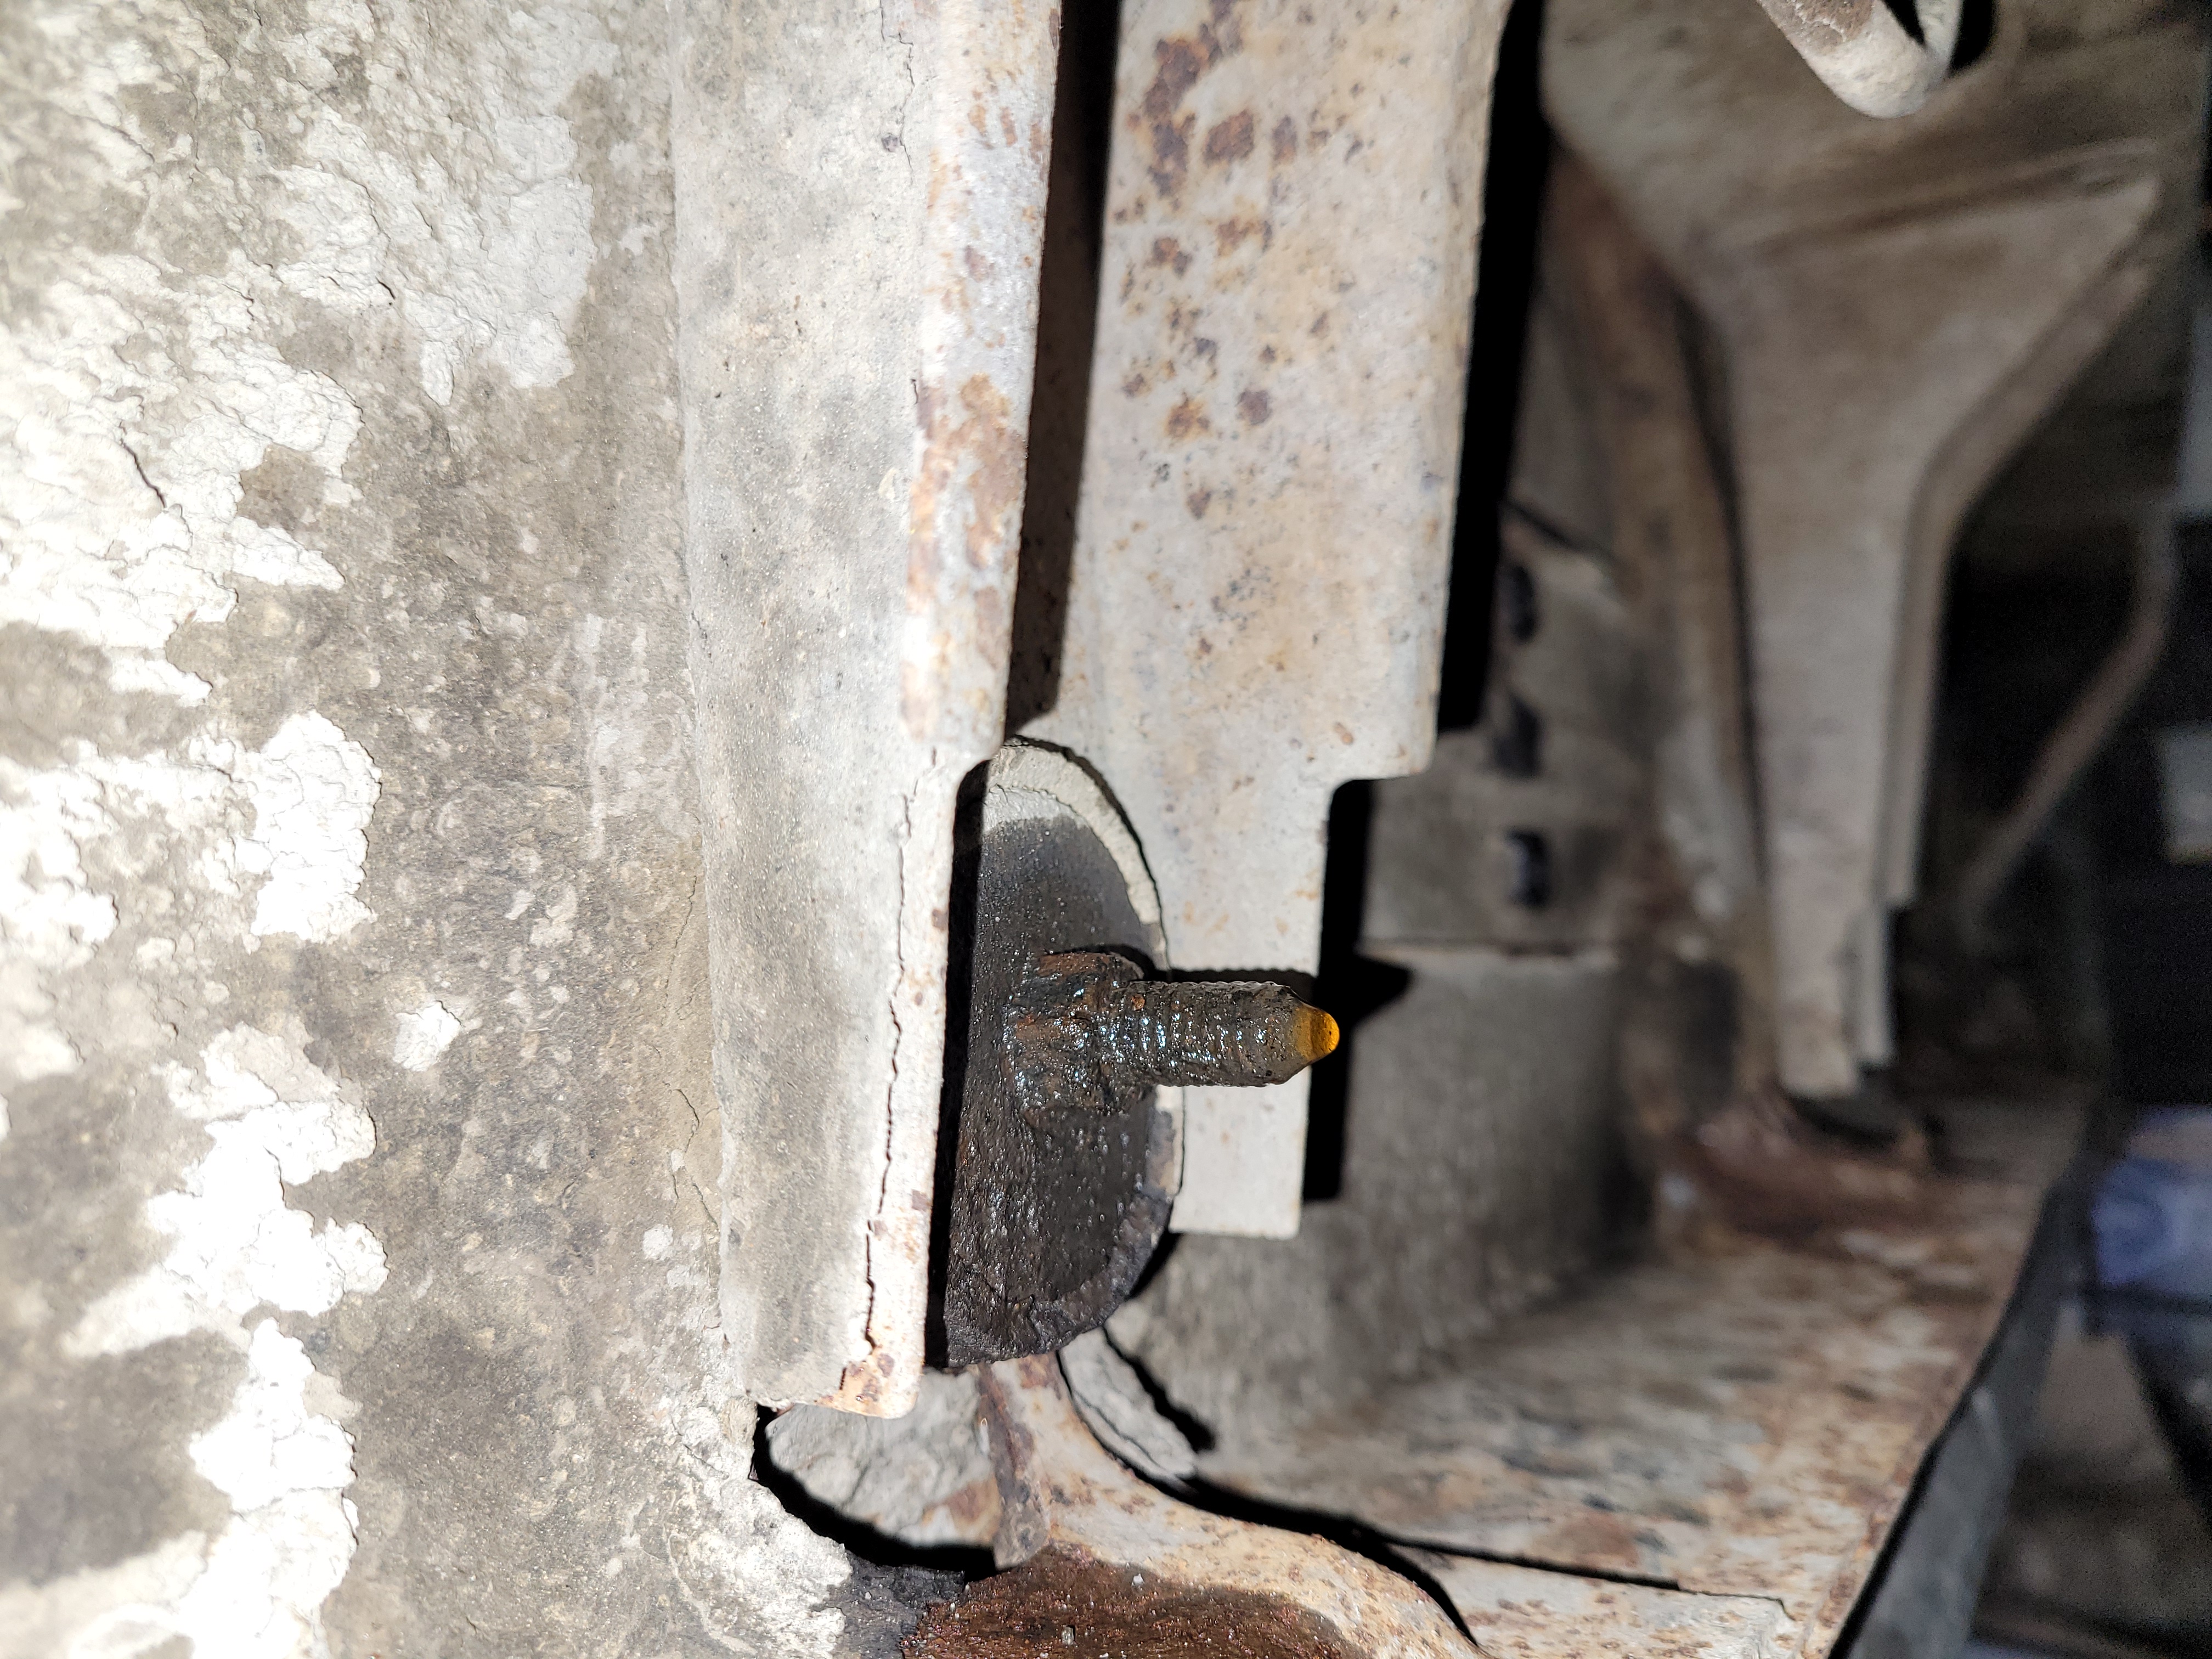 20240310_123133.jpg (1,986.22 KB) 20240310_123133.jpg (1,986.22 KB)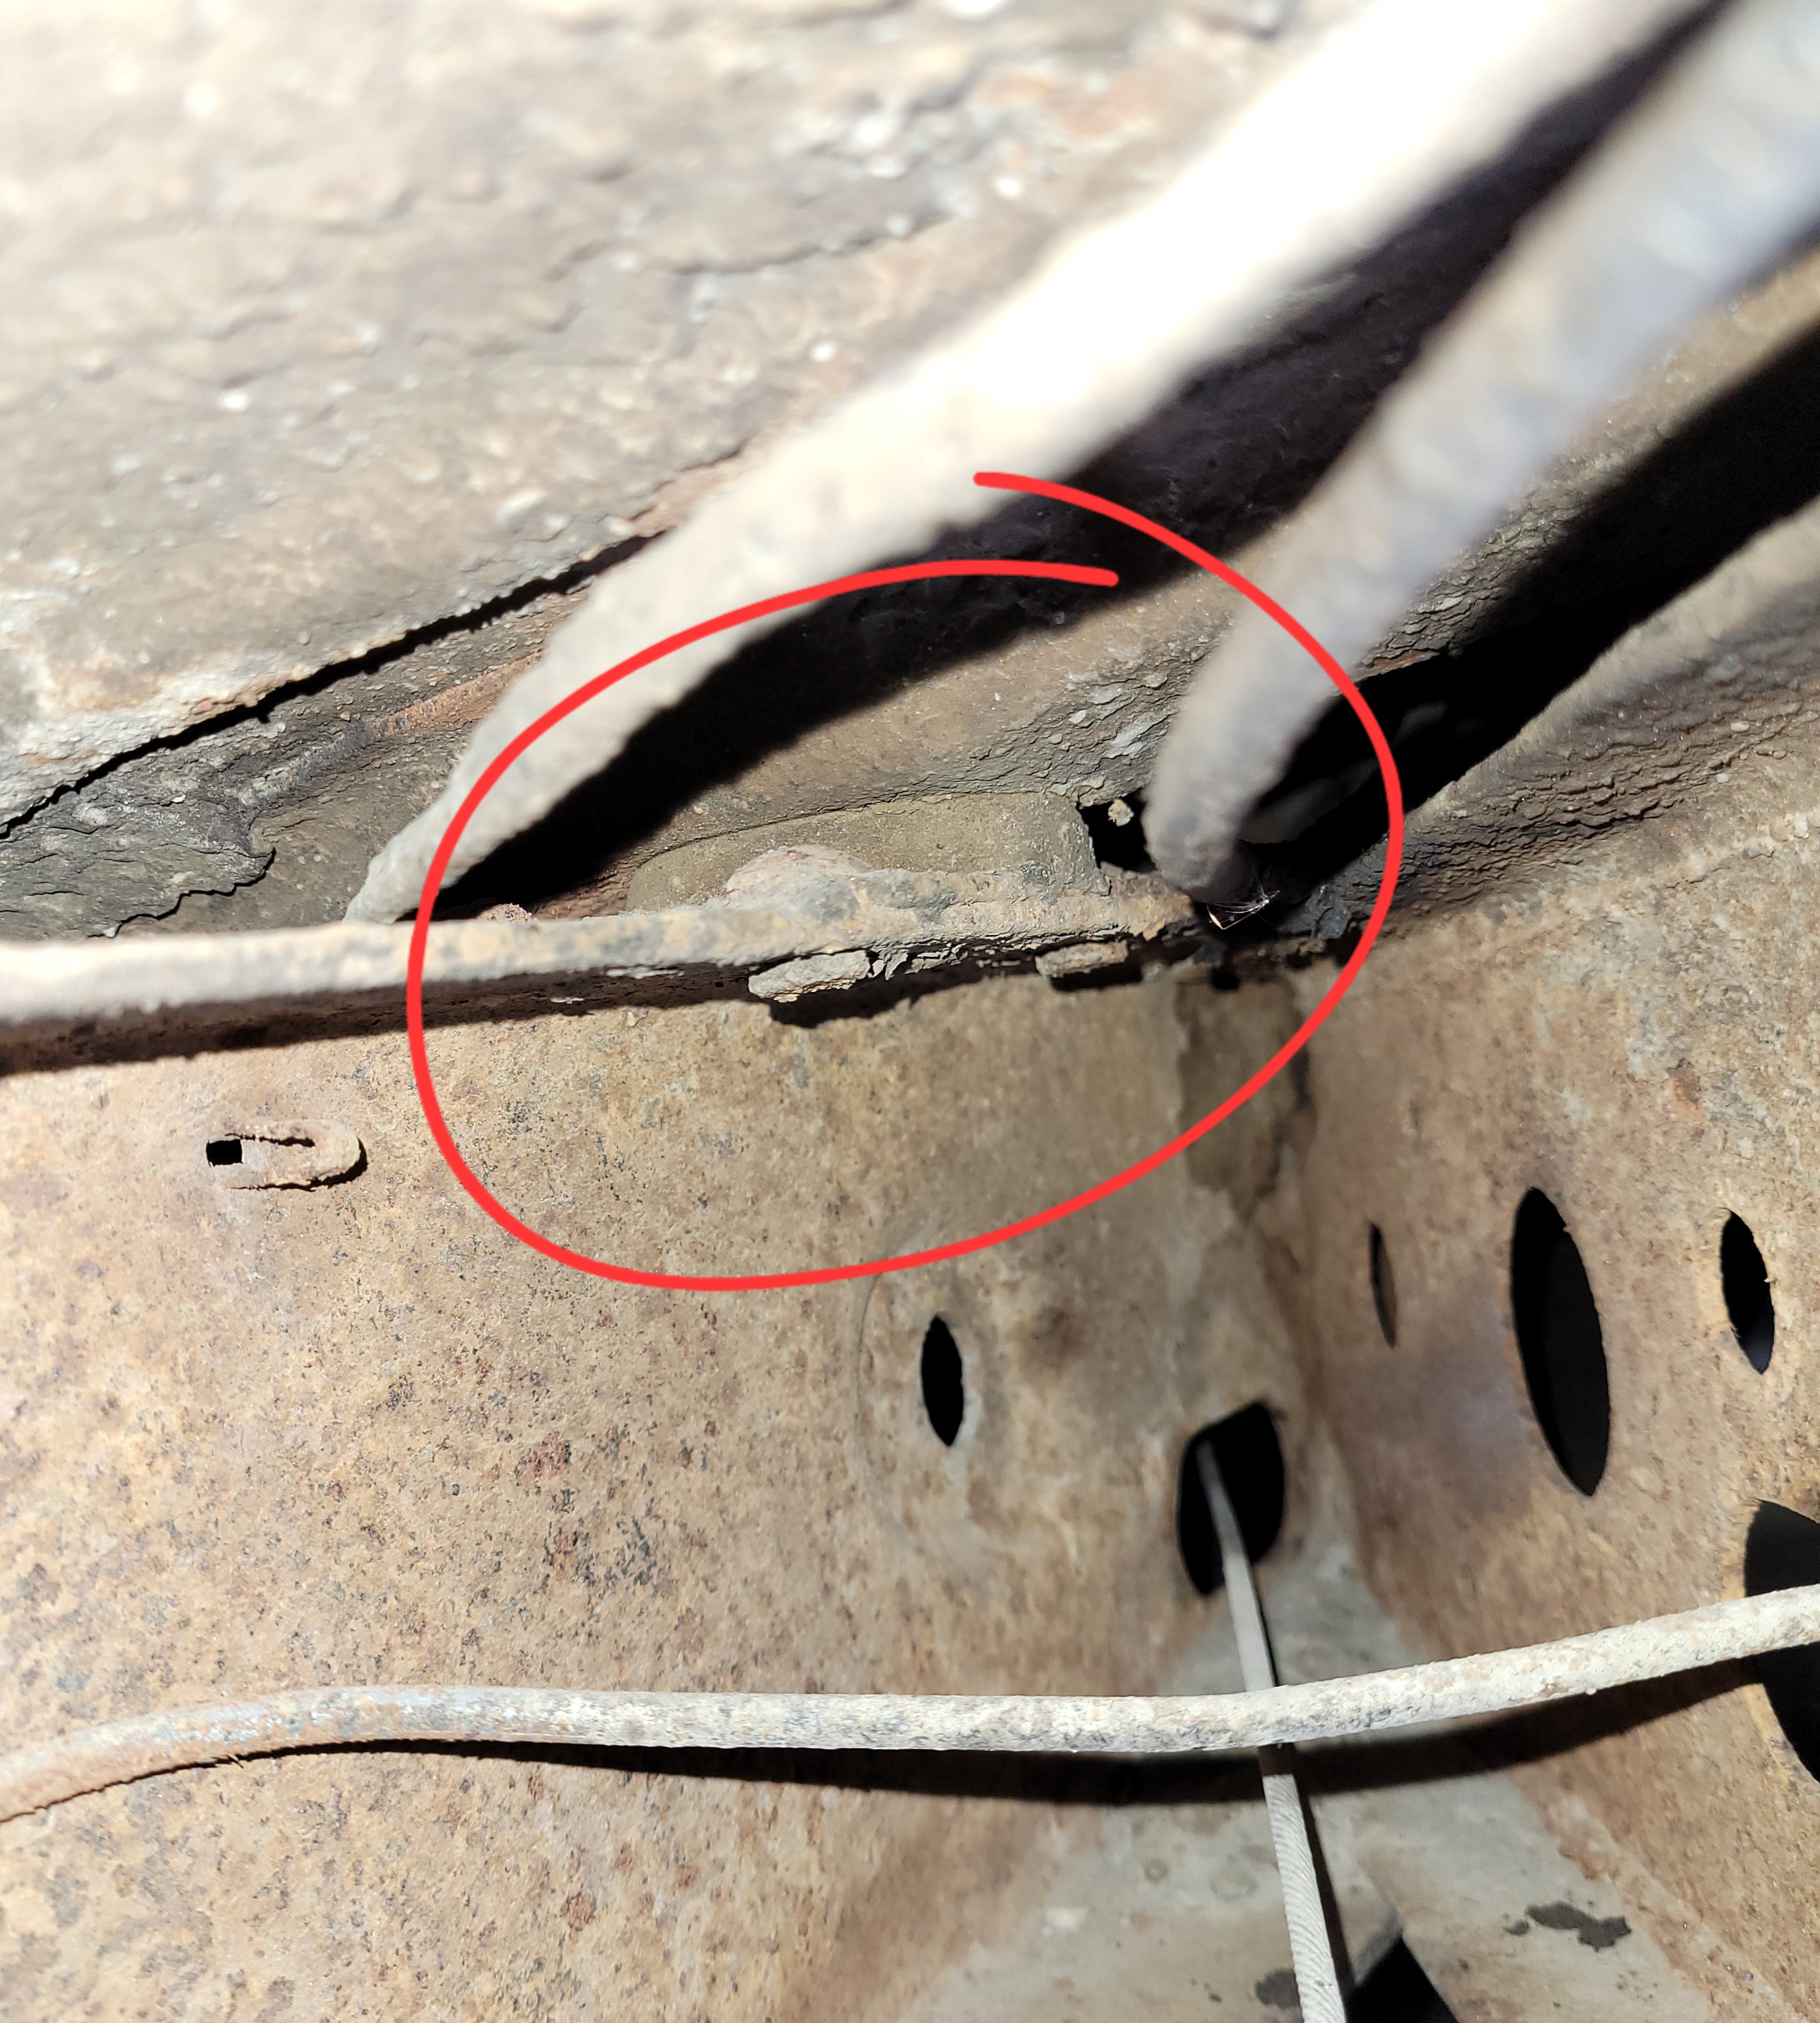 20240310_123144.jpg (2,580.60 KB) 20240310_123144.jpg (2,580.60 KB)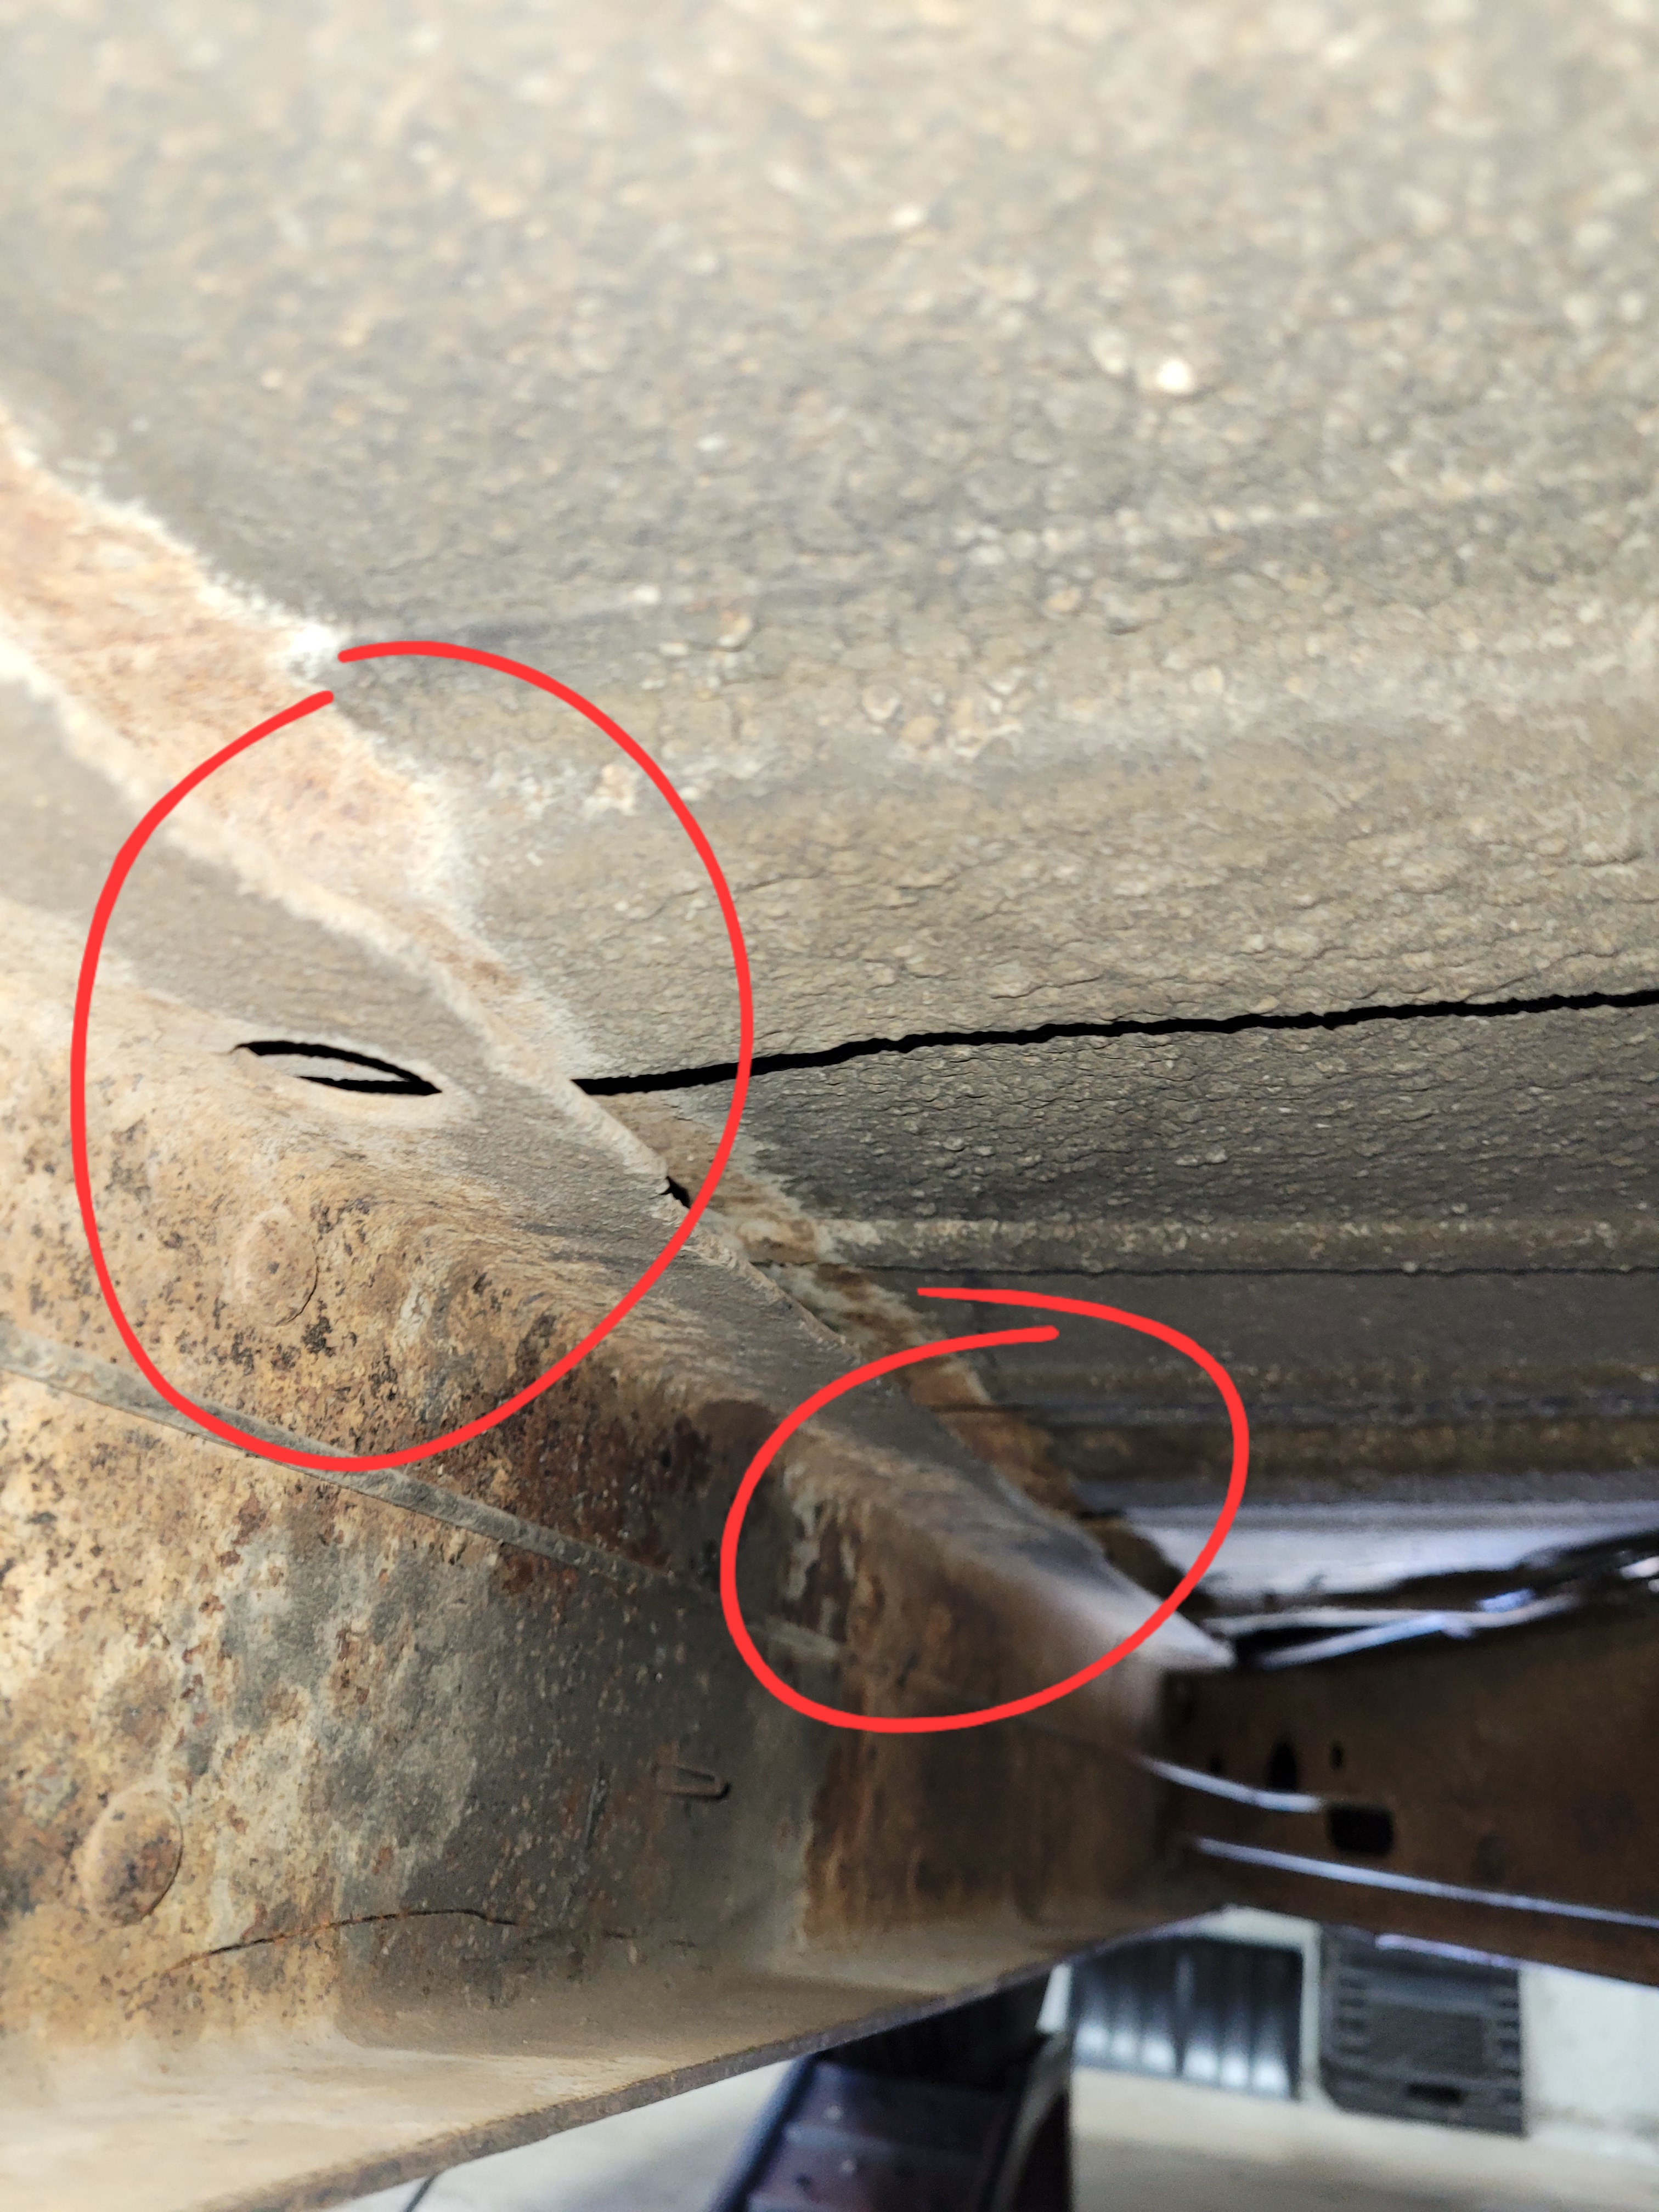
Posted on: 3/10 14:29
|
|||
|
||||


