|
Re: Carb rebuild II
|
||||
|---|---|---|---|---|
|
Forum Ambassador

|
Can't help on your specific question but here's a few items from a Motors manual re the float adjustments. Entire Stromberg section is discombobulated with snippets here and there of various EE models. If more info wanted, PM with an email address and will scan entire section & send.
Attach file:  (256.63 KB) (256.63 KB) (85.56 KB) (85.56 KB)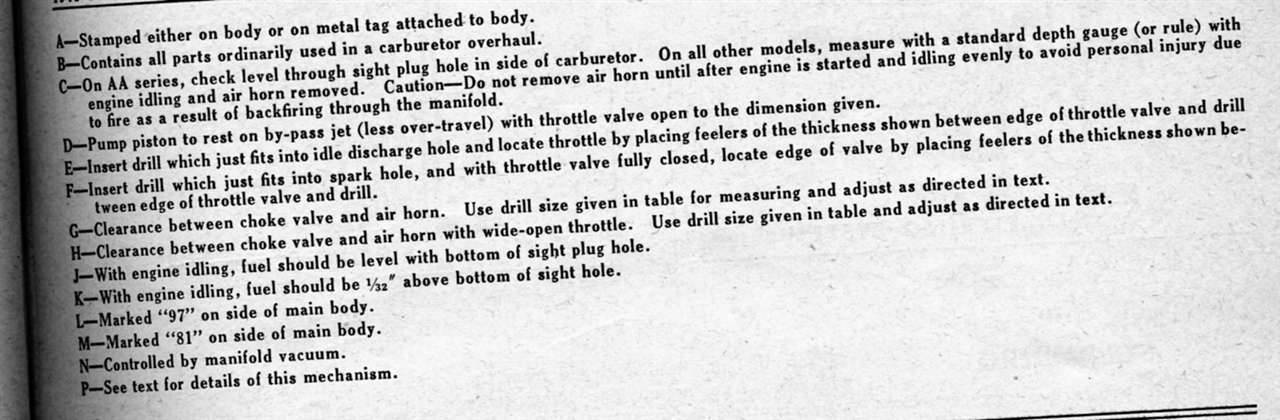 (51.55 KB) (51.55 KB) (50.23 KB) (50.23 KB)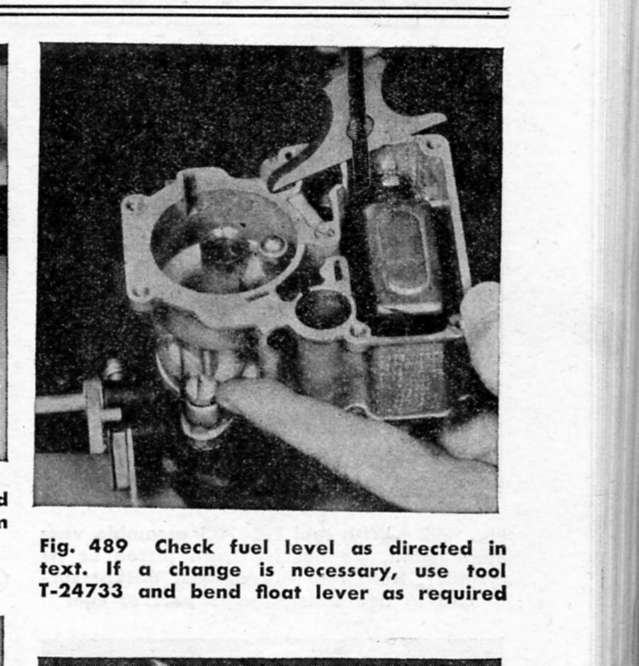
Posted on: 2009/7/22 12:41
|
|||
|
||||
|
Re: Carb rebuild II
|
||||
|---|---|---|---|---|
|
Home away from home
|
HH56,
Thank you. This is really helpful. It confirms the float level adjustment and provides a number of other adjustments I can check. I am particularly interested in the float adjustment method, "This dimension is measured...with the gasket removed and the engine idling". So, this means that I would remove the top cover plate of the carb (which would include the choke and the accelerator pump) and idle the car to check the depth of the gas level from the top of the bowl. Doesn't seem hard, but it sounds like it could get a little messy. I may give this a shot over the weekend if it seems not to be running optimally. Any idea how far out I should start with the idle adjustment needles at the bottom plate? Before rebuild, these were three turns out. That seemed like a lot to me, so I started at 2 turns. Idle is quite smooth and my test run seemed good, but I may have to play with these a bit. Thanks for the help!
Posted on: 2009/7/22 13:34
|
|||
|
||||
|
Re: Carb rebuild II
|
||||
|---|---|---|---|---|
|
Forum Ambassador

|
EE-22 and 23 fuel level is set the same way, car running and top off the carburetor - sounds a little odd but it's a real, dynamic measurement and I've never had reason to question it.
Affix a vacuum gauge to your intake manifold to set the idle mixture (after warm-up and at correct idle speed) to the give the highest vacuum at the leanest (innermost) setting. Usually I begin to close them off one at a time until the engine begins to falter (and vacuum drops), then gradually turn them out (richer) and watch the vacuum slowly rise. When it ceases rising, I turn back in (leaner) about 1/4 turn or less. Do one first, the the other, then back to the first for a final check.
Posted on: 2009/7/22 13:55
|
|||
|
||||
|
Re: Carb rebuild II
|
||||
|---|---|---|---|---|
|
Home away from home
|
Owen -
Great. Thanks for the tip. I rebuilt a double pumper Holley one time on an old souped-up Corvette when I was still young and Corvettes weren't worth anything. I screwed up something and it leaked like a sieve as soon as I fired it up. It flooded the exterior of the manifold and caught fire from the dizzy spark. I was already out of the car to "adjust" the needle and seat. The car was running, pumping more gas to the fire, which was going pretty good. I was trying to beat the fire out with my jacket, which is also going pretty good, and I was screaming for someone to come out of the house and help. My mother ran out, saw what was happening, ran back in and back out with a giant pot of water, which she poured directly down the carburetor throat (the only place on top of the engine not actively involved in fire). It did kill the engine. She then grabbed the way-to-short garden hose and started squirting water over the length of the car from the driveway (car was in the garage), soaking me, but otherwise having little effect. I finally got the fire out. Pushed the Corvette out of the garage and hosed down the engine compartment and then just proceeded to be totally pissed-off for the next couple hours. Now, I have a fire extinguisher close at hand in the garage, but I am still a little hesitant to fire up a car with the carb partially dis-assembled.
Posted on: 2009/7/22 17:20
|
|||
|
||||
|
Re: Carb rebuild II
|
||||
|---|---|---|---|---|
|
Forum Ambassador
|
That should have raised your heart rate a bit!
Posted on: 2009/7/22 17:37
|
|||
|
||||
|
Re: Carb rebuild II
|
||||
|---|---|---|---|---|
|
Home away from home

|
That's why Holley's are known as "the flaming tower of power".
Posted on: 2009/7/22 23:37
|
|||
|
||||
|
Re: Carb rebuild II
|
||||
|---|---|---|---|---|
|
Home away from home
|
A little more follow-up on the carb:
Starts and runs strong. Pretty strong acceleration, except at top end it drops off a bit, I may need slightly richer mix, or possibly its a faulty power valve. Everything is good when cold. When I run it up to temperature, it does leak after I turn it off. Not right away, but within just a few minutes. The leak is inside the throat, both sides. The gas collects on the closed throttle plates and then leaks out of the bottom plate and mostly onto the manifold. I needed to prime this AM to start, which I usually would not have to do except after the car sat for a week or so. Once it is running, it idles pretty smoothly and does not leak at all (or if it does, I guess it goes down the manifold as the throttle plates would be slightly open). Where should I look for the culprit? Thanks
Posted on: 2009/7/23 13:06
|
|||
|
||||
|
Re: Carb rebuild II
|
||||
|---|---|---|---|---|
|
Quite a regular

|
I found those jet plugs like to leak, you really need a tight fit there even with new washers or gaskets. Could be part of your problem. Also, when adjusting the idle I found a pair of leather gloves really helpful, I think the inboard screw was designed to melt your skin to the exhaust manifold...
Posted on: 2009/7/23 18:48
|
|||
|
Steve Mackinnon
1939 Packard 120 Sedan (sold) 1940 Packard 110 Convertible |
||||
|
||||
|
Re: Carb rebuild II
|
||||
|---|---|---|---|---|
|
Home away from home
|
Mack,
I agree with the need for gloves. I first tried to use a screw driver and guide it in with my fingers - burned fingertips on one hand and burned knuckles on the other.
Posted on: 2009/7/23 20:27
|
|||
|
||||


